Feeds:
Posts
Comments

Posts Tagged ‘Rolled Oats’

As promised, here is the granola recipe I mentioned when we chatted about homemade yogurt earlier this week.  It’s the perfect crunch to top that tart yogurt.  And it’s just sweet enough that you won’t need to add anything else.  And even if you don’t make it as a yogurt topper, it’s a perfect stand-alone snack.

Again, the advantage of making your own granola is that you have control over what goes into it.  I use not only organic ingredients, but more interesting, healthy additions that you won’t find in a typical store-bought granola blend.  Quinoa, chia seeds, flaxseed meal– all of these are phenomenal, nutritious foods.  Uncooked steel-cut oats in granola?  You bet!  They add such a nice texture.  It’s also nice to be able to choose the type of fat to use.  Olive oil works perfectly here, and is so good for you.  I also love using coconut oil (you remember my coconut oil obsession, right?), it imparts such a lovely flavor.

If you don’t have all of these ingredients, or you want to try something else, by all means, do so.  Maple syrup comes to mind.  Or if you want a chunkier granola, increase the rolled oats and add less steel cut oats or quinoa.  Dark chocolate, cinnamon, or unsweetened coconut flakes, anyone?  See what I mean?  Have fun with this. Just remember to try to keep the ratio of dry/wet ingredients the same when substituting.  Pack it for a snack at work, or take it for your kids’ events.  If you make it– they will eat it.

The Recipes:  Homemade Granola Two Ways

Homemade Granola with Coconut Oil, Vanilla, Dried Blueberries and Cherries:

1 cup rolled oats, dry

1/2 cup chopped walnuts

1/2 cup chopped almonds

1/3 cup pepitas

1/2 cup steel cut oats, dry

1/2 cup quinoa, dry

1 tablespoon flaxseed meal

2 tablespoons chia seeds

1/2 cup dried cherries

1/2 cup dried blueberries

3 tablespoons virgin coconut oil

1/3 cup honey

1 teaspoon vanilla extract

pinch of kosher salt

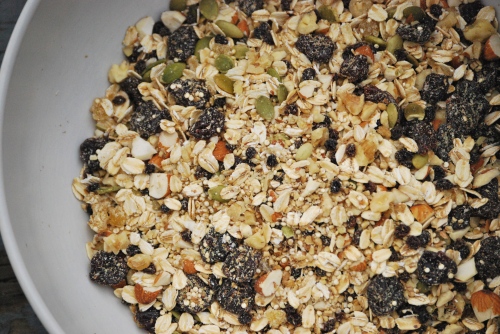
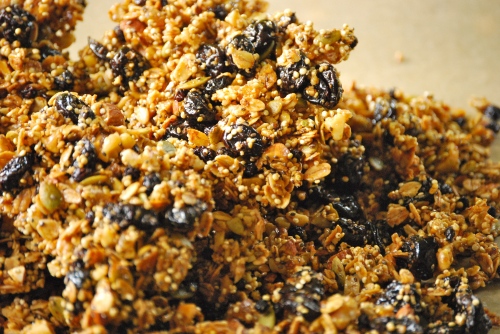
Homemade Granola with Olive Oil, Ginger, Almond, and Dried Cherries:

(As shown in the photographs)

1 cup rolled oats, dry

1/2 cup coarsely chopped walnuts

1/2 cup coarsely chopped almonds

1/3 cup pepitas

1/2 cup steel cut oats, dry

1/2 cup quinoa, dry

1 tablespoon crystallized ginger, finely chopped

1/2 cup dried cherries

1/2 cup dried currants

1 tablespoon flaxseed meal

2 tablespoons chia seeds

3 tablespoons olive oil

1/3 cup honey

1 teaspoon almond extract

pinch of kosher salt

Preheat an oven to 250°F.  Line a large baking sheet with parchment paper, set aside.  In a large bowl mix all of the dry ingredients together, with the exception of the salt and dried fruit.  In a small bowl, mix together the oil (if using coconut oil, be sure to melt it in a small saucepan first, so it can liquify) honey, and extract.  Mix the wet ingredients and the dry ingredients together.  Here is where you need to make a decision — you can either mix the dried fruit into this mixture and bake it for two hours or you can mix it in during the last 10 minutes of baking.  Doing so right away will yield a very chewy fruit, which some people tend to enjoy.  Doing so later, will keep the fruit more soft and tender.  The choice is yours.  I enjoy both ways.

Spread the mixture onto the lined pan and sprinkle with kosher salt.  Bake in the oven for two hours, stirring every 15-20 minutes, or so.  The grains will get evenly toasted this way.  After 2 hours, remove from the oven and let the granola sit, untouched, for a bit to cool and firm up.  When it’s cool, you can break it into chunks.  Keeps well for days in a sealed container with a lid.  Enjoy!

Thanks for stopping by Relishing It — hope you enjoy the granola!

Laurie

Read Full Post »

I know, I know, could I possible have a more lengthy title for a recipe?  I could.  I didn’t mention the whole wheat flour.  You get the idea.  This is a cookie recipe I’ve been playing around with for the last few weeks.  You already know that I’m a cookie fiend, so this one is for me (and hopefully you).  It has all of my favorite  flavors that make-up a perfect cookie.

Let’s break this down.  First, I wanted to create a cookie that contains coconut oil.  You can read a bit about it here on my friend Amy’s blog.  Not only do I love the health factor, but the flavor is phenomenal.  Use virgin coconut oil as opposed to regular, as it has a more noticeable coconut flavor.   Then there’s the browned butter.  Is there anything that brown butter does not make better?  Of course not.  It adds a deep caramel-like flavor that is unforgettable.  The toasted walnuts add a brilliant crunch.  Now cookies are obviously not going to be terribly healthy, but I slipped in whole wheat flour and rolled oats for fiber.   Finally, we get to the chocolate chips.  Use good quality chocolate, or even go the chunk route and chop your own.

All of these elements come together to make this delicious cookie.  It’s loaded with great ingredients and has wonderful texture– crisp on the very edges and soft in the middle.  Now that’s what I’m talking about.  My husband declared this the best cookie he’s ever eaten.  So, that’s something, right?!  I hope you enjoy these little morsels as much as I have!

The Recipe:  Chocolate Chip, Walnut, and Oatmeal Cookies with Browned Butter and Coconut Oil

(Makes 24-26 cookies)

1 cup packed brown sugar

1/2 cup virgin coconut oil

1/4 cup (4 tablespoons) butter, browned

1 egg, lightly beaten

1 teaspoon vanilla

1 cup (5 ounces) whole wheat flour

1/2 teaspoon baking powder

1/2 teaspoon baking soda

1 teaspoon kosher salt

1 cup rolled oats

1 cup chocolate chips (Ghirardelli 60 % cacao chips are my favorite)

1/2 cup chopped walnuts, toasted

Preheat oven to 350°F.  Line a baking sheet with parchment paper.

In a small saucepan over medium heat add the butter.  Stirring frequently with a wooden spoon, cook the butter until it becomes a beautiful medium colored brown, just a few minutes.   Too little will not have enough flavor, and too much will taste burnt.  It will smell fragrant and somewhat caramel-like.  Remove from heat and pour into a bowl to cool for at least 10 minutes.

In a small sauté  pan over medium heat add the walnuts.  Stirring frequently, toast them until they become fragrant, just a few minutes.  Keep a watchful eye, as they can burn quickly.  Remove from heat and pour onto a plate to cool for 5 minutes.

In a medium bowl, whisk together the flour, salt, baking powder, and baking soda.  Set aside.

In a bowl of a stand mixer fitted with a paddle attachment (a hand mixer or bowl and wooden spoon can also be used), add the coconut oil, browned butter (brown bits, too), and brown sugar.  Cream the mixture on medium speed for about 2 minutes.  Mix the beaten egg and vanilla together and pour that into the bowl.  Continue to cream for about 3-4 more minutes, or until the mixture has gained a little volume and has become pale in color (Note: it won’t have as much volume as cookies with room temperature butter). Add the flour mixture and mix until combined.  Turn the machine off and stir in the oats, chocolate chips and walnuts by hand.

Roll into balls by hand or use a small scoop.  Use a bit of pressure to make the mixture form a solid ball.  Bake cookies for 9-10 minutes, the edges should just be starting to turn golden brown.  Remove from oven and let cool on pan for a couple of minutes.  Remove from pan and place on a cooling rack.  The cookies will keep for a few days in an airtight container.  Enjoy!

Have a wonderful weekend, friends!  Be sure to check back next week — something exciting will be happening on Relishing It!

Laurie

Read Full Post »

Notice anything different?  Look at the URL (and blog title) above.  That’s right, my blog is now ‘Relishing It’, with the profanity in my web address (though it provided a few chuckles) now gone.  Let me know what you think.

On to today’s post.  Oatcakes?  No doubt the title of this recipe alone is so inviting that you can’t wait to try it.  Alright, it may not sound exciting, but these little creations are incredible.  I want implore you to make them to prove that even with a title like ‘oatcakes’, these are delicious.  Did I mention that they’re also easy and convenient?   I stumbled across these hearty cakes in another recently published cookbook, Super Natural Every Day by Heidi Swanson.  Heidi authors the blog 101 Cookbooks  , which I’ve been following for some time.  This book is fantastic, with a concentration on healthy and vegetarian foods.  I’ve made these oatcakes several times over the last couple of weeks, as my family (mostly my husband) devours them.  These are most certainly not muffins.  To be honest, I’m not really a muffin fan.  While they’re sweet and cake-like, I find that I always choose something else if given the option.  Yes, these oatcakes have that tell-tale ‘muffin shape’, but the comparison ends there.  These are very dense, hearty, and flavorful, though not particularly sweet.  Even better, they’re filled with ingredients that are nutricious and tasty.  You’ll see that the recipe contains a few items that you may not have on hand.  Don’t let that stop you from making them.  My guess is that once you have the ingredients on-hand, you’ll make this recipe again and again.

Whole grains, oatmeal, and whole wheat pastry flour provide the heft here.  The original recipe also called for whole flax seeds, though my variation relies on flax meal.  Whole flax seeds are too hard for your body to break down.  They simply pass through, without giving you the healthy benefits of omega-3 fatty acids, fiber, and antioxidants that you get in the ground form.  Whether you use whole seeds or ground meal, store them in the refrigerator once opened.  Heart-healthy walnuts add a nutty crunch to the cakes, and also contain omega-3 fatty acids that are good for you.  The cakes are sweetened with raw cane sugar, honey, and maple syrup– a sublime combination.  Here I deviated from the original recipe as well, as it called for just the maple syrup and sugar.  I was feeling a bit stingy about my dwindling maple syrup supply being depleted by another 3/4 cup, so I substituted half with honey.  It really paid off, as the honey and oat combination is heavenly.  There are also two different oils that keep the cakes moist– butter and extra virgin coconut oil.  The latter is emerging as a healthy alternative oil that’s seeing more use in cooking and baking.  You can read about some of it’s health benefits here.  When you go to purchase it, take note that it will not be a liquid.  It will be white and solid.

These oatcakes are a perfect snack for your busy summer.  They keep well and transport easily.  Take them on walks, bike rides, camping, or for a simple morning breakfast.  They are very filling, and they’ll satisfy your hunger for longer than you think.  I hope you enjoy them as much as we do!

The Recipe: Oatcakes

(makes 1 dozen)

3 cups rolled oats

2 cups whole wheat pastry flour or spelt flour

1/2 teaspoon aluminum-free baking powder

2 teaspoons kosher salt

1/4 cup flax meal

3/4 cup chopped walnuts, lightly toasted

1/3 cup extra virgin coconut oil

1/3 cup unsalted butter

1/4 cup plus 2 tablespoons honey

1/4 cup plus 2 tablespoons maple syrup  (Note:  just to be clear — 3/4 cup total of equal parts maple syrup and honey)

1/2 cup raw cane sugar or natural cane sugar

2 large eggs, lightly beaten

Preheat the oven to 325°F with a rack in the top third of the oven.  Butter a standard 12-cup muffin pan.

Combine the oats, flour, baking powder, salt, flax meal, and walnuts in a large mixing bowl.

In a medium saucepan over low heat, combine the coconut oil, butter, honey, maple syrup, and sugar and slowly melt together.  Stir just until the butter melts and sugar has dissolved, but don’t let the mixture get too hot.  And if it does, let it cool a bit – you don’t want it to cook the eggs in the next step.

Pour the coconut oil mixture over the oat mixture.  Stir a bit with a fork, add the eggs, and stir again until everything comes together into a wet dough.  Spoon the dough into muffin cups, nearly filling them.

Bake for 25-30 minutes, until the edges of each oatcake are deeply golden.  Remove pan from oven and let cool for a couple of minutes.  Then run a knife around the edges of the cakes and tip them out onto a cooling rack.  Serve warm or at room temperature.  They are especially good with a smear of butter and a drizzle of honey.  Enjoy!

Source: Adapted from Super Natural Every Day Cookbook by Heidi Swanson

Thanks again for stopping by!

Laurie

Follow me on Twitter!

Read Full Post »