Feeds:
Posts
Comments

Posts Tagged ‘Whole Grains’

Healthy Chocolate Zucchini Muffins | Relishing It

As you know I sent my little girl off to Pre-Kindergarten on Monday– and she is absolutely loving it.  I sometimes like to bake treats for their lunch boxes, or for an after-school sweet when they get home.  I distinctly recall getting off the school bus as a kid and walking into the house to the smell of something wonderful that my mom had made during the day.  She’d have batches of cookies ready, or even racks (yes, racks) of pies on the counter.  And she always timed it out so they were ready when my brother and I walked through the door.  However… I’m a little hesitant to bake such delights using all of that sugar on a daily– or even weekly– basis.  Don’t get me wrong, my kids get their share of sugar, but it’s nice to be able to put something a little healthier, something more substantial, into their little growing bodies.

Healthy Chocolate Zucchini Muffins | Relishing It

Healthy Chocolate Zucchini Muffins | Relishing It

Healthy Chocolate Zucchini Muffins | Relishing It

I was able to create a healthy muffin recipe that was made with whole grains, healthy coconut oil, and no processed sugar (alright, there are chocolate chips, but they’re optional…kind of.  You’ll want them in there).  These muffins are also loaded with vegetables, and your kids will be none the wiser!  What more could one want?  They are perfectly chocolate-y, but not overly sweet.  They stay very moist– quite like a small cake.  I really have no guilt about giving this treat to my kids, or eating it myself for that matter.  I hope you like them as much as we do!

Healthy Chocolate Zucchini Muffins | Relishing It

Healthy Chocolate Zucchini Muffins | Relishing It

The Recipe:  Healthy Chocolate Zucchini Muffins

(makes 12)

1 cup white whole wheat flour (whole wheat pastry flour works, too)

1/2 cup unsweetened cocoa powder

1/2 teaspoon kosher salt

1 teaspoon baking soda

1 teaspoon baking powder

1/2 cup virgin coconut oil (warmed to the liquid state, but not hot)

1/2 cup honey

2 eggs, at room temperature

1 teaspoon vanilla

1 1/2 cups coarsely grated zucchini (about 1 medium)

3/4 cup chocolate chips (Ghirardelli 60 % Cacao Bittersweet are the best, in my opinion)

Note:  The coarsely grated zucchini is definitely visible in these muffins, which is how I prefer them.  If you don’t fancy that, simply grate the zucchini finer.

Preheat the oven to 350°F.  Spray or butter a 12-cup muffin tin.  Set aside.

In a large bowl, sift, then whisk together the flour, salt, baking powder, baking soda, and cocoa.   Toss the chocolate chips into the mixture. Set aside.

In another large bowl, thoroughly mix the honey, coconut oil, vanilla, and eggs together until uniform.  Add the zucchini and mix until evenly coated.

Combine the two bowls together, mix until everything is wet.  Do not over mix. Evenly distribute the batter–1/4 cup per muffin is about right.  Bake for about 18 minutes, or until a tester inserted into a muffin comes out clean.  Remove from oven and let cool for about 3 – 5 minutes before removing from the pan.  Keeps well for days in an airtight container.  Enjoy!

Thanks for stopping by Relishing It!

Laurie

Read Full Post »

Healthy Banana Bread via Relishing it

I figure it’s finally time to share my favorite banana bread with all of you.  Really, what’s a food blog without a banana bread recipe, right?  I bet I make banana bread at least every couple of weeks.  My freezer is packed with bananas that don’t get eaten right away.  I just keep adding to the pile…one here, one there.  This recipe is a bit unusual because it calls for six bananas– so start saving up!

Healthy Banana Bread via Relishing It

Since we eat banana bread so often, I really wanted my version to be healthy.  I tweaked and tweaked and finally arrived at this recipe a while ago. It’s exactly what I wanted it to be.  Since over-ripe bananas are sweeter, you’ll only need a little bit of honey to get the sweetness just right.  No sugar added here.  The larger number of bananas really gives this bread deep flavor, as well as keeps it moist without much fat.  And speaking of fat,  I used a healthier virgin coconut oil in it.  The flavor combines perfectly with the bananas and chocolate.  I used a mixture of oat flour and whole wheat pastry flour for the base.  Combined, they give the bread a perfect texture– just slightly lighter than ordinary banana bread, but with enough heft to be satisfying.

Cacao Nibs for Healthy Banana Bread via Relishing It

Healthy Banana Bread via Relishing It

When it comes to the chocolate, you have a decision to make.  I prefer adding cacao nibs, but my kids/husband like chocolate chunks.  If you aren’t familiar with cacao nibs, they’re crushed cacao beans.  They are unsweetened and have a bit of a crunch that adds a nice texture.  They’re also loaded with antioxidants.  Alone they are somewhat bitter, but adding them to sweet things makes them delicious. Try throwing them into your next smoothie!  And lastly, I added chia seeds for more health benefits, because why not?

Healthy Banana Bread via Relishing It

A few reminders:  First, make sure to use really over-ripe bananas.  You’ll want that extra sweetness since you won’t be adding sugar.  I’m talking the blacker, the better.  Also, make sure you bake your banana bread long enough.  There is nothing worse than under-baked banana bread.  A longer bake time is better.  There are so many bananas in there that the chances of it being dry are very slim.  Hope you enjoy this as much as we do!

Healthy Banana Bread via Relishing It

The Recipe:  Healthy Banana Bread

(makes one loaf)

1/3 cup virgin coconut oil

1/4 cup honey

2 eggs, at room temperature

1 teaspoon vanilla

6 smashed over-ripe bananas (about 1 1/2 cup — a tablespoon or two extra is fine)

1/2 cup (2 1/4 ounces) oat flour

1  1/4 cup (7 ounces) whole wheat pastry flour

2 teaspoons baking powder

1 teaspoon kosher salt

1/2 cup cacao nibs  OR  1 cup chocolate chunks

1 tablespoon chia seeds (optional)

Preheat oven to 350°F.  Lightly grease a 9 x 5 loaf pan.  Set aside.

In a medium bowl, combine the oat flour, whole wheat pastry flour, chia seeds, salt, and baking powder with a whisk.  Set aside.

In a bowl of a stand mixer (or regular bowl if mixing by hand), add the honey and coconut oil.  Combine for a minute on medium speed until somewhat creamy.  Add the eggs and vanilla.  Mix for another minute, or so.  Then add the fork-smashed bananas.  Mix until well combined and somewhat smooth.  Next, sift the flour mixture over the wet ingredients.  Combine on low just until all of the ingredients are moistened.  Do not over-mix.  Add the cocoa nibs or chocolate chunks and fold in with a rubber spatula.  Scoop mixture into the prepared pan and smooth the top.  Bake for 45-48 minutes, or until a tester comes out clean from the middle of the loaf.  The center should feel somewhat firm when you feel it.  Let cool in pan for about 20 minutes, then run a knife around the edge and gently remove from pan.  Continue to let cool on a cooling rack.  For best results, after cutting into it, place the cut side down on a cutting board and leave the rest of the bread uncovered for the first day.  The texture will remain true this way.  Enjoy!

Thanks for stopping by Relishing it!  Hope you all are having a lovely Summer, so far!

Laurie

Read Full Post »

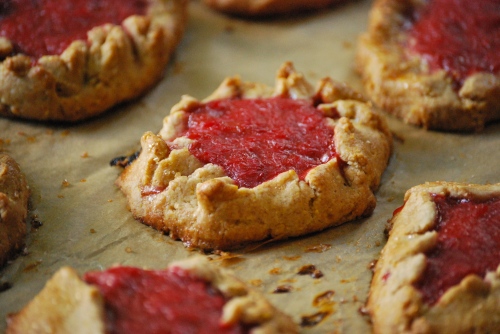
Rustic Rhubarb Tartlets via Relishing It

Rhubarb in January?!  No, I haven’t lost my mind, and I generally try to prepare and write about foods that are in season.  But every now and then I get tired of following the unwritten ‘rules’ of food blogging.  And since I had a few bags of rhubarb in my freezer just crying out to be made into more of these lovely tartlets, I figured why not?  So rhubarb in January it is.  Rhubarb freezes remarkably well, so there is no reason you shouldn’t be enjoying it’s unique, tart, splendor any time of the year.

Rhubarb

Rustic Rhubarb Tartlets via Relishing It

I’ve always loved rhubarb.  Especially the gorgeous, vibrant, red variety.  These tartlets are one of my favorite ways to enjoy this sometimes overlooked fruit.  Or vegetable.  Actually, it turns out rhubarb is a vegetable, but– and I’m not making this up– a court in New York ruled in 1947 that rhubarb is classified as a fruit in the U.S.  Anyway… the whole grains in the crust work impeccably well here.  One of the best ingredients in this recipe is the addition of the cornmeal.  It lends a nice toothsome bite that perfectly contrasts the soft rhubarb compote.

Rustic Rhubarb Tartlets via Relishing It

Rustic Rhubarb Tartlets via Relishing It

Aside from the flavors, I love the size of these tartlets.  They’re perfect little individual servings.  I’m not sure why, but I’m a sucker for most any miniaturized dessert.  There’s something so appealing about them.  I also love the rustic, ‘free-form’ look of the crust.  They have that homemade quality that just feels…genuine.  Like it was made just for you.  And since they’re ‘free-form’, there’s no wrong way to shape them.  Enjoy!

Rustic Rhubarb Tartlets via Relishing It

The Recipe:  Rustic Rhubarb Tartlets

(Makes 10 individual Tartlets)

The Rhubarb Compote:

1 pound fresh or frozen rhubarb, cut into pieces

1/2 cup brown sugar

1 teaspoon orange zest

The Pastry Dough:

1 cup unbleached all-purpose flour

1 cup whole wheat flour

1/2 cup fine cornmeal

1/4 cup granulated sugar

1 teaspoon kosher salt

1 stick cold butter, cut into small cubes

1/4 cup plus 2 tablespoons heavy cream

2 egg yolks

1 egg plus 1 teaspoon water, mixed together for an egg wash

To make the rhubarb compote:  Place the rhubarb plus brown sugar in a heavy-bottomed saucepan over medium heat.  Stir frequently.  Cook for 10-15 minutes, or until the rhubarb has softened and broken down a bit.  Remove from heat and stir in the orange zest.  Set aside.

Preheat your oven to 375°F.  Line a large baking sheet with parchment paper.

To make the pastry dough:  In a small bowl, mix the egg yolks and cream together.  Set aside. Sift the all-purpose flour, whole wheat flour, cornmeal, sugar, and kosher salt together and place into the bowl of a food processor (this recipe can easily be done by hand, too).  Next, add the butter and turn the mixer to low.  Increase to medium once the butter begins to get incorporated.  When the flour is coarse, like cornmeal, add the egg yolks/cream mixture and mix until just combined.  The dough will appear crumbly, but will hold it’s shape when squeezed together.

This dough is best when shaped right away, as it is really easy to work with.  If you need to refrigerate it for some reason, make sure to let it warm up before trying to roll it out.

Divide the dough into 10 equal pieces.   Lightly flour your work surface and roll each dough ball out to about a 5-inch circle.  Use a bench scraper, if your dough begins to stick.  Divide the rhubarb compote evenly among the circles — about 1/4 cup each.  Turn the edges of the dough up and around the compote and pinch the sides together.  The dough may split or break, but just keep pinching it together to create a seal.  Place the tartlets onto your prepared baking sheet.  Use a pastry brush and brush the dough with the egg wash.  Bake for about 35 minutes, or until the edges are a beautiful deep golden brown.  Remove from oven and cool.  These will keep well for days in a sealed container.  Enjoy with freshly whipped cream and a sprinkle of turbinado sugar!

Source:  Adapted from Good to the Grain by Kim Boyce

So glad you stopped by today ! xo

Laurie

Read Full Post »

Well hello there!  I hope you all have been well.  I’ve been just a bit preoccupied with the start of summer, so my regular posting here hasn’t been so…regular.  It’s not due to a lack of cooking, however.  The fresh summer produce has been invigorating!  With my little boy out of school for the season, we’ve been having a blast.  You forget how magical summer break is for little kids.  Rivers, lakes, playgrounds, we’ve hit ’em all.  But, it’s time to get into a routine again, so I’ll be back later this week with a new delicious post for you!

My friend Liz asked me to write a post for today on her wonderful blog, Carpé Season.  Liz just had a beautiful baby boy and is taking a little extra time to love him up this summer.  I’m sharing one of my favorite homemade treats on her blog– chewy granola bars.  These are, hands-down, the best granola bars I’ve ever eaten.  Ever.  So head over here and give them a look!

In the meantime, enjoy a few of these photos of my summer, so far.  See you soon!

Laurie

Read Full Post »

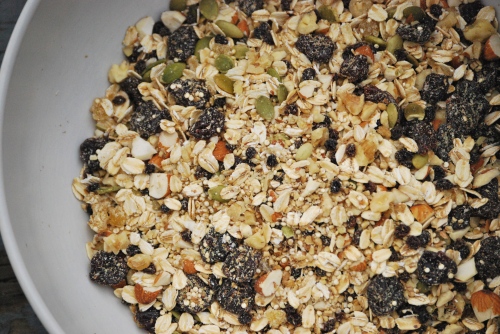
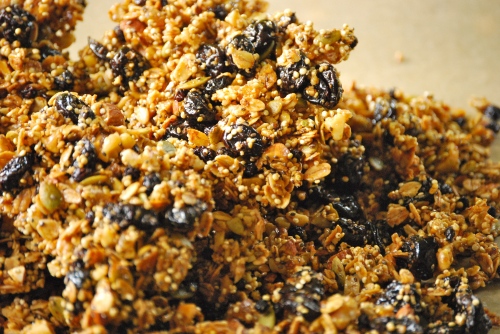
As promised, here is the granola recipe I mentioned when we chatted about homemade yogurt earlier this week.  It’s the perfect crunch to top that tart yogurt.  And it’s just sweet enough that you won’t need to add anything else.  And even if you don’t make it as a yogurt topper, it’s a perfect stand-alone snack.

Again, the advantage of making your own granola is that you have control over what goes into it.  I use not only organic ingredients, but more interesting, healthy additions that you won’t find in a typical store-bought granola blend.  Quinoa, chia seeds, flaxseed meal– all of these are phenomenal, nutritious foods.  Uncooked steel-cut oats in granola?  You bet!  They add such a nice texture.  It’s also nice to be able to choose the type of fat to use.  Olive oil works perfectly here, and is so good for you.  I also love using coconut oil (you remember my coconut oil obsession, right?), it imparts such a lovely flavor.

If you don’t have all of these ingredients, or you want to try something else, by all means, do so.  Maple syrup comes to mind.  Or if you want a chunkier granola, increase the rolled oats and add less steel cut oats or quinoa.  Dark chocolate, cinnamon, or unsweetened coconut flakes, anyone?  See what I mean?  Have fun with this. Just remember to try to keep the ratio of dry/wet ingredients the same when substituting.  Pack it for a snack at work, or take it for your kids’ events.  If you make it– they will eat it.

The Recipes:  Homemade Granola Two Ways

Homemade Granola with Coconut Oil, Vanilla, Dried Blueberries and Cherries:

1 cup rolled oats, dry

1/2 cup chopped walnuts

1/2 cup chopped almonds

1/3 cup pepitas

1/2 cup steel cut oats, dry

1/2 cup quinoa, dry

1 tablespoon flaxseed meal

2 tablespoons chia seeds

1/2 cup dried cherries

1/2 cup dried blueberries

3 tablespoons virgin coconut oil

1/3 cup honey

1 teaspoon vanilla extract

pinch of kosher salt

Homemade Granola with Olive Oil, Ginger, Almond, and Dried Cherries:

(As shown in the photographs)

1 cup rolled oats, dry

1/2 cup coarsely chopped walnuts

1/2 cup coarsely chopped almonds

1/3 cup pepitas

1/2 cup steel cut oats, dry

1/2 cup quinoa, dry

1 tablespoon crystallized ginger, finely chopped

1/2 cup dried cherries

1/2 cup dried currants

1 tablespoon flaxseed meal

2 tablespoons chia seeds

3 tablespoons olive oil

1/3 cup honey

1 teaspoon almond extract

pinch of kosher salt

Preheat an oven to 250°F.  Line a large baking sheet with parchment paper, set aside.  In a large bowl mix all of the dry ingredients together, with the exception of the salt and dried fruit.  In a small bowl, mix together the oil (if using coconut oil, be sure to melt it in a small saucepan first, so it can liquify) honey, and extract.  Mix the wet ingredients and the dry ingredients together.  Here is where you need to make a decision — you can either mix the dried fruit into this mixture and bake it for two hours or you can mix it in during the last 10 minutes of baking.  Doing so right away will yield a very chewy fruit, which some people tend to enjoy.  Doing so later, will keep the fruit more soft and tender.  The choice is yours.  I enjoy both ways.

Spread the mixture onto the lined pan and sprinkle with kosher salt.  Bake in the oven for two hours, stirring every 15-20 minutes, or so.  The grains will get evenly toasted this way.  After 2 hours, remove from the oven and let the granola sit, untouched, for a bit to cool and firm up.  When it’s cool, you can break it into chunks.  Keeps well for days in a sealed container with a lid.  Enjoy!

Thanks for stopping by Relishing It — hope you enjoy the granola!

Laurie

Read Full Post »

Had enough heavy Holiday foods and sweets yet?  Me too.  I figure it’s time to get back to a few delicious everyday recipes.  Now that it’s just you, me, and Winter, we can make all sorts of great dishes for no good reason other than because we want to.  Today, it’s homemade pizza.  What’s more ‘everyday’ than that?  This is the perfect stay-at-home meal that’ll make you happy you didn’t head out into the wind and cold searching for a restaurant this weekend.  The base here is my go-to pizza crust (though, admittedly, I love this one by Zoe Francois as well).  This multi-flour pizza crust tastes amazing and it’s ridiculously easy to throw together.  It never fails me.

I know, I know– we’ve all made homemade pizza, so why should you try this recipe?  I guess three reasons come to mind.  First, the crust here combines three different flours.  They give the dough more depth, more heartiness.  While you may find it a bit more difficult to track down the rye flour, it’s worth making the effort.  And even if you can’t, add in more regular flour to ensure that the total amount is about 14 ounces.  This dough is easy to make ahead of time.  While it’s ready in just over an hour, if you want to let it sit in the refrigerator for a day or so, you’ll really notice that the flavors deepen.

Reason number two for following this recipe is the pizza stone.  Sure, it isn’t actually part of the recipe, but if you’ve been disappointed by your homemade efforts in the past, a decent pizza stone can make a huge difference.  Go buy one– now.  They vary in price and size, so pick one that fits your needs.  The stone is a must-have for a decent crust.  You’ll want the crust to begin baking on contact.  It adds that nice crunchiness that so many homemade efforts are missing.  I’ve experimented with this pizza crust recipe over the years, and finally found that using the heated stone– as well as rolling out the crust very thin— makes all the difference.  It is perfectly crispy, yet still substantial.

Reason number three is the ingredients.  Of course we all like different toppings, but if you haven’t tried ricotta cheese, olive oil, and fresh herbs on your pizza, you’re missing out.  Try it.  I insist.  Ricotta provides such a delightful creaminess, that nicely balances the salt so prevalent in other ingredients.  And olive oil and fresh herbs add a vibrancy that so many pizzas lack.  (Note, if you put herbs on your pizza, put those on after its baked to avoid burning them.)  If you’re curious, the pizza in the photographs contains olive oil, sliced garlic, roasted red pepper, spinach, ricotta cheese, grated mozzarella, parmesan, and red-pepper flakes.  Give it a try, or experiment for yourself.  Either way, have a wonderful pizza night this weekend with your family!

The Recipe: Homemade Pizza Dough

(Makes enough for 2 medium pizzas or several individuals)

1 teaspoon instant or rapid-rise yeast

2 cups unbleached all-purpose flour  (note: the total weight of all the flours combined should be about 14 ounces)

3/4 cup whole wheat flour

1/4 cup rye flour

2 teaspoons kosher or sea salt

1  to  1 1/4 cups water heated to 100-110°F

2 tablespoons, plus 1 teaspoon olive oil

Making the Dough: Using a food processor fitted with the dough blade, add the flours, salt, and yeast (of course this can all be done by hand, if you don’t have a food processor). Pulse it a few times to combine.  Turn the machine on and add 1 cup water plus 2 tablespoons olive oil slowly into the feed tube.  Process for about 30 seconds and then slowly add the remaining 1/4 cup of water, a little bit at a time, until the mixture forms a dough ball and begins swirling around the processor. You may not need the entire 1/4 cup of water.  It should be slightly sticky to the touch.  If it’s too dry, add a bit more water.   Turn the dough onto a slightly floured work surface and knead by hand for a minute or so.  Place dough into a bowl greased with the remaining teaspoon of olive oil.  Cover with plastic wrap and let rise in a warm, draft-free area until doubled in size, 1-2 hours.  At this point, you can use the dough immediately.  Or you can deepen the flavor and refrigerate it over night.  If you have the time, a slow-rise in the refrigerator for 6-8 hours is also an option.  You may also freeze the dough.  Defrost in a covered bowl in the refrigerator or at room temperature.  I’ve kept my dough in the refrigerator for several days and it just seems to deepen the flavor.

Getting ready to make the pizza:  Place your pizza stone on the middle rack in your oven.  Preheat the oven for as high as it will go, mine is 500°F, for 30 minutes before you place your pizza on the stone.   On a floured surface, roll your pizza dough out to your desired thickness (I suggest going very thin!).  Generously flour a pizza peel or the back of a large cookie sheet and place the rolled-out dough onto it.  Make sure you can move the dough around with ease, as it will need to slip off of the surface and onto the pizza stone very quickly.  Place your toppings onto the pizza.  Make sure to drizzle any olive oil onto the pizza after it is on the stone, if need be, or it will run everywhere during the transfer.  Open the oven and pull out the rack.  Gently and very confidently slip the pizza onto the stone.  Make sure to start at the end of the stone furtherest away from you.  Close the oven door and let bake until the cheese is a deep golden brown and done to your liking.  Check it often, it will take about 5- 7 minutes. However, every oven is different, so do not rely on this number too heavily.

Source: Adapted from Mark Bittman’s How To Cook Everything

So glad to stopped by Relishing It today!  I love having your company.

Laurie

Join me on Twitter

Read Full Post »