Feeds:
Posts
Comments

Posts Tagged ‘Snack’

Fresh Corn Salsa | Relishing It

I’ll get to the corn salsa in a minute– but first I want to talk about beer!  Admittedly, I’ve been drinking too darn much beer this summer.  Not at one time– nothing like that.  But this summer, more than any other, it’s just been so easy to sit outside with Radd in the evening and visit over a beer or two.  I suppose it’s partly to do with our mild weather– not too hot, not too humid.  It has been perfect, which is excellent for my happiness.  And while I probably don’t need those calories at the end of the day, instead of stressing, I’ve decided to embrace it.

Fresh Corn Salsa | Relishing It

Fresh Corn Salsa | Relishing It

So what have I been sipping on?  Mostly farmhouse ales and saisons.  Two that I love are Saison Dupont and a local farmhouse ale from Liftbridge called Farm Girl.  Speaking of local beer, I’ve also been enjoying a few others like Bent Paddle’s Paddle Break Blonde and Steel Toe’s Size 7 IPA.  Now before this post turns into an essay on local beer, let me just say this– our craft beer scene here in Minnesota is just incredible right now.  So many wonderful breweries and taprooms, and I’ve been testing them out like it’s my job.  I’m owning it, I don’t mind saying.  A few other great summer favorites (not local) are Leffe Blonde and Pyramid’s Apricot Ale.  There, that’s my beer confession.

Fresh Corn Salsa | Relishing It

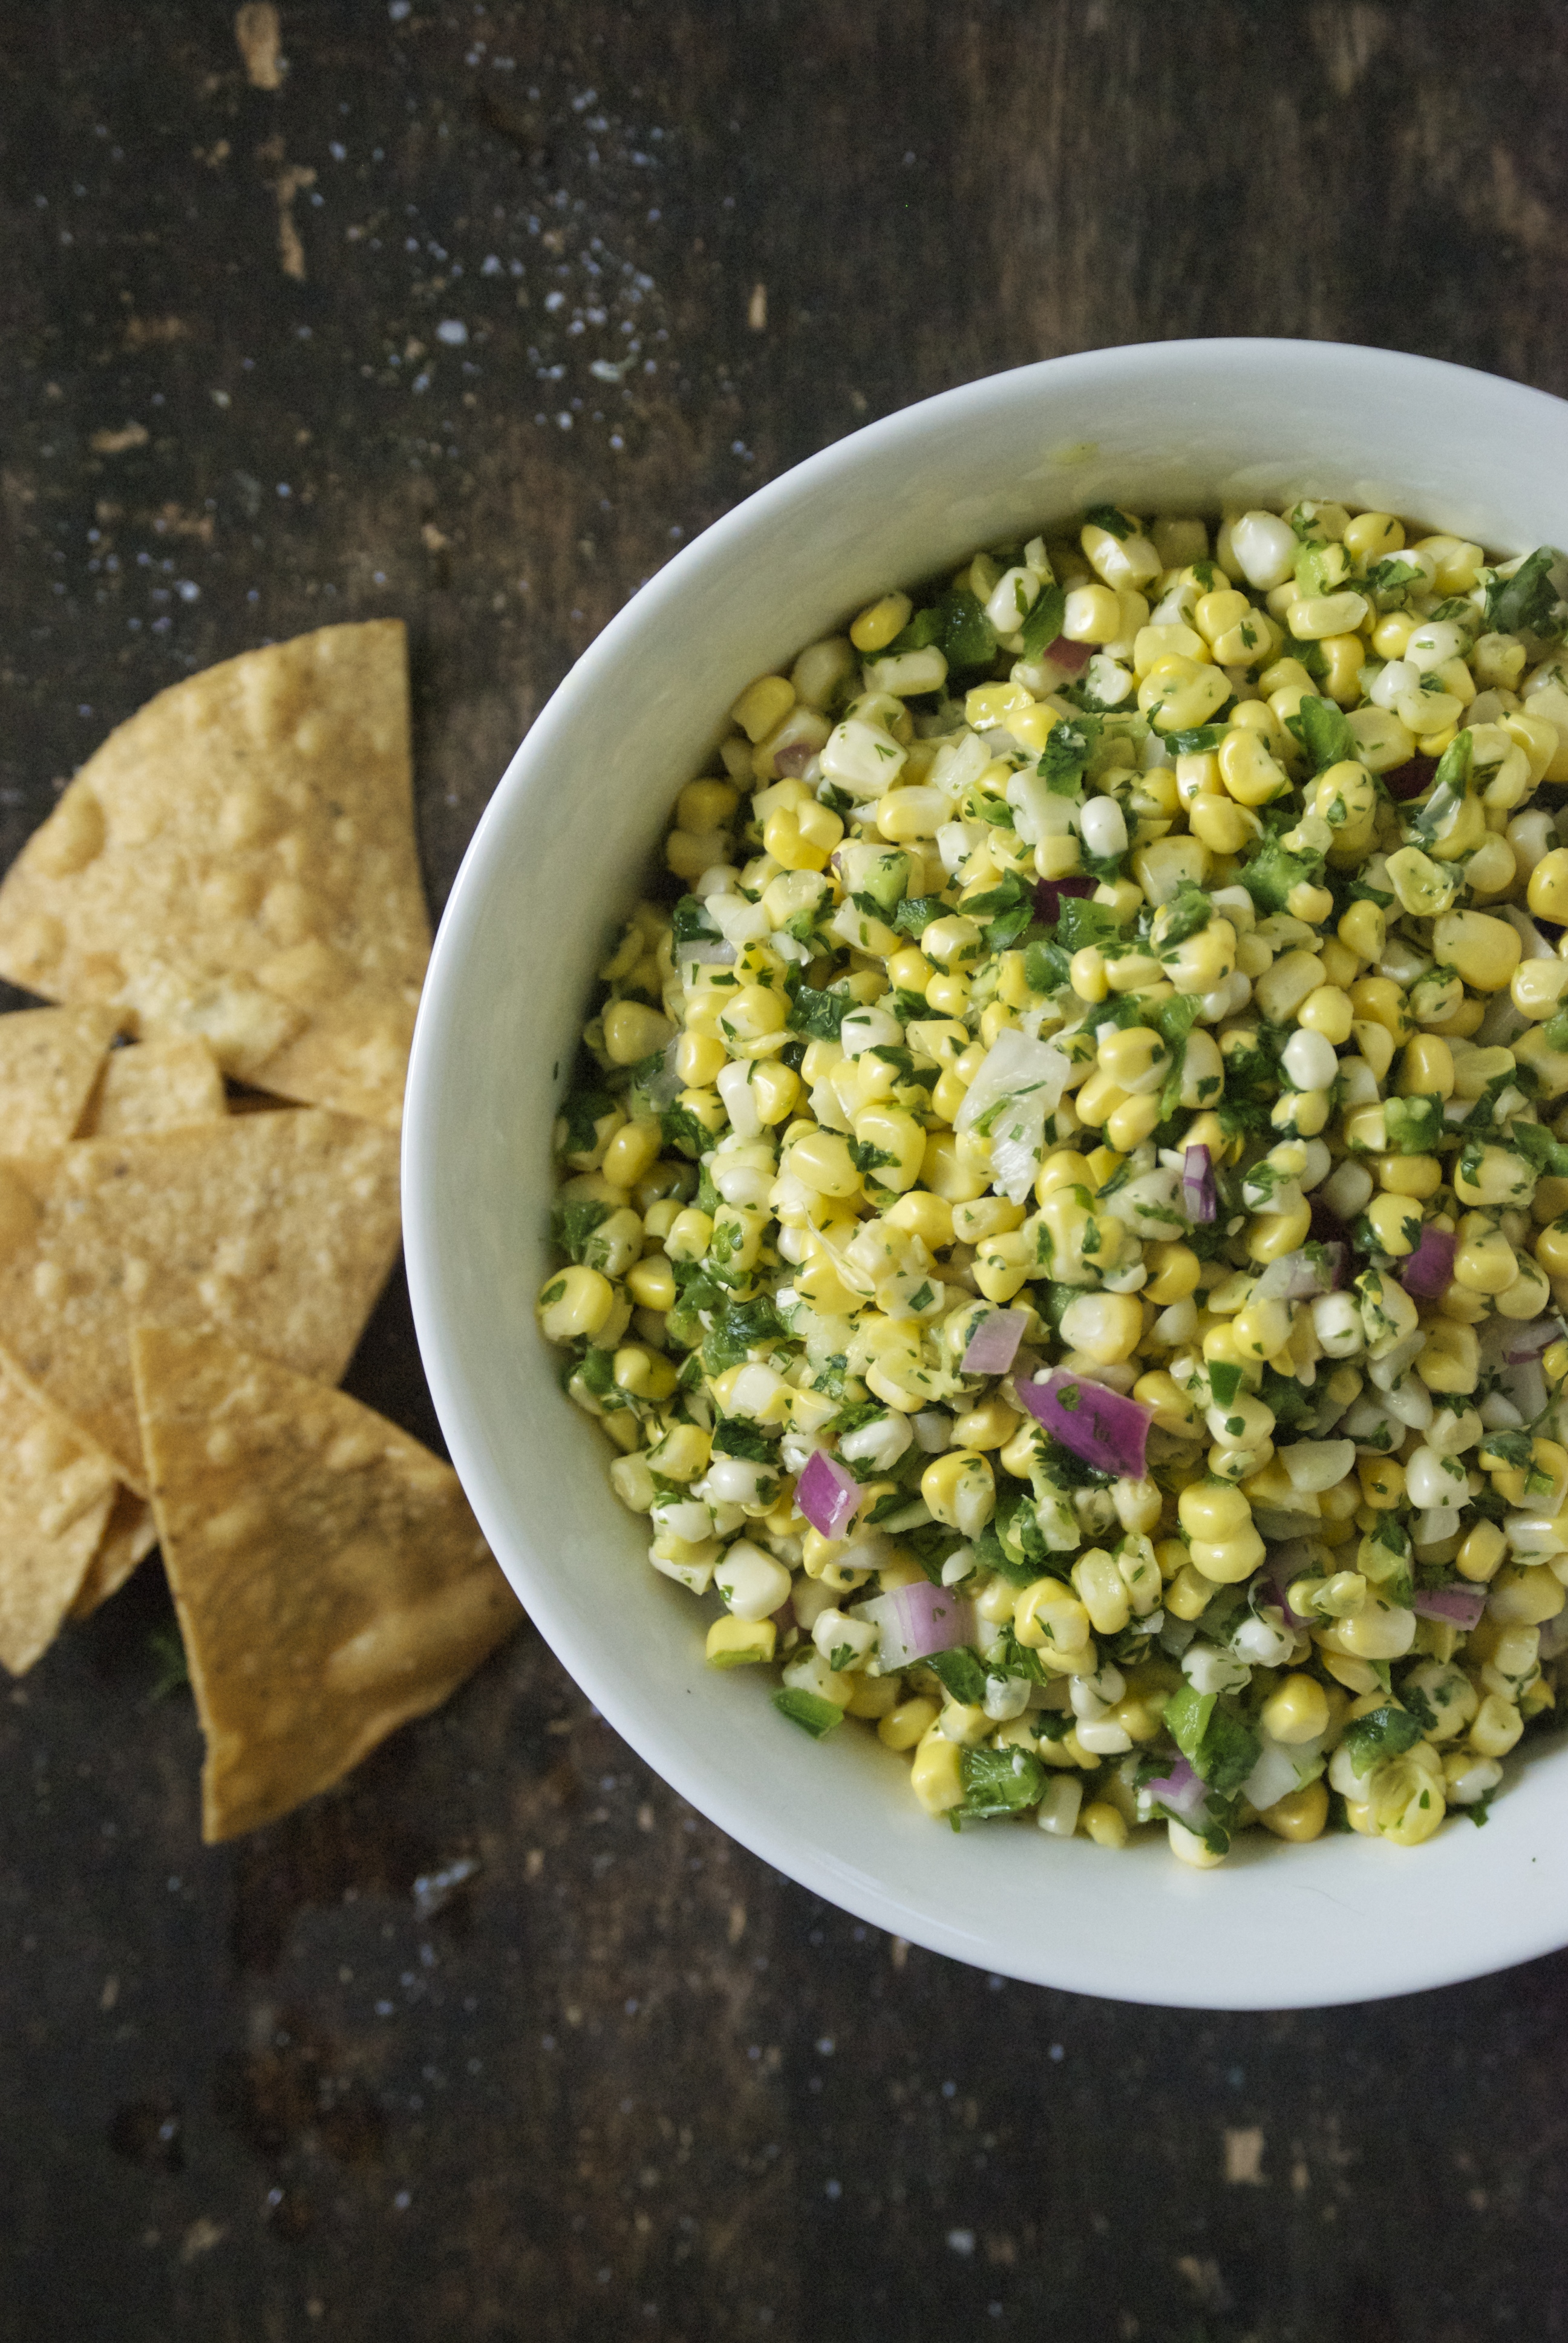
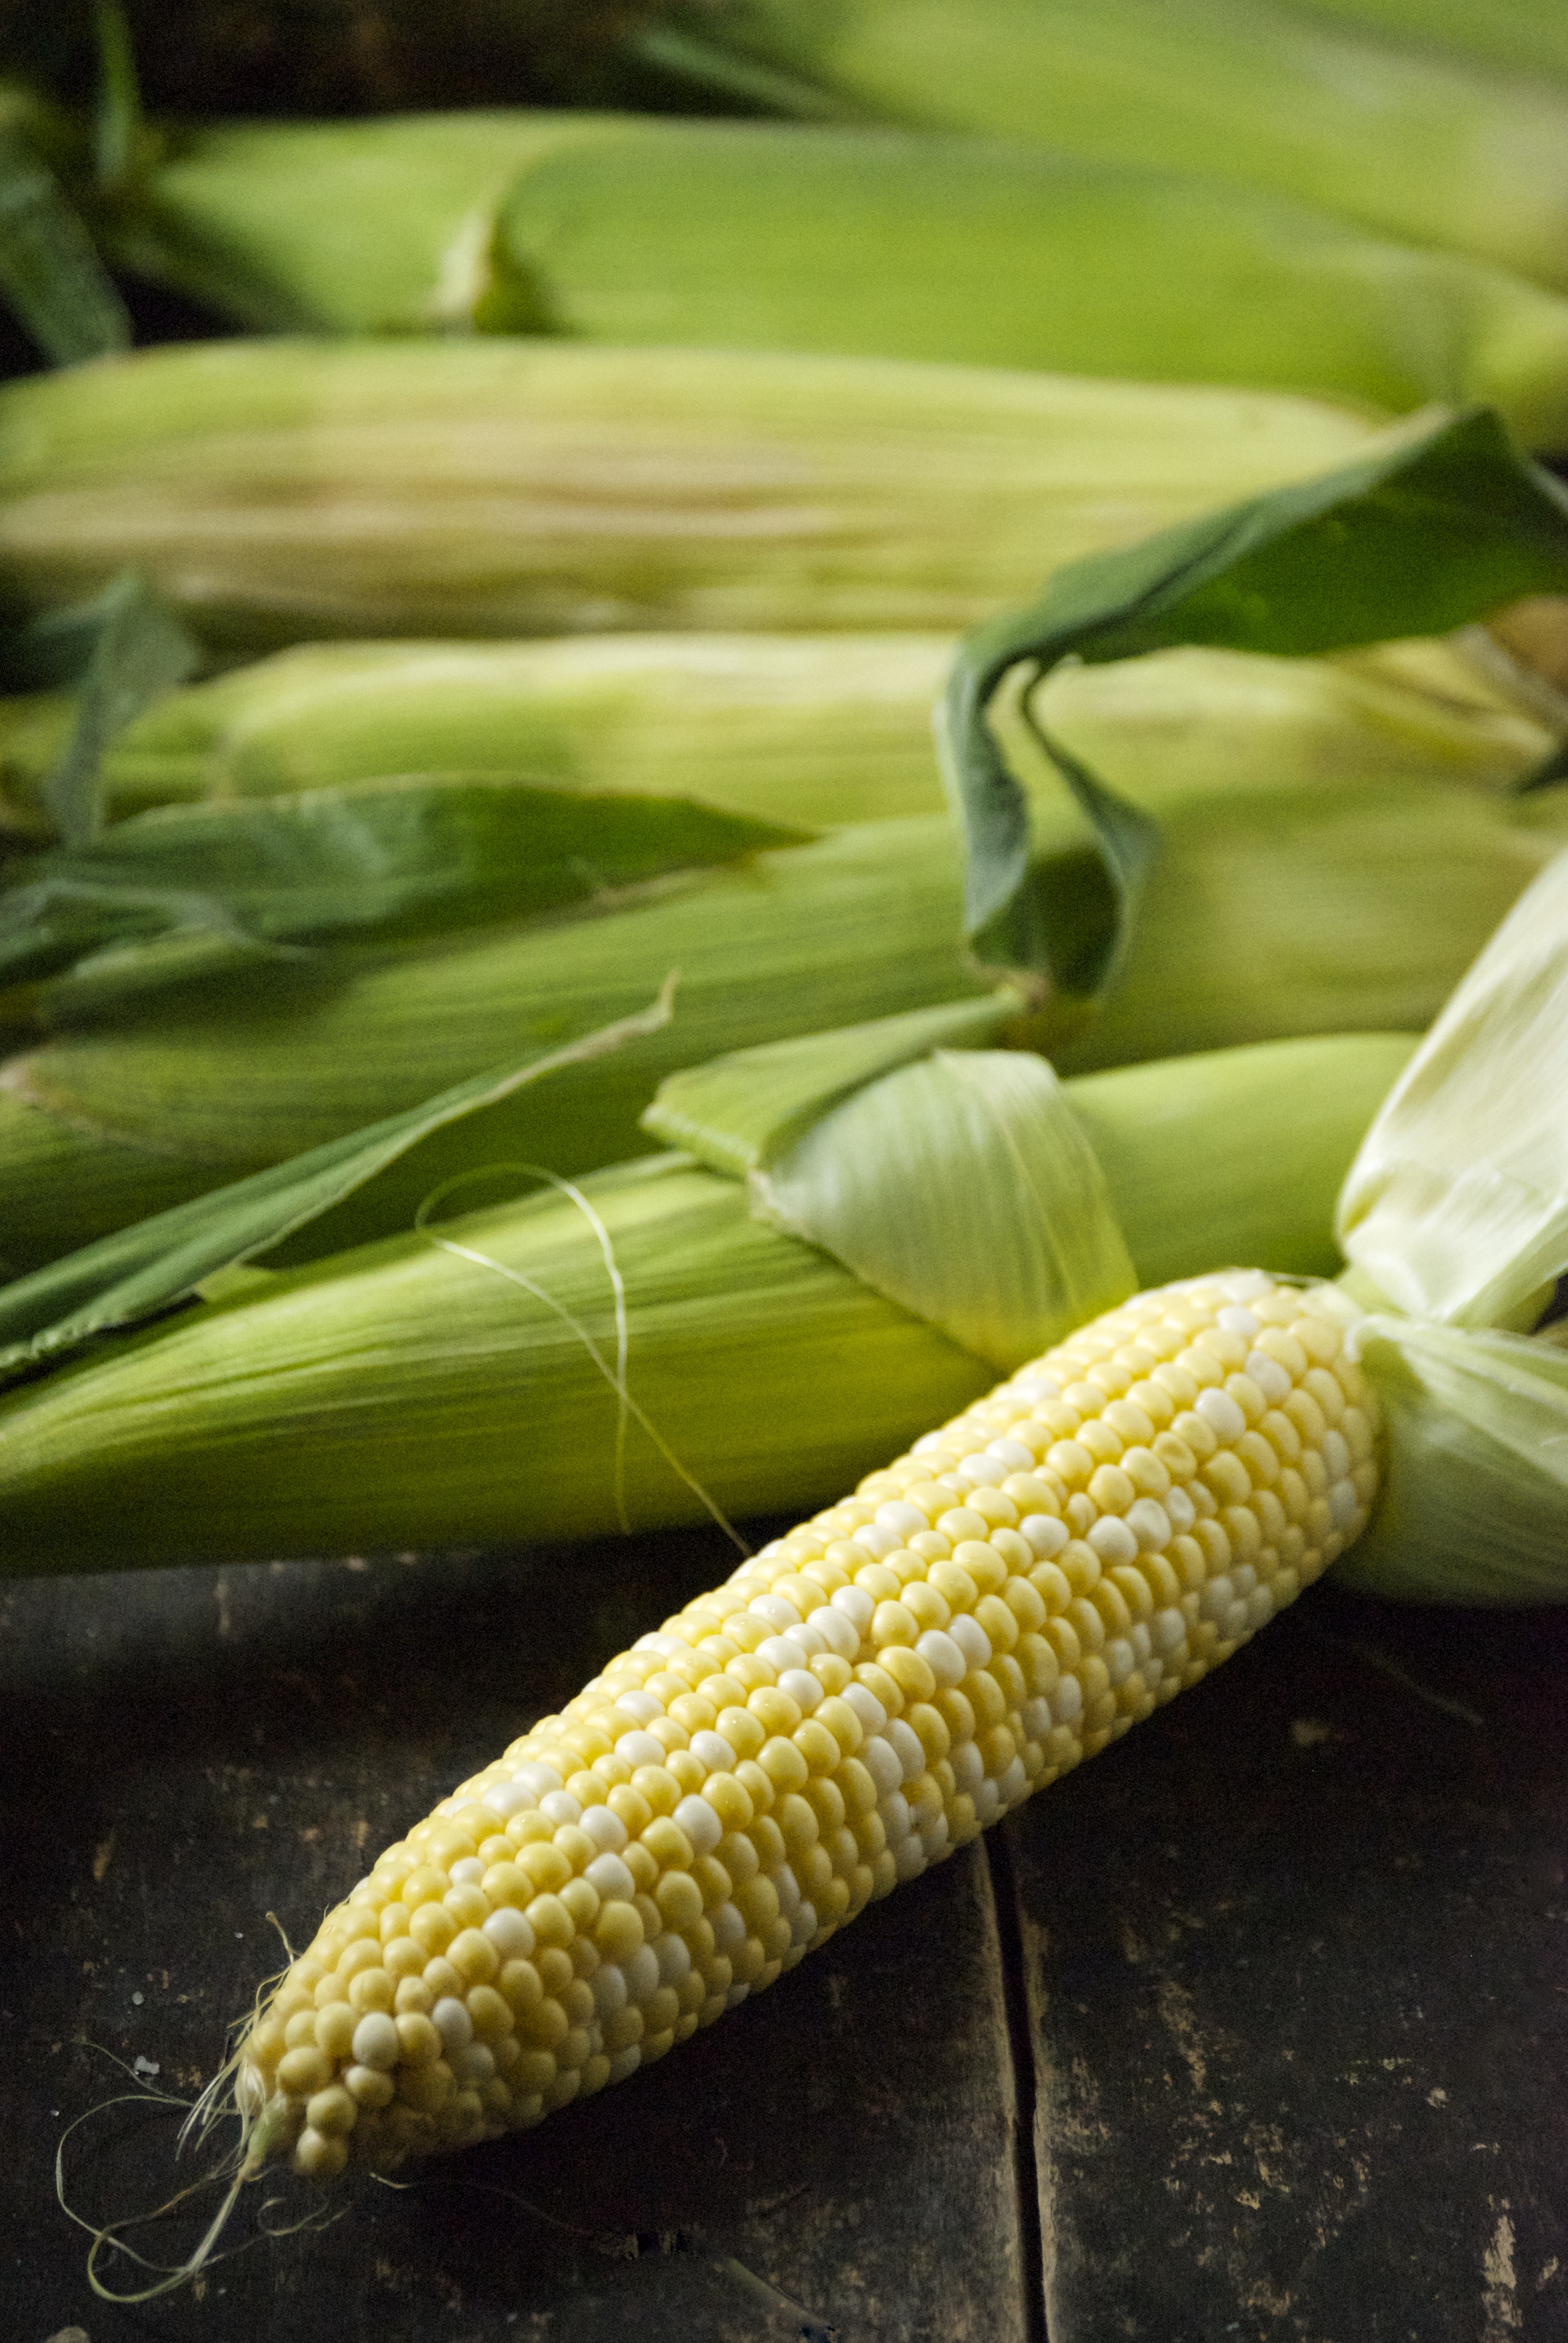
So what goes smashingly well with summer beer?  Yup– chips and fresh corn salsa.  I love salsa of any variety– tomato, tomatillo… but, there’s something about fresh corn salsa that wins the salsa competition for me.  I would choose corn every time.  It’s fresh, slightly sweet, spicy, and loaded with that citrusy lime/cilantro flavor.  Not to mention, it is simple to make– so simple that it’s somewhat silly to even give a recipe.  But, I think the same can be said for most summer fare– fresh and simple and that’s just fine.  So, get out your chefs knife and start cutting up that corn.  Then pour yourself a glass of cold beer and soak up some summer fun.  Cheers!

Fresh Corn Salsa | Relishing It

The Recipe: Fresh Corn Salsa

6-8 ears of fresh corn, cut

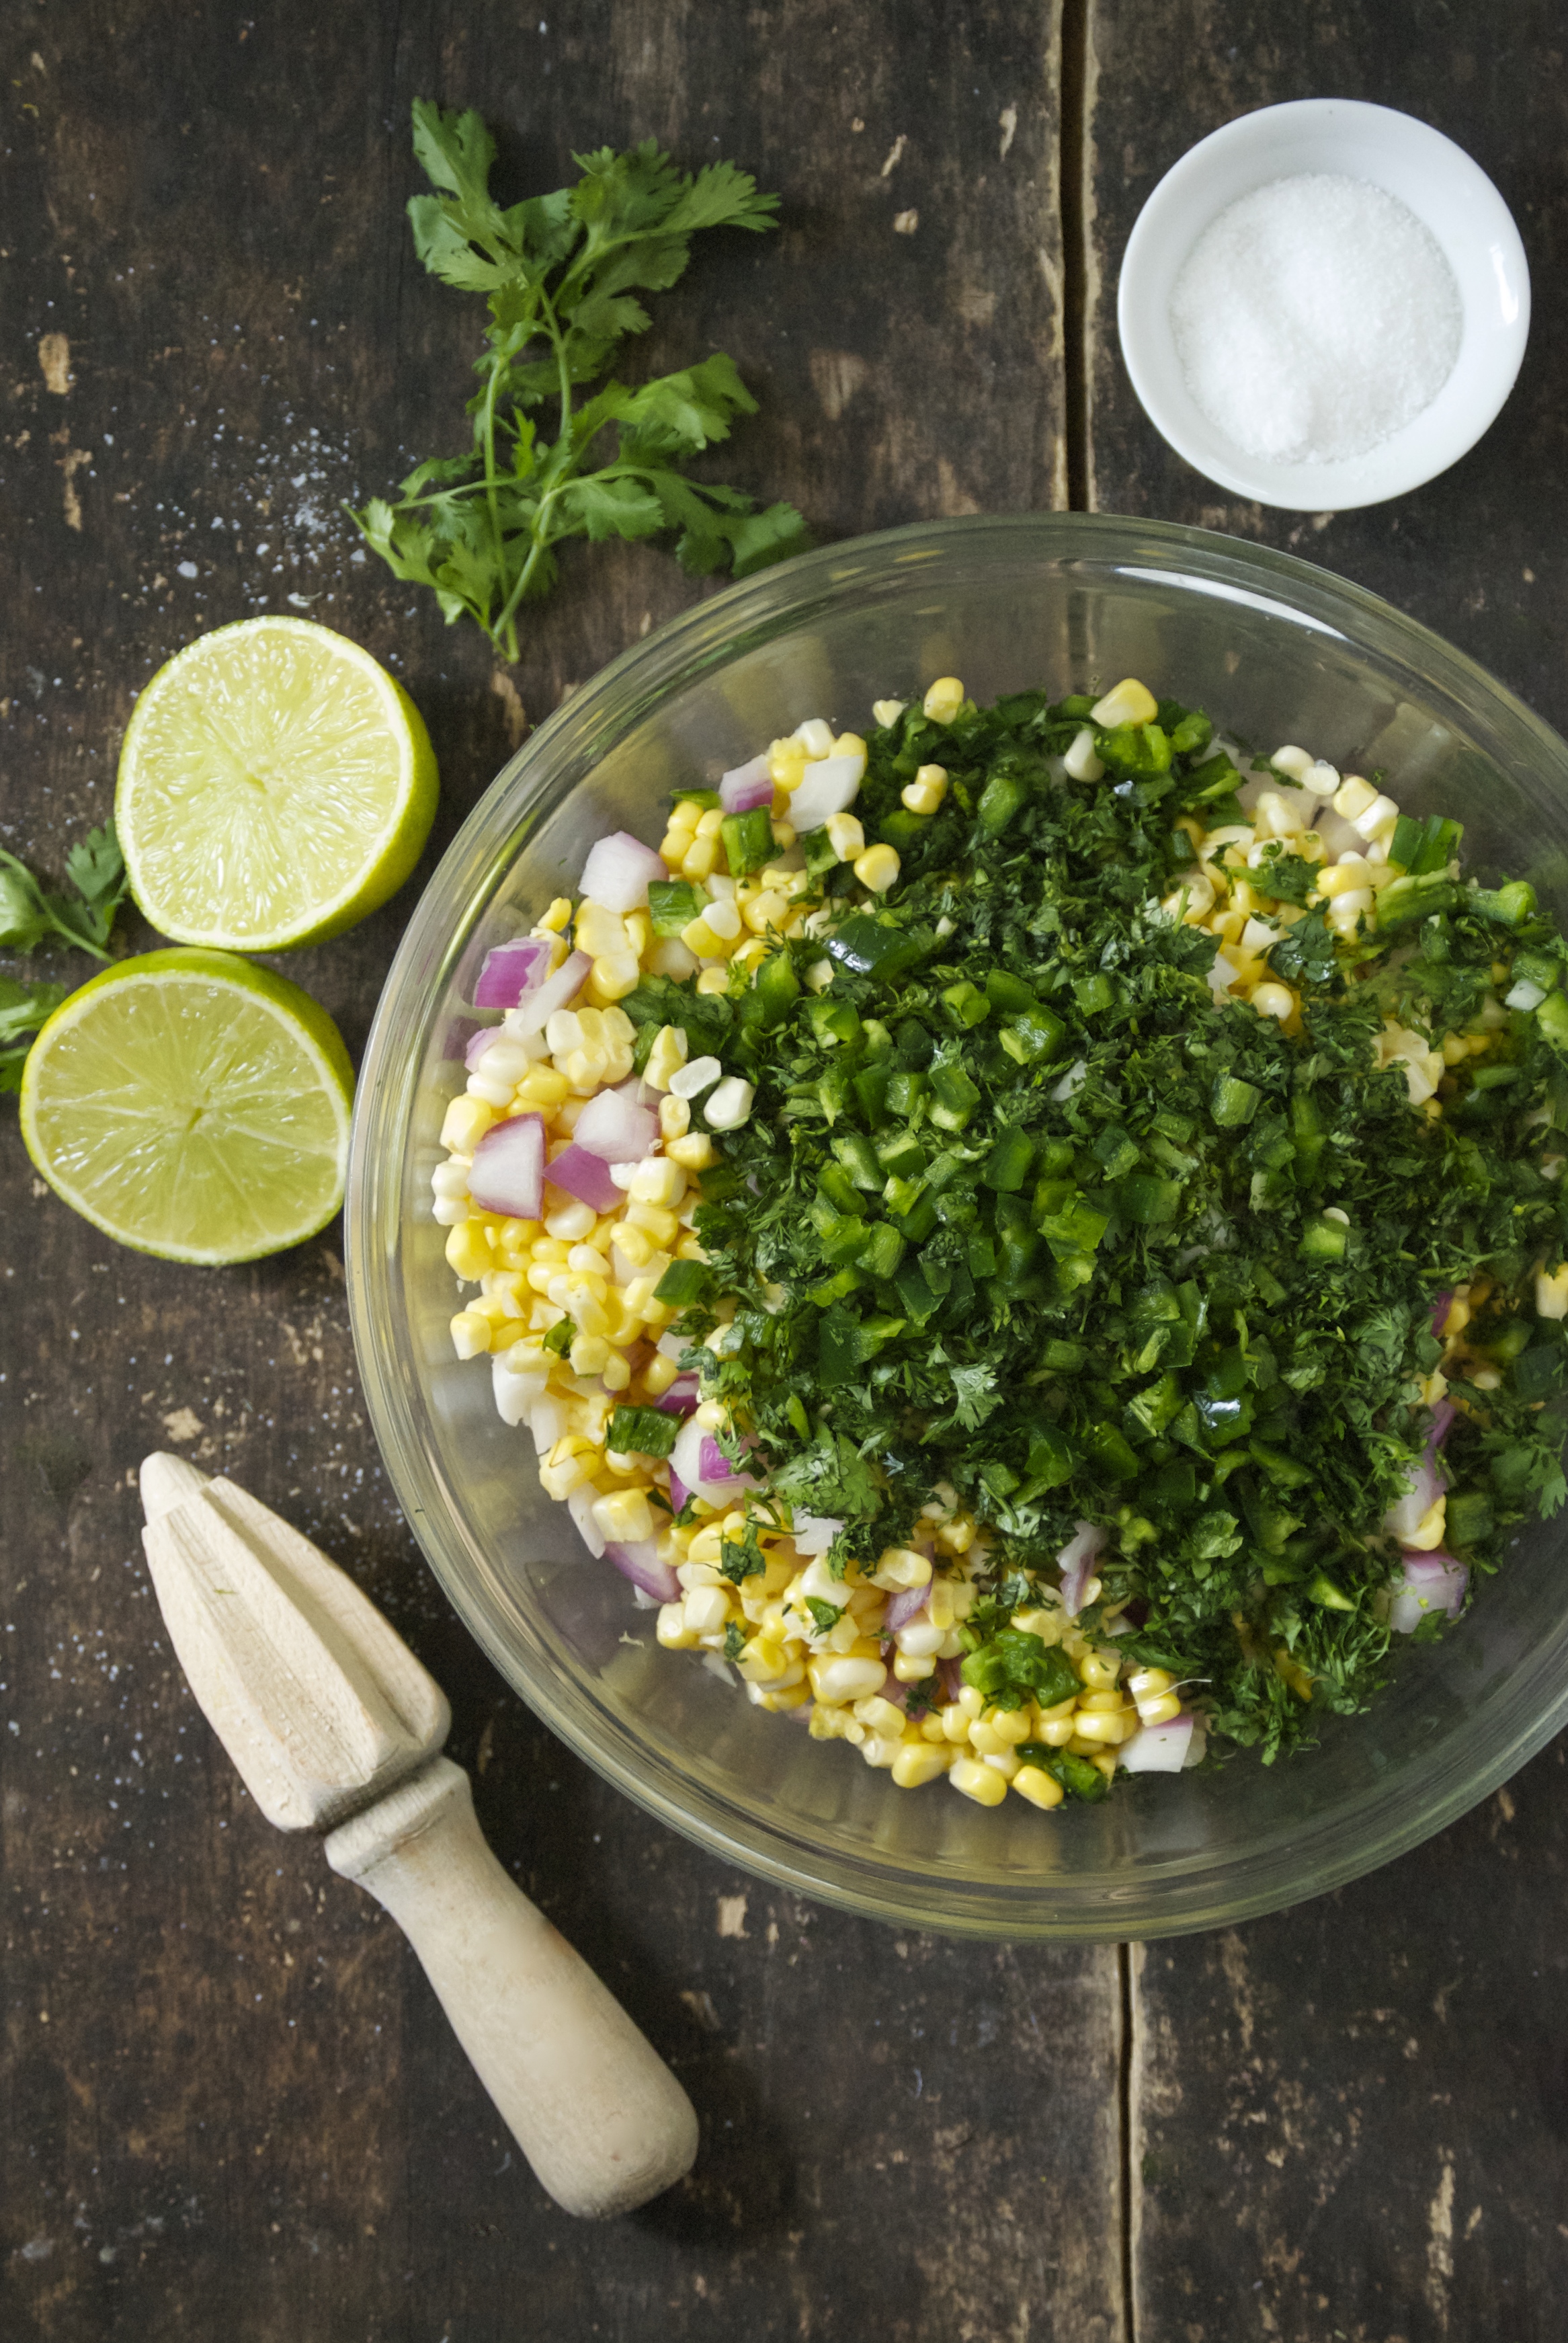
1 large red onion, diced

1 bunch fresh cilantro, finely chopped

2 jalapeños, chopped (remove seeds/ribs if heat is a factor)

2 cloves garlic, finely minced

juice of one lime

kosher salt

In a medium-sized bowl mix all of the ingredients.  Add more lime juice to taste.  Season appropriately with salt.  You may need more salt than you are used to — corn needs a bit to bring out its wonderful flavor.  Let flavors meld for a bit before serving.  Store leftovers covered in the refrigerator.  Enjoy!

Fresh Corn Salsa | Relishing It

Thanks for stopping by Relishing It!

Laurie

Read Full Post »

Healthy Banana Bread via Relishing it

I figure it’s finally time to share my favorite banana bread with all of you.  Really, what’s a food blog without a banana bread recipe, right?  I bet I make banana bread at least every couple of weeks.  My freezer is packed with bananas that don’t get eaten right away.  I just keep adding to the pile…one here, one there.  This recipe is a bit unusual because it calls for six bananas– so start saving up!

Healthy Banana Bread via Relishing It

Since we eat banana bread so often, I really wanted my version to be healthy.  I tweaked and tweaked and finally arrived at this recipe a while ago. It’s exactly what I wanted it to be.  Since over-ripe bananas are sweeter, you’ll only need a little bit of honey to get the sweetness just right.  No sugar added here.  The larger number of bananas really gives this bread deep flavor, as well as keeps it moist without much fat.  And speaking of fat,  I used a healthier virgin coconut oil in it.  The flavor combines perfectly with the bananas and chocolate.  I used a mixture of oat flour and whole wheat pastry flour for the base.  Combined, they give the bread a perfect texture– just slightly lighter than ordinary banana bread, but with enough heft to be satisfying.

Cacao Nibs for Healthy Banana Bread via Relishing It

Healthy Banana Bread via Relishing It

When it comes to the chocolate, you have a decision to make.  I prefer adding cacao nibs, but my kids/husband like chocolate chunks.  If you aren’t familiar with cacao nibs, they’re crushed cacao beans.  They are unsweetened and have a bit of a crunch that adds a nice texture.  They’re also loaded with antioxidants.  Alone they are somewhat bitter, but adding them to sweet things makes them delicious. Try throwing them into your next smoothie!  And lastly, I added chia seeds for more health benefits, because why not?

Healthy Banana Bread via Relishing It

A few reminders:  First, make sure to use really over-ripe bananas.  You’ll want that extra sweetness since you won’t be adding sugar.  I’m talking the blacker, the better.  Also, make sure you bake your banana bread long enough.  There is nothing worse than under-baked banana bread.  A longer bake time is better.  There are so many bananas in there that the chances of it being dry are very slim.  Hope you enjoy this as much as we do!

Healthy Banana Bread via Relishing It

The Recipe:  Healthy Banana Bread

(makes one loaf)

1/3 cup virgin coconut oil

1/4 cup honey

2 eggs, at room temperature

1 teaspoon vanilla

6 smashed over-ripe bananas (about 1 1/2 cup — a tablespoon or two extra is fine)

1/2 cup (2 1/4 ounces) oat flour

1  1/4 cup (7 ounces) whole wheat pastry flour

2 teaspoons baking powder

1 teaspoon kosher salt

1/2 cup cacao nibs  OR  1 cup chocolate chunks

1 tablespoon chia seeds (optional)

Preheat oven to 350°F.  Lightly grease a 9 x 5 loaf pan.  Set aside.

In a medium bowl, combine the oat flour, whole wheat pastry flour, chia seeds, salt, and baking powder with a whisk.  Set aside.

In a bowl of a stand mixer (or regular bowl if mixing by hand), add the honey and coconut oil.  Combine for a minute on medium speed until somewhat creamy.  Add the eggs and vanilla.  Mix for another minute, or so.  Then add the fork-smashed bananas.  Mix until well combined and somewhat smooth.  Next, sift the flour mixture over the wet ingredients.  Combine on low just until all of the ingredients are moistened.  Do not over-mix.  Add the cocoa nibs or chocolate chunks and fold in with a rubber spatula.  Scoop mixture into the prepared pan and smooth the top.  Bake for 45-48 minutes, or until a tester comes out clean from the middle of the loaf.  The center should feel somewhat firm when you feel it.  Let cool in pan for about 20 minutes, then run a knife around the edge and gently remove from pan.  Continue to let cool on a cooling rack.  For best results, after cutting into it, place the cut side down on a cutting board and leave the rest of the bread uncovered for the first day.  The texture will remain true this way.  Enjoy!

Thanks for stopping by Relishing it!  Hope you all are having a lovely Summer, so far!

Laurie

Read Full Post »

And another seasonal food makes it’s first appearance!  This time it’s rhubarb’s turn in the spotlight.  You’ll probably see a similar line here next week with another ingredient–maybe even every week throughout Spring and Summer as I blog.  I can’t help it!  I just get so excited for all of this seasonal gorgeous, vibrant produce.

Rhubarb has been cropping up everwhere around here in the last week.  The first Twin Cities farmers’ markets of the season opened this weekend, so I hauled the family to our favorite one in St. Paul.  It was fun getting a chance to chat with the vendors again after the Winter break.  I’ve found that the first few weeks are a good time to connect with them– to see what they’ll be offering and how the season is shaping up– since they aren’t quite as busy as they’ll be by Summer.  I bought many things, including a bunch of rhubarb.  Even better, a friend was also kind enough to give me a huge bundle.  Perfect.

So what to do with all this rhubarb?  Well, this cake and this crumble are two of my favorite things to make with it.  But I’ve also found the coffee cake that you see in this post.  I love coffee cakes.  They’re perfect for…well…coffee in the afternoon, of course.  They’re also easy to make and stay moist for days.

The rhubarb is obviously the main attraction here.  It adds a notable, though restrained tartness.  The cake is perfectly sweetened.  I used my homemade 1 % yogurt, which was a nice substitute for sour cream.  It kept the cake wonderfully moist, and as a bonus, it has less calories.  The next time I make this one, I’m going to try it with white whole wheat flour to get the benefits of using a whole grain.  I’ll let you know how it turns out.  And if you try it that way first, let me know about it.  Enjoy!

The Recipe:  Rhubarb Crunch Coffee Cake

1/2 cup (1 stick) unsalted butter

1 cup granulated sugar

2 eggs at room temperature

1 teaspoon vanilla

1 cup yogurt or sour cream

2 cups all-purpose flour

1 1 /2 teaspoon baking powder

1 teaspoon baking soda

1/2 teaspoon kosher salt

For the Rhubarb and Crunch Topping:

2 cups chopped rhubarb

1 /4 cup plus 2 tablespoons brown sugar

1 tablespoon all-purpose flour

1 teaspoon cinnamon

1/2 cup chopped walnuts

1 tablespoon butter, softened

pinch of kosher salt

Preheat the oven to 350°F.   Butter an 8-inch square cake pan.

To prepare the Rhubarb and the Crunch Topping: Combine 2 cups of rhubarb with 2 tablespoons of brown sugar in a small bowl; set aside.  Using a fork, combine 1/4 cup of brown sugar, 1 tablespoon of flour, cinnamon, 1 tablespoon of butter, and a pinch of kosher salt in a small bowl until crumbly.  Stir in the walnuts; set aside.

In a medium-sized bowl, sift or whisk together 2 cups of all-purpose flour, baking soda, baking powder, and kosher salt; set aside.

In a bowl of a stand mixer fitter with a paddle attachment, cream together 1 stick of butter and granulated sugar until creamy.  Add the eggs, one at a time, scraping down the sides of the bowl after each one.  Cream for 2-3 minutes, until light and fluffy.  Add the yogurt and vanilla and mix until combined.  The mixture may look curdled at this point.  That is ok.  Add the dry ingredients and mix until everything is just combined, being careful not to over mix.

Place half of the cake batter into the pan and smooth out.  Sprinkle half of the crunch topping over the batter in the pan.  Dollop the remaining cake batter on top of the crunch topping and smooth out with an offset spatula.  Combine the remaining crunch topping with the rhubarb and pour that mixture evenly on the top of the cake.  Place in the oven and bake for about 55-60 minutes.  Check the center for doneness with a toothpick.  This cake will taste great right away and will be even more moist the following day.  Store covered at room temperature.  Enjoy!

Source:  Adapted from Kitchen Simplicity

Thanks for stopping by Relishing It!

Laurie

Read Full Post »

I made the long drive across the entire state of North Dakota to my home town yesterday.  It was me, my four-year-old and my two-year-old…in a car…for 8 1/2 hours.  I made the same drive last Summer, also without Radd (who’ll be joining us later this week), and was so proud of myself for having arrived with my little kids and sanity intact that you’d have thought I split the atom.  Fortunately it went well again this year, though was about as fun as you’d expect.  


Since I’m heading back to my roots this week, I thought I’d share a little treasure from my childhood–pickled eggs.  It seems a bit odd to follow up French-style recipes for clafoutis and galettes with ‘pickles-in-a-jar’, but there’s something to be said for comfort food.  I grew up with jars of these treats sitting on our counter.  While pouring over childhood pictures recently, I noticed that there was an egg jar in the background in so many photos.  My Mom made the best pickled eggs– we absolutely loved ’em.

In continuing with my food philosophy, I use high-quality eggs in all of my baking and cooking.  I’m talking about eggs that come from a farm where the chickens roam freely and peck at nutritious food– not the cheap, supermarket eggs that sell for $1 a dozen, as these generally come from perpetually-caged chickens that have never seen daylight.  Yes, organic/cage-free eggs are a bit more expensive, but compared to your other proteins (meat) they are affordable.  Free-range cage-free eggs are not only a great source of protein, but they provide healthy Omega-3’s.  They’re also relatively low in calories.

Through the years, my brother and I have made adjustments to our Mom’s pickled-egg recipe.  We’ve been on a quest to improve upon ‘the best’ by making it a bit spicier.  This is my latest version. Now if you don’t fancy spicy food– you can skip the chili peppers and the red pepper flakes.  My family prefers to eat these eggs with a basket of pretzels, a few drops of Chalupa (or a Louisiana-style) sauce, and a nice cold beer.  Perfect.

The Recipe:  Pickled Eggs

Roughly 2 dozen eggs, hard boiled

1 liter white vinegar

1 jar hot chili peppers and the juice (Mezzetta is my favorite brand for these)

1 white onion, thickly sliced

1 bulb garlic, cloves peeled and left whole

1 teaspoon pickling spice

1 tablespoon peppercorns

To boil the eggs:  Gently place the eggs in a 4 quart sauce pan.  Cover with cold water.  Let cook over medium heat until water begins to boil.  Boil for 1 minute only.  Cover and remove from heat immediately.  Set a timer for 12 minutes.  After that, pour out the hot water and run cold water over the eggs to stop the cooking process.  Let cool completely before peeling.  (Note: older eggs peel more easily than fresh ones)

Once your eggs are cool and peeled, start layering your ingredients into your jar.  This doesn’t have to be precise.  Once the eggs, onions, garlic, hot chili pepper and their juice, peppercorns, and pickling spice are in the jar — you can add the white vinegar.  Make sure you have enough liquid to cover the eggs.  These eggs will start to taste “pickled” in about 3 days, and will keep getting better and hotter the longer they sit.  They can be stored, tightly sealed on your counter.  Enjoy!

Read Full Post »

Notice anything different?  Look at the URL (and blog title) above.  That’s right, my blog is now ‘Relishing It’, with the profanity in my web address (though it provided a few chuckles) now gone.  Let me know what you think.

On to today’s post.  Oatcakes?  No doubt the title of this recipe alone is so inviting that you can’t wait to try it.  Alright, it may not sound exciting, but these little creations are incredible.  I want implore you to make them to prove that even with a title like ‘oatcakes’, these are delicious.  Did I mention that they’re also easy and convenient?   I stumbled across these hearty cakes in another recently published cookbook, Super Natural Every Day by Heidi Swanson.  Heidi authors the blog 101 Cookbooks  , which I’ve been following for some time.  This book is fantastic, with a concentration on healthy and vegetarian foods.  I’ve made these oatcakes several times over the last couple of weeks, as my family (mostly my husband) devours them.  These are most certainly not muffins.  To be honest, I’m not really a muffin fan.  While they’re sweet and cake-like, I find that I always choose something else if given the option.  Yes, these oatcakes have that tell-tale ‘muffin shape’, but the comparison ends there.  These are very dense, hearty, and flavorful, though not particularly sweet.  Even better, they’re filled with ingredients that are nutricious and tasty.  You’ll see that the recipe contains a few items that you may not have on hand.  Don’t let that stop you from making them.  My guess is that once you have the ingredients on-hand, you’ll make this recipe again and again.

Whole grains, oatmeal, and whole wheat pastry flour provide the heft here.  The original recipe also called for whole flax seeds, though my variation relies on flax meal.  Whole flax seeds are too hard for your body to break down.  They simply pass through, without giving you the healthy benefits of omega-3 fatty acids, fiber, and antioxidants that you get in the ground form.  Whether you use whole seeds or ground meal, store them in the refrigerator once opened.  Heart-healthy walnuts add a nutty crunch to the cakes, and also contain omega-3 fatty acids that are good for you.  The cakes are sweetened with raw cane sugar, honey, and maple syrup– a sublime combination.  Here I deviated from the original recipe as well, as it called for just the maple syrup and sugar.  I was feeling a bit stingy about my dwindling maple syrup supply being depleted by another 3/4 cup, so I substituted half with honey.  It really paid off, as the honey and oat combination is heavenly.  There are also two different oils that keep the cakes moist– butter and extra virgin coconut oil.  The latter is emerging as a healthy alternative oil that’s seeing more use in cooking and baking.  You can read about some of it’s health benefits here.  When you go to purchase it, take note that it will not be a liquid.  It will be white and solid.

These oatcakes are a perfect snack for your busy summer.  They keep well and transport easily.  Take them on walks, bike rides, camping, or for a simple morning breakfast.  They are very filling, and they’ll satisfy your hunger for longer than you think.  I hope you enjoy them as much as we do!

The Recipe: Oatcakes

(makes 1 dozen)

3 cups rolled oats

2 cups whole wheat pastry flour or spelt flour

1/2 teaspoon aluminum-free baking powder

2 teaspoons kosher salt

1/4 cup flax meal

3/4 cup chopped walnuts, lightly toasted

1/3 cup extra virgin coconut oil

1/3 cup unsalted butter

1/4 cup plus 2 tablespoons honey

1/4 cup plus 2 tablespoons maple syrup  (Note:  just to be clear — 3/4 cup total of equal parts maple syrup and honey)

1/2 cup raw cane sugar or natural cane sugar

2 large eggs, lightly beaten

Preheat the oven to 325°F with a rack in the top third of the oven.  Butter a standard 12-cup muffin pan.

Combine the oats, flour, baking powder, salt, flax meal, and walnuts in a large mixing bowl.

In a medium saucepan over low heat, combine the coconut oil, butter, honey, maple syrup, and sugar and slowly melt together.  Stir just until the butter melts and sugar has dissolved, but don’t let the mixture get too hot.  And if it does, let it cool a bit – you don’t want it to cook the eggs in the next step.

Pour the coconut oil mixture over the oat mixture.  Stir a bit with a fork, add the eggs, and stir again until everything comes together into a wet dough.  Spoon the dough into muffin cups, nearly filling them.

Bake for 25-30 minutes, until the edges of each oatcake are deeply golden.  Remove pan from oven and let cool for a couple of minutes.  Then run a knife around the edges of the cakes and tip them out onto a cooling rack.  Serve warm or at room temperature.  They are especially good with a smear of butter and a drizzle of honey.  Enjoy!

Source: Adapted from Super Natural Every Day Cookbook by Heidi Swanson

Thanks again for stopping by!

Laurie

Follow me on Twitter!

Read Full Post »

%d bloggers like this: