Feeds:
Posts
Comments

Posts Tagged ‘dessert’

Crispy and Chewy White Chocolate, Peppermint Candy, and Marshmallow Cookies | Relishing It

That’s a loooong title, I admit.  But it’s the only way to capture the glory that are these amazing holiday cookies.  I came up with this recipe last year around the holidays and have played around with the recipe since.  I think I’ve nailed it here, folks.  These cookies have everything– crispy, chewy, a holiday twist.  There’s a fair chance that when you make them, you’ll eat them all in a day.  They won’t make it to the holiday party.  They’re that good.

Crispy and Chewy White Chocolate, Peppermint Candy, and Marshmallow Cookies | Relishing It

Crispy and Chewy White Chocolate, Peppermint Candy, and Marshmallow Cookies | Relishing It

Crispy and Chewy White Chocolate, Peppermint Candy, and Marshmallow Cookies | Relishing ItThe flavors in this recipe remind me of one of my favorite holiday desserts that my mom would make.  The dessert was one of those refrigerator pan desserts that gets better the longer it sits.  She would buy that huge candy cane for this one and crush it up.  It was folded into a custard of some sort along with some marshmallows.  Then it was poured onto a graham cracker crust and put in the refrigerator.  As a kid, I thought this dessert was just about the best thing about the holidays, aside from the presents.  I haven’t had it in years, so I’m not so sure that my adult self would enjoy it quite so much.  Spoonfuls of marshmallows don’t really do it for me anymore.

Crispy and Chewy White Chocolate, Peppermint Candy, and Marshmallow Cookies | Relishing It

Crispy and Chewy White Chocolate, Peppermint Candy, and Marshmallow Cookies | Relishing It

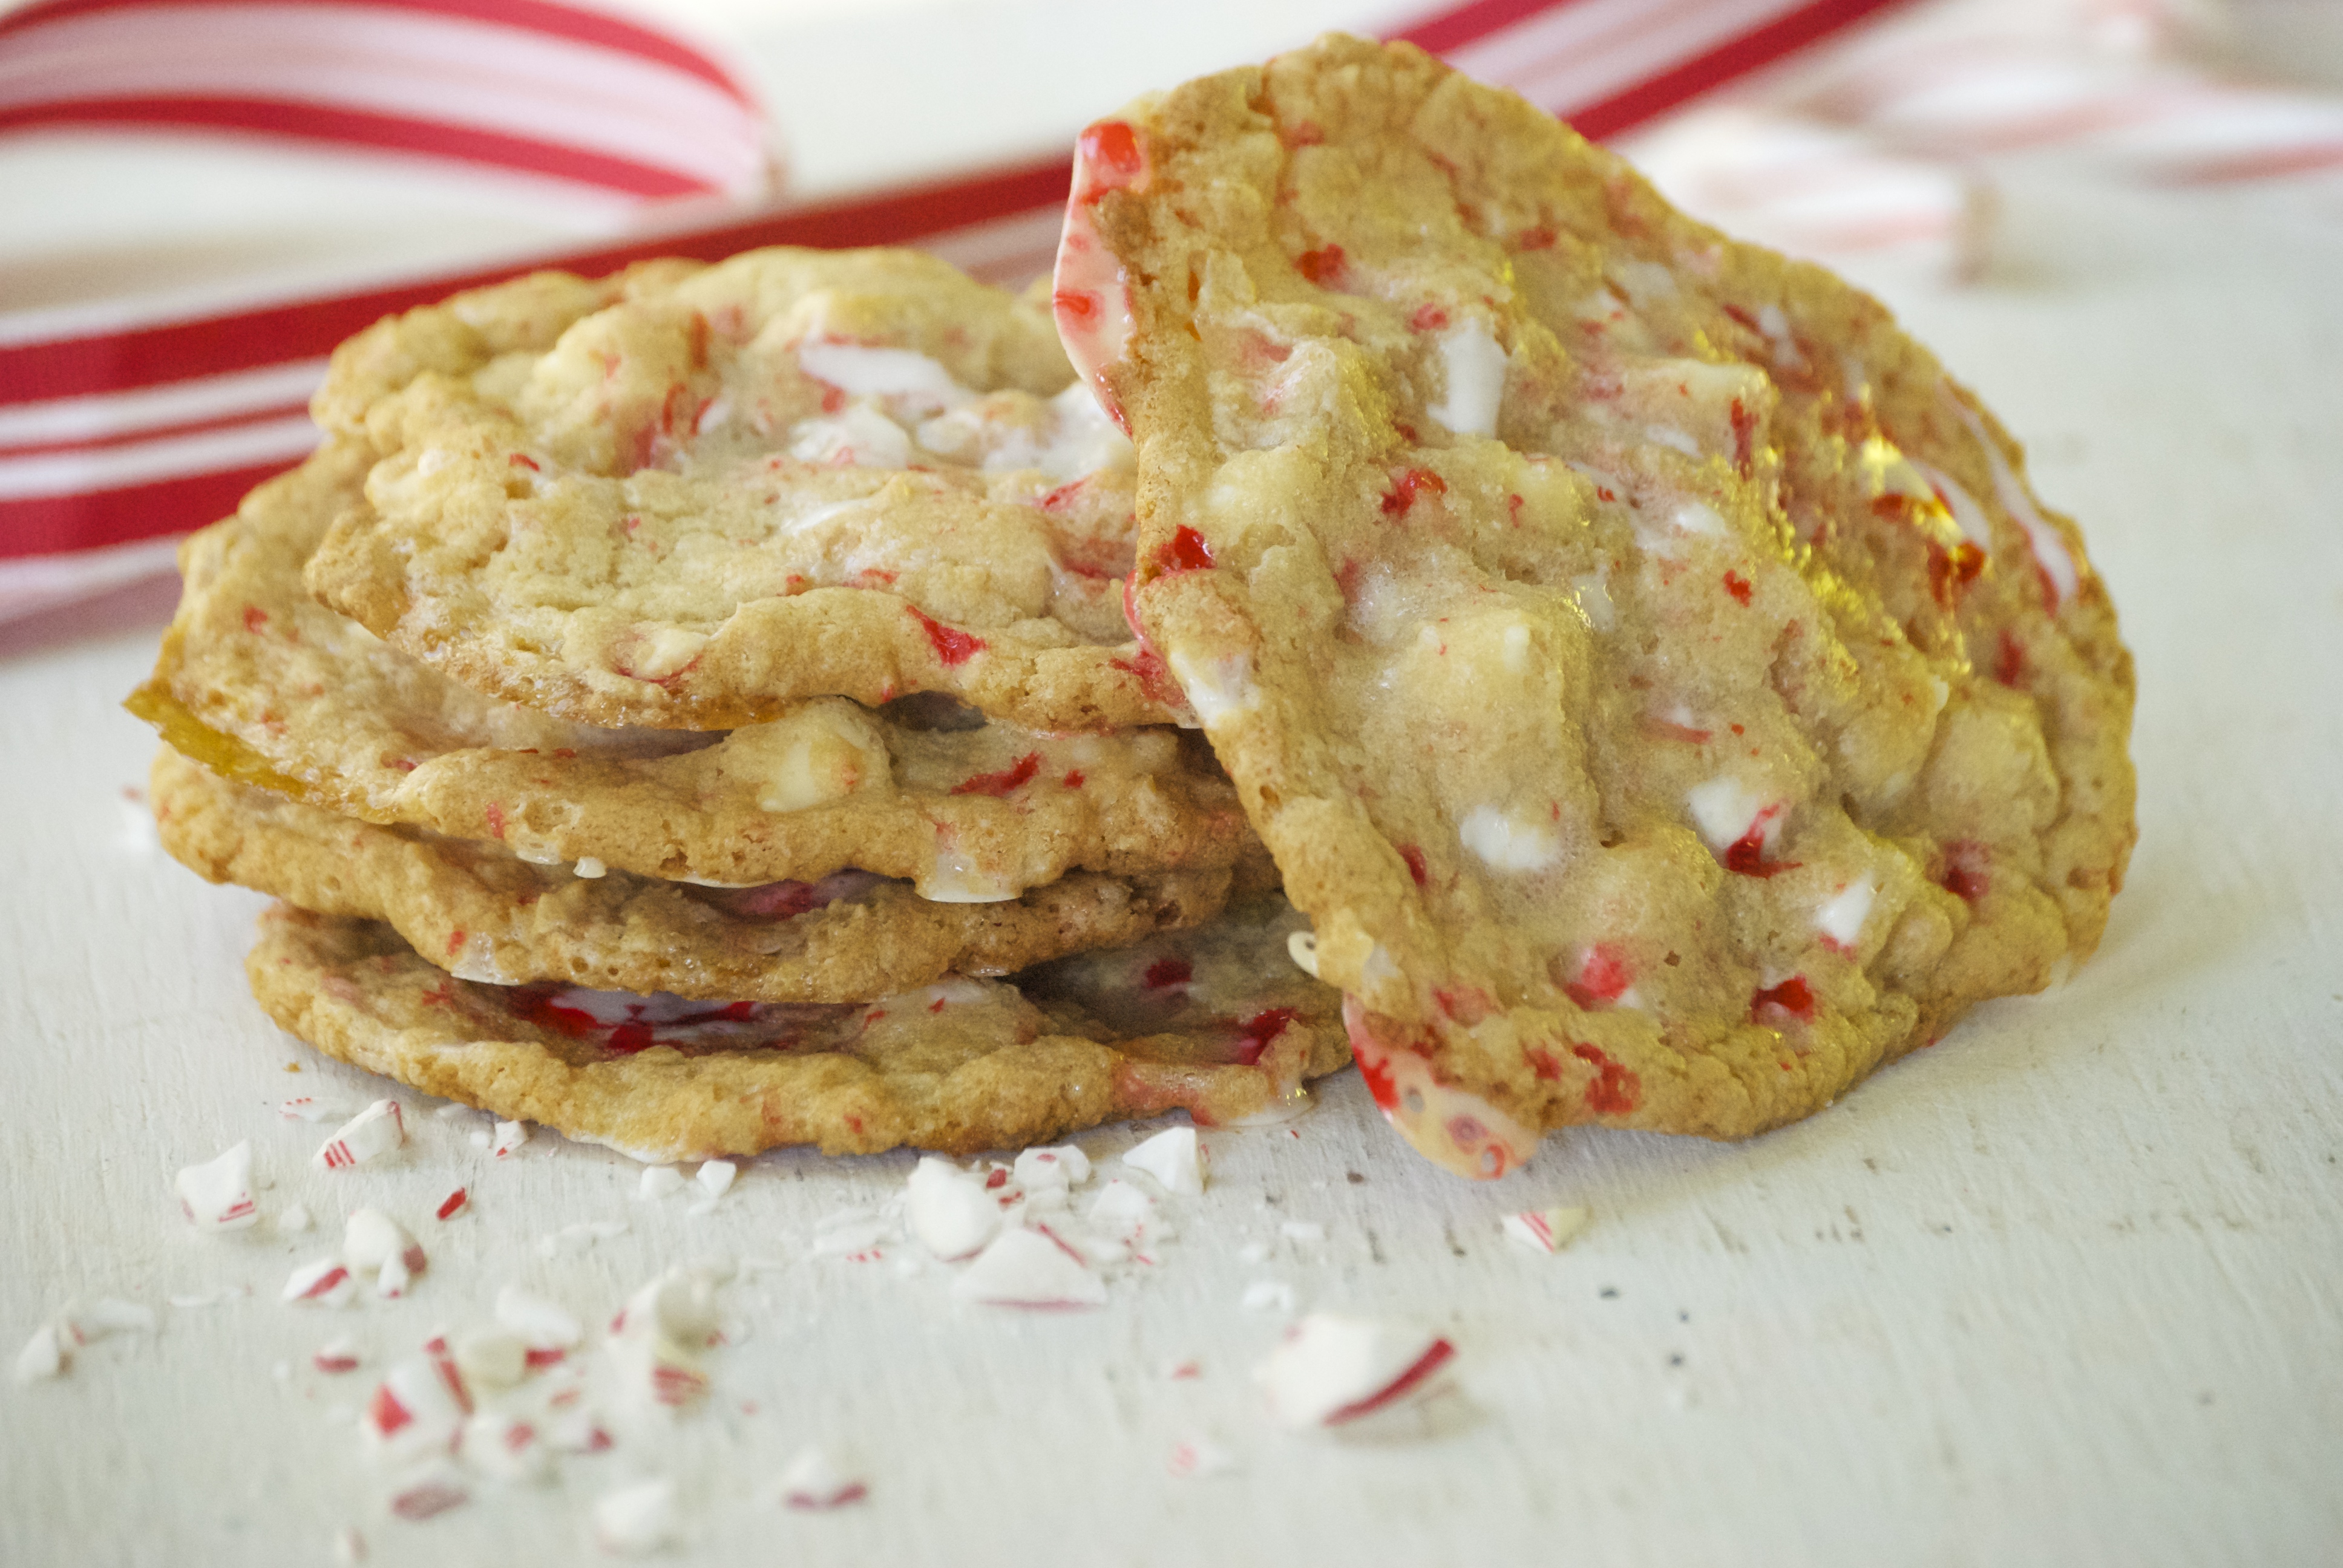
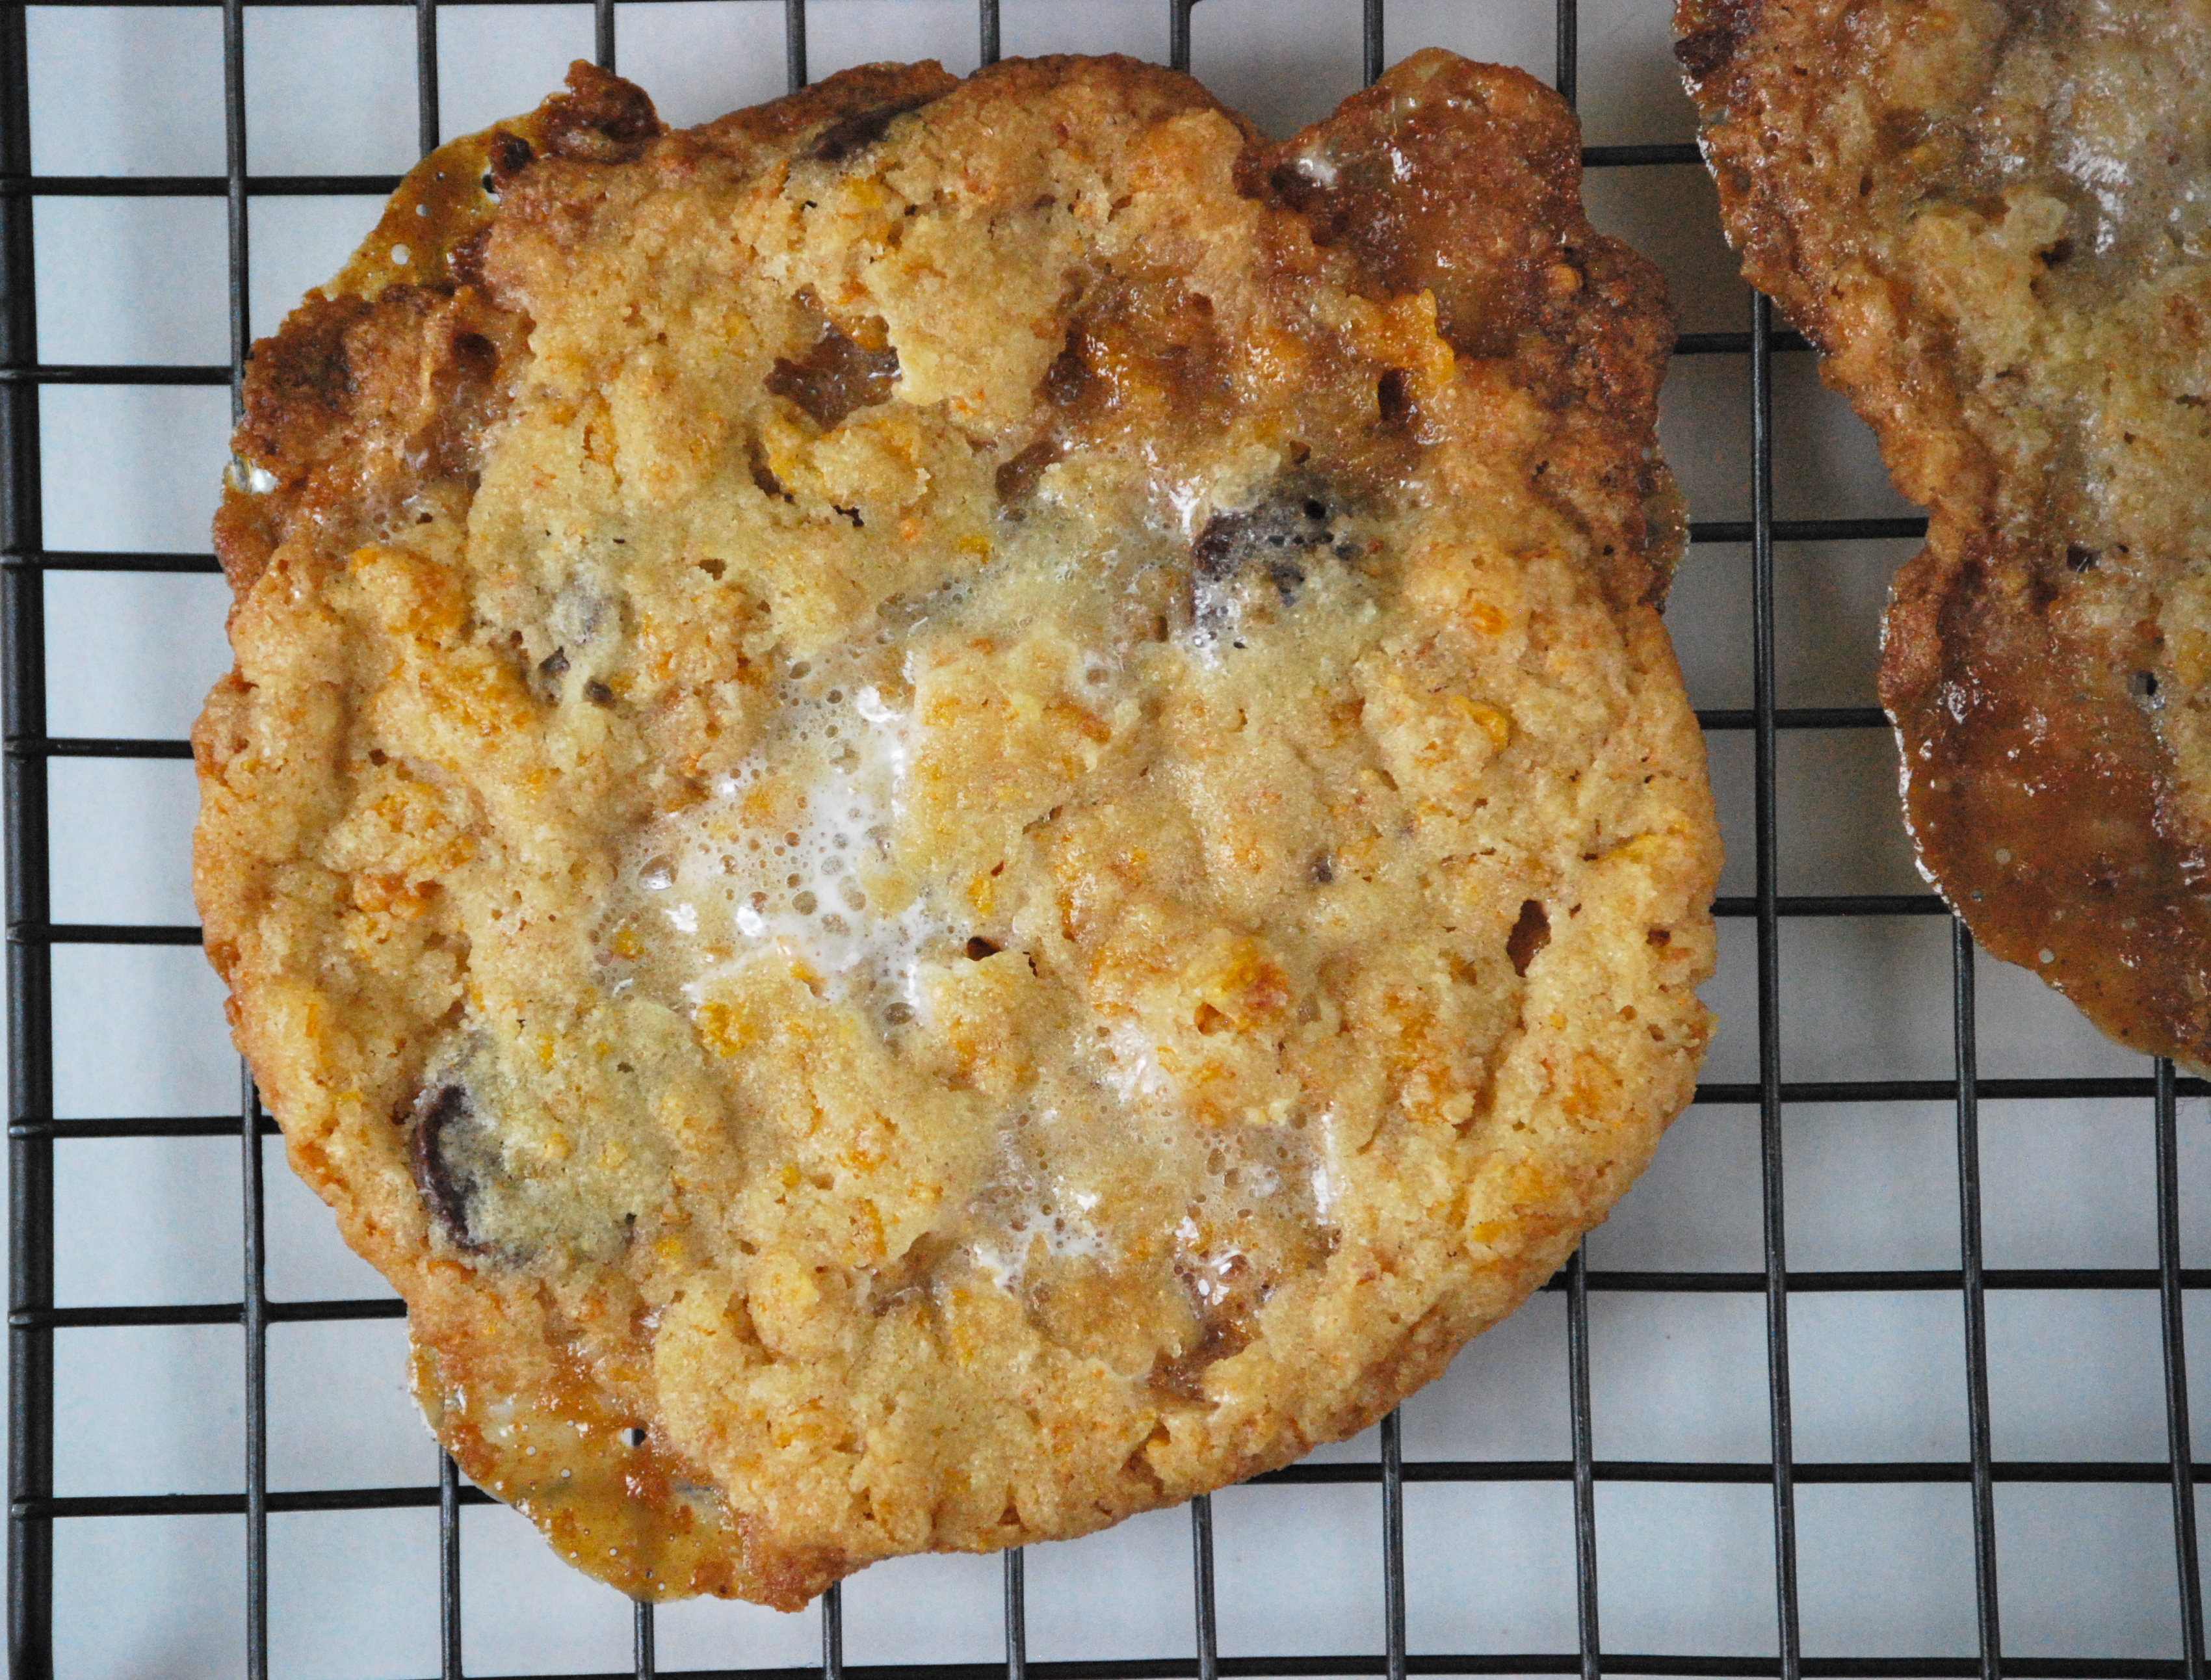
Even so, I decided to try my hand at a cookie version of that nostalgic dessert.  I love the flavors, but just wanted a better way to get them together.  And I love what happens to marshmallows when you bake them into a cookie.  They add a chewiness that is fantastic, but the ones on the outer-edges practically turn into a crisp toffee.  The peppermint candy makes the whole thing taste like the holidays.  And the white chocolate, well, that’s a no-brainer.  All good stuff.  I know you’re going to love these– enjoy!

Crispy and Chewy White Chocolate, Peppermint Candy, and Marshmallow Cookies | Relishing It

Crispy and Chewy White Chocolate, Peppermint Candy, and Marshmallow Cookies | Relishing It

The Recipe: Crispy and Chewy White Chocolate, Peppermint Candy, and Marshmallow Cookies

(makes 2 dozen)

1 stick (8 tablespoons) unsalted butter, at room temperature

1/2 cup granulated sugar

1/2 cup light brown sugar

1 egg, at room temperature, lightly beaten with a fork

1 teaspoon vanilla

1 1/2 cups (6 3/4 ounces) all-purpose flour

1 teaspoon baking soda

1 teaspoon baking powder

1 teaspoon kosher salt

1 cup miniature marshmallows

1 cup white chocolate chips

about 3/4 cup crushed peppermint candies, divided (from about 9-10 6-inch candy canes) *see note

coarse sea salt

Note:  Place the candy canes in a large resealable plastic bag and use a rolling pin to crush them.  It works best to gently pound rather than roll over them. 

Preheat oven to 350°F. Line a large rimmed baking sheet with parchment paper.

In a small bowl, whisk together the flour, salt, baking soda, and baking powder.  Set aside.

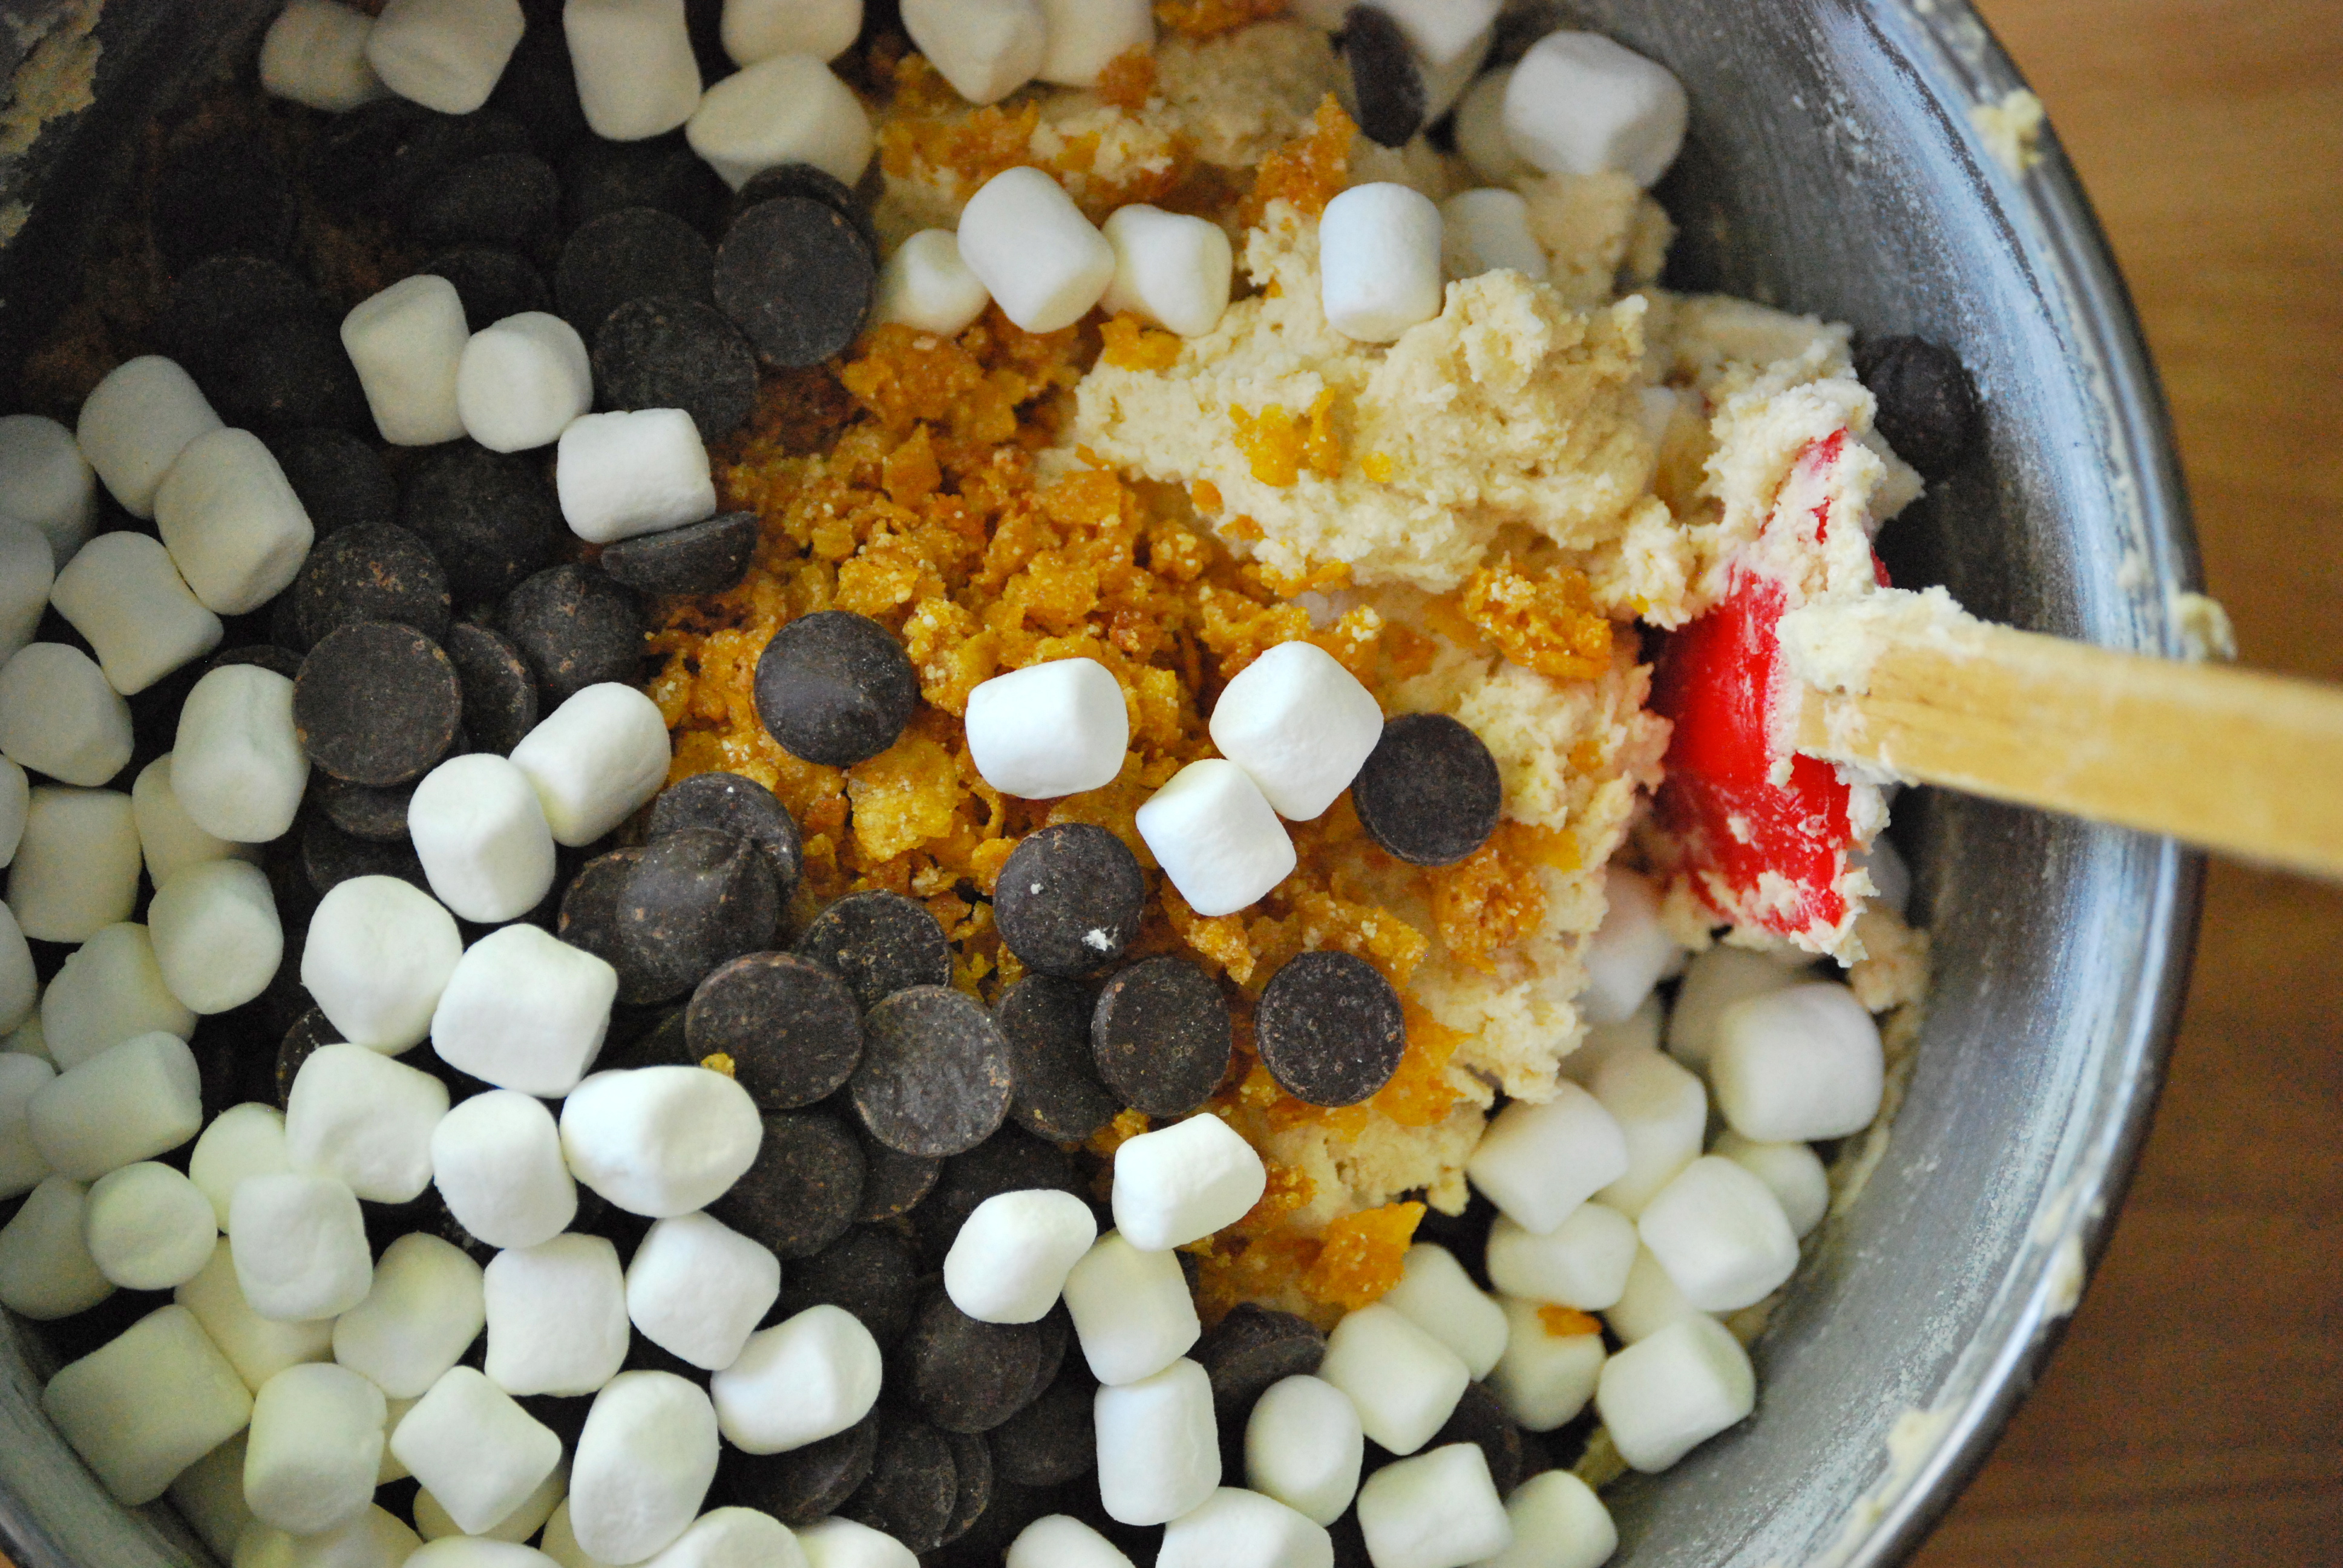
In a bowl of a stand mixer fitter with a paddle attachment (or use a regular bowl and wooden spoon), beat the butter and sugars together until nice and creamy, about 2 minutes.  Then add the egg and vanilla and beat on medium for about 3-4 minutes, or until the mixture is light and fluffy and has incorporated enough air into it.  Remember to scrape down the sides with a rubber spatula along the way.  Then add the flour mixture to the butter and mix just until everything is incorporated.  Do not over-mix.  Remove bowl from the stand mixer and using a rubber spatula, fold in the white chocolate chips, 1/2 cup crushed peppermint candy, and marshmallows until everything is evenly distributed.

Line a cutting board or another sheet pan with parchment paper.  Using a small scoop form the dough into balls.  You should end up with about 24 cookies.  Sprinkle them with the remaining crushed peppermint candy and a bit of sea salt. Place them in the freezer for about 15 minutes.  Then take six out (leave the rest remaining) and place on the lined cookie sheet.  This particular cookie spreads out a bit, so six on a cookie sheet works well.  Bake for about 11 minutes, or until the edges become golden-brown.  Remove from oven and let rest on the pan for about two minutes (a bit longer than the average cookie because the marshmallow needs to set).  Once the cookie feels sturdy enough to move, place it on a cooling rack and repeat with the rest of the cookies– taking them out of the freezer as you need them.  They are magnificent the first and second day if left out uncovered.  They tend to lose their crispiness in an airtight container, but are still quite delicious. Hope you enjoy them!

Thanks for stopping by Relishing It!

Laurie


Read Full Post »

Perfect Pumpkin Bars with Maple Cream Cheese Frosting | Relishing ItI’ll admit it, one of the main reasons I’m writing this post is so next year, when I’m craving a perfect pumpkin bar, I’ll know exactly where to look.  But that doesn’t mean they’re not for you, too.  They make an excellent dessert alternative for Thanksgiving.  I like pumpkin bars that are thick– I have no time for those weak, thin and flimsy ones. I suppose one could even say that this is more a pumpkin cake, but the fact that I swoop into the pan and eat this treat with my hands, makes me comfortable with the bar title.

Perfect Pumpkin Bars with Maple Cream Cheese Frosting | Relishing It

Perfect Pumpkin Bars with Maple Cream Cheese Frosting | Relishing ItOne of things that makes these bars stand out is the use of virgin coconut oil.  I try to swap out vegetable or canola oil whenever I can.  I find the smell and taste of those to be somewhat off-putting.  And aside from the better flavor, coconut oil is much healthier.  Both the coconut oil and the pumpkin make these bars stay moist for days and days.  The maple cream cheese frosting is the perfect way to top them.

Perfect Pumpkin Bars with Maple Cream Cheese Frosting | Relishing It

Perfect Pumpkin Bars with Maple Cream Cheese Frosting | Relishing It

These bars would be fantastic on your Thanksgiving table for those guests who aren’t into pie so much.  They can be left in a regular cake pan, or to fancy things up a bit, put them on a festive platter.  Using parchment paper in the pan makes them really easy to lift out.  However you decide to serve them, I know your friends and family are going to love them.  Enjoy!

Perfect Pumpkin Bars with Maple Cream Cheese Frosting | Relishing It

The Recipe: Perfect Pumpkin Bars with Maple Cream Cheese Frosting

(makes a 9 x 13 pan)

2 cups (9 ounces) all-purpose flour

2 teaspoons baking powder

1 teaspoon baking soda

1 teaspoon kosher salt

1 1/2 tablespoons ground cinnamon

1/2 teaspoon ground cloves

1/2 teaspoon freshly grated nutmeg

1/2 teaspoon ground ginger

1 cup granulated sugar

1/2 cup packed light brown sugar

1 cup coconut oil, melted, then cooled a bit

4 eggs, room temperature

1 15- ounce can plain pumpkin purée

1 teaspoon vanilla

For the Frosting:

3 cups confectioners sugar (about 12 ounces), sifted

8 ounce package of cream cheese (full fat)

1/2 stick unsalted butter, at room temperature

1 teaspoon salt

2 tablespoons real maple syrup

toasted walnuts, for garnish

Preheat oven to 350°F.  Line 9 x 13 cake pan with parchment paper (let enough hang over the edges to be able to grasp and lift the cake out with) and coat with non-stick cooking spray (if wanting to remove from pan in one large piece) or just grease pan with coconut oil, butter, or spray.

In a medium-sized bowl, whisk together the flour, baking powder, baking soda, salt, cinnamon, cloves, nutmeg, and ginger.  Set aside.

In a bowl of a stand mixer (or using a regular bowl and wooden spoon) fitted with the paddle attachment, mix the coconut oil and sugars together until blended well.  Add the eggs and vanilla and mix until somewhat creamy, 3 minutes or so.  Then add the pumpkin puree and blend until uniform.

Sprinkle the dry ingredients on top of the wet and use a spatula to fold everything until moistened, (this will prevent a big cloud of flour from landing on your countertop), then using the paddle attachment again mix until just combined.  Do not over mix.  Bake for 35 minutes or until a cake tester comes out clean.

While the cake is cooling, make the frosting.  Using the paddle attachment of a stand mixer (or a hand mixer, or wooden spoon) mix all of the ingredients together, except the confectioners sugar, until smooth and creamy. Then add the sifted confectioners sugar and mix until smooth.

Remove cake from pan once it has cooled, if desired.  Or frost it in the pan. Sprinkle with toasted walnuts, if you like.  Keeps well for days covered at room temperature.  Enjoy!

Thanks for stopping by Relishing It!

Laurie


Read Full Post »

Healthy Chocolate Zucchini Muffins | Relishing It

As you know I sent my little girl off to Pre-Kindergarten on Monday– and she is absolutely loving it.  I sometimes like to bake treats for their lunch boxes, or for an after-school sweet when they get home.  I distinctly recall getting off the school bus as a kid and walking into the house to the smell of something wonderful that my mom had made during the day.  She’d have batches of cookies ready, or even racks (yes, racks) of pies on the counter.  And she always timed it out so they were ready when my brother and I walked through the door.  However… I’m a little hesitant to bake such delights using all of that sugar on a daily– or even weekly– basis.  Don’t get me wrong, my kids get their share of sugar, but it’s nice to be able to put something a little healthier, something more substantial, into their little growing bodies.

Healthy Chocolate Zucchini Muffins | Relishing It

Healthy Chocolate Zucchini Muffins | Relishing It

Healthy Chocolate Zucchini Muffins | Relishing It

I was able to create a healthy muffin recipe that was made with whole grains, healthy coconut oil, and no processed sugar (alright, there are chocolate chips, but they’re optional…kind of.  You’ll want them in there).  These muffins are also loaded with vegetables, and your kids will be none the wiser!  What more could one want?  They are perfectly chocolate-y, but not overly sweet.  They stay very moist– quite like a small cake.  I really have no guilt about giving this treat to my kids, or eating it myself for that matter.  I hope you like them as much as we do!

Healthy Chocolate Zucchini Muffins | Relishing It

Healthy Chocolate Zucchini Muffins | Relishing It

The Recipe:  Healthy Chocolate Zucchini Muffins

(makes 12)

1 cup white whole wheat flour (whole wheat pastry flour works, too)

1/2 cup unsweetened cocoa powder

1/2 teaspoon kosher salt

1 teaspoon baking soda

1 teaspoon baking powder

1/2 cup virgin coconut oil (warmed to the liquid state, but not hot)

1/2 cup honey

2 eggs, at room temperature

1 teaspoon vanilla

1 1/2 cups coarsely grated zucchini (about 1 medium)

3/4 cup chocolate chips (Ghirardelli 60 % Cacao Bittersweet are the best, in my opinion)

Note:  The coarsely grated zucchini is definitely visible in these muffins, which is how I prefer them.  If you don’t fancy that, simply grate the zucchini finer.

Preheat the oven to 350°F.  Spray or butter a 12-cup muffin tin.  Set aside.

In a large bowl, sift, then whisk together the flour, salt, baking powder, baking soda, and cocoa.   Toss the chocolate chips into the mixture. Set aside.

In another large bowl, thoroughly mix the honey, coconut oil, vanilla, and eggs together until uniform.  Add the zucchini and mix until evenly coated.

Combine the two bowls together, mix until everything is wet.  Do not over mix. Evenly distribute the batter–1/4 cup per muffin is about right.  Bake for about 18 minutes, or until a tester inserted into a muffin comes out clean.  Remove from oven and let cool for about 3 – 5 minutes before removing from the pan.  Keeps well for days in an airtight container.  Enjoy!

Thanks for stopping by Relishing It!

Laurie

Read Full Post »

Rustic Apple Galette | Relishing It

The end of our summer.  I honestly don’t know whether to jump for joy or curl up into a ball and sulk.   My boy starts school next week– first grade.  He isn’t dreading school this year– unlike the last two– when he saw it only as a limitation on ‘play time’.  That’s not to say that he didn’t love school.  He did, once he got there.  But he has serious home-body tendencies that can be a bit…difficult to overcome sometimes.  Now the prospect of making new friends has him excited.   And my baby, Aria, starts the following week in pre-kindergarten.  She is so excited.  She has Aanen’s previous teacher, whom we all adore.  Aria starting school really brings out mixed emotions in me.  Joy because I’ll finally get to enjoy an hour or two of quiet each day.  Aria is a talker.  Nonstop.  Really.  She’s a relentless, wonderful hurricane.  A true sensing extrovert on the Meyers-Briggs scale.  The other three of us are the opposite.  But even though I’ll get to enjoy some quiet, I’m also a bit panicked.  Not having my baby at home reminds me just how fast time is passing.  And to add to my melancholy of another season ending, and my kids off to school, I turned 39 on Monday.  Time.  It just rolls on.

Rustic Apple Galette | Relishing It

It’s very strange, because it’s not just the days, or even years that are flying past.  It’s the decades!  I don’t feel 39 years old, but somehow it just happened.  I’ll turn around tomorrow and my kids will be off to college.  But to be brutally honest, my kids growing up, and me aging isn’t what really hurts.  No, the most painful realization is that my parents are aging right along with us.  It seems like just yesterday that I’d watch my dad play softball, goofing off on the pitcher’s mound or galloping around the bases like a kid.  Strange to think that that was 20 years ago.  The fact is, they’re getting older.  And while they’re both still doing great and keeping busy, they’re slowing down.  Through a daughter’s eyes…I can tell.  I know I can’t do anything about it, but I really don’t want the next 20 years to pass as quickly as the last have.  I need time to slow a bit, so I can savor every moment with my loved ones.

Rustic Apple Galette | Relishing It

Rustic Apple Galette | Relishing It

Rustic Apple Galette | Relishing It

It feels a bit strange to delve into such deep issues here on a food blog, but there it is.  I guess if there’s a tie-in to Relishing It, it’s that working in the kitchen soothes me.  It’s my balm, so to speak.  This week a kind neighbor offered up her gorgeous apple tree– free for the picking.  Aria and I gathered a huge box-ful, which I’ve turned into several apple galettes.  I’ve written before here about my love for galettes.  They’re perfect in that un-perfect, rustic way.  I like my apple desserts with just a hint of cinnamon and not much else.  I want to taste the apples.  I also like to add a drizzle of icing to apple galettes that I normally don’t with other fruits, since the apples don’t have that beautiful sheen that you get with a berry or peach galette.  The icing makes it look so much more appealing, and adds a subtle sweetness.  Enjoy!

Rustic Apple Galette | Relishing it

The Recipe:  Rustic Apple Galette

3 cups / 400 grams sliced firm tart apples (from 6 small apples)

3 teaspoons fresh lemon juice (from 1 small lemon)

1/3 cup granulated sugar

1 teaspoon ground cinnamon

1/2 teaspoon kosher salt

2 tablespoons cold butter, diced

1 egg mixed with 1 teaspoon water, for egg wash

1 tablespoon turbinado sugar, for sprinkling

1 cup powdered sugar with a splash of milk, for the glaze

1 single All-Butter Pie Crust

Preheat oven to 375°F.

Follow the instructions for making the All-Butter Pie Crust. After it has chilled for at least 2 hours, it will be ready for use.

Peel and slice, not too thick (so they bake properly) and not too thin (so they don’t turn to mush) the apples.  Place into a large bowl and toss with the lemon juice.  Then add the sugar, cinnamon, and salt.  Toss again.  Set aside.

Roll the pie dough out onto a piece of parchment paper.  Lightly dust parchment and rolling pin with flour.  Roll the pie dough into a 12-inch circle.  Place the apples and juices into the center.  Place the butter pieces on top of the apples.   Gently flip the edges over the apples.  Pinch the seams together as much as possible, to prevent leaking while baking.  Using a pastry brush, apply the egg wash to the dough.  Then sprinkle with turbinado sugar.  Gently pat down the apples so they are somewhat level– this will prevent the peaks from burning.

Bake for about 40 minutes, or until the crust is a beautiful golden brown and the apples are tender.  Keep an eye on the apples in the final minutes, so they don’t get too dark.  Remove from oven and let cool.  Mix the glaze to your desired consistency and drizzle over the galette when cool.  Enjoy!

Thanks for stopping by today!

Laurie

Read Full Post »

Sour Cherry Galette with an All Butter Pie Crust via Relishing It

I wait all year long for sour cherries to come into season.  They are my absolute favorite fruit to bake with, just nudging out blueberries.  Sour cherries have such a unique flavor– that brilliant tartness which I soften with a bit of sugar.  Today’s recipe is a wonderful sour cherry galette that is perfect for capping a summer dinner on the patio.  If you can get your hands on a few baskets of sour cherries,  I can’t think of a better way to showcase them than in this dessert (or breakfast– no judging).

Sour Cherry Galette with an All Butter Pie Crust via Relishing It

I love the simplicity of the galette–there’s just something genuine about it’s rustic look.  And the fruit-to-crust ratio is perfect.  Galettes have another advantage– they’re virtually foolproof.  The crust is my go-to all purpose pie crust.  It’s an all butter crust, so there’s no shortening or lard.  I know that some folks incorporate other fats into their crust because they say it makes it a bit crispier.   However, this one is perfectly crisp,  and I try to avoid cooking with those sorts of fats.

All Butter Pie Crust via Relishing It

All Butter Pie Crust via Relishing It

All Butter Pie Crust via Relishing It

All Butter Pie Crust via Relishing It

All Butter Pie Crust via Relishing It

The trick here is to use very, very cold butter.  So cold, in fact, that most times I use frozen butter that has been run through a large box grater.  The other key here– whether it’s in a galette, pie, scones, or biscuits– is to not overwork the dough.  Yes, you still have to use your muscles a bit, but the less you work it, the better it tends to be.  My food processor gets a break when I make pie crust.  I feel more in control if I do it by hand using my pastry blender.  If the butter becomes too soft, just pop it in the freezer for a few minutes.  You get the idea.  If you haven’t made a galette before, this is a great place to start.  It’s also easy to make with fresh blueberries– just dial back the sugar to 1/4 cup.  Enjoy!

Sour Cherry Galette with an All Butter Pie Crust via Relishing It

Sour Cherry Galette with an All Butter Pie Crust via Relishing It

Sour Cherry Galette with an All Butter Pie Crust via Relishing It

Sour Cherry Galette with an All Butter Pie Crust via Relishing It

A couple of other fruit desserts you may enjoy: Blueberry Galette and Sour Cherry Hand Pies

The Recipe:  Sour Cherry Galette with an All Butter Pie Crust

(serves 4-6)

For the All Butter Pie Crust

(Makes enough for 2 galettes,  one double-crusted pie, or two single-crusted pies)

315 grams of all-purpose flour (2 1/2 cups)

2 sticks of frozen, unsalted butter (1 cup)

1 tablespoon granulated sugar

1 teaspoon kosher salt

1/2 cup, plus about 3 tablespoons ice cold water

For the Sour Cherry Pie Filling

2 cups sour cherries, pitted

1 tablespoon cornstarch

1/3 cup granulated sugar

pinch of salt

1 egg mixed with 1 teaspoon water (for egg wash)

about 1 tablespoon turbinado sugar, for sprinkling

To make the pie dough:  Pour the water into a large measuring cup.  Add a couple of ice cubes.  Set aside.  In a large bowl, whisk together the flour, salt, and sugar.  Set aside.  Using the large holes of a box grater, quickly grate the frozen butter.  Place the butter into the bowl with the flour mixture.  Using a pastry blender, quickly work the butter into the flour until the mixture resembles small peas.  Feel the butter, if it doesn’t feel very cold, you can place it into the freezer for a few minutes.  Continuing, measure out 1/2 cup of ice water (careful not to add the ice cubes) and using a rubber spatula incorporate the water into the butter/flour mixture by folding it in.  Add more water, if necessary, a tablespoon at a time.  Three tablespoons does the trick for me.  The mixture will look like a shaggy mess.  Press it together and if it sticks, but isn’t sticky– it is ready.  You don’t want it wet, but you don’t want it dry either.  Knead it together with your hands a couple of times to form a ball shape.  Divide the dough into half and wrap each half into plastic wrap.  Refrigerate for at least 1-2 hours before using.  Or freeze for months and thaw in the refrigerator.  For this recipe, you will use only 1 of the balls of dough.  Save the other one for another time.

Preheat the oven to 375°F.  In a medium-sized bowl, stir the cherries, sugar, cornstarch, and salt together.  On a large piece of parchment paper that will fit onto a large baking sheet, sprinkle a tiny amount of flour onto the paper and onto your rolling pin to help it roll out more easily.  Roll out 1 ball of pie dough into a 12-inch circle on the parchment paper.   Place the cherry mixture into the center, and carefully fold the sides over each other.  Press them together so they adhere– this will help prevent too much cherry juice from leaking when it bakes.  Gently slide the galette and the parchment paper onto a large baking sheet. Using a pastry brush, lightly paint the egg wash onto the dough.  Then sprinkle with the turbinado sugar.  Place the baking sheet into the oven and bake for about 45 minutes, or until the crust is a deep golden brown and the cherry juices are bubbling a bit and possibly oozing out.  Let cool before eating.  Keeps well in an airtight container.  Enjoy!

Thanks so much for stopping by today!

xo

Laurie

Read Full Post »

Lemon Curd Ice Cream via Relishing It

My kids wait for ice cream season all winter long.  During those cold months here in Minnesota hot cocoa tides them over, but once the weather warms up, they clamor for ice cream nearly every day.  It’s fun to go out and about when the weather is warm.  And a nice little jaunt to some of our favorite ice cream shops always seems like a perfect ending to a day.

Lemon Curd Ice Cream via Relishing It

At home, I’ve been experimenting a lot with my ice cream machine lately.   And I’ve come up with some pretty amazing batches– roasted balsamic strawberry was a favorite of mine.  The kids loved the malted chocolate with chunks of malted milk balls.  I’m sure I’ll get to sharing those recipes at some point.  But for now, all four of us agree that this lemon curd ice cream is one of the best ice creams we’ve ever eaten.  Full stop.  And honestly, if you knew my family, you would know that that really means something.

Lemon Curd Ice Cream via Relishing It

Lemon Curd Ice Cream via Relishing It

Making the lemon curd requires an extra step, but it really doesn’t take that long.  Just make sure to allow enough time for the curd to cool completely in the refrigerator.  You will have a bit of curd leftover, which is a bonus.  Freeze it, if you like, or spread it on good bread, pound cake, or pile it on meringues (speaking of which– I have a recipe I’ll share soon for these.  Freeze your egg whites from making the ice cream).

Lemon Curd ice Cream via Relishing It

My favorite way to serve the ice cream is with a drizzle of good olive oil, a sprinkle of fresh herbs, and a touch of fleur de sel (or any good sea salt).  The olive oil goes brilliantly with the lemon.  Rosemary, lavender, or thyme are all wonderful on top — just a bit, not too much.  And the fleur de sel brings all of the flavors together.  Together, you get a perfect balance between the sweet and tart flavors.  Trust me, you will enjoy this combination.  It would also be fabulous made into a cocktail and topped with champagne.  Or stick it on a cone.  Anyway you serve it will be amazing.  Enjoy!

Lemon Curd Ice Cream via Relishing It

The Recipe: Lemon Curd Ice Cream

2 cups heavy cream, divided

1 cup milk

2/3 cup granulated sugar

1 teaspoon vanilla

dash of kosher salt

1 tablespoon (packed) lemon zest

5 egg yolks

1 cup lemon curd (see note)

Note:  Substitute lemon for the orange in this recipe.  Make sure to allow enough time for the curd to cool completely in the refrigerator.  I recommend making it a day ahead of time.

In a large sauce pan, heat 1 cup of cream, milk, sugar, vanilla, salt, and lemon zest together.  Bring to a simmer just until tiny bubbles appear.  Remove from heat and let infuse for 1 hour.  After the hour bring mixture back to a small simmer.  Have the egg yolks in a large bowl and slowly ladle half of the milk/cream mixture into the eggs, whisking the entire time.  Pour the egg mixture into the the remaining milk/cream mixture in the sauce pan.  Cook until the temperature reaches 175°F.  Do not let it boil.  Remove from heat.  Meanwhile, have a large bowl filled with ice/water and a smaller bowl that will hold all of the ice cream mixture in it.  Have the remaining cup of cream in the bowl so it is very chilled (this will help the warm milk/cream mixture cool faster).  Place a strainer over the bowl, and pour the milk/cream mixture into the strainer so that it will combine with the remaining cup of cream.  Stir the mixture until the temperature reduces to 70°F.  Whisk in the lemon curd at this point.  Chill for at least 4 hours in the refrigerator or overnight.  Place into an ice cream maker at this point and follow instructions.

Source:  Adapted from this recipe.

Thanks for stopping by Relishing It today!
xo

Laurie

Read Full Post »

Momofuku's Cornflake Chocolate Chip Marshmallow Cookies via Relishing It

I’m sitting at my desk drinking this super-healthy green smoothie while staring at photos of cookies stuffed with marshmallows.  True story.  Seems a bit ridiculous, doesn’t it?  To be honest, I’ve been a little hesitant to post this recipe because I like to think that you stop by Relishing It for a little delicious, healthy food inspiration.  And here I am sharing a full-sugar, zero-whole grains cookie recipe with marshmallows.  Now I usually try to limit those bad-for-you ingredients in my sweet treats– like in this favorite.  But for today’s recipe I couldn’t bring myself to change a thing.  Behold these little masterpieces, in all their unhealthy glory!

Cornflake Crunch via Relishing It

Momofuku's Cornflake Chocolate Chips Marshmallow Cookies via Relishing It

Why try to make something more healthy when it contains marshmallows?  There really wasn’t much of a point.  And for these cookies, the marshmallows are the star.  They melt into a wonderful caramel-like puddle within the cookie.  The cornflake mixture is also important here.  It adds a noticeable crunch.  So how good are they?  They’re freaking amazing.  I’m serious.  Just really, unbelievably good.  Make sure you don’t eat them all in one sitting.   They are an indulgence, after all.

Momofuku's Cornflake Chocolate Chip Marshmallow Cookies via Relishing It

Momofuku's Cornflake Chocolate Chip Marshmallow Cookies via Relishing It

So, there you have it– an amazing cookie recipe that you can wow your friends and children with.  On a side note, they are perfect to freeze and pop into the oven whenever you want to bake up a couple.   The cookies spread quite a lot, so be sure to not overcrowd your pan.   The photo I have above shows them on the pan heading into the freezer.  I did not bake them that way– it would have been disastrous!  I’m not sure when I’ll get to New York so I can visit the real Momofuku Milk Bar, but until then, I’m glad I can enjoy– in moderation– these beauties at home.

Momofuku's Cornflake Chocolate Chip Marshmallow Cookies via Relishing It

The Recipe:  Momofuku’s Cornflake Chocolate Chip Marshmallow Cookies

For the Cornflake Crunch:

5 cups cornflakes

1/2 cup milk powder

3 tablespoons granulated sugar

1 teaspoon kosher salt

9 tablespoons unsalted butter, melted

For the Cookies:

2 sticks unsalted butter

1 1/4 cup granulated sugar

2/3 cup light brown sugar, packed

1 egg, at room temperature

1 teaspoon vanilla

1 1/2 cups unbleached all-purpose flour (7 1/2 ounces)

1/2 teaspoon baking powder

1/2 teaspoon baking soda

1 1/2 teaspoon kosher salt

3 cups Cornflake Crunch

2/3 cup chocolate chips

1 1/4 cup mini marshmallows

To make the Cornflake Crunch:  Preheat oven to 275°F.  In a medium bowl, add the cornflakes (use your hands to crush them to about a quarter of their size), milk powder, sugar, and salt.  Toss together.  Pour the butter over the mixture and gently mix it together.  Spread the mixture onto a parchment lined cookie sheet.  Bake for about 20 minutes.  They will be toasted and smell wonderful when done.  Remove from oven and let cool.  Store extras in an airtight container.

In a medium-sized bowl, whisk the flour, baking powder, baking soda, and salt together.  Set aside.  In a small bowl, gently mix the egg and vanilla together.  Set aside.

In a bowl of a stand mixer (or use a hand mixer) fitted with the paddle attachment, cream the butter, brown sugar, and granulated sugar on medium-high speed for about 3 minutes.  Add the egg mixture, and continue to beat for about 6-7 minutes.  Scraping down the bowl, as necessary.

Add the flour mixture and mix until just combined, being careful not to over-mix. Fold in the marshmallows, chocolate chips, and cornflake crunch using a rubber spatula.

Form into cookies using a 1/3 measuring cup.  Flatten the tops a bit, with your fingers.  Place on a large parchment lined cookie sheet and refrigerate or freeze  for at least one hour before baking.  Place extras in a large plastic bag and leave in the freezer until ready to use.  Do not thaw before baking.

When ready to bake the cookies, preheat oven to 375°F.  Line a large cookie sheet with parchment paper. Place the chilled or frozen cookies at least 4 inches apart from each other (they spread quite a bit).  Bake for about 18 minutes or until they are puffed and the edges are a deep golden brown.  More or less time depending upon if using chilled or frozen dough.  Be attentive!  Remove from oven and let cool for a couple of minutes on the cookie sheet before placing on a cooling rack.  Store in an airtight container for a few days.  Enjoy!

Source:  Adapted from Christina Tosi’s Momofuku’s Milk Bar

Thanks for stopping by Relishing It!

Laurie

Read Full Post »

Blueberry Coffe Cake via Relishing It

Hello, friends!  I hope you all had a wonderful weekend.  Since we had no prior obligations, we were able do whatever we wanted on Saturday and Sunday.  First up was a visit to one of our favorite summer spots,  Minnehaha Falls.  This beautiful little park in Minneapolis is full of trails, waterfalls, bike paths, and best of all, Sea Salt Eatery.  I really don’t complain much about living in Minnesota, but if I have one gripe (no, not the weather), it’s that we’re so far from the ocean and all of that amazing seafood.  Sea Salt eases the pain a bit.  They offer amazing, fresh seafood.  Stopping in for the ridiculously tasty fish tacos and a catfish po’boy was a great start to the weekend.  It’s the little things like this that make me happy.

Blueberries

Aside from fish tacos, we also ate plenty of this amazing blueberry coffee cake.  I baked this up the night before so we could enjoy the relaxing morning at home while the kids played in the living room.  Coffee cake is one of my favorite things– this one is gorgeous, and so is this one.  Today’s blueberry version is one of my son’s very favorite things that I bake.  He loves it.  The beautiful thing about this cake is that it is just as brilliant with fresh blueberries as it is with frozen.  Which makes it perfect to eat throughout the winter.  When organic frozen blueberries are on sale, I generally stock up for smoothies and this cake.  And blueberry season is just around the corner (thankfully) so, fresh ones aren’t far off!

Blueberry Coffee Cake via Relishing It

As usual, I’ve swapped out the all-purpose flour in this recipe for a whole grain version.  It works well here.  It gives the cake a bit more substance. The lemon zest brings a bit more life to the blueberries and the addition of walnuts to the crumb topping supplies a nice bit of texture to each bite.  I will warn you to keep a close eye on this cake near the end of the baking time.  Be careful not to over-bake it, as it will be a bit more dry than it should be.  When a toothpick inserted into the center comes out crumb-free– it’s done.  It keeps well for days covered with aluminum foil and sitting at room temperature.  Hope this coffee cake becomes a family favorite in your house, too!

Blueberry Coffee Cake via Relishing It

The Recipe:  Blueberry Coffee Cake

(Makes an 8×8 cake)

For the Crumbs:

1/3 cup (1 1/2 ounces) white whole wheat flour

1/4 cup sugar

1/3 cup packed brown sugar

pinch of kosher salt

1/2 cup toasted walnut halves, chopped

5 tablespoons room temperature butter

For the Cake:

2 cups and 2 teaspoons white whole wheat flour (10 ounces)

2 teaspoons baking powder

1/2 teaspoon baking soda

1/2 teaspoon kosher salt

1/4 teaspoon ground cinnamon

pinch of freshly grated nutmeg

2/3 cup sugar

zest of 2 small organic lemons, or 1 large

6 tablespoons room temperature butter

2 large eggs, at room temperature  (*see note)

1 teaspoon vanilla

1/2 cup buttermilk  (*see note)

2 cups fresh or frozen organic blueberries (do not thaw)

Note:  It’s important to use room temperature eggs in baked goods.  Eggs at room temperature add more volume to your finished product.  Place your eggs in a bowl of warm water for about 10-15 minutes, they will then be room temperature and ready to use.  Don’t have any buttermilk?  No worries.  Don’t just add regular milk as a substitute, as the baking soda in the cake will only be activated with an acid, therefore leaving you with a flat cake.  To make a 1/2 cup of buttermilk add 1 1/2 teaspoons white vinegar to 1/2 cup of milk.  Stir and let it sit for about 10 minutes.  

Preheat the oven to 350°F.  Prepare a square 8×8 pan with butter.

To make the crumbs:  In a small bowl, combine the flour, sugar, brown sugar, and salt with a whisk.  Using a fork, mash in the butter.  When it is mostly uniform, gently mix in the walnuts.  Put into the refrigerator until ready to use.

Prepare the blueberries by putting them into a medium bowl and gently tossing them with 2 teaspoons of the flour.  Set aside.

To make the cake: In a medium bowl, whisk together the remaining 2 cups of flour, baking powder, baking soda, kosher salt, cinnamon, and nutmeg.  Set aside.  In a bowl of a stand mixer, combine the sugar and lemon zest by rubbing it together with your fingers.  When it is fragrant and combined, add the butter and beat together with the sugar using the paddle attachment for about 3 minutes on medium speed,  or until it is light and pale in color.  Add the eggs one at a time, beating for about 1 minutes after each one.  Then add the vanilla extract.  The batter may look curdled at this point and that’s ok — it will smooth out.  Reduce the mixer speed to low and add the flour mixture and buttermilk alternately in two additions.  Starting and ending with the flour.  Be careful not to over mix.  Gently fold in the blueberries using a rubber spatula.

Pour the batter into the prepared pan and smooth out with a rubber spatula.  Add the crumb mixture to the top.  Gently pat the mixture into the batter.  Bake for 55-65 minutes, or until a toothpick inserted into the center comes out clean.  Let cool.  Keeps well for days at room temperature covered with aluminum foil.  Enjoy!

Source:  Adapted from Dorie Greenspan’s Baking: From My Home To Yours

Thanks for stopping by Relishing It!

Laurie

Read Full Post »

Fudge Brownies with Chocolate Malted Buttercream via Relishing It

What should you make for the special people in your life for Valentine’s Day?  I’ve been waiting to answer that question for awhile now.  These cute little brownies are the perfect sweet treats for your loved ones.  I love brownies when I need a chocolate fix.   These, from an earlier post, are always a hit.  They have a perfect balance of chocolate-y chewiness.  And these are fabulous when I’m in the mood for something a little out of the ordinary. But the fudge brownie bites with chocolate malted buttercream that you see here are perfect for turning brownies into an indulgent dessert for Valentine’s Day.  The chocolate malted buttercream is spectacular.

DSC_0851

DSC_0859

To be honest, I’m not exactly sure how many batches of these I made this summer.  They’ve become a favorite in our house.  And in the mini-muffin pan, they’re transformed into perfect bite-sized treats.  The brownie is more chewy than cake-like, which is how I prefer them.  The stirred-in chocolate chips add a nice pool of chocolate throughout .  Yes, they’re delicious on their own, but the malted-milk buttercream frosting makes these mini-desserts.

Fudge Brownies with Chocolate Malted Buttercream via Relishing It

Fudge Brownies with Chocolate Malted Buttercream via Relishing It

I’ll be baking up another batch of these sweets for our Valentine’s Day this year.  We’ve had a tradition for years– even before our little ones were born– of making a nice meal, opening a bottle of wine, and enjoying a candlelight dinner at home.  Now that we have kids, I always look forward to making a meal with them.  In the past we’ve had a nice pasta dish, such as this one.  Heart shaped pizzas would be fun, too.  Though, I’ve been in the mood for seafood lately, so this is also an option.  Whatever we choose to make, I know it will be fun.  Have a lovely Valentine’s Day!

Fudge Brownies with Chocolate Malted Buttercream via Relishing It

The Recipe:  Fudge Brownies with Chocolate Malted Buttercream

(makes an 8×8 square pan or 24 mini-brownie bites)

For the Fudge Brownies:

3/4 cup (3 3/4 ounces) all-purpose flour

1 teaspoon baking powder

3/4 teaspoon kosher salt

1/4 teaspoon espresso powder

1/2 cup butter

3 ounces unsweetened chocolate, chopped

1/2 cup packed brown sugar

1/2 cup granulated sugar

2 large eggs, at room temperature

1 large egg yolk, at room temperature

1 teaspoon vanilla extract

1/2 cup semi-sweet chocolate chips (preferably Ghiradelli’s 60% cacao)

For the Chocolate Malted Buttercream: 

(Note: double this buttercream recipe if you enjoy your brownie bites loaded with frosting, such as in the photos.  If you prefer a normal amount, one batch will be fine)

6 tablespoons unsalted butter, at room temperature

1/4 cup unsweetened cocoa powder

1/2 teaspoon kosher salt

1 1/4 – 1 1/2 cups powdered sugar, sifted

1 tablespoon milk

1/2 teaspoon vanilla extract

1/4 cup heavy cream

3 tablespoons malted milk powder

Preheat the oven to 350°F and place the rack in the middle of the oven.  Prepare either an 8×8-inch square pan or a mini-muffin pan with either butter/flour, or a shot of cooking spray with the flour in it.  Set aside.

To make the brownies:  In a medium sized bowl, whisk together the flour, salt, and baking powder.  Set aside.  In a large bowl, melt the butter and chopped chocolate in a microwave for 25 seconds (or you place the bowl of chocolate/butter over a saucepan of steaming water).  Stir and repeat until the chocolate is melted.  Whisk in the brown and granulated sugars, and espresso powder.  Then, mix in the eggs, egg yolk, and vanilla.  When it is uniform, fold in the flour mixture, being careful not to over mix.  Fold in the chocolate chips.  Bake for 25-30 minutes for the 8×8-inch pan or 14-16 minutes for the mini-muffin pan.  A tester inserted should come out clean and the tops of them should be slightly cracked with a bit of color around the edges.  Cool in 8×8-inch pan completely.  Remove the mini-brownies once they have cooled in the pan for about 3 minutes.  Let cool completely before frosting.

To make the frosting:  Mix together the cream and malted milk powder.  Set aside.  In a bowl of a stand mixer fitted with the paddle attachment (a hand mixer or your muscles will work, too), cream together the butter, cocoa powder, and salt for about 3 minutes on medium speed.  As always, scrape down the sides of the mixer, as necessary.  Add about 1 1/4 cups of powdered sugar and mix on low to combine.  Add the milk and vanilla and mix.  Slowly add the cream/malted milk mixture while mixing on medium speed.  Mix until it is the consistency you like, add more powdered sugar, if necessary.

Spread frosting onto cooled brownies.  They will keep well for days covered with aluminum foil or in an airtight container.  Enjoy!

Source:  Adapted from Joy Wilson’s Joy the Baker Cookbook

Thanks for stopping by Relishing It today!

Laurie

Read Full Post »

Apple Challah via Relishing It

Despite the frigid weather, we survived this week’s arctic blast here in Minnesota.  And while I managed to get out-and-about a couple of times, much of the long weekend was spent tidying up the house and pre-Spring cleaning.  By January our home is so cluttered with Christmas toys, winter gear, and heaping piles of kindergarten projects that it’s almost unbearable.  So we bought more toy shelves (I really need to have a garage sale this Spring), organized the important school work, and re-arranged a few rooms.  And somehow, once everything was in order, it felt like we’d uncovered two new rooms.  Now I can finally think clearly again!

Apples for Apple Challah via Relishing It

Diced apples for Apple Challah via Relishing It

Aside from the re-organization and playing countless games of Munchkin and Memory with the little ones, I also managed to squeeze in a little baking.  It was a nice way to help warm the house when the windchill dropped to -30°F.  This apple challah turned out perfectly.  One of my favorite things to play around with in the kitchen is bread made with yeast.  I’m fascinated by how yeast grows and changes, creating such interesting flavor.  Baking bread takes patience and planning, but not a lot of work.  And the aroma of freshly baked bread, alone, is worth the small effort.

Challah dough stuffed with apples via Relishing It

Challah stuffed with apples via Relishing It

Apple Challah ready to bake via Relishing It

If you have reservations about working with yeast, just relax and start with something simple.  This apple challah is a nice entry point.  You basically shove everything into a pan and bake it up.  But the results are a magical, tender, rustic-looking bread.  This one isn’t overly sweet– it’s amazing flavors come from the apples, honey, and cinnamon.  One of my favorite characteristics of this challah is the nice ‘crunch’ provided by sprinkling turbinado sugar on top.  The crust is best on the day it’s baked, since it tends to soften over time in a sealed container.  Even so, it keeps well for several days, and the inside stays soft and moist.  Enjoy it drizzled with a bit of honey and a nice cup of hot coffee.

Apple Challah via Relishing It

Apple Challah via Relishing It

The Recipe:  Apple Challah

For the Dough:

4 cups (20 ounces) unbleached all-purpose flour  (see note)

1 1/2 teaspoons kosher salt

6 tablespoons canola oil

2 large eggs, at room temperature

1/4 cup honey

1 package instant yeast  (2 1/4 teaspoons)

1/2 cup luke-warm water (between 100-110°F)

For the Filling:

3 smallish apples, diced into 3/4-inch chunks with the skin on

1 teaspoon cinnamon

3 tablespoons granulated sugar

For the Glaze:

1 large egg beaten with 1 teaspoon water

Turbinado sugar for sprinkling

Note: The recipe from King Arthur called for 4 cups of flour.  I generally assume that 1 cup of all-purpose flour weighs 5 ounces.  So, I added 20 ounces of flour to this recipe.  King Arthur called for 4 cups of flour, but stated 17 ounces as their weight measurement.  I did feel the dough was a bit stiffer than I was accustomed to working with, but the outcome was absolutely perfect.  It was a soft and tender bread that was sublime.  I think it’s safe to say that anything between 17-20 ounces would work here, though I haven’t tried the 17 ounce version first-hand.  Can you tell that I love my scale? 

In a bowl of a stand mixer (the recipe can also be done by hand, of course), mix the yeast, honey, and water together until it is dissolved.  Let stand for 5-10 minutes, or until it begins to get a bit foamy.

Add the remaining ingredients for the dough to the yeast mixture and slowly mix using the paddle attachment until the dough just comes together.  Remove the paddle attachment and add the dough hook.  Knead the dough for a few minutes until it is soft and smooth.  Place the dough in a slightly oiled large bowl and cover it with a dishtowel or lightly greased plastic wrap.  Allow to rise for about 2 hours, or until it has doubled in size.

Lightly grease a 9 or 10-inch springform pan or a 9-inch cake pan that is at least 2-inches deep.  Mix the apple filling ingredients together in a bowl.

Gently deflate the dough and transfer it to a lightly floured work surface.  Roll the dough out into a 8 x 10-inch rectangle.  Place the apples on the dough in two 10-inch rows near the center of the dough.  Fold each side over the row of apples closest to it.  Pushing down as you go to seal it.  Using a sharp knife, cut the dough down the center, and then across 8 times.  You should end up with 16 pieces of dough.  Hopefully the photographs will help with a visual.  Place the pieces of dough into the prepared pan so they create a single layer.  Tuck any apples that have fallen out into the mixture.

Cover the challah with a lightly greased piece of plastic wrap.  Allow to rise for about 1 1/2 hours, or until it’s about 2-inches high.

Preheat the oven to 325°F toward the end of rising time.  Brush the top of the dough with the egg wash and sprinkle heavily with turbinado sugar (or any coarse sugar).  Bake for about 55 minutes, or until the top is a beautiful golden brown.  Some of the higher pieces may get dark brown, and that’s ok.  The dough needs to bake all the way through in the middle, so be patient.  Remove challah from oven and after 5 minutes loosen the edges and transfer it to a rack.  Serve hot or cold, preferably with a drizzle of honey.  Keeps well for days in a covered container.  Enjoy!

Source:  Adapted from King Arthur Flour

Thanks so much for stopping by!  xo

Laurie

Read Full Post »

Older Posts »

%d bloggers like this: