Feeds:
Posts
Comments

Posts Tagged ‘Walnuts’

Salad of Green and Yellow Split Peas with Pesto via Relishing It

In case you haven’t caught on yet, I’m a huge advocate of having a pantry stuffed with dried goods.  Legumes, grains, you name it, I’ve got it in a mason jar ready for use.  And on those occasions when I notice it isn’t stocked full, I briefly panic and then run out to replenish whatever is missing.  I guess it’s almost a compulsion, since it’s not like I’m going to not have access to food– I live a few blocks from our co-op.  I may be a little crazy, but I embrace it.

Salad of Green and Yellow Split Peas with Pesto via Relishing It

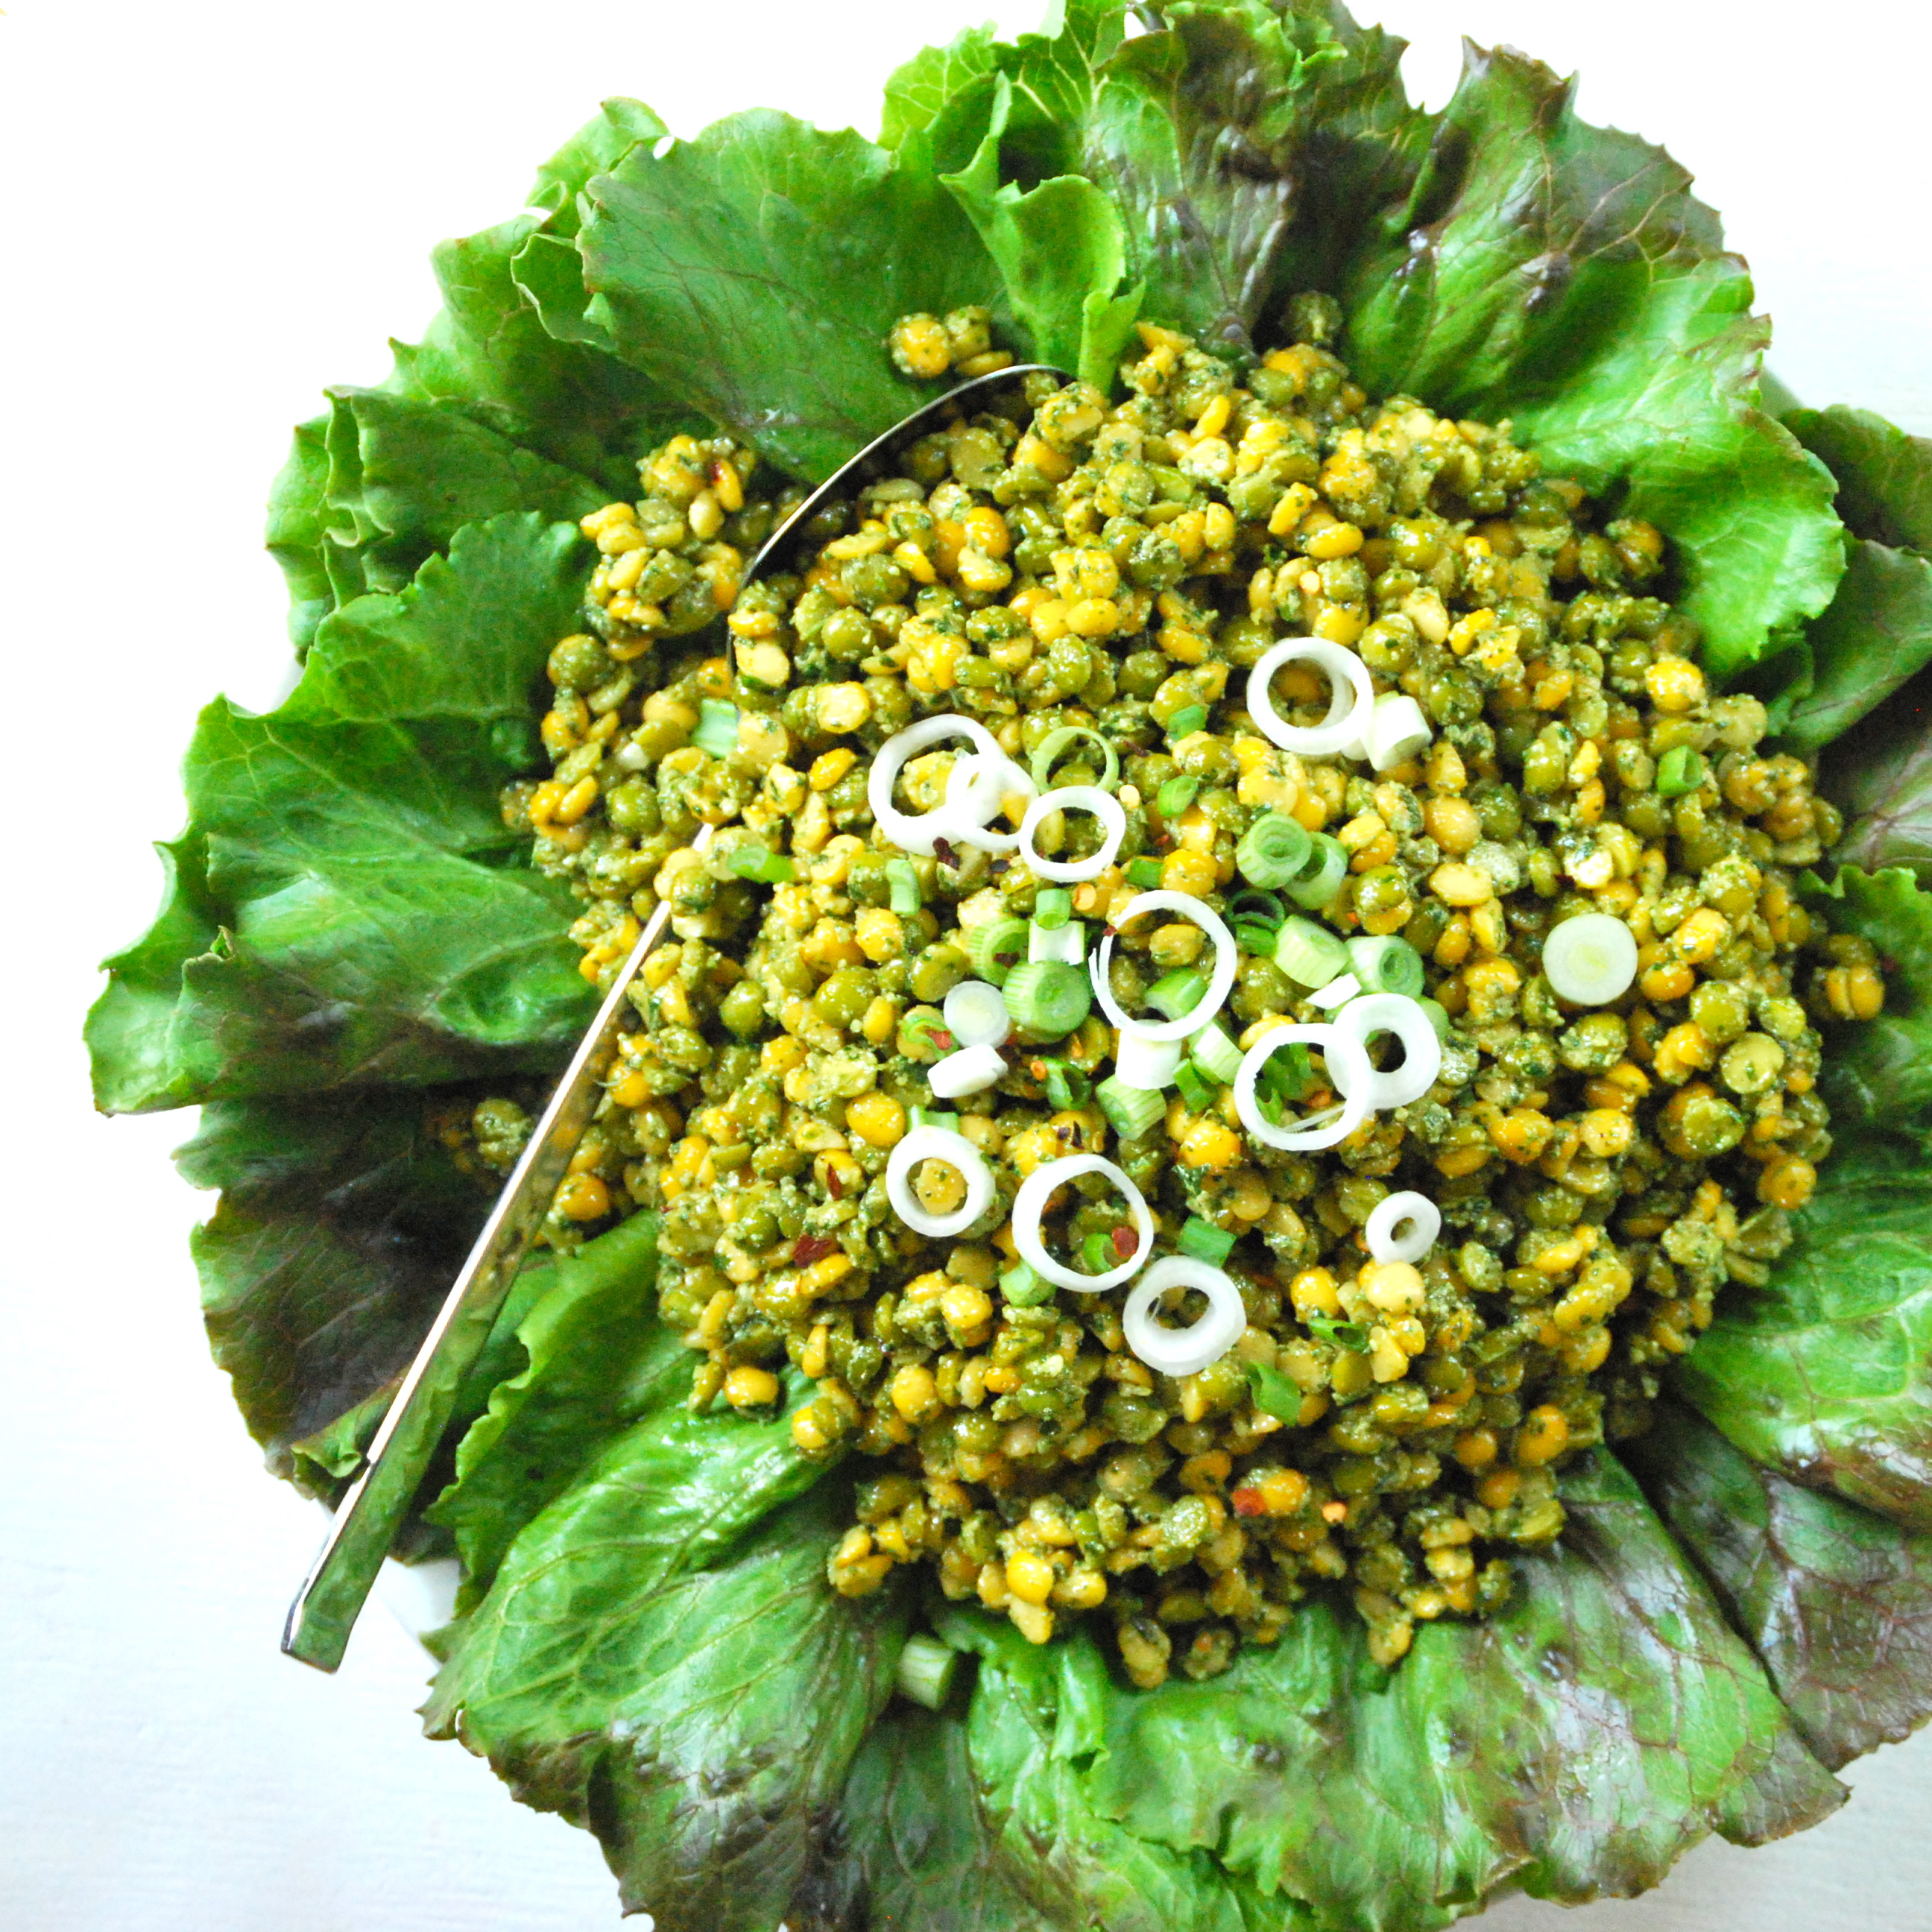
Summer is a great time to combine those dried goods with some of the season’s freshest offerings.  I love the combination of peas and pesto.  Using dried yellow and green split peas here works beautifully and is absolutely stunning to look at.  The sliced scallion on top provides a nice crunch and a burst of freshness.  This salad is also very filling– it’s one of those that can be a stand-alone meal.  And with a smaller portion size, it pairs wonderfully with most any grilled foods.

Salad of Green and Yellow Split Peas with Pesto via Relishing It

Salad of Green and Yellow Split Peas with Pesto via Relishing It

About this time of year, I also start to make large batches of pesto to freeze for the winter.  I’ll pop a small portion into ice cube trays or muffin tins to fully freeze.  I then pop them out, wrap them in plastic wrap, and put them into freezer bags (or use my vacuum sealer).  It’s a wonderful treat in the cold winter months to have pesto to mix into pasta or to dollop into soups.  If you choose to do this– a word of advice.  If you blanch your greens for just 30 seconds or so, then put it into an ice bath to stop the cooking process and proceed with the recipe–your pesto will remain a beautiful, vibrant green, even after it has been frozen.  I always use this method if I’m planning to freeze my pesto, or even if I know I’m going to have leftovers that may sit in my refrigerator for a few days.  The color just ‘pops’.  One more trick regarding pesto, remember you have the option to add a bit of water instead of more olive oil to loosen it up if it’s a bit thick.  Either way, be sure to season it appropriately with kosher salt– the right amount can make the pesto sing!  Enjoy!

Salad of Green and Yellow Split Peas with Pesto via Relishing It

The Recipe: Salad of Green and Yellow Split Peas with Pesto

(serves 4-6)

Large bed of leafy lettuce leaves

1 cup dried green split peas

1 cup dried yellow split peas

1 bunch of sliced scallions to garnish

For the Pesto:

1 cup packed basil leaves

1/4 cup packed Italian leaf parsley

3 cloves garlic, smashed

1/4 cup grated parmesan or grana padano cheese

1/4 cup walnut halves, toasted and roughly chopped

1/3 – 1/2 cup extra virgin olive oil, or more

sprinkle of hot pepper flakes

kosher salt and freshly ground pepper, to taste

To cook the Split Peas:  Rinse the peas and place in a large saucepan.  Cover with salted water, making sure that about two inches of water are above the peas.  Bring to a boil, then reduce to a medium/low.  Cook for about 25 minutes, then begin testing them for doneness.  You may need to cook them longer, depending upon how high your heat was.  You will want them to be soft, but retain their shape.  Be careful not to overcook them, or they will turn to mush.  When done, drain the water and let cool.

To make the Pesto:  As I stated above, you can choose to blanch the greens or not, depending upon how fast you’re going to use the pesto.  You decide.  Place either the blanched or unblanched basil and parsley into a small food processor (use a large one, if making a bigger batch).  Pulse a few times to chop up a bit.  Add the parmesan, walnuts, garlic, red pepper flakes, and a pinch of salt and pepper.  Pulse a couple more times to combine.  With the machine running on low, slowly begin adding the olive oil.  Scrape down the sides, as necessary.  Add as much olive oil to reach your desired consistency.  Or, add a few tablespoons of water at the very end to loosen it up a bit.  Re-season with salt and pepper.  Use right away, or place in the refrigerator with plastic wrap tightly pushed onto it’s surface, or freeze.

Place the lettuce leave onto a large platter.  Mix the cooled split peas with about 1/3 cup of the pesto, use more if desired.  Add salt and pepper, if needed.  Pour mixture over the lettuce, top with sliced scallions, and a drizzle of good olive oil.  Enjoy!

Thanks for stopping by today!

xo

Laurie

Read Full Post »

I know, I know, could I possible have a more lengthy title for a recipe?  I could.  I didn’t mention the whole wheat flour.  You get the idea.  This is a cookie recipe I’ve been playing around with for the last few weeks.  You already know that I’m a cookie fiend, so this one is for me (and hopefully you).  It has all of my favorite  flavors that make-up a perfect cookie.

Let’s break this down.  First, I wanted to create a cookie that contains coconut oil.  You can read a bit about it here on my friend Amy’s blog.  Not only do I love the health factor, but the flavor is phenomenal.  Use virgin coconut oil as opposed to regular, as it has a more noticeable coconut flavor.   Then there’s the browned butter.  Is there anything that brown butter does not make better?  Of course not.  It adds a deep caramel-like flavor that is unforgettable.  The toasted walnuts add a brilliant crunch.  Now cookies are obviously not going to be terribly healthy, but I slipped in whole wheat flour and rolled oats for fiber.   Finally, we get to the chocolate chips.  Use good quality chocolate, or even go the chunk route and chop your own.

All of these elements come together to make this delicious cookie.  It’s loaded with great ingredients and has wonderful texture– crisp on the very edges and soft in the middle.  Now that’s what I’m talking about.  My husband declared this the best cookie he’s ever eaten.  So, that’s something, right?!  I hope you enjoy these little morsels as much as I have!

The Recipe:  Chocolate Chip, Walnut, and Oatmeal Cookies with Browned Butter and Coconut Oil

(Makes 24-26 cookies)

1 cup packed brown sugar

1/2 cup virgin coconut oil

1/4 cup (4 tablespoons) butter, browned

1 egg, lightly beaten

1 teaspoon vanilla

1 cup (5 ounces) whole wheat flour

1/2 teaspoon baking powder

1/2 teaspoon baking soda

1 teaspoon kosher salt

1 cup rolled oats

1 cup chocolate chips (Ghirardelli 60 % cacao chips are my favorite)

1/2 cup chopped walnuts, toasted

Preheat oven to 350°F.  Line a baking sheet with parchment paper.

In a small saucepan over medium heat add the butter.  Stirring frequently with a wooden spoon, cook the butter until it becomes a beautiful medium colored brown, just a few minutes.   Too little will not have enough flavor, and too much will taste burnt.  It will smell fragrant and somewhat caramel-like.  Remove from heat and pour into a bowl to cool for at least 10 minutes.

In a small sauté  pan over medium heat add the walnuts.  Stirring frequently, toast them until they become fragrant, just a few minutes.  Keep a watchful eye, as they can burn quickly.  Remove from heat and pour onto a plate to cool for 5 minutes.

In a medium bowl, whisk together the flour, salt, baking powder, and baking soda.  Set aside.

In a bowl of a stand mixer fitted with a paddle attachment (a hand mixer or bowl and wooden spoon can also be used), add the coconut oil, browned butter (brown bits, too), and brown sugar.  Cream the mixture on medium speed for about 2 minutes.  Mix the beaten egg and vanilla together and pour that into the bowl.  Continue to cream for about 3-4 more minutes, or until the mixture has gained a little volume and has become pale in color (Note: it won’t have as much volume as cookies with room temperature butter). Add the flour mixture and mix until combined.  Turn the machine off and stir in the oats, chocolate chips and walnuts by hand.

Roll into balls by hand or use a small scoop.  Use a bit of pressure to make the mixture form a solid ball.  Bake cookies for 9-10 minutes, the edges should just be starting to turn golden brown.  Remove from oven and let cool on pan for a couple of minutes.  Remove from pan and place on a cooling rack.  The cookies will keep for a few days in an airtight container.  Enjoy!

Have a wonderful weekend, friends!  Be sure to check back next week — something exciting will be happening on Relishing It!

Laurie

Read Full Post »

Last week I told you I’d have another fabulous recipe for you to use up any left-over winter squash you have from this dish.  Here it is, and it’s a remarkable Squash Ravioli, which also happens to be one of my favorite meals.  I’ve always felt that homemade pasta is the perfect comfort food– and pairing it with squash and browned butter with sage makes for a sublime Autumn dinner.

Browned butter and sage sauce is so simple to make, yet the incredible flavor will really stay with you.  I crave this sauce for weeks after we make this dish– you will too.  Seriously, it’s that good.  It perfectly compliments the sweetness of the squash, the creamy ricotta cheese, and the hint of freshly-grated nutmeg– all of which make up the filling.  The walnuts add texture to counter the pillow-soft ravioli.  And topping almost anything with Parmesan cheese makes it a little bit better.  Serve the ravioli with the crispy sage leaves (if you can keep yourself from eating them before dinner).

Now I know making homemade pasta may not be on your agenda.  Here’s the thing, though– fresh pasta really is that much better than the dried varieties you see at the market.  There’s no comparison.  And as I’ve said before, if you make it a family project you’ll enjoy the process, rather than thinking of it as just preparation.  As for the equipment, while it’s certainly easier to use a food processor and pasta roller, all you really need are strong arms, a sturdy wooden spoon, and a rolling pin.  Hey, it’s exercise, right?  Give it a try and you’ll be pleasantly surprised by how satisfying it is to make your own pasta.  And even more satisfying when you get to fill it with amazing ingredients like this.

The Recipe:  Squash Ravioli with Browned Butter and Sage

The Pasta Dough:

(Makes 1 pound of dough)

2 cups all-purpose flour

2 large whole eggs

1/4 cup extra-virgin olive oil

3 tablespoons water

1 egg (reserved for ravioli wash)

The Squash Filling:

1 1/2 cups squash puree

1/2 cup ricotta cheese

1/4 teaspoon freshly grated nutmeg

1 teaspoon kosher salt

1/2 teaspoon cracked pepper

Browned Butter and Sage Sauce:

1 stick unsalted butter

6 sage leaves

2/3 cup water

1/2 cup grated Parmesan cheese

salt and pepper

1/2 cup toasted walnuts

To make the pasta dough:  Mix 2 eggs and olive oil into a measuring cup.  Add 3 tablespoons water (or however much needed to reach 7 fluid ounces).  Put the flour into a food processor fitted with a regular blade and pulse a couple of times to aerate (there will not be enough dough to successfully use the dough blade).  Start running the machine and pour the egg mixture down the feed tube, carefully getting every drop in there.  A dough ball should form quickly.  Do not process for more that 40 seconds total.  Turn machine off and turn dough onto a lightly floured surface.  Knead by hand for  a half minute, or until it’s smooth.  Form it into a ball and wrap it tightly with plastic wrap.  Let rest at room temperature for at least a half hour.   Store in the refrigerator for a day, or freeze for a month or more.  Defrost in the refrigerator and let sit at room temperature before rolling.

To bake the squash: Preheat oven to 375°F.  Place a quartered, seeded squash on a cookie sheet lined with aluminum foil.  Cover with foil and bake until soft and tender, 35-45 minutes.  Let cool.  Scoop out flesh into food processor.  Add a bit of water if necessary and puree until smooth.  Cool.

To make the filling:  Add the squash, ricotta cheese, nutmeg, salt and pepper to a bowl.  Mix and set aside.  There may be some leftover filling.  Refrigerate and enjoy by the spoonfuls the next day.

To form the ravioli:  Quarter the dough ball.  Use a pasta machine or roll each section by hand.  Making sure to flour your work surface well.  The goal is to get the dough very thin and long.  Once you achieve this, straighten up the sides, if necessary and cover.  Repeat with another quarter of the dough.  You’ll want to get two matching sections.  Make the ravioli however big you like.  Using a pastry brush, apply an egg wash (beaten egg) along the edges of each ravioli.  Place a tablespoon of filling in the middle of each section and top with the other section of dough.  Press the dough together along the egg wash– this will seal the filling inside.  Use a pasta cutter to cut the ravioli into sections.  Or use a knife and press down with fork tines to seal.

To make the browned butter and sage sauce:  In a medium-sized sauce pan, place a stick of butter and the sage leaves.  Begin to brown the butter until it’s fragrant and has a nice caramel color.  Stir frequently.  Add 2/3 cup of pasta water and cook for another 3-4 minutes.  Remove from heat.

Place the ravioli in a large pot of salted, boiling water.  You will want to work in batches.  Place three ravioli (depending upon the size of your pot) into the water.  Cook for about three minutes.  The dough will shrink and tightly enclose the mound of filling when done.   Remove from water and repeat with remaining ravioli.  Toss the cooked ravioli into the brown butter and sage sauce immediately, so they don’t stick together.  When serving, sprinkle with Parmesan cheese and the toasted walnuts.  Enjoy!

Source:  Pasta and Sauce adapted from Lidia Bastiancich’s Lidia’s Family Table

Thanks for stopping by Relishing It!  Have a great day.

Laurie

Follow me on Twitter!

Read Full Post »

I spent a fair amount of time this season talking food with friends old and new.  Along with discussing recipes and how to prepare food, we talk about what we like, and what we don’t.  Inevitably, I bring up beets– one of my favorites.  I’ve been a bit surprised to find that people either love beets or hate them.  There seems to be no middle ground.  But I have a theory here– that people only think they despise this lovely vegetable.  If you fall on the side of those who don’t appreciate these deep-crimson beauties, I have a question.  Have you ever eaten a fresh beet?  Because like all foods, an opinion based on a grocery store canned good doesn’t count.  If your experience is based on those sad, flavorless little cubes poured into a bowl, you have to give this recipe a try.  It’ll change your mind.  And if you already love beets, add this fantastic dish to your salad repetoir.

Obviously I love fresh beets.  Every time I cut into one, revealing its brilliant, deep red, I smile.  This color happens naturally!  Amazing.  Fresh beets are slightly sweet, with delicious earthy undertones.  They have a lovely crunch when eaten raw and a tender silkiness when cooked.  My favorite way to eat beets is roasted and unpeeled, baked in the oven, and then tossed with a bit of olive oil.  Of course, they shine in soups as well.  Here, I’ve used them as the centerpiece for this fantastic salad.  How’s that for versatility?

This beet salad is so simple, yet it will blow your mind.  The dark and viscous spicy sweet balsamic dressing is a standout made specifically to pair with the beets.  It’s one of the most unique dressings you’ll ever taste– very intense, explosive flavors.  The creamy cheese provides balance to the acidity of the dressing, and adds that additional layer of complexity that I think most salads need.  And the crunch from the toasted nuts is a nice textural addition.  It’s fantastic served with greens, or as a stand alone.  Enjoy!

The Recipe: Roasted Beet Salad

6 medium beets, roots and tops trimmed

Olive oil to coat

1/2 cup walnuts (or pecans), toasted

1/2 cup good quality goat or blue cheese, crumbled  ( I’ve had it with both cheeses, go for the blue)

Handful of leafy greens

Dressing:

1 cup balsamic vinegar, reduced to 1/3 cup

1/2 teaspoon red pepper flakes

1/2 teaspoon ground cinnamon

1/2 teaspoon allspice

1/2 teaspoon cayenne

Preheat oven to 425°F.  Toss beets in olive oil to coat.  Line a rimmed baking sheet with aluminum foil.  Place beets on baking sheet and roast until tender, about 35-45 minutes.  Let cool.

Combine ingredients for dressing together.  Set aside.  Toast nuts by placing in a small skillet over medium heat, stirring frequently.  When nuts become fragrant, remove from heat, about 4-5 minutes.

When beets are cool, peel and cut into wedges.  Place on top of a bed of greens.  Sprinkle with cheese and toasted nuts.  Drizzle the dressing over the top.  Enjoy!

Source:  Adapted from Nosh Restaurant via The Minnesota Homegrown Cookbook

Thanks for stopping by today!  Have a great weekend.

Laurie

Follow me on Twitter

Read Full Post »

Chocolate Zucchini Cake

This is the cake that conjures up childhood memories every time I make it.  The original recipe is nestled in one of those tattered  ‘Hometown Cookbooks’ that was a staple for those of us who grew up in the rural Midwest.   My Mom made this cake while I was growing up, as did half the residents in my tiny town.  But my specific memory of this cake takes me to the farm of my childhood best friend several miles down a gravel road east of Regent.  Most everytime I shared a meal with Allison at her family home, her mother would make chocolate zucchini cake.  I loved it.

While I loved the recipe as written, I’ve made several changes that add more wholesome ingredients like whole grains, reduce the sugar, and intensify the chocolate flavor.  I tested the changes on my Dad (also a chocolate fanatic), who thought it was perfect.  My Mom, on the other hand, thought it may be too chocolate-y.  I took this as a good sign since there’s no such thing as too much chocolate, and she’s not crazy about it like my Dad and me.   This is a delightful, versitile everyday cake.  It’s well- suited for coffee, ice cream, a cold glass of milk, and friends. It’s very moist due to the zucchini, has nice texture because of the nuts, and the rich chocolate  flavor is impressive.  It’s a comfort dessert, or maybe that’s just me, thinking about my hometown.

Speaking of my hometown, I figure this is as good a place as any to give you a glimpse at western North Dakota.  On our recent trip over Labor Day, Radd and I took the kids down some of the old country backroads– including the short-cut between my hometown of Regent and Radd’s hometown of Bowman, 60 miles away.  We drove that road (below) nearly every weekend to see each other 20 years ago.  While it wasn’t that impressive to our two and four year olds, it sure brought on the nostalgia.  Enjoy the pictures– and the cake!

The Recipe: Chocolate Zucchini Cake

1/2 cup butter

1/2 cup extra-virgin olive oil (canola or vegetable oil can also be used)

1 cup granulated sugar

1/2 cup brown sugar

2 eggs, at room temperature

1/2 cup milk (2%)

1 1/4 cup all-purpose flour ( I prefer King Arthur or Bob’s Red Mill Flours)

1 cup white whole wheat flour (substitute all-purpose, if you don’t have this)

1/2 cup Dutch-process cocoa, plus more to coat pan

1 teaspoon espresso powder

1 teaspoon vanilla

1 teaspoon baking soda

1 teaspoon kosher salt

2 cups coarsely grated zucchini (about 1 large)

1 cup chopped walnuts, toasted

1 cup chocolate chips (Ghirardelli 60% cacao are my favorite)

Preheat oven to 350°F.  Generously butter a 9 x 13 -inch cake pan, then sprinkle with cocoa powder.  Tap off any excess.  In a small skillet toast the walnuts over medium heat, until they become fragrant, about 4-5 minutes.  Making sure to stir them during that time.

In a medium-sized bowl, sift together the flours, cocoa powder, salt, baking soda, and espresso powder, set aside.  In a liquid measuring cup mix the milk and vanilla together, set aside.

 In a stand mixer fitted with a paddle attachment, cream the butter, oil, and sugars until light and fluffy, about 5-6 minutes.  Add the eggs one at a time and beat well.  Alternate adding the flour mixture and the milk mixture.  Starting  and ending with the flour.  Be sure to scrape the bowl down when necessary and make sure not to over-mix the batter.

Remove paddle attachment and gently fold the zucchini into the batter with a rubber spatula.  Pour into the cake pan and spread flat.  Top with toasted walnuts and chocolate chips.  Bake for about 35-45 minutes.  A cake tester should come out with a few dry crumbs clinging to it.  This cake keeps extremely well.  I think it’s almost better served the day after it is made.  Make sure to enjoy it with a big scoop of vanilla ice cream.

Source:  Inspired by recipes in cookbooks from my hometown of Regent, North Dakota.

Thanks for stopping by today — hope you all have a lovely weekend!
Laurie

Follow me on Twitter!

Read Full Post »

First, a warning:  this is an overly-enthusiastic blog post today because…IT IS MY BIRTHDAY!  That’s right, I still get REALLY excited about my birthday.  Even though I’m clinging to my mid-thirties, like a child I still get giddy whenever August 26th rolls around.  I look forward to the phone calls with my family and friends.  I wait for the e-mails, cards, and Facebook wishes.  I love it all.

Now a second warning:  I’m going to get a bit sentimental.  The truth is, I still love my birthday so much because I look back on my life thus far, and forward to another wonderful year.  I’m so fortunate to be married to my wonderful husband, and I have two beautiful children.  I had the benefit of growing up in a loving family and then marry into another.  Thanks for having me, Mom and Dad.  Here’s to many more great years!

So what about the food?  Rather than make a birthday cake, I decided to go with one of my all-time favorites.  This carrot cake is easily one of the best I’ve ever eaten.  After giving my neighbors a sample, they agreed that this is as good as carrot cake gets.  It has the perfect amount of nuts– they provide just enough texture and flavor without overwhelming the dessert.  It has no raisins, which, to be honest, I don’t really miss.  The cake is dense, as you’d expect, but not heavy– in short, it’s perfect.  The two secrets to this cake are oranges and limes.  Freshly-squeezed orange juice and a little zest really add a fragrant punch, while the icing– laced with lime juice and zest– make it unforgettable.

The Recipe: Carrot Cake with Lime Mascarpone Icing

For the Cake:

1 1/4 cups unsalted butter, softened

2 cups light brown sugar

5 large free-range or organic eggs, separated

zest and juice of 1 orange

1 1/2 cups of self-rising flour, sifted

1 heaping teaspoon baking powder

1 cup ground almonds

4 ounces / 1 cup chopped walnuts, toasted, plus more for topping the cake

1 heaping teaspoon ground cinnamon

1/4 teaspoon ground cloves

a pinch of freshly ground nutmeg

1/2 teaspoon ground ginger

10 ounces/ 3 cups organic carrots, peeled and coarsely grated

pinch of kosher salt

For the Lime Mascarpone Icing:

4 ounces mascarpone cheese

8 ounces full-fat cream cheese

1 cup confectioners’ sugar, sifted

zest and juice of 1 lime

Preheat oven to 350°F.  Grease and line with parchment paper a 9 – inch square or round cake pan.  (Note:  I used mini-loaf pans and yielded 6).  Beat the butter and sugar together by hand or using a stand mixer until pale and fluffy.  Beat in the egg yolks one at a time and add the orange zest and juice.  Gently stir in the sifted flour and baking powder, and add the ground almonds, walnuts, spices and the grated carrots.  Mix together well.

In a separate bowl, whisk the egg whites with a pinch of salt until stiff, then gently fold them into the cake mix.  Scoop the batter into the prepared cake pan and bake for about 50 minutes (less if using the mini-loaf pans) until golden and risen.  To check cake using a toothpick, insert into cake for 5 seconds — it’s done when it comes out clean.  If it feels sticky, bake a bit longer.  Let cake cool in pan for 10 minutes.  Turn out onto a cooling rack and let cool completely.

To make the icing: mix all of the ingredients except the lime juice together.  Carefully add 1 teaspoon at a time.  Making sure the icing doesn’t get too thin.  Spread generously on the cake and top with walnuts.  Enjoy!

Source:  Adapted from Jamie Oliver’s Cook With Jamie Cookbook

Thanks again for stopping by Relishing It today.  I hope you all have a wonderful weekend — I know I will.

Laurie

Follow me on Twitter

Read Full Post »

Notice anything different?  Look at the URL (and blog title) above.  That’s right, my blog is now ‘Relishing It’, with the profanity in my web address (though it provided a few chuckles) now gone.  Let me know what you think.

On to today’s post.  Oatcakes?  No doubt the title of this recipe alone is so inviting that you can’t wait to try it.  Alright, it may not sound exciting, but these little creations are incredible.  I want implore you to make them to prove that even with a title like ‘oatcakes’, these are delicious.  Did I mention that they’re also easy and convenient?   I stumbled across these hearty cakes in another recently published cookbook, Super Natural Every Day by Heidi Swanson.  Heidi authors the blog 101 Cookbooks  , which I’ve been following for some time.  This book is fantastic, with a concentration on healthy and vegetarian foods.  I’ve made these oatcakes several times over the last couple of weeks, as my family (mostly my husband) devours them.  These are most certainly not muffins.  To be honest, I’m not really a muffin fan.  While they’re sweet and cake-like, I find that I always choose something else if given the option.  Yes, these oatcakes have that tell-tale ‘muffin shape’, but the comparison ends there.  These are very dense, hearty, and flavorful, though not particularly sweet.  Even better, they’re filled with ingredients that are nutricious and tasty.  You’ll see that the recipe contains a few items that you may not have on hand.  Don’t let that stop you from making them.  My guess is that once you have the ingredients on-hand, you’ll make this recipe again and again.

Whole grains, oatmeal, and whole wheat pastry flour provide the heft here.  The original recipe also called for whole flax seeds, though my variation relies on flax meal.  Whole flax seeds are too hard for your body to break down.  They simply pass through, without giving you the healthy benefits of omega-3 fatty acids, fiber, and antioxidants that you get in the ground form.  Whether you use whole seeds or ground meal, store them in the refrigerator once opened.  Heart-healthy walnuts add a nutty crunch to the cakes, and also contain omega-3 fatty acids that are good for you.  The cakes are sweetened with raw cane sugar, honey, and maple syrup– a sublime combination.  Here I deviated from the original recipe as well, as it called for just the maple syrup and sugar.  I was feeling a bit stingy about my dwindling maple syrup supply being depleted by another 3/4 cup, so I substituted half with honey.  It really paid off, as the honey and oat combination is heavenly.  There are also two different oils that keep the cakes moist– butter and extra virgin coconut oil.  The latter is emerging as a healthy alternative oil that’s seeing more use in cooking and baking.  You can read about some of it’s health benefits here.  When you go to purchase it, take note that it will not be a liquid.  It will be white and solid.

These oatcakes are a perfect snack for your busy summer.  They keep well and transport easily.  Take them on walks, bike rides, camping, or for a simple morning breakfast.  They are very filling, and they’ll satisfy your hunger for longer than you think.  I hope you enjoy them as much as we do!

The Recipe: Oatcakes

(makes 1 dozen)

3 cups rolled oats

2 cups whole wheat pastry flour or spelt flour

1/2 teaspoon aluminum-free baking powder

2 teaspoons kosher salt

1/4 cup flax meal

3/4 cup chopped walnuts, lightly toasted

1/3 cup extra virgin coconut oil

1/3 cup unsalted butter

1/4 cup plus 2 tablespoons honey

1/4 cup plus 2 tablespoons maple syrup  (Note:  just to be clear — 3/4 cup total of equal parts maple syrup and honey)

1/2 cup raw cane sugar or natural cane sugar

2 large eggs, lightly beaten

Preheat the oven to 325°F with a rack in the top third of the oven.  Butter a standard 12-cup muffin pan.

Combine the oats, flour, baking powder, salt, flax meal, and walnuts in a large mixing bowl.

In a medium saucepan over low heat, combine the coconut oil, butter, honey, maple syrup, and sugar and slowly melt together.  Stir just until the butter melts and sugar has dissolved, but don’t let the mixture get too hot.  And if it does, let it cool a bit – you don’t want it to cook the eggs in the next step.

Pour the coconut oil mixture over the oat mixture.  Stir a bit with a fork, add the eggs, and stir again until everything comes together into a wet dough.  Spoon the dough into muffin cups, nearly filling them.

Bake for 25-30 minutes, until the edges of each oatcake are deeply golden.  Remove pan from oven and let cool for a couple of minutes.  Then run a knife around the edges of the cakes and tip them out onto a cooling rack.  Serve warm or at room temperature.  They are especially good with a smear of butter and a drizzle of honey.  Enjoy!

Source: Adapted from Super Natural Every Day Cookbook by Heidi Swanson

Thanks again for stopping by!

Laurie

Follow me on Twitter!

Read Full Post »

I live in Minnesota, where the maple trees are now being tapped.  Yes, its a bit of poetic dreaming, but this makes me long for a little country home with my very own maple trees, big red barn, and sprawling garden.  I conveniently ignore the “back-breaking labor” part of that dream.  While I don’t get to live the bucolic life here in the middle of the city, I’m fortunate enough to have access to the local, delicious maple syrup from nearby (not to mention a few fantastic farmers markets).

I love maple syrup, though this wasn’t always true.  The fact is, for most of my childhood I’d never had the real thing.  I detested the overly-thick, sugary mess that most restaurants labled “maple syrup.”  At home, we usually had a berry syrup, as getting real maple in rural North Dakota wasn’t an option at the time.  Once I finally had a taste, I was hooked.  I couldn’t believe that it was nothing like the gloppy corn syrup-based knock-offs I had been exposed to.  It was thin– delicate almost– and just sweet enough.

A friend recently told me about a fantastic cake recipe by David Lebovitz— one of my favorite accomplished chefs.  This maple walnut pear cake is perfect for this time of year.  It’s one of those desserts that’s simple to throw together and toss into the oven, yet the result is so much more than an ordinary cake.  The flavor-combination is beautiful.  The maple syrup, walnut, and pear build off of one another, while the cinnamon binds them all together.  This is a moist cake that gets better with each passing day.  I think I even prefer it on the second day when the glaze really gets a chance to soak in.  But seriously,who’s going to wait that long for a piece?  Try it– you’ll love it.  And for goodness sakes, don’t forget the whipped cream!

The Recipe: Maple Walnut Pear Cake 

Topping:

1/3 cup maple syrup

1/4 cup packed light or dark brown sugar

1/2 cup walnuts, toasted and coarsely chopped

3 ripe Bosc pears (I used D’Anjou and they worked fine), peeled, quartered, cored, and cut lengthwise into 1/4-inch slices

Cake:

1 1/2 cups all-purpose flour

1 teaspoon baking powder

2 teaspoons ground cinnamon

1/2 teaspoon salt

1/2 cup unsalted butter, at room temperature

1/2 cup granulated sugar

1/4 cup packed light brown sugar

1/2 teaspoon vanilla extract

2 eggs, at room temperature

1/2 cup whole milk, at room temperature

Directions:

Preheat the oven to 350°F.

Make the topping:  Combine the maple syrup and 1/4 cup dark or light brown sugar in a 9-inch cake pan or a cast-iron skillet.  Set the pan directly over the heat on the stovetop until it begins to bubble; simmer gently for 1 minute, stirring often.  Remove pan from heat.

Sprinkle walnuts evenly over maple mixture in the pan, then arrange the pear slices over the walnuts.  A pinwheel pattern works perfectly.

Make the cake:  In a small bowl, whisk together the dry ingredients (flour, baking powder, cinnamon, salt).  In a stand mixer fitted with a paddle attachment or by hand, beat together the butter, granulated sugar, and 1/4 cup light brown sugar on medium speed until light and fluffy, about 3 to 5 minutes.  Add the vanilla and eggs, one at a time, beating until each is incorporated.  Gradually mix in half of the flour mixture, then stir in the milk, then add the remaining flour mixture.  Mix just until combined.

Scrape the batter over the pears in the pan and carefully smooth into an even layer.  Bake for about 50 minutes, or until a tester inserted into the middle of the cake comes out clean.  Cool 15 minutes in the pan.

Run a knife around the sides of the cake to loosen it from the pan.  Invert a serving plate, or cake stand, over the pan, and carefully invert cake onto it.  Gently lift the pan off of the cake and arrange any walnuts that may have gone astray.

(Note:  Apples can easily be substituted for the pears in this cake.)

Source:  David Lebovitz’s: Ready for Dessert

One last note…Food Bloggers across the country are uniting on May 14 to help fight childhood hunger.  In Minneapolis/St. Paul the bake sale will be held at 920 East Lake St. Mpls, MN 55407 — in the Midtown Global Market.  The hours of the sale are 11:00am-4:00 pm.  I hope you come out and support this important cause.

Hope you are all well and enjoying a bit of spring!  As always, I appreciate your comments!

Thanks for stopping by,

Laurie

Follow me on Twitter!

Read Full Post »

%d bloggers like this: