Feeds:
Posts
Comments

Archive for the ‘Soup’ Category

Homemade Beef Broth | Relishing It

Well this week has flown by.  My little boy has been sick for a few days, so my usual routine has been interrupted.  I absolutely don’t mind the interruption, and like having him home with me all day again, but I just hate it when my little ones are sick.  Since he hasn’t been eating a whole lot (sore throat), I’m so thankful to have frozen broth at the ready for both the ease and the nourishment that it can give to him.  I guess this is as good a time as any to post this recipe, then.

Homemade Beef Broth | Relishing It

Making broth isn’t a new concept, but it seems as though the foodie/health world has rediscovered it lately.  There’s a good reason for that.  Making broth is simple and it offers so many healthy benefits that store-bought versions simply do not.  They also taste so much better.  Make a homemade broth and then do a taste-test with a store brand.  I have.  The difference is stunning.

Homemade Beef Broth | Relishing It

Homemade Beef Broth | Relishing It

For my beef broth, I start with finding some good, properly-raised beef.  You know I’m a grass-fed beef advocate.  So, I suggest you find some grass-fed beef bones (you’ll want a mix of marrow bones and some with a bit of meat on them) to make the healthiest, most nourishing broth possible.  Soup bones can easily be found at a good co-op or grocery store, your local butcher, or from the farmers market. They’re cheap.  Sometimes they’re even labeled “pet bones”– which is kind of odd.  But trust me, they’ll make a rich broth that you’ll love.

Homemade Beef Broth | Relishing It

The other ingredients you likely already have at home– carrots, celery, onion, garlic, cider vinegar, and some dried or fresh herbs.  It’s a simple process that involves roasting the bones and vegetables first– to really amp up their flavors– then simmering on the stove for hours with water, herbs, and vinegar.  The vinegar is added to, supposedly, draw out some of the minerals from the bones.  I’ve read conflicting information on this, but I finally decided that since I love the flavor it imparts, I’m going to go with it.  Simmer this broth as long as you can.  The longer you do, the more nutrients it will draw out of the bones.

Homemade Beef Broth | Relishing It

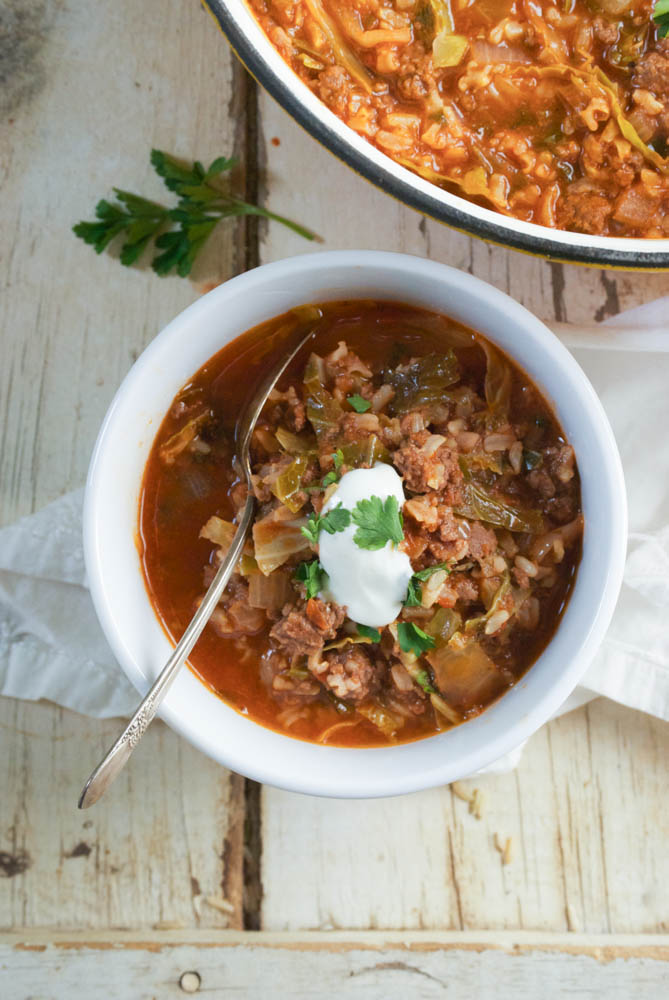
The flavor will be good after three hours, or so– but shoot for 8 or even 24, if that’s a possibility for you. Also, after simmering for about 2-3 hours, I remove the bone with meat on it, and trim the cooked meat off. I put the bone back into the broth and save the meat to use another time. At this point it hasn’t been overcooked, but it has still added plenty of flavor to the broth already. If you don’t want to bother, just leave it in the broth for the duration of the time. As long as you hit that three-hour mark, the broth will taste amazing! Use it in soups like this Paprikash that is one of our family favorites. Fill your freezer up with both this beef broth and this chicken broth for quick, healthy soups this winter.

Homemade Beef Broth | Relishing It

The Recipe: Homemade Beef Broth

(makes a few quarts)

about 6 pounds of good quality, preferably grass-fed, beef bones (some containing marrow and some containing a bit of meat)

about 3 carrots, halved

2 celery stalks, halved

1 large onion, quartered

1 garlic bulb (that’s the entire thing), halved and not peeled

3 dried bay leaves

1 teaspoon dried thyme

1 tablespoon black peppercorns

handful of fresh parsley, rough chopped

2 tablespoons kosher salt, or more to taste

6 tablespoons apple cider vinegar (I use Bragg’s)

Preheat oven to 400°F. Line a rimmed baking sheet with parchment paper (for easy clean-up). Place the beef bones, carrots, celery, onion, and garlic on the pan with a bit of olive oil and a sprinkle of salt.  Roast for about 40-45 minutes, or until the beef and vegetables have a bit of color. Remove from oven.

Add the beef, vegetables, and any juices (leave the grease behind) to a large kettle.  Top it with the bay leaves, thyme, peppercorns, fresh parsley, cider vinegar, and enough cold filtered water to cover it all.

Bring everything to a high simmer so that it’s almost boiling, but not quite.  Then reduce the heat with the lid ajar to just a low simmer that is barely bubbling and let it cook away for as many hours as you can.  Three hours for sure, but shoot for more, if you can. If wanting to use the meat from the meaty bone (and you should– it’s great for quick meals and/or snacks), remove from bone after about 2-3 hours, put the bone back in the pot.

After you have finished simmering the broth, remove the large pieces with tongs and strain the liquid through a cheesecloth.  This will give you a nice clear broth. At this point you can put it in jars (or BPA-free plastic quart-sized containers) leaving about an inch of head-space (the liquid will expand as it freezes) or leave it in a large pot and refrigerate until completely cold (this will take hours, so overnight works well) and pour into jars afterwards. This makes removing the top layer of grease a cinch. Once that has been completed, throw a lid on it and freeze.

Thanks for stopping by Relishing It! Have a great weekend.

Laurie


Read Full Post »

Healthy Stuffed Cabbage Roll Soup | Relishing It

It’s early November and the first winter storm of the season just rolled through Minnesota.  I generally try to have a positive tone when I share my thoughts here, but this… sucks.  No time to acclimate to lower temperatures over a few weeks, no light dusting of snow that melts away in the sun.  Nope.  Winter is here and I’m not ready for it yet.  Thankfully, we got the leaves raked (barely) and taken to the compost pile, the summer furniture is tucked away in the shed, and my small garden has been cut down.  But still, this is ridiculous.  Last winter was grueling, to say the least.  I want more crunchy leaves on the sidewalks and more bonfires with our neighbors.  I want more outdoor runs without the worry of slipping on ice. I realize that I’m going to have to wait months for these simple pleasures again.  And I will wait patiently and enjoy them all-the-more when they arrive.  There.  Now I’m feeling a little bit better.

Healthy Stuffed Cabbage Roll Soup | Relishing It

Healthy Stuffed Cabbage Roll Soup | Relishing It

For now, I will pour myself into doing the things that I love to keep my mind off of the frigid temperatures.  Today it’s warm soup and fresh bread.  This stuffed cabbage roll soup is a favorite in our house.  It has all the wonderful flavors and textures of stuffed cabbage rolls with less work.  It’s hearty and filling– total comfort food.  But, it’s also healthy.  Like, really healthy.  It’s loaded with whole foods–grass-fed beef, fresh cabbage, canned tomatoes, brown rice, and zingy fermented sauerkraut.  I love to eat cabbage year-round– it’s an underrated vegetable, in my opinion.  Not only is it good for you, it has a long refrigerator life.  This is much more than a soup– almost a stew.  Feel free to add more broth or tomatoes if you like it a little less thick.  I think it’s perfect as is, but especially fantastic with a dollop of sour cream or plain yogurt on top and a sprinkle of fresh dill or parsley.  I hope you give it a try.  Enjoy!

Healthy Stuffed Cabbage Roll Soup | Relishing It

Healthy Stuffed Cabbage Roll Soup | Relishing It

The Recipe: Healthy Stuffed Cabbage Roll Soup

(serves 4)

1 pound grass-fed ground beef

3/4 cup dry long grain brown rice

1 small white or yellow onion, diced

2 garlic cloves, minced

2 teaspoons kosher salt, plus more if needed

cracked black pepper

1 quart chicken broth, preferably homemade

2 cups crushed canned tomatoes (or a 15 ounce can–Muir Glen Organic is great)

2 cups homemade tomato sauce (or a 15 ounce can — again, go with Muir Glen)

3 cups, thinly shredded cabbage ( I used 1 somewhat smallish one)

1 teaspoon fresh thyme

1 bay leaf

1/4 cup packed chopped fresh parsley

2 cups homemade sauerkraut or store-boughten, preferably fermented

sour cream or yogurt, dill or parsley for garnish

Begin by rinsing the brown rice.  Then add it along with 1 1/2 cups of cold water and a pinch of salt to a large sauce pan.  Bring to a boil, then cover and reduce heat to a simmer and cook until the rice is tender and the water has been absorbed, about 40 minutes.  Keep a watchful eye or you may burn the rice.  You can always add more water and drain any extra, if you’re worried about that happening.

In a large Dutch oven over medium-high heat, brown the ground beef.  Drain the grease, if there is any and add the onion and garlic to the pan along with 2 teaspoons of kosher salt and some cracked black pepper.  Cook the ground beef/onion mixture for just a few minutes, stirring occasionally, until the onion softens a bit.

Add the crushed tomatoes, tomato sauce, chicken broth, chopped cabbage, cooked brown rice, fresh thyme, and bay leaf to the Dutch oven.  Cook for about 30-40 minutes over low-medium heat, or until the cabbage has wilted and is tender.  Add the sauerkraut and freshly chopped parsley and cook for another 5 minutes, or until the sauerkraut has warmed.  Remove bay leaf before serving.  Top with sour cream or plain yogurt and fresh dill or parsley.  Leftovers may become somewhat thick from the rice absorbing more liquid– it can be thinned out with more tomatoes or broth.

Thanks for stopping by Relishing It!

Laurie


Read Full Post »

Hearty Soup of Beef Roast, Root Vegetables, and Warm Spices | Relishing It

I’ve mentioned my rural roots here in previous posts, but for those of you that are new to Relishing It, I grew up on a small dairy farm in western North Dakota.  And I still get terribly homesick from time to time.  So this is one of those recipes that reminds me of my childhood, and helps me cope with being away.  It’s strange, even though I’ve spent more of my life away from Regent ND, it still has my heart.  It’s still my home.  One of the hardest parts of growing older is wanting those comforts of the past, but coming to terms with the fact that they’ll never again be as you remember them.  It’s the double-edge of nostalgia, I suppose.  I miss being that carefree kid running around the farm.  I miss seeing my childhood friends.  I miss regularly seeing my aunts, uncles, and cousins.  And I miss talking with my grandparents, who have all passed away.

Black Butte, North Dakota | Relishing It

                                                             My view every morning for 18 years

When I was a teenager, I worked at the museum in town during the summers.  On my lunch breaks I would venture up to my grandparents’ house for lunch.  My grandma would always make sure to have something ready for me and the three of us would eat together and talk about our lives.  Even then, I really did realize that it was a special time and that one day I’d look back on it with a mixture of longing and gratitude.  My grandparents (on both sides of the family) were real salt-of-the-earth people.  They were hard-working, no-nonsense, and very kind.  I’m so lucky to have had them in my life.  So many of my interests now are things that they did and were interested in– preserving, fermenting, gardening, sausage-making, and even distilling alcohol.  The conversations we could have!

Hearty Soup of Beef Roast, Root Vegetables, and Warm Spices | Relishing It

The soup I’m sharing with you today is based on a soup that my Grandma Jesch used to make for me on some of those lunch breaks.   I only have the memory of the flavors to go off of, but I think this is a pretty good representation.  She would often simmer an entire beef roast for hours, and then turn it into this most amazing, hearty soup.  It has chunks of tender beef, along with root vegetables.  But, the flavors I remember most are the warm spices.  There was a hint of something unusual that drew me to this soup whenever she made it– cinnamon, star anise, and allspice are what I figured they might be– and here they work beautifully.  Also, you’d be a fool not to finish this dish with a splash of cream.  Hope you enjoy!

Soup of Roast Beef, Root Vegetables, and Warm Spices | Relishing It

The Recipe: Hearty Soup of Roast Beef, Root Vegetables, and Warm Spices

(serves 4)

2 tablespoons olive oil

About a 3 pound beef roast ( preferably grass-fed and bone-in)

1/2 white onion, chopped

3-4 garlic cloves, chopped

1 quart beef broth, preferably homemade

4 cups water

5-6 large carrots, cut into chunks

3-4 parsnips, cut into chunks (if too large, remove the woody center)

3 celery stalks, cut into chunks

8-10 smallish yellow potatoes, cut into chunks

1 cinnamon stick

1 star anise

1/2 teaspoon ground allspice

1 teaspoon dried thyme (or 1 1/2 teaspoons fresh)

1 dried bay leaf

kosher salt, and fresh black pepper, to taste

fresh parsley and heavy cream, for serving

Heat a large Dutch oven with olive oil in it.  Season the beef with salt and pepper.  Sear all sides of it until a deep golden color develops.  Remove beef from the pan.  Add the onion and garlic to the hot pan and sauté for a few minutes until tender.  Add the beef back to the pan, along with the beef stock, water and the spices of cinnamon, star anise, allspice, thyme, and bay leaf.  Bring to a high simmer, then reduce heat to medium, cover and let simmer for about 2 1/2 hours or until the beef is somewhat tender.  Next, add the celery, carrots, and parsnips to the pot and simmer until the beef is fully tender, or practically falling off of the bone, another 30-45 minutes, or so.  Then, add the potato chunks and cook for about 20 more minutes until they are tender.  Meanwhile, remove the beef from the pot and separate it into chunks using a fork– removing any visible fat, as well.  Return the pieces of beef to the pot when the potatoes are completely done.  Re-season with salt and pepper.  Remove and discard the star anise, cinnamon stick, and bay leaf.  Sprinkle with freshly chopped parsley and a splash of cream before serving.  Enjoy!

Thanks for stopping by today!

Laurie

Read Full Post »

Pho Ga (Vietnamese Chicken Noodle Soup) | Relishing It

When we moved to the Twin Cities from North Dakota in 1999, we were stunned by all of the wonderful restaurants.  More specifically, the ethnic food choices were mind boggling.  We simply did not have access to these types of food where we grew up. One of the very first places we tried was a small Vietnamese restaurant on the Midway in St. Paul.  It had recently been in the paper for having one of the best bowls of pho in town and the photograph that accompanied the article made my mouth water.  I didn’t know what pho was, but I knew I had to try it– and it. was. wonderful.   We still go to that restaurant occasionally during the Winter months, though now it’s more likely that you’ll find me making this dish at home.

Pho Ga (Vietnamese Chicken Noodle Soup) | Relishing It

It’s quite simple to make a delicious bowl of pho ga that can come together quickly so long as you have the homemade chicken broth ready.  And again, here you’ll want to use the homemade broth– it’ll make the difference.  I generally pull a couple of jars of broth and some shredded, cooked chicken from the freezer just a little while before we want to sit down for dinner.  Pho is all about a simple, flavorful base– some chicken, some rice noodles, and then load the top with fresh ingredients.  No two bowls of pho are identical, at least not in our house, because we all add our own little additions.  I love fish sauce and sriracha mixed into my broth– my kids, not so much.  I also load mine up with jalapeños, basil, sprouts, and a healthy squeeze of lime.  It’s sublime.

Pho Ga (Vietnamese Chicken Noodle Soup) | Relishing It

This soup will warm your body and if it were possible to do– I believe that it may actually warm your soul.  Think of a snowy, cold night tucked in at home.  Light a candle or two and nuzzle in.  Slurp on a bowl of this soup with your family or friends.  It makes the Winter months that much more enjoyable.

Pho Ga (Vietnamese Chicken Noodle Soup) | Relishing It

The Recipe:  Pho Ga | Vietnamese Chicken Noodle Soup

(Serves 4)

2 quarts homemade chicken broth (imperative for this recipe)

3- inch piece of fresh ginger, peeled

5 whole cloves

2 teaspoons whole coriander seeds

2 whole star anise

5 whole allspice berries

1 package (about 14 ounces) thin dried rice noodles

1 bunch scallions, thinly sliced

1 bunch fresh cilantro, stems removed

1/2 medium white onion, thinly sliced

About 4 cups shredded chicken,  (save from when making broth OR boil or bake chicken breasts/thighs)

1 bunch of fresh basil, regular or Thai, for garnish

fresh bean sprouts, for garnish

2 fresh jalapeños, for garnish

1-2 fresh limes, quartered, for garnish

Serve with the following condiments: fish sauce, sriracha sauce, hoisin sauce, red chili paste, and soy sauce

For this recipe, I’m assuming you have homemade chicken broth at the ready.  If you don’t– make some immediately.  If you don’t have time to wait the full 24 hours for it to simmer, that’s fine.  Three hours or so,  will work.  Follow these instructions and add the pho ga broth spices (fresh ginger, cloves, allspice berries, coriander seeds, and star anise) right into the pot.  Note:  You will have much more broth than the recipe calls for, but that’s not entirely a bad thing.  You may want to up the amount of spices, as well. 

Begin by adding two quarts of homemade chicken broth to a large saucepan or kettle.  Place the ginger into the pot along with a spice sachet or cheesecloth tied with string filled with the cloves, allspice berries, coriander seeds, and star anise.  Bring to a boil, then reduce to a medium simmer and let cook for about 45 minutes, so that the flavors can infuse.

Meanwhile, when the broth is nearly finished,  cook the rice noodles according to the package instructions (I generally cook them for less time than suggested)– they don’t take very long to cook, so keep a watchful eye.  You do not want the noodles to become mush.  Fill your individual bowls with the rice noodles,  shredded chicken, some sliced white onion, a bit of cilantro, and sliced scallions.

Remove the ginger and spice sachet from the broth.  Ladle the hot broth into the noodle filled bowls.  Serve with accompaniments– fresh basil, bean sprouts, fresh jalapeño, and lime.  Along with the condiments– fish sauce, sriracha sauce, hoisin sauce, soy sauce, and red chili paste.  Enjoy!

I hope you are all having a wonderful week so far.  Take Care!

Laurie

Read Full Post »


LR edited-0098.jpg-0154

I’m sitting here at my desk on this blustery Minnesota morning, reading about blizzard warnings and drinking a hot coffee.  I’m also thinking about this wonderful, warming soup.  I really wish I had a bowl waiting for me downstairs.  Last week I shared with you how to make your own homemade chicken broth and I promised  that a few delicious soup recipes would follow, so here’s number one.  This Sopa De Lima (Mexican Chicken Lime Soup) has become one of our family favorites.  I love it because I’m partial to broth soups– they warm me up in such a perfect way.  I’m also a huge fan of citrus in my soups– I love to finish them with lemon, or in this case with lime.  It really brightens them up.  This soup comes together in no time at all if you’ve done a bit of prep work– i.e., made your broth ahead of time.

Sopa De Lima (Mexican Chicken Lime Soup) | Relishing It

Assuming you’ve made the broth ahead of time, make sure you reserved your chicken meat for this recipe.  This soup is so simple and doesn’t contain a lot of other major ingredients, so the broth really shines.  Honestly, the soup is basically just seasoned broth with chicken, a bit of tomato, puréed charred onion and a lot of fresh toppings.  And it’s amazing.  Traditionally, tortillas are deep-fried for the top of the soup, but even I take shortcuts sometimes.  I generally forego the deep-frying of the tortillas and instead opt to use good quality tortilla chips.  Having a large pot of hot oil on my stove is just a bit too much effort for me, with not enough reward– but, you can certainly choose to give it a go.

Sopa De Lima (Mexican Chicken Lime Soup) | Relishing It

I’ve found that I love the flavor of broiling the onions and garlic until they have a bit of char on them– not too much.  It really emphasizes the smokey flavor.  You’ll want to watch the garlic and most likely remove it from the oven before the onion is done.  Otherwise it may burn.  The toppings at the end are a personal choice, make it as spicy (with jalapeños and cayenne pepper) as you want.  Load it up with tortilla chips, aged white cheddar cheese, cilantro, more lime, and avocados.  I’m kicking myself for forgetting to put the avocados on the soup before I snapped the photos.  Rest assured I plopped some on it before I devoured the bowl.  They’re perfect here, so don’t forget the avocados.  Enjoy!

Sopa De Lima (Mexican Chicken Lime Soup)| Relishing It

The Recipe:  Sopa De Lima (Mexican Chicken Lime Soup)

(Serves 4)

2 quarts chicken broth (preferably homemade using this recipe)

About 4 cups shredded cooked chicken (use chicken from stock that you previously made OR boil or bake some bone-in, skin-on chicken breasts and thighs– then shred)

1 medium white onion, sliced

about 1 1/2 garlic bulbs, peeled (not just the cloves– the entire bulb!)

1 cup puréed or crushed canned tomatoes

1 teaspoon dried oregano

1/2 teaspoon dried thyme

1/2 teaspoon ground cumin

1/4 teaspoon ground cloves

1/4 teaspoon ground allspice

1 4-inch cinnamon stick

1 dried bay leaf

freshly ground black pepper and kosher salt, to taste

zest from two organic limes

1/4 – 1/3 cup fresh lime juice

Toppings: tortilla chips, cilantro, jalapeños, ground cayenne pepper, lime slices, aged white cheddar cheese (or monterey jack), and avocados

Place the sliced onion and peeled garlic cloves on a baking sheet.  Place in the oven and broil until color begins to develop, flipping once.  You may need to remove the garlic before the onion is done, so it does not burn.  Keep a watchful eye while broiling.

Begin the broth.  In a large Dutch oven or kettle, add the chicken broth, tomatoes, oregano, thyme, cumin, cloves, allspice, cinnamon, bay leaf, lime zest, and salt and pepper.  Bring to a boil, then reduce to medium and let cook for about 20-25  minutes.

Meanwhile, place the charred onion and garlic in a blender and add a bit of broth.  Blend until somewhat smooth.  Add the mixture to the soup.  Continue to cook the soup until you reach the 20-25 minute mark.  Remove the bay leaf and cinnamon.   Add the lime juice and taste.  Season with more salt and pepper, if necessary.

You can choose to add the chicken directly into the soup, but I generally heat in up in the microwave and portion it out among the bowls and ladle the hot soup over it.  Then add the final toppings– the tortilla chips, cheese, cilantro, jalapeños, lime slice, cayenne, and avocados.  Enjoy!

Thanks for stopping by Relishing it!

xo

Laurie

Read Full Post »

Homemade Chicken Broth | Relishing It

Hello, friends!  I hope you all had wonderful holidays.  Ours was busy, yet really fun.  We did a bit (17 hours!) of driving and managed to see a lot of our family.  Since Christmas is such a special time, I really try to keep the focus on my kids and making memories with them– thus the lack of blog posts for the last few weeks.  But yesterday I sent the little ones back to school after an additional two-days off due to the extremely cold weather here in Minnesota caused by the…POLAR VORTEX!  Have you heard about this thing?!  I’m kidding, of course you have.  It seems to be pretty much the only thing that’s been on the news for the last two weeks.  Well, we actually didn’t mind it much.  We played a lot of indoor games (Life, Jenga, Battleship, and Uno each saw some use), and we ate a lot of delicious soup.  Which, I guess, is my segue into today’s recipe.

I have two amazing soup recipes that I plan to share over the next week or so, but before I get ahead of myself, I want to talk about homemade chicken broth.  Homemade chicken broth is the cornerstone to both of these recipes.  While I know that making homemade broth is an old hat for some, for most the solution is picking up a box at the supermarket.  I’ll be honest, that’s occasionally been my solution too, though we recently got another freezer, so I’ve been making broth non-stop now that I have more space.  There are so many health benefits that come with good homemade chicken broth.  It was with good reason your Mother and Grandmother fed you chicken noodle soup when you were sick as a child– they knew what they were doing.

Homemade Chicken Broth | Relishing It

One of the nice things about making chicken broth is that it can be as easy or as involved as you want it to be.  Pretty much any amount of effort will most likely yield something far better tasting than what you get in those grocery store boxes.  Throw a chicken in a pot with a few vegetables, a few herbs, water, salt, and perhaps a glug of white wine.  There it is.  So what are you waiting for?

Alright, a little more detail.  Broth can be made with whole chickens, chicken parts, of just bones (though, technically this last one is called stock). I generally buy a whole (organic, pasture-raised, etc) chicken that is about 5 pounds.  And contrary to what you may have heard, the meat from the chicken is definitely still useable after you have simmered it to make broth.  The chicken retains its wonderful texture and moistness.  The key is that you have to know when to remove the chicken from the simmering pot.

Here’s how to do it:  after 2 1/2 – 3 hours of simmering, take the whole chicken out and remove the tender, fully cooked meat.  Then return the bones and skin to the pot and continue to simmer.  I normally simmer my broth for 24 hours– you can get so many healthy things out of that chicken the longer you simmer it.  However, if you can’t simmer it for 24 hours due to your schedule, anything longer than 3 hours will be just fine.  If you can stretch it to anywhere between 8 and 24 hours, it gets even better.

Homemade Chicken Broth | Relishing It

Monetarily speaking, it also makes sense to make your own.  The cost of the chicken alone is less than I would spend on the amount of broth I yield from one bird.  Plus, I get delicious tender, flavorful chicken that I can plan meals around.  I store my broth in the freezer in wide-mouth quart jars.  I’ve made the mistake of using regular jars and have had some crack. I also don’t put the lids on initially, leaving 1-inch- 1 1/2- inches of space at the top to allow enough room for the broth to expand as it freezes.  I then put the lids on after it has frozen.

You’ll find that once you make your first batch of broth, you won’t be able to turn back.  Honestly.  Enjoy– get started on that broth and I’ll meet you back here very soon to talk about some delicious soups you can make with it!

Homemade Chicken Broth | Relishing It

The Recipe: Homemade Chicken Broth

(Yields 5-6 quarts)

4-5 pound organic, pasture-raised whole chicken, or chicken parts, or bones

3-4 celery sticks, rough chopped

1 large carrot, rough chopped

1 large parsnip, rough chopped

1 onion, quartered (no need to peel)

1 bulb garlic, halved (no need to peel)

3/4 teaspoon whole black peppercorns

1 1/2 tablespoons dried thyme

3 dried bay leaves

handful of fresh parsley, rough chopped

About 2 tablespoons kosher or sea salt, more to taste

healthy glug of white wine, about 3/4 cup

Note: Remember, this is my version to make the broth.  If you don’t have all of the ingredients, don’t sweat it.  Use what you do have.  It’ll be delicious.  Also, when using the wine, if you’re not planning to finish the bottle,  portion it out into containers, freeze, and use some the next time you plan to make broth.  It works great!

Add all of the ingredients to a large, heavy-bottomed stock pot.  Fill with cold, filtered water– enough to cover ingredients by 1 inch to 1 1/2 inches.  Bring the ingredients to a near boil, skip off foam using a spoon, then reduce the heat to the lowest setting with the lid ajar ever so slightly.  You’ll want it to be on a very low simmer with the smallest amount of bubbles forming for the remainder of the time.  This will keep the evaporation to a minimum, as well as let the flavors deepen.

Simmer for about 2 1/2 hours.  Then carefully take the chicken from the pot and remove the meat.  At this point the chicken will shred beautifully.  You can use the meat immediately,  or freeze for another time.  Return the bones and skin to the pot and continue simmering for another 21 1/2 hours, or less time if need be.

When the broth is done, you will want to strain and discard the bones and vegetables– they’ve served their purpose.  Using the back of a large spoon, I often push the carrots and parsnips through the strainer– it gives the broth a wonderful color and flavor.  After you’ve removed the large chunks, you’ll want to pour the liquid through a cheesecloth, so it is nice and clear.  At this point, you can decide if you want to remove the fat from the broth or not.  Some people prefer the richness it adds and leave it in there.  I pour it into a gravy separator, the kind where the spout is on the bottom and the fat floats to the top.  If you don’t have that, you can also try a large resealable bag– the fat will float to the top and you can make a small cut on the bottom.  This may be tricky, so be careful.  Another option, is to wait until you place it into the jars or plastic containers, if using.  Once the broth is cold, the fat will harden and you can simply remove it.

When pouring into the jars, or plastic containers, if using– make sure to leave about a 1 1/2- inch space from the top of the jar.  The liquid will expand as it freezes.  Cool the broth completely before placing the the freezer.  I choose not to place the lids on them immediately, instead waiting until after they’ve fully frozen.  Thaw in warm water or place in the refrigerator when ready to use.  Enjoy!

Thanks for stopping by Relishing It today!

Laurie

Read Full Post »

Vegetarian Lentil Taco Soup | Relishing ItBaby, it’s cold outside!  Or at least it is here in Minnesota.  There is definitely that ‘winter-is-coming’ chill in the air.  And this is just the start.  Wind chills will eventually plummet to -50 degrees F, snow will pile up on the sidewalks.  Ugh.  I always complain as autumn comes to a close, knowing that we face the long slog to April.  My body just isn’t acclimated to the cold for the first month or so.  Ah well, I guess there’s also the comforting expectation of snuggling into a warm blanket and a good book while the kids head out to play in the snow.  There is that to look forward to…

Homemade Taco Seasoning | Relishing It

Homemade Taco Seasoning | Relishing It

Vegetarian Lenti; Taco Soup | Relishing It

As soon as the weather turns, I start thinking about soup.  This particular one is a beauty.  It’s substantial– more like a cross between a soup and a stew.  It’s loaded with healthy protein from lentils and beans, though my favorite ingredient this time around is most definitely the corn.  It makes so many soups better.  It adds a nice flavor and a bit of texture, as well.  Not to mention, it pairs beautifully with the Mexican flavors.

Vegetarian Lentil Taco Soup | Relishing It

Let’s talk about those flavors, shall we?  Years ago I began making my own taco mix.  To be honest, it happened a bit by accident.  I ran out of my usual purchased taco seasoning, so I had to improvise.  Luckily, I keep a well stocked spice cabinet (Penzys really should send me a thank you note).  In looking at the recipe, don’t let the length of the list scare you.  I realize that not everyone has all of the spices on hand.  As long as you have the main ones (chili, paprika, garlic, onion, and cumin powder), you will be just fine.  But, if you do happen to have the others, even better.  Try this seasoning the next time you make traditional tacos– you’ll love it!

Vegetarian Lentil Taco Soup | Relishing ItThe soup is wonderful served with the usual taco accompaniments– sour cream, cilantro, jalapeños, and of course some tortilla chips. However, I also discovered another way that I like to eat the leftovers.  Since the legumes continue to soak up more broth overnight, the soup becomes a bit thicker.  I love to serve it atop baked spaghetti squash.  It’s delicious and makes a great gluten-free, paleo, and even vegan meal! So– perfect to serve to friends or family that might be trying to eat that particular way.  Stay warm, friends!

Vegetarian Lentil Taco Soup Over Spaghetti Squash | Relishing It

The Recipe: Vegetarian Lentil Taco Soup

(serves 4-6 comfortably)

2 cups dry brown lentils, rinsed

2/3 cup dry red beans (or 1 can), rinsed

2/3 cup dry black beans (or 1 can), rinsed

2 tablespoons olive oil

1/2 cup chopped white onion

3 garlic cloves, minced

1 quart puréed or crushed tomatoes

1 quart vegetable broth (or use chicken, if you’re not trying to stay vegetarian)

1 heaping cup frozen corn

1/2 cup chopped fresh cilantro

juice of one lime

scallions, jalapeños, sour cream (if vegan isn’t your aim) and limes as garnish options

For the Taco Seasoning:

(makes a scant 1/2 cup)

2 tablespoons ancho chili powder

1 tablespoon ground cumin

1 teaspoon sweet paprika

1 teaspoon garlic powder

1 teaspoon onion powder

2 teaspoons kosher salt

2 teaspoons coarse black pepper

1/2 teaspoon crushed red pepper flakes

1/2 teaspoon dried oregano

1/4 teaspoon smoked paprika

1/4 teaspoon ground allspice

To begin: soak and cook your red and black beans separately following standard directions to cook beans.  Honestly, I usually have extras in my freezer that I pull out to throw into this soup.  Beans freeze incredibly well, so feel free to make extras for that purpose. You’ll want about 1 1/2 cups of cooked red beans, and 1 1/2 cups of cooked black beans.  Or simple choose to use one can of each, rinsed.

Mix all of the taco seasoning ingredients together in small bowl, set aside.

Heat a large Dutch oven over medium-high heat and add the olive oil.   Begin to saute the onion and garlic for a couple of minutes until somewhat soft.  Add the taco seasoning to the onion mixture.  Then add the tomatoes, vegetables stock, cooked red and black beans, and the lentils.  Bring to a boil, then reduce heat to a medium simmer.  Cook covered for about 30-40 minutes, or until the lentils are tender, but have not fallen apart.  Stirring a couple of times along the way.  Make sure not to overcook the lentils, or they will turn to mush.  When the soup is done, add the frozen corn, cilantro, and juice of one lime.  Reseason with salt and pepper, if necessary.  Serve with sour cream, cilantro, jalapeños, and more lime.  Enjoy!

Thanks for stopping by Relishing It!

Laurie

Read Full Post »

Roasted Red Pepper Soup | Relishing It

You already have a nice stockpile of frozen red peppers to get you through the winter, right?  No?  Well it’s time to get on that.  I figure that here in Minnestota you can still get one, maybe two last visits in to the farmers market to stock up.  If you come across a box or two of red peppers–buy them!  You’ll be happy you did.

Roasted Red Pepper Soup | Relishing It

Roasted Red Pepper Soup | Relishing It

Roasted Red Pepper Soup | Relishing It

Now here’s what I want you to do with those peppers: broil them in the oven for just a few minutes until they are nice and black, then throw them in a large plastic resealable bag.  The trick here is that the steam in the bag will loosen the blackened skin.  When they’ve cooled a bit, slip off the skin with your fingers.  Next, put the peppers in a food processor, or chop with a knife.  Finally, place your chopped peppers in a plastic freezer bag, or vaccum seal it and freeze it.  Now you’re set.  Whenever you want to make this incredible soup this winter, you can do so in about 20 minutes.  How’s that for a quick dinner plan?

Roasted Red Pepper Soup | Relishing It

This roasted red pepper soup is one of my favorites.  It has a silky texture and amazing flavor.  Drizzle a little olive oil on top, and serve it with a piece of crusty homemade bread.  Of course, you can do so many other things with those roasted peppers, as well.  You can make roasted red pepper hummus, or throw them in your favorite pasta dish.  Really, the possibilities are endless.  Just get them now and freeze those babies!

Roasted Red Pepper Soup | Relishing It

The Recipe:  Roasted Red Pepper Soup

(serves 4)

About 8 large red peppers  (3 1/2 cups chopped roasted red peppers)

1/2 medium white onion  (3/4 cup chopped)

5 garlic cloves, minced

1 quart chicken broth  (4 cups)

1 large anchovy filet, minced

1 teaspoon chopped fresh thyme ( or 1/2 teaspoon dried)

1 teaspoon chopped fresh oregano ( or 1/2 teaspoon dried)

1 dried bay leaf

extra virgin olive oil

kosher salt and cracked black pepper

1 lemon

parsley, for garnish

To Prepare the Red Peppers:  Place oven rack close to the broiler unit.   Line a large baking sheet with parchment paper.  Cut the peppers in half and remove the insides.  Place peppers on baking sheet and press down with your hand to flatten them.  Place under broiler and broil them for about 15 minutes, or until they are very black.  You will need to move the pan around and perhaps even rotate some of the peppers using tongs.  Keep a close eye on them.  Once they are done, remove from the pan and immediately place in a large resealable plastic bag.  The steam will loosen the black skin.  After 10 – 15 minutes or so, remove from the bag and slip the skin off using your fingers.  It should come off easily.  Discard the blackened portion.  Chop the peppers in a food procesor or by hand.

To Make the Soup:  In a Dutch oven, heat about 3 tablespoons of olive oil at  medium/high heat.   Add the chopped onions and garlic and a generous sprinkle of salt.  Sauté for a couple of minutes until tender. Then add the peppers, chicken broth, oregano, thyme, anchovy, bay leaf, and salt and pepper to taste.  Bring to a boil and then reduce to a simmer for about 15- 20 minutes.  Remove bay leaf and purée  with an immersion blender or carefully pour the soup into a stand blender.  Blend until smooth.  Taste and re-season with salt and pepper, as needed.  Since there are so few ingredients in this soup, the amount of salt plays a big role in bringing out the flavors– make sure to salt it properly.  To serve, squeeze a bit of lemon to taste on the soup (also plays a big role), a drizzle of olive oil, and some fresh parsley.  Enjoy!

Hope you all have a lovely weekend!

xo

Laurie

Read Full Post »

Coconut Red Curry Soup with Brown Rice Noodles via Relishing It

Hello again!  I hope you had a wonderful weekend.  Ours went by far too quickly, and was… a bit of a mixed bag.  Friday night I made this tasty coconut red curry soup, we played games, and had a dance party in Aria’s room– flashing colored lights and blaring music included.  It was great.  I still smile when I think about how happy she was spending her birthday money on her own disco ball.  Saturday, on the other hand, was not so pleasant.  Do you ever have days where everyone in the family wants to do something different?  No one can agree on a plan, everyone is a bit “off”, and the day spirals into communal grumpiness.  That was our Saturday.  As we were putting the kids to bed that night, talking about how we had wasted one of our precious weekend days, my daughter (in her sweet four-year-old voice) said, “Everybody’s different.  That’s just how life is.”  So there’s a bit of wisdom.  Thankfully, by Sunday we had all learned our lessons and agreed to compromise, and it was fantastic.  The sun was shining, we went out-and-about, the kids were happy, the adults were happy.  We ended the weekend on a great note.

Guajillo Peppers for Red Curry Paste via Relishing It

Anyway…back to this soup that I threw together for “Friday Night Fun.”  It’s loaded with tons of healthy ingredients– brown rice noodles, bok choy, snow peas, turmeric, chicken, and homemade red curry paste.  It’s all in there, combining to make a warm and filling soup laced with those delicious Thai flavors that we love.  The idea for this soup came about awhile back when I was making some other Thai dish.  I realized that I was out of curry paste, so I took a look at the ingredients on the empty bottle in the fridge.  I was already familiar with making my own condiments ( here and here), so I decided to give homemade curry paste a shot.  And since the the first listed ingredient was sugar, I figured it was an opportunity to make a healthier version to use in other meals.  One of the things I love about making homemade versions is that there really isn’t a right or wrong way.  It’s fun to go ‘off-book’.  As long as you pay attention to how the flavor combinations develop as you add ingredients, you’ll be fine.  Cooking with this philosophy opens up so many possibilities.  Have the courage to take a chance, and rely on your taste, and it’ll be a game changer for your kitchen skills.

Ingredients for Red Curry Paste via Relishing It

At any rate, I love the result of this red curry paste.  I decided to not add anything sweet to the actual paste.  Instead, I made up for any needed sweetness by seasoning the whole soup.  Use your judgement to fit this dish to your family’s taste.  The same goes for the dried chili peppers.  Here, I used a mild one– Guajillo.  Penzeys carries all sorts of dried chili peppers in different ranges of heat.  Use whichever you prefer.  And don’t be put-off by the anchovies in the paste.  They add a little umami flavor, but you won’t taste anything fish-like.  Trust me on this one.  One final thing on the paste, it’s a nice idea to make this a bit ahead of time to allow the flavors to come together.  You will have leftovers that can be stored in the refrigerator.  Of course, if you decide not to make your own curry paste, this soup will still be wonderful with a store-bought version.

Homemade Red Curry Paste via Relishing It

I love cooking with coconut milk (the canned version, not the carton).  Here, I sweetened the soup with a bit of honey, but palm sugar (or regular) can also be used.  The vegetables are interchangeable, of course.  A couple of hefty handfuls of spinach are a nice replacement for the bok choy.  Red pepper (sautéed a bit beforehand) also goes very well in this dish.  You can roast your own chicken, bake some chicken breasts, or use store-bought rotisserie chicken for an even quicker meal.  Or you can leave the chicken out entirely for a vegetarian option.  If you happen to have kaffir lime leaves on hand, throw them in– they will be brilliant.  I didn’t this time around, but the extra lime juice worked just fine.

Coconut Red Curry Soup via Relishing It

A note about the bowl in the photo– isn’t it lovely?  You know I advocate using local ingredients as much as possible, but I also have a soft spot for local artists.  The gorgeous bowl in these photos is from Evla Pottery.  I fell in love with their work years ago when my husband surprised me with a large decorative plate.  Last week while on a stroll with Aria, I stopped in to have a look around and was smitten with these bowls.  Evla is run by a husband and wife who craft wonderful pottery and paintings.  They have a beautiful store, and I’m thankful that they’re just a few blocks from our home.  Stop by if you’re in the neighborhood, or take a look on-line if you need to treat yourself or another to something special.

Coconut Red Curry Soup with Brown Rice Noodles via Relishing It

The Recipe: Red Coconut Curry Soup with Brown Rice Noodles

(Serves 4-6)

For the Red Curry Paste:

4 dried Guajillo peppers (other peppers will work fine, too)

1 stalk lemon grass, finely chopped ( about 1 1/2 tablespoons)

1 knob fresh ginger, finely chopped (about 1 tablespoon)

1 teaspoon hot curry powder

1 tablespoon coriander seeds, toasted and ground

1 tablespoon fish sauce

3-4 tablespoons minced shallot

3 garlic cloves

2 anchovy fillets, finely chopped

3 tablespoons liquid from soaked peppers, more if needed

For the Coconut Red Curry Soup:

2-3 tablespoons olive oil

About 1 pound chicken breasts, cooked and shredded (rotisserie works well, too)

2 teaspoons coriander seed, toasted and ground

1 tablespoon fresh ginger, finely chopped

1 stalk lemon grass, left whole

2 tablespoons finely chopped shallots

1 tablespoon hot or sweet curry powder

1 teaspoon ground turmeric

2-3 tablespoons honey (or more, to taste)

3 tablespoons fish sauce

3 tablespoons red curry paste

1 bunch green onions, finely chopped

2 heads baby bok choy, leaves separated  (or a couple hefty handful of fresh spinach)

About 1  1/2 cups fresh snow peas

1/2 chopped cilantro

1-2 limes, cut into wedges

5 cups water

1 can organic coconut milk

8 ounces brown rice noodles

To make the red curry paste:  Place the dried chili peppers into a small bowl, pour boiling water over them and cover the bowl with a plate.  Let sit for 30 minutes.  Reserve some of the soaking liquid.  Using  a small mini food processor, add the peppers, lemon grass, ginger, curry powder, ground coriander, fish sauce, shallots, garlic, anchovies, and 3 tablespoons soaking liquid.  Blend for a few minutes until very smooth.  Cover and refrigerate until ready to use.

To make the coconut red curry soup:  In a large dutch oven, heat the olive oil.  Add the shallots and ginger and sauté for a minute or so.  Add the curry powder, turmeric, ground coriander, and red curry paste and sauté for another 30 seconds.  Add  5 cups of water along with the lemon grass stalk, fish sauce, coconut milk, and honey.  Bring the soup to a boil, then reduce heat to low-medium and let simmer for 15-20 minutes, or so.

Meanwhile, bring a large kettle full of water to a boil for the brown rice noodles.  When the soup tastes as if the flavors have melded, cook the rice noodles in the boiling water for about 8-10 minutes, or until they are al dente. Remove the stalk of lemongrass.  About 2 minutes before the rice noodles are done, add the snow peas , bok choy , and chicken to the soup.    Strain the noodles and add them to the soup.  Stir in most of the green onions and cilantro, reserving a bit for garnishing the top each bowl.  Be sure to serve a lime wedge or two along with each bowl– the lime really brightens the soup and brings all of the flavors together.   This soup is best enjoyed immediately when it is done.  Enjoy!

Thanks for stopping by today! xo

Laurie

Read Full Post »

Black Bean Soup with Pineapple via Relishing It

Greetings!  With another wave of snowstorms moving into Minnesota this weekend, it’s time for a new soup recipe here at Relishing It.  You already know that I’m soup-obsessed, so I won’t go into that again.  But I always find that Winter is a bit more bearable knowing I can eat soup as often as I like.  Honestly, if you were to take a peak into our refrigerator on any given day this time of year you’d find a couple of soups.  And the leftovers are just easy, quick lunches.  I think so many soups actually get better after sitting for a day or two.

Black Beans via Relishing It

This particular soup takes me back.  Many years ago, I flew out to the East Coast for my best friend’s wedding.  A few days before the ceremony, we found a cute little restaurant that made an amazing black bean soup with pineapple chunks.  Having spent my whole life in North Dakota up to that point, I’d never eaten anything like it.  Black beans with pineapple simply weren’t a pairing you’d find in the local Midwest diners.  The soup was so delicious that we went back for it several times that week.  Since I’ve thought about that soup so often, I finally decided to create my own version of it at home.

Roasted Red Peppers via Relishing It

First up are the beans.  These fantastic little legumes are delicious and good for your body.  More on that here.  I love how versatile they are– they’re staples in Mexican, Indian, and Caribbean cuisine.  Add to that the fact that they’re inexpensive, and it’s a total win.  I put beans in so many dishes that it’s ridiculous.  In this soup, the pineapple makes for a perfect pairing with the black beans.  It adds a nice subtle sweetness to contrast with the savoriness.  And the acidity from the fruit gives this soup a fresh flavor that you don’t often find in bean-based dishes.

Black Bean Soup with Pineapple via Relishing It

I also delved into my frozen supply of roasted red peppers from this past summer.  They worked great in this soup.  If you can’t find any roasted red peppers, feel free to use a regular one, but be sure to sauté it a bit before adding it to the soup.   The cilantro on top gives it another burst of freshness, and the jalapeño lends just the right amount of heat.  So gather up your ingredients and get this one simmering for the snowfall this weekend.  Cozy-up, my friends!

Black Bean Soup with Pineapple via Relishing It

The Recipe:  Black Bean Soup with Pineapple

(serves 4-6)

2 tablespoons olive oil

2 2/3 cups dried organic black beans, soaked overnight (or 4 – 15 ounce cans, drained)

1/2 cup white onion, chopped

4 garlic cloves, chopped

1/2 cup roasted red peppers, chopped

1 1/2 tablespoons cumin seed, toasted then ground

1 teaspoon coriander seed, toasted then ground

1/2 teaspoon smoked paprika

1 dried bay leaf

1 pineapple, cut and cubed,  yielding about 2 cups (canned can also be substituted)

4 cups water

kosher salt and pepper, to taste

Sliced jalapeños and chopped cilantro, for garnish

In a large Dutch oven, sauté the onion and garlic in the olive oil over medium heat for a couple of minutes.  When the onions are soft, add the ground cumin, coriander, and smoked paprika.  Sauté for about 30 seconds.  Add the roasted red pepper, soaked beans, water, bay leaf, and salt and pepper.  Cook for about a half hour over medium heat or until the beans start to feel nice and soft.  Add the pineapple and continue to cook for another 20 minutes, or until the beans are completely soft and tender.  When they are, carefully remove about 1 cup of the black beans and place it into a blender.  Blend until smooth, then return to the pot.  If you want the soup thicker, blend a few more beans.  Like your soup thinner, add a bit more water.  You get the idea.  Adjust seasoning with salt and pepper, if necessary.   Top with chopped cilantro and sliced jalapeños.  Keeps well for days in the refrigerator.  Enjoy!

Have a lovely weekend!

Laurie

Read Full Post »

Older Posts »

%d bloggers like this: