Feeds:
Posts
Comments

Posts Tagged ‘Main Dish’

Enchilada Bake with Butternut Squash, Black Beans, and Shredded Chicken | Relishing It

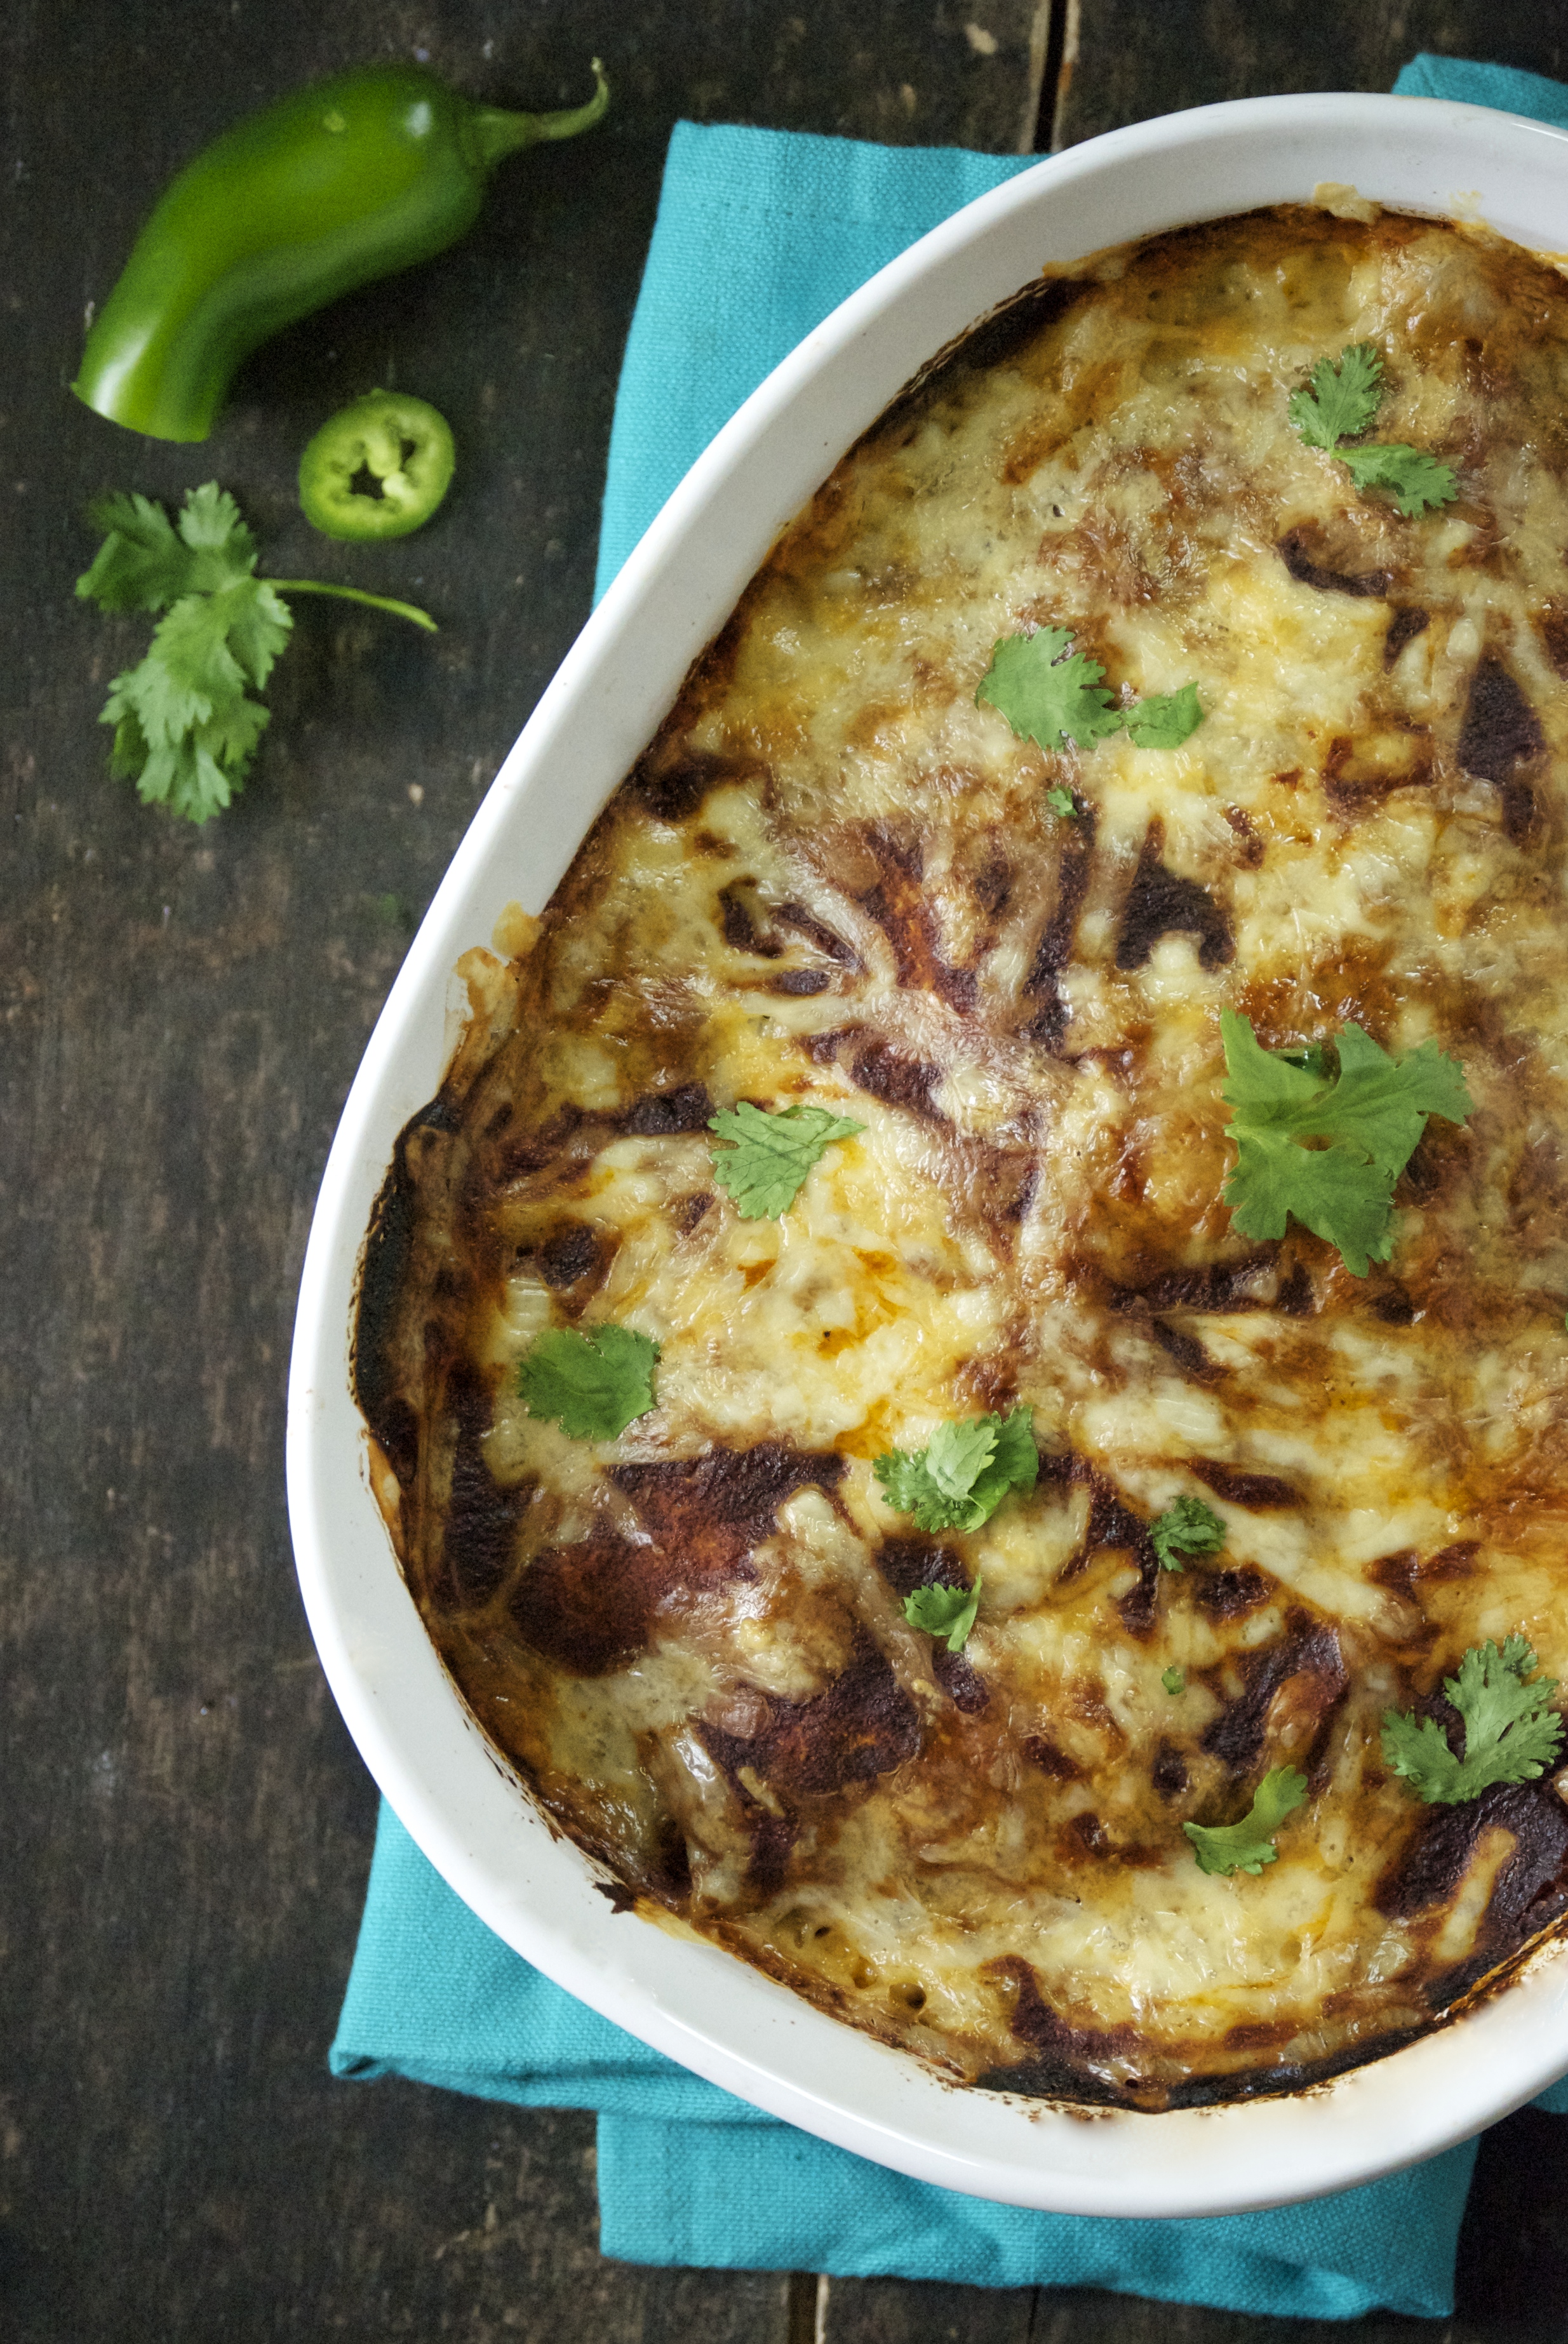
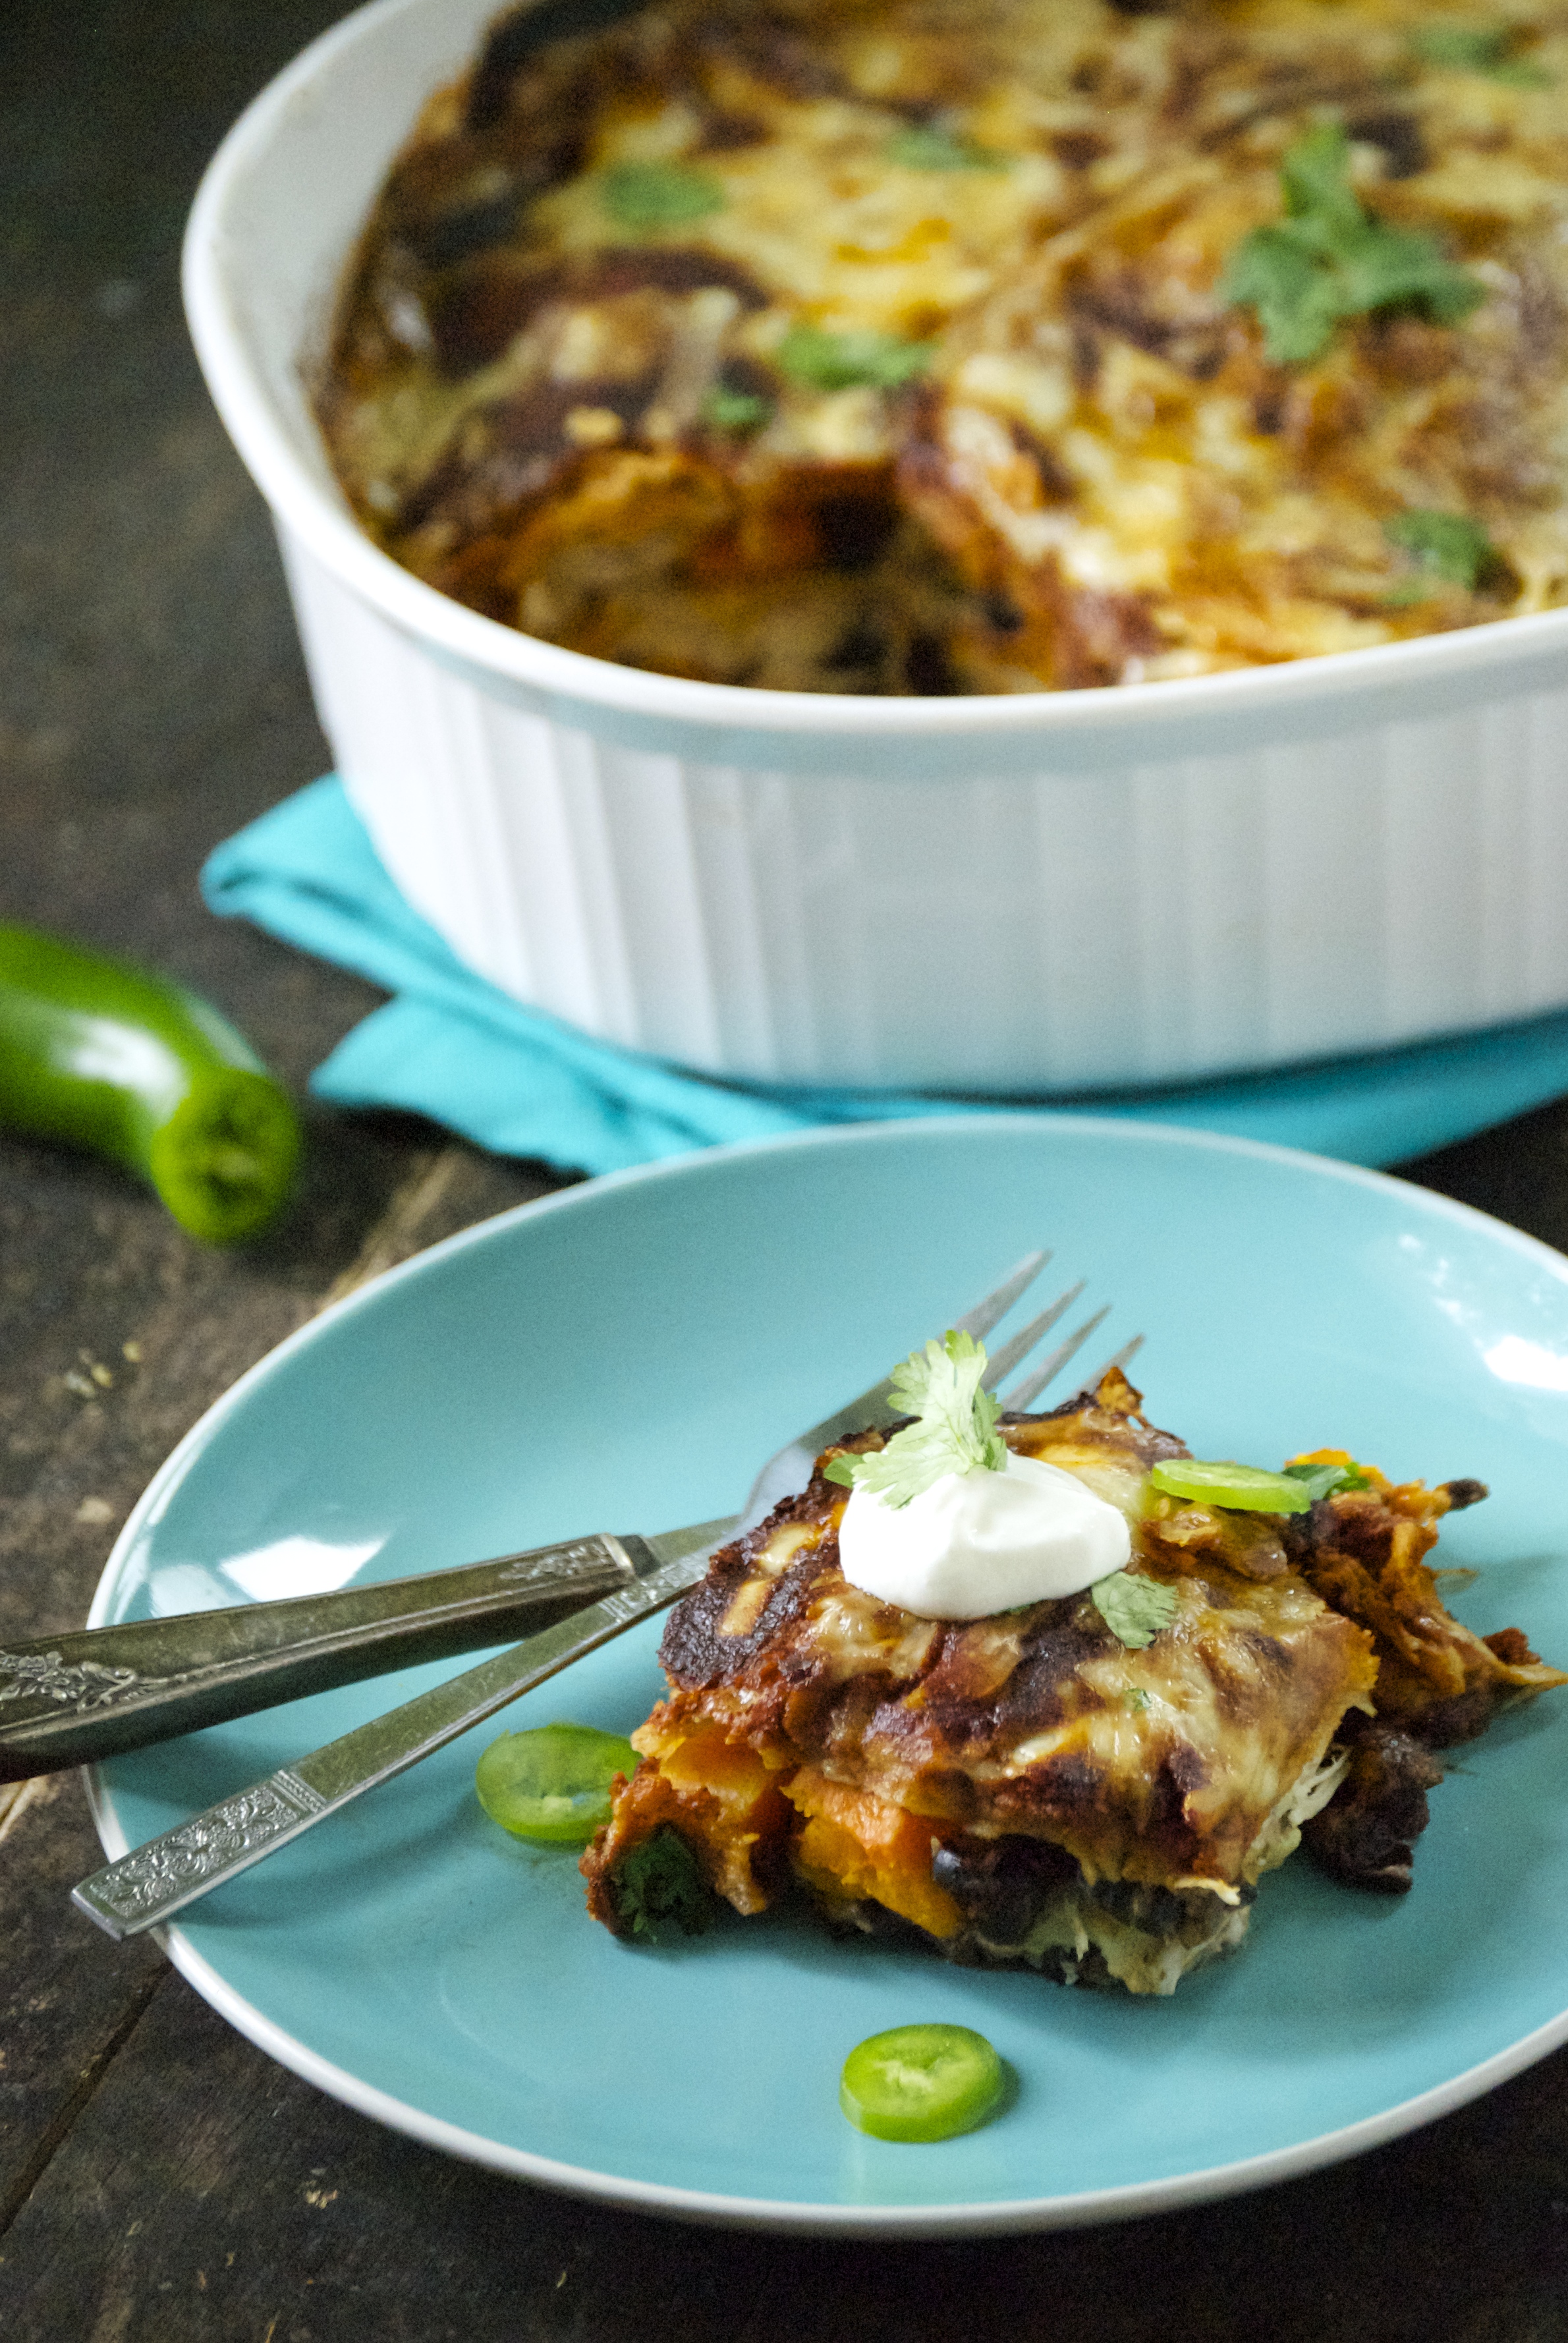
So, I’m assuming you have all made your homemade batch of enchilada sauce from my post a couple days ago, right?  Now, what are you going to do with that bowl of deliciousness?  You could use it for regular ol’ enchiladas, but why not try something different– like this enchilada bake? An enchilada bake is kind of like an Italian lasagna but with a Mexican twist.  It’s a lot of layering of ingredients of your choosing separated by tortillas, cheese, and sauce.  And it’s wonderful.

Enchilada Bake with Butternut Squash, Black Beans, and Shredded Chicken | Relishing It

Enchilada Bake with Butternut Squash, Black Beans, and Shredded Chicken | Relishing It

Enchilada Bake with Butternut Squash, Black Beans, and Shredded Chicken | Relishing It

Of course, you can use any sort of filling that you want, but I chose to go with butternut squash because it’s in-season right now.   Shredded chicken probably isn’t necessary as the black beans give this dish protein and a nice Mexican vibe.  With that said, the chicken was perfect in this dish– and my husband probably would have rioted without it.  Plus, I had some in my refrigerator from making broth the other day.  I love the combination of the squash, black beans, and chicken– they compliment each other so well.  And the enchilada sauce ties everything together.

Enchilada Bake with Butternut Squash, Black Beans, and Shredded Chicken | Relishing It

Enchilada Bake with Butternut Squash, Black Beans, and Shredded Chicken | Relishing It

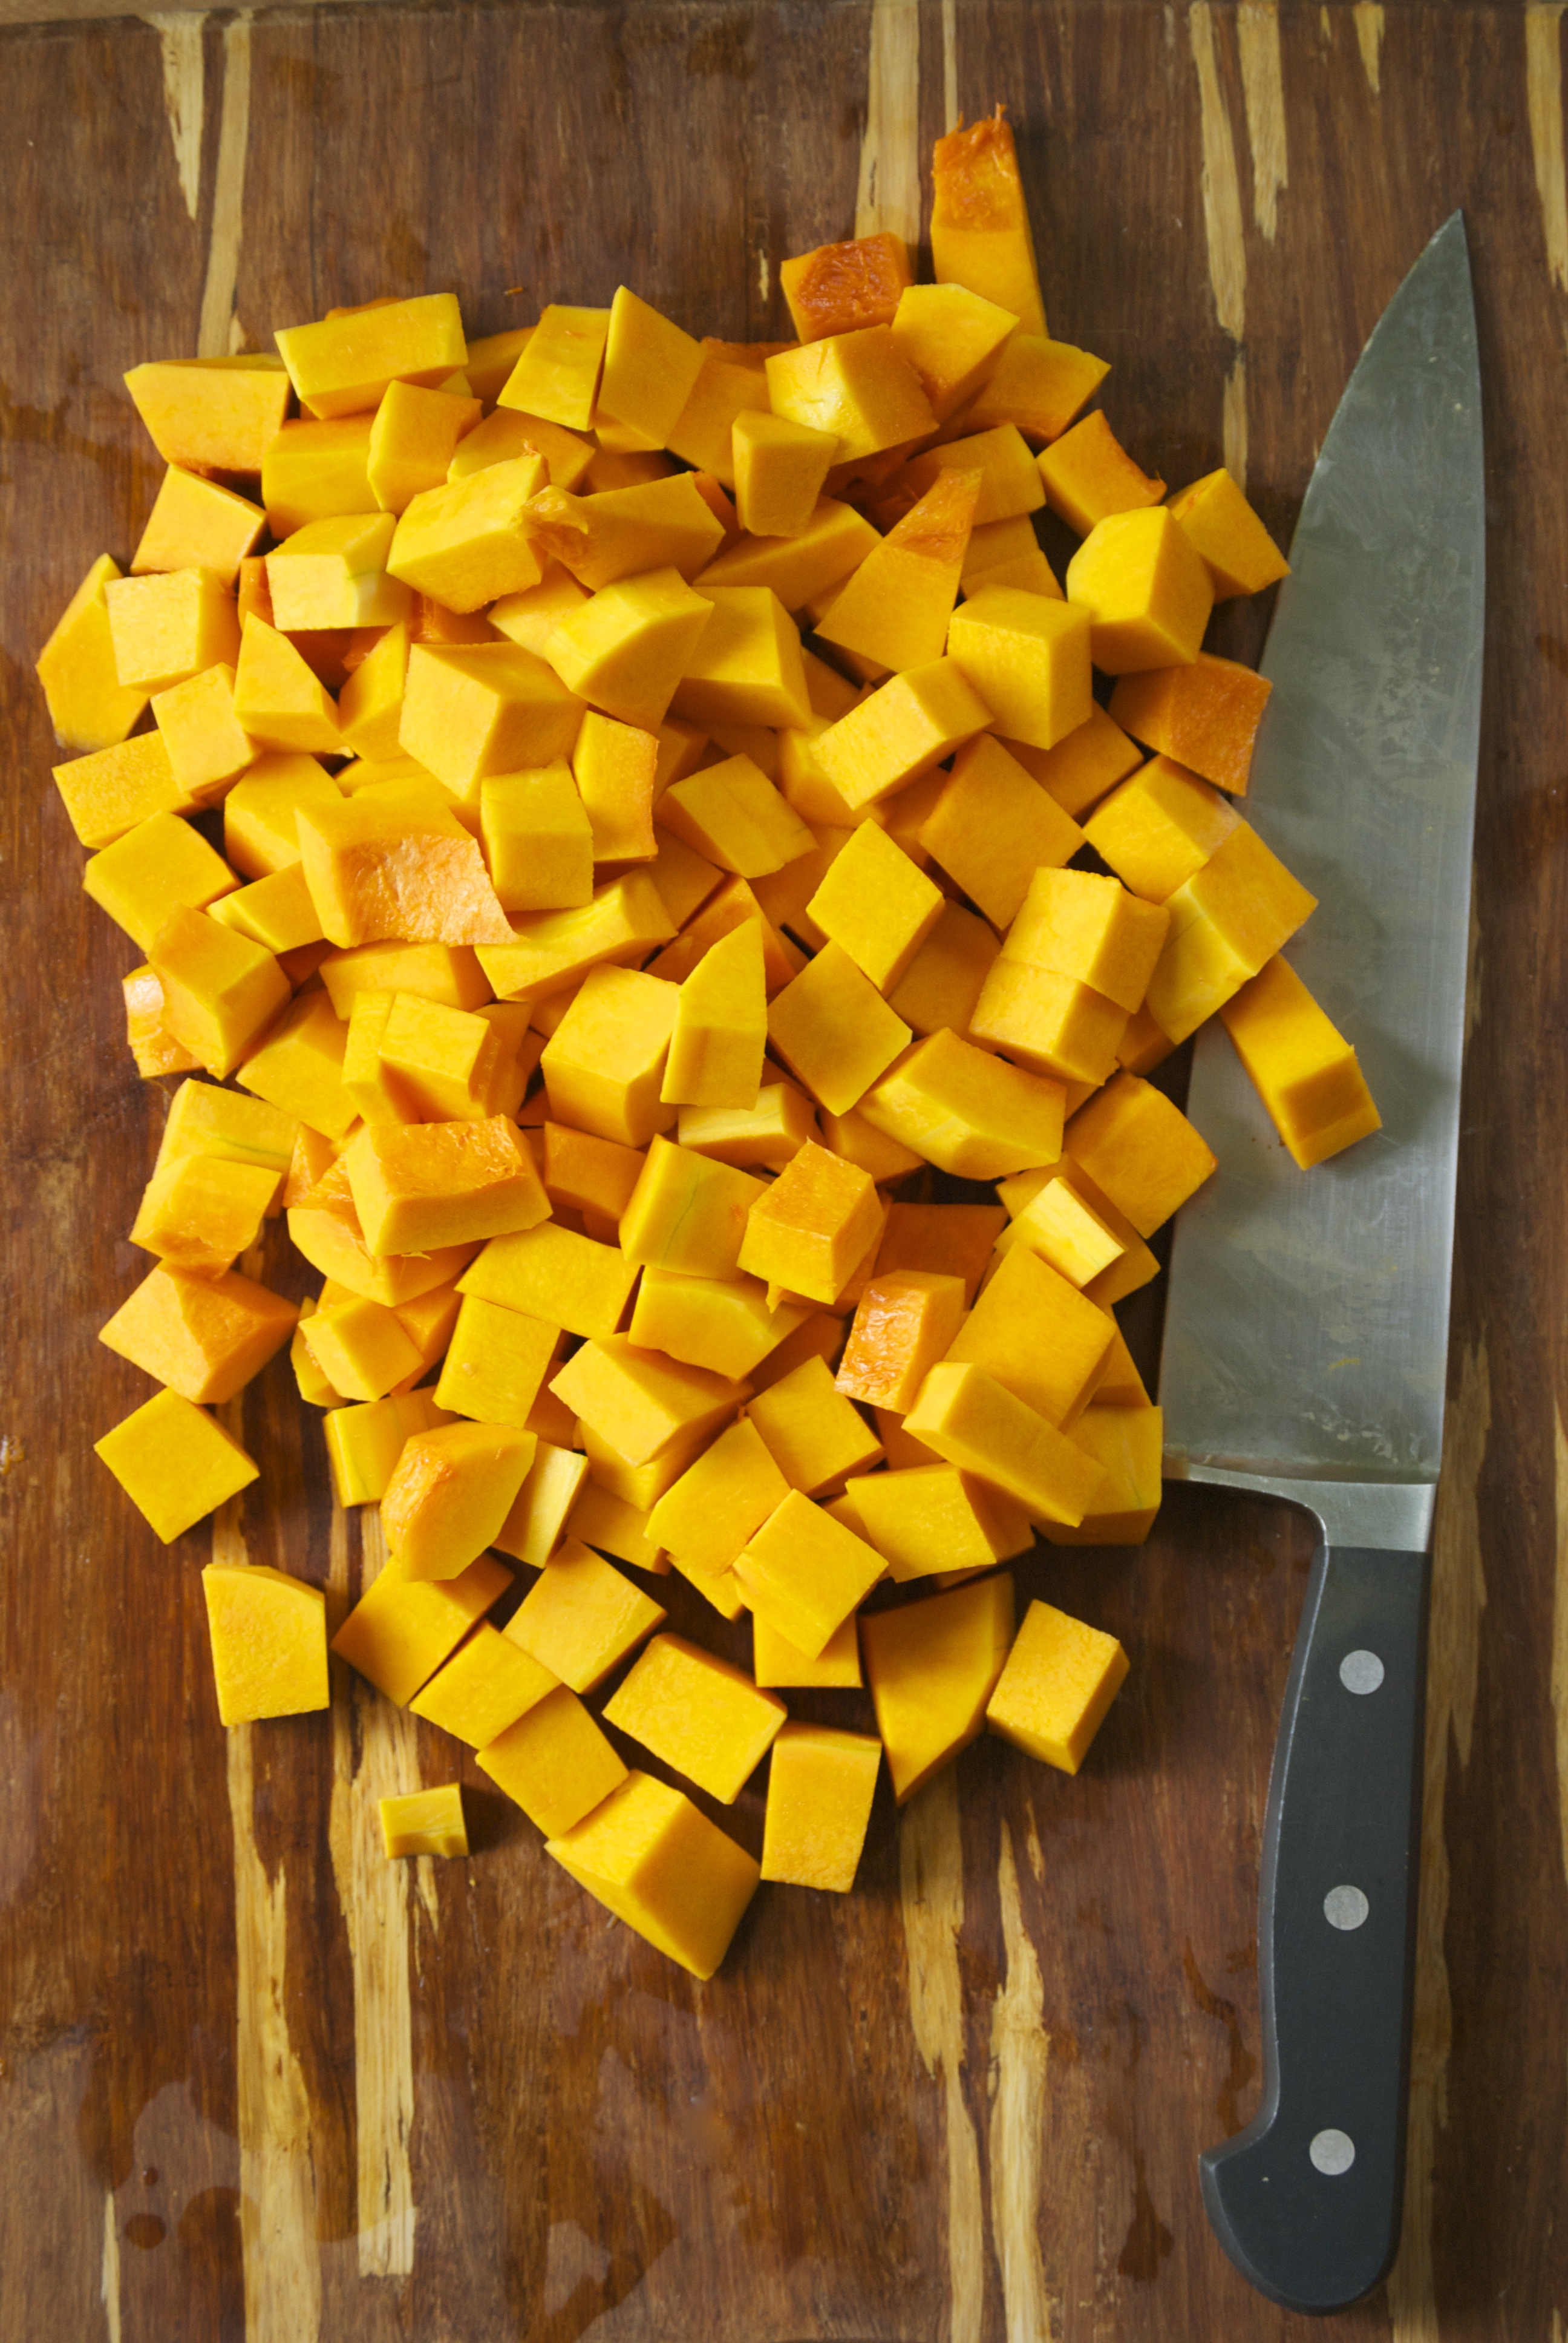
If you’re not entirely sure how to cut into that butternut squash, I took a few photos that should help you out.  It’s quite easy to dice.  And if you have extra squash, roast it and freeze it for later.  I love doing that this time of year, since they are so plentiful and inexpensive at the farmers markets.  Something to think about if you’re like me and stocking your freezer full of summer goodness to get you through the winter.  Be well, my friends.

Enchilada Bake with Butternut Squash, Black Beans, and Shredded Chicken | Relishing It

Enchilada Bake with Butternut Squash, Black Beans, and Shredded Chicken | Relishing It

The Recipe: Enchilada Bake with Butternut Squash, Black Beans, and Shredded Chicken

(makes an 11 x 8 casserole)

1 butternut squash, cubed into small pieces (you’ll only use about 1 1/2 cups of it)

1 cup cooked black beans

1 1/2 cups shredded monterey jack cheese

about 12 corn or flour tortillas, or more depending upon your pan size

1 cup shredded, cooked chicken ( *see note)

2 cups homemade enchilada sauce, plus more for serving

olive oil

salt and pepper

green onions, sour cream, and jalapeños, for garnish

*Note: If you don’t have any cooked chicken on hand, you can easily roast some.  You’ll need about 2 bone-in, skin-on chicken breasts.  Place on a small baking sheet lined with foil.  Drizzle with olive oil, salt, and pepper. Bake at 375°F for about 45 minutes, or until the chicken reaches between 165-170°F when inserted with a thermometer. You can bake the chicken and squash at the same time, the chicken will just need to bake a bit longer.  Let the chicken rest for at least 10 minutes before shredding it

Preheat oven to 375°F.  Place the cubed squash on a large baking pan lined with parchment paper.  Drizzle with olive oil and sprinkle with salt and pepper.  Roast for about 25 minutes, or until tender.  Remove from oven.  You will not use all of the squash.  Store remaining squash in the refrigerator to use throughout the week, or freeze.

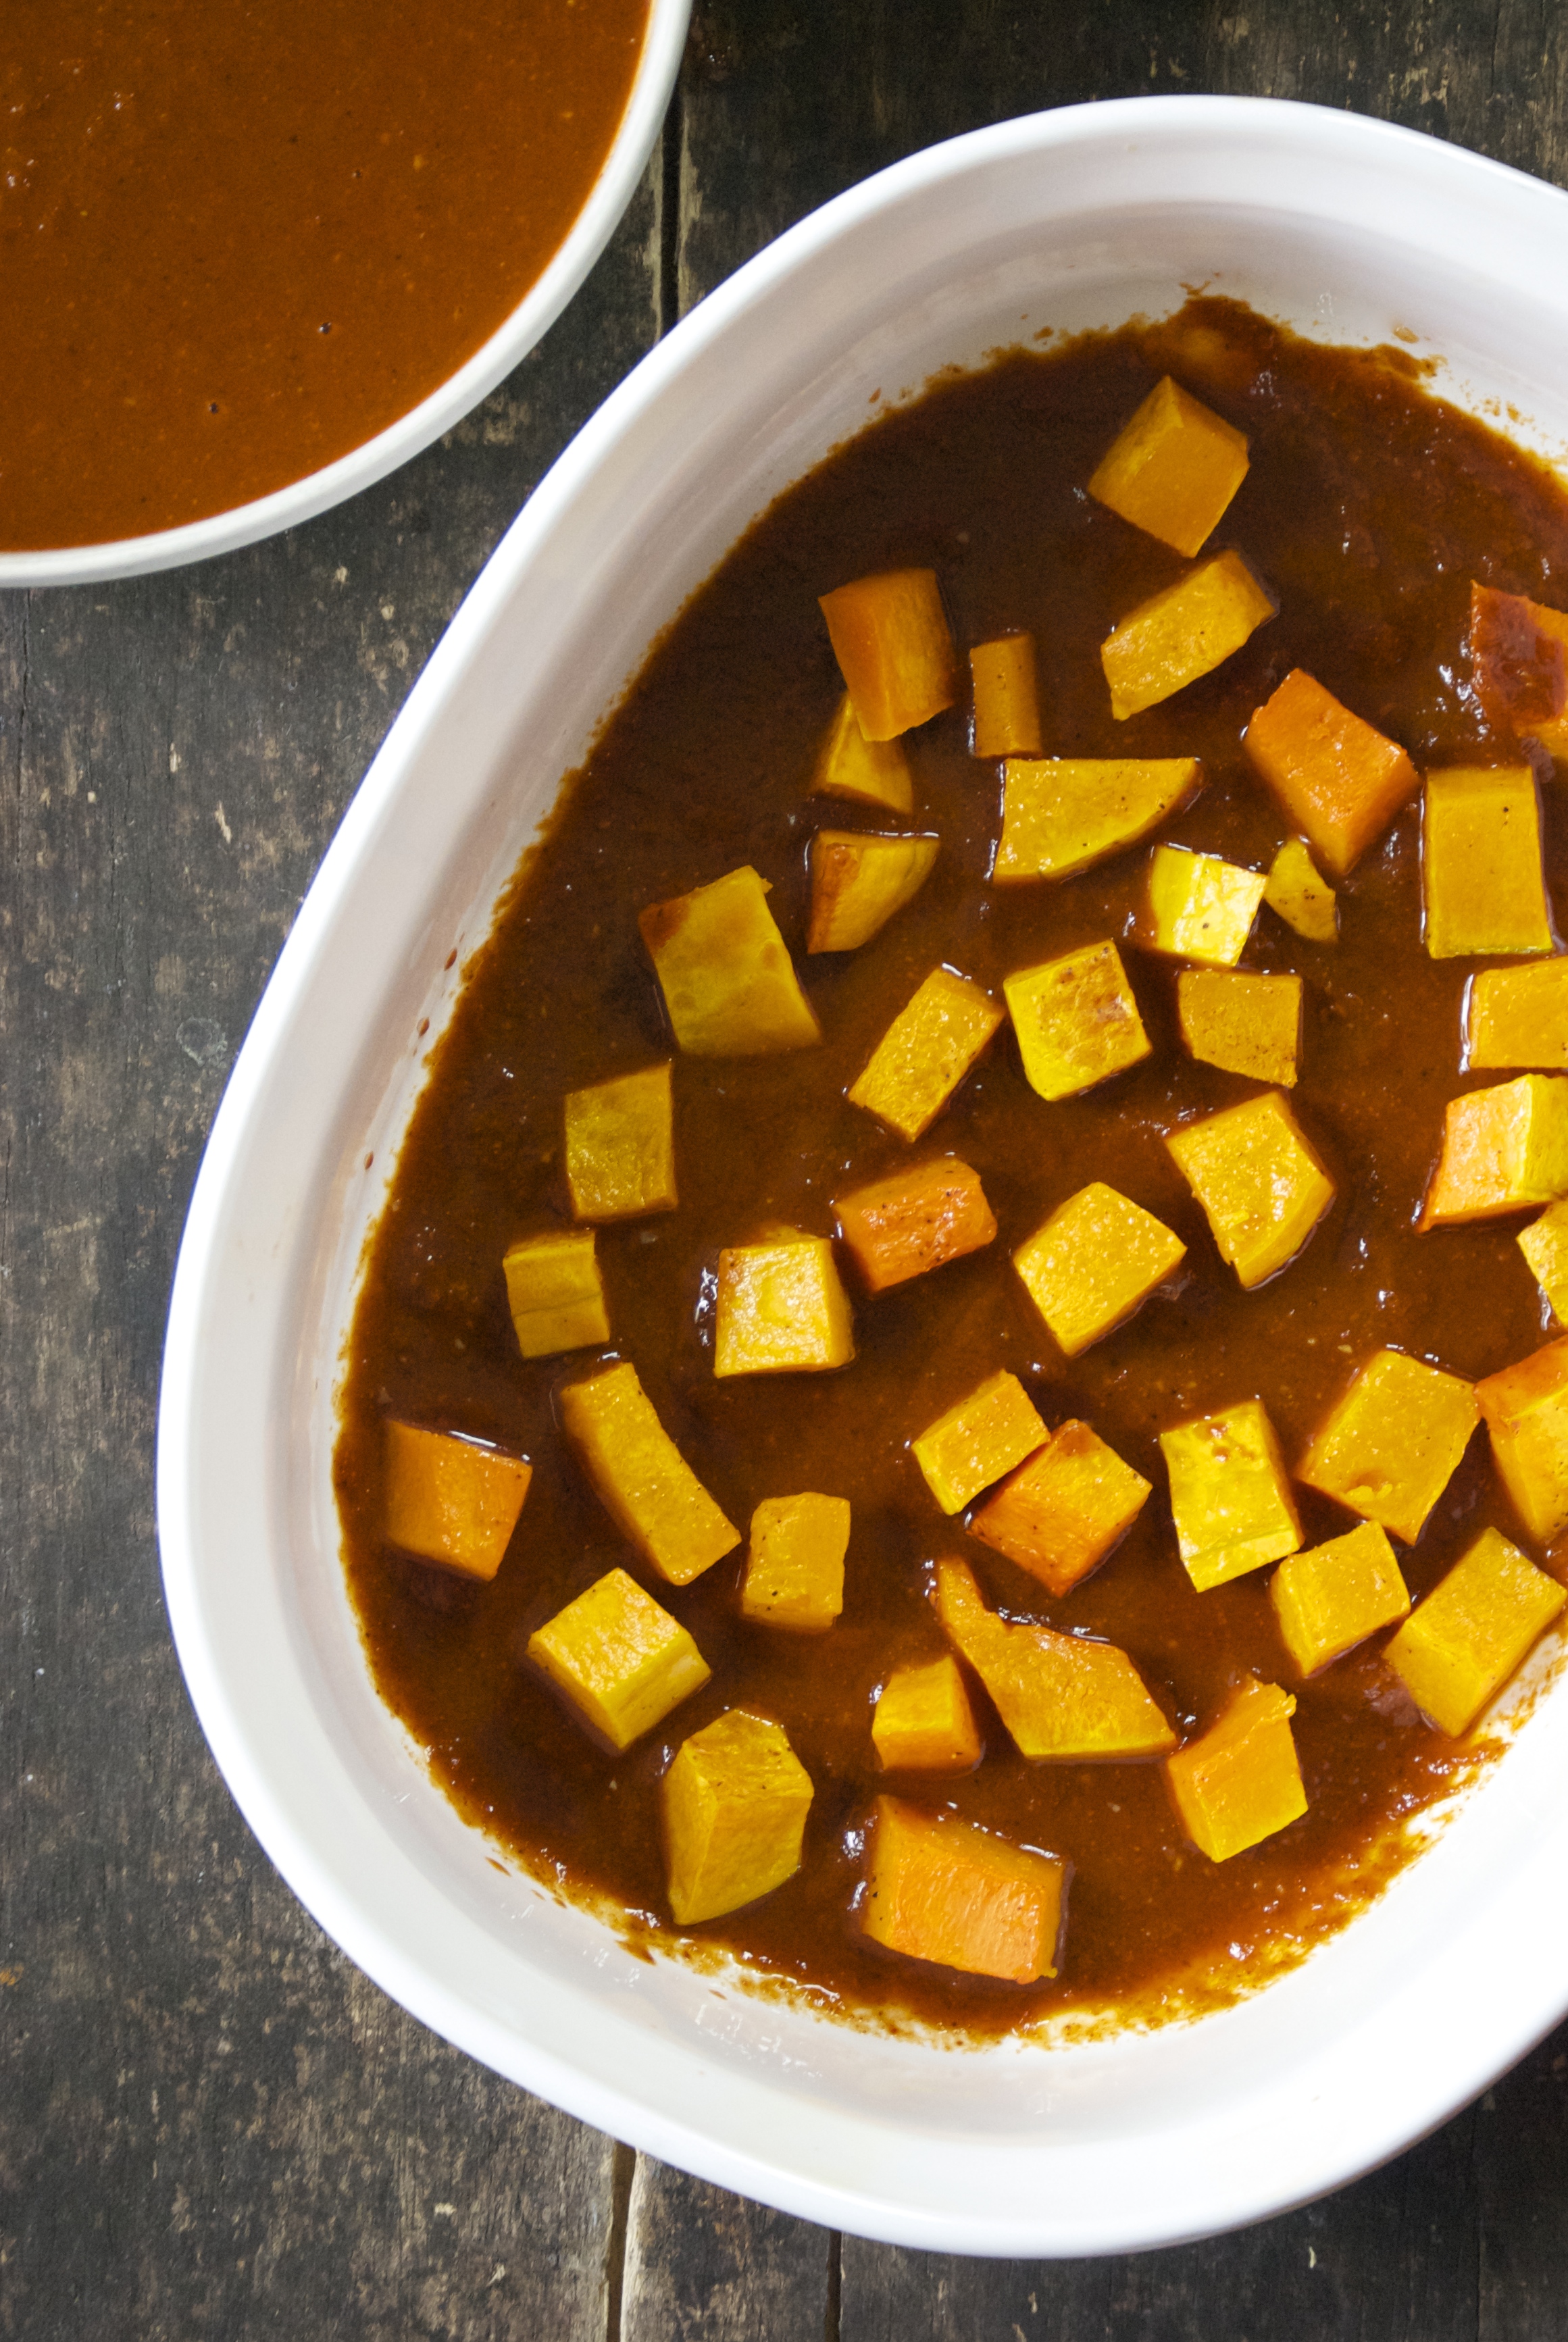
Next, begin layering the enchilada bake.  The amounts I listed were for a casserole dish that measures 11 x 8.  Use whatever dish you have, but just know that you may need to make adjustments to the amounts.  Start by putting 1/2 cup of enchilada sauce on the bottom, followed by about 1 cup of roasted squash.  Then place about 4 tortillas on top of that, followed by 1/2 cup of black beans, 1/2 cup of shredded chicken and 1/2 cup shredded cheese. The next layer will be 4 more tortillas, 1/2 cup of black beans, 1/2 cup of shredded chicken, and 1/2 cup of roasted squash.  Then, the final layer is 4 tortillas, 1 1/2 cup of enchilada sauce topped with about 1 cup of monterey jack cheese. Slightly push down on the layers, as you go.

Bake uncovered at 375°F for about 40-45 minutes, or until the cheese is a beautiful golden brown.  Remove from oven and serve with extra enchilada sauce, sour cream, chopped green onions, and jalapeños.  Leftovers can be kept in the refrigerator and are wonderful when served with a little extra enchilada sauce.  Enjoy!

As always, thanks for stopping by!

Laurie


Read Full Post »

Roasted Tomatillo and Pork Stew | Relishing It

It has been a busy couple of weeks around our household lately.  School started for both of my kids and I’m happy to report that they are really loving it. Honestly, getting back onto the swing of things wasn’t that difficult despite the transition from late summer bedtimes and laid-back mornings around the house.  And I suddenly have a bit more free time now, which has fallen perfectly in-line with canning season! That wonderful time of the year when I dream of tomatoes. I’ve been busy in the kitchen stocking up on salsa, sauces, and plain tomatoes for the winter. Two more boxes I picked up from the farmers market this weekend are waiting for me as I write this. But, I wanted to share this ridiculously delicious recipe with you before I dive into chopping my day away again.

Roasted Tomatillo and Pork Stew | Relishing It

Roasted Tomatillo and Pork Stew | Relishing It

Roasted Tomatillo and Pork Stew | Relishing It

Roasted Tomatillo and Pork Stew | Relishing It

I was never exposed to tomatillos while growing up.  In fact, I didn’t really ever buy them before I moved to Minnesota.  Now, I just love them and making salsa with them is a no-brainer.  However, we’ve been getting a beautiful bag almost weekly from our CSA, so I wanted to do something a bit different, because how many chips can a girl really eat?  Kidding…I can eat A LOT of chips.  Pork and tomatillos are a perfect combination together– the tang from these little green gems is perfect.  This stew could not be easier to make or more satisfying. The flavors are bright and the pork is tender, yet doesn’t need to cook all day long, which makes it a bonus for a weeknight meal.  I love to serve it with a scoop of brown rice on top, but it can be equally satisfying if you prefer it without grains.  If your family loves heat, preparing it with jalapeños in the sauce would be ideal.  We put them on the side, because…kids.  I really hope you make this stew– it’s perfect with the changing weather.  Now, if you’ll excuse me– I need to get back to my little tomato factory.  Hope you are all well!

Roasted Tomatillo and Pork Stew | Relishing It

The Recipe: Roasted Tomatillo and Pork Stew

(serves 4)

2 pounds tomatillos, husks removed and tomatillos cut in half

1 bulb (yes, the entire bulb) garlic, separated into cloves

1 large white onion, chopped into large pieces

1/2 bunch fresh cilantro, roughly chopped

2 1/2 pounds – 3 pounds boneless pork shoulder, cut into 1-inch cubes

1 teaspoon cumin seed, toasted then ground with mortar and pestle OR 1 1/4 teaspoon ground cumin

fresh cilantro, jalapeño,and lime for garnish

olive oil, salt and pepper

1 cup uncooked brown rice, cooked according to directions, for serving

Preheat oven to 400°F.  Line a large baking sheet with parchment paper.  Place the tomatillos, onion chunks, and garlic cloves on the baking sheet.  Drizzle with olive oil and sprinkle with salt and pepper.  Roast for 30 minutes, then broil for 2-5 minutes until slightly browned.  Keep a watchful eye.

Meanwhile, heat a large Dutch oven over medium-high heat with about 2 tablespoons of olive oil.  Sprinkle the pork shoulder with salt and pepper and begin browning the meat in two batches, so as to not to overcrowd the pan.  When meat is done place it all back into the Dutch oven.

Reduce oven temperature to 375°F.

In a large food processor, place the contents of the roasting pan, plus 1/2 bunch of fresh cilantro, and ground cumin seed and pulse a few times.  You don’t want the mixture to be completely pureed– a little texture is nice.  Add the mixture to the browned pork.  Stir.  Bring almost to a boil on the stovetop then immediately place in the oven.  Bake for about 1 hour, or until the pork is tender.  Reseason with salt and pepper, if necessary.  Serve immediately with a scoop of rice, jalapeño, more fresh cilantro and a wedge of lime.  Enjoy!

Thanks for stopping by Relishing It!

Laurie


Read Full Post »

Black Rice Ramen with Sesame Garlic Ginger Scallion Sauce | Relishing It

I just got back from an amazing walk.  The temperature was perfect at a nice cool 60 degrees, the birds were singing, and a beautiful assortment of tulips soaked up the sun.  A walk on a day like today is good for clearing my head.  So, now I’m home with a full cup of coffee, ready to tell you about this fantastic recipe that I conjured up.

Black Rice Ramen with Sesame Garlic Ginger Scallion Sauce | Relishing It

I recently came across organic black rice (forbidden rice) ramen noodles at my co-op.  You may remember this recipe that has black rice.  Or this one, with a bit of a Spring twist.  I love black rice– it’s ridiculously healthy.  So, when I found it in pasta form, I was excited.  I generally use brown rice noodles, so I’m thrilled to have another healthy option.  Fear not, if you can’t find black rice ramen– most any thin pasta will work here–regular ramen, vermicelli, angel hair pasta, just about anything really.

Black Rice Ramen with Sesame Garlic Ginger Scallion Sauce | Relishing It

This is a really quick dinner that can be whipped-up in about 20 minutes.  It’s versatile in that it can be served hot or cold, which is a nice option for the upcoming warmer months.  It’s also versatile in that you can pair any of your favorite vegetables with it and it will be fantastic.  Red peppers come to mind.  I’m on a broccoli kick…still.  And so are my kids, so that’s what I went with.  The vegetables can be roasted, quickly sautéed, or even raw.  You decide. I generally roast mine, but I know that will stop with the summer heat.   The sauce is simple and packed with flavor.  The sesame, garlic, ginger, and scallions all compliment one another.  The sauce is light– it barely coats the noodles and vegetables.  I didn’t want it loaded with oil (read calories), but I still wanted it potent.  When you toss all of the ingredients together, make sure to reserve a bit of pasta water.  You can use that to loosen everything up, if necessary.  Be sure to taste and re-season with more soy sauce or sesame oil, if you want a bit more punch.  Hope you enjoy!  We sure did.

Black Rice Ramen with Sesame Garlic Ginger Scallion Sauce | Relishing It

The Recipe: Black Rice Ramen with Sesame Garlic Ginger Scallion Sauce

(serves 2)

2 squares of ramen, (about 5 ounces total)

2 tablespoons olive oil or peanut, if you have it

4 teaspoons finely chopped fresh ginger

6 garlic cloves, finely chopped

1/2 teaspoon red pepper flakes

2 tablespoons rice vinegar

1/2 teaspoon hoisin sauce

4 teaspoons sesame oil

2 tablespoons soy sauce

4 scallions, thinly sliced

handful of broccoli and crimini mushrooms, bite-size

sesame seeds and chopped peanuts for garnish

(Note: This meal comes together rather quickly– you’ll need to work fast and be attentive.)

Preheat oven to 375ºF.  Bring a medium sauce pan filled with water to a boil.

On a baking sheet, roast the broccoli and mushrooms for 3-4 minutes, or until slightly tender.  Remove from oven.   Place the ramen in the boiling water and keep a watchful eye.  It will only need about 5 minutes to cook.  Test along the way.  Reserve some cooking water.  When tender, drain.

Meanwhile, in a medium-sized skillet over medium-low heat,  heat the olive oil and add the ginger, garlic, and red pepper flakes.  Sauté for about 1-2 minutes until aromatic.  Then add the vinegar, hoisin, sesame oil, and soy sauce and whisk together until warmed through.  Add most of the scallions, reserving a few for garnish.  Sauté for 30 seconds.  Toss in the vegetables and then the ramen.  Use tongs to toss everything together.  Loosen with 1-2 tablespoons of pasta water, if need be.  Taste.  Re-season with soy sauce and sesame oil, if desired.  Top with sesame seeds, chopped peanuts, and reserved scallions.  If wanting to make a cold version, run the pasta under cold water.   You may need a bit more oil to loosen the pasta, if cold.  Enjoy!

Thanks for stopping by Relishing It today!

Laurie

Read Full Post »

Beer-Braised Pork Shoulder with Polenta | Relishing It

Another polar vortex, another no-school day for the kids.  So another cozy, cold-weather meal is in order.  It was difficult to come up with a name for this dish that would capture the flavors here.  It has so many things going on, but they don’t necessarily fit nicely into a category.  A little bit of Mexican from the ancho chiles and the cumin, and a little bit of Asian from the star anise and the cloves, brought together by the American craft beer.  At any rate, let me tell you about this delicious pork shoulder that you’re going to want to make more than once this winter.

Beer Braised Pork Shoulder with Polenta | Relishing It

For those of you who have a fear of tackling a large cut of meat, this recipe is an ideal entry point.  Braising a pork shoulder could not be easier and the results are dynamite.  For starters, and not to sound like a broken record– please use a piece of meat that has been raised properly, preferably local.  Braising can be done using any variety of liquids– broth, wine, milk, or plain water.  In this recipe I used a local craft beer that paired with the spices to develop a deep, wonderful flavor.  The pork works wonderfully with the sweeter tones of cinnamon/cloves/star anise/and allspice.  It also works well with ancho chiles and cumin.  Marrying the two combinations together is fantastic.  You’ll love it.  Be sure to top it with a bit of fresh jalapeño– it’s not that hot and the freshness really brightens up the flavors.

Beer-Braised Pork Shoulder with Polenta | Relishing It

We generally serve the pork shoulder on top of  polenta.  I love a creamy, hot bowl of polenta when it’s cold outside.  Polenta is basically just yellow cornmeal.  It’s origin is Italian and from what I gather, true Italians wouldn’t dream of putting dairy into their polenta, instead making it only with water.  I’m not Italian.  So, I opted for a couple pats of butter and a sprinkle of parmesan mixed in with mine.  I think my Fortify friends may have influenced this a bit.  You will find different variations of the grind size when buying polenta.  Medium ground seems to make the most satisfying polenta.  Some people think making polenta is fussy, but I haven’t found that to be the case.  I do however advise you to be ready to sit down and eat the moment the polenta is done.  It doesn’t stay creamy all that long before it starts to harden and become a bit clumpy.  While it still maintains it’s lovely flavor, the silky texture will be lost.  So, be ready to sit down at the table and enjoy this lovely meal.

Beer-Braised Pork Shoulder with Polenta | Relishing It

The Recipe: Beer-Braised Pork Shoulder with Polenta

(serves about 4 with leftovers)

For the Pork Shoulder:

2 tablespoons olive oil, for browning

about a 4-pound pork shoulder (bone-in gives a great flavor)

1 medium white onion, diced

7-8 garlic cloves, minced

1 tablespoon ancho chile powder

1 teaspoon ground cumin

1/2 teaspoon ground allspice

1/4 teaspoon chipotle chile powder

1/4 teaspoon ground cloves

1/4 teaspoon ground coriander

1 4-inch long cinnamon stick

1 whole star anise

1 dried bay leaf

Kosher salt and freshly cracked black pepper

1 12-ounce bottle of really good craft beer (Locally,  Fulton’s Lonely Blonde or Indeed’s Midnight Ryder work really well.  One is a lighter beer and the other is a black ale.  The end results are each different, but both equally delicious.)

For the Polenta:

5 cups water

1 cup polenta, preferably medium grind

salt

a couple pats of butter

a few grates of fresh parmesan cheese

Pre-heat oven to 250 °F.  Over a med-high flame, heat a large Dutch oven coated with olive oil until it is hot.  Pat the pork shoulder dry with a paper towel and season both sides of it with salt and pepper.  Place the pork in the Dutch oven and brown every side (ends, too) until a deep, dark caramel color has formed on all sides.  Remove from the pot and place on a plate.  In the same pot, add the onion and garlic, and a bit more olive oil, if needed.  Sprinkle with salt and pepper.  After about 3 minutes, add the the entire list of spices.  Stir and then add the beer.  Place the pork, along with any juices back into the pot.  Bring to an almost boil, then remove from heat.  Cover and place in the heated oven for about 3 hours.  You will know when the pork is done when you touch it with a fork.  It should feel tender, not tough.  It should practically fall off of the bone when gently tugged at.  If there is too much resistance, roast it a bit longer.  Be sure to have an oven thermometer, so you know the accuracy of your oven.

Meanwhile, begin the polenta.  In a large saucepan heat 5 cups of water seasoned with salt.  When it is boiling, sprinkle the polenta on the top.  Whisk everything together and reduce the heat to a medium simmer.  Continue to whisk every so often to avoid the bottom burning.  The mixture will eventually thicken up– the exact time will depend upon the size of the grain and how high you have the heat– so, I won’t give an exact measurement in minutes (anywhere from 20-40 minutes), just look for it to be the thickness that you desire.  When it is done, remove from heat and mix in a couple of pats of butter and a few grates of fresh parmesan cheese.  Polenta requires a decent amount of salt, to bring out the flavor– re-season, if necessary.  (Note:  leftover polenta can be spread out smoothly onto a baking sheet.  Refrigerate, then cut into squares.  You can bake or fry it and top it with all sorts of things– use your imagination!)

While the polenta is cooking, tend to the pork.  When the pork is done, remove it from the pot.  I like to make a smooth sauce out of the liquid, but the choice is entirely yours.  You can certainly skip this step.  Strain the liquid.  Then pour the liquid portion into a gravy separator to remove the fat, or use a spoon to skim it from the top.   Remove the cinnamon, star anise, and bay leaf and discard.  Place the remaining onions and garlic into a blender.  Then pour the liquid (sans fat) into the blender and blend it together (always be careful when blending hot liquids).  Return the mixture to the Dutch oven and re-season with salt and pepper, if necessary.  Meanwhile, separate the meat from the bone and tear it into big chunks.  Place the meat into the sauce.  Serve with jalapeños and polenta, if desired.  This is a wonderful dish to re-warm, as the flavors deepen even more overnight.  Enjoy!

Thanks for stopping by Relishing It!

Laurie

Read Full Post »

Lamb Tagine via Relishing It

I woke up to the welcoming rumble of thunder this morning.  Now that may not seem too interesting, but with a quick glance out the window, I saw heavy snowflakes falling everywhere and blanketing the ground.  Thunder and snow– brilliant!  I know I may be the last person in Minnesota (aside from my husband) who isn’t quite ready to let Winter go yet.  Yes, I know it has been a long season this year, but the prospect of one last snowstorm made for a lovely start to my day.  And this has to be the last one of the year right?  Right?

Moroccan Lamb Tagine via Relishing It

This lovely dish will keep you warm while you wait for the snow to melt.  It’s a delicious Moroccan lamb tagine, which is technically a “Spring” dish.  So, even if you’re not able to frolick in the fresh Minnesota snow, you can enjoy this delightful meal.  What is a tagine?  It’s a North African “stew” that is simmered in a special pot.  The pot itself is called a tagine.  It’s an interesting vessel with a conical lid which allows for less steam loss.  Less steam loss means you don’t have to add as much liquid in the first place, which concentrates the flavors.   The stew itself consists of a meat, paired with fruits and nuts.

Moroccan Lamb Tagine via Relishing It

As it turns out, you don’t actually have to use a tagine.  I don’t have one, so I turned to my trusty Dutch oven with it’s tight fitting lid.  It worked wonderfully.  We’ve made this tagine several times, and it’s become a favorite in our house. Lamb pairs beautifully with dried fruits.   It’s full of dried plums, cilantro, turmeric, and pearl onions.  The dried plums disintegrate to form a splendid, slightly sweet sauce that coats the lamb perfectly.  The pearl onions add a nice contrast.  The dish can be served with whole wheat couscous or even quinoa and topped with chopped almonds for a bit of crunch.  Add more cilantro or fresh mint  for a burst of freshness.  Traditionally preserved lemons or Harissa (recipe coming soon!) can be served along side, so feel free to experiment.  One pound of lamb feeds our family of four perfectly, since this is a rich dish– you don’t need a pile on your plate.  We serve it with a nice salad or a vegetable on the side.   However, if you have more people, or are wanting leftovers (highly encouraged), feel free to double the recipe.  Enjoy!

Moroccan Lamb Tagine via Relishing It

The Recipe:  Lamb Tagine

(Serves 3-4 people)

olive oil

1 medium white onion, chopped

1 pound lamb stew meat, cubed

10 saffron threads (optional) broken with a mortar and pestle or with your fingertips   *See note

2 tablespoons honey

1 3/4 – 2 cups beef broth, or more

1/2 teaspoon ground tumeric

1-inch piece of whole cinnamon or 1/4 teaspoon ground

pinch of nutmeg or mace

3/4 cup dried plums (prunes)

1/3 cup chopped cilantro

15 frozen (or fresh) pearl onions

fresh mint or more chopped cilantro,  and chopped toasted almonds to garnish

Note: Saffron is a wonderful spice that is used often in Moroccan dishes.  However, it is quite expensive.  This tagine is delicious with or without it–so, you decide.

If you are fortunate enough to have a real tagine, of course use that for this dish.  If you don’t have one, a Dutch oven with a tight fitting lid is a wonderful alternative.

Preheat oven to 375°F.

Heat a couple tablespoons of olive oil in a Dutch oven.  Always use a paper towel to pat your meat dry  before browning it– you will get a wonderful color this way.  Season the lamb with a sprinkle of sea salt and cracked black pepper.  Brown your meat in two batches, so the pan does not get overcrowded.   Make sure to let the meat develop a nice dark color.   Add more olive oil, as needed.

Remove the meat from the pan.  Add a bit more olive oil to the pan, (and even a splash of beef broth, if there is a lot of color on the bottom) and brown the chopped onion.  Scrape up all of the brown bits, as they have a ton of flavor.  After a few minutes, add the lamb, turmeric, cinnamon, nutmeg, saffron, cilantro, prunes, and honey.  Saute for 30 seconds, then add the beef broth.  Cover and bring to a boil.  Remove from heat and place in the oven for about 50 minutes.  Check during the baking time to see if you need to add more broth.  The consistency is your choice, so add as much or as little as you want.  It will thicken near the end.  When it seems done, add the pearl onions and return to oven so they heat through, about 5 minutes.  Garnish with chopped cilantro or mint and chopped almonds.  It’s delicious served with whole wheat couscous or even quinoa.  Enjoy!

Source:  Adapted from Fine Cooking Magazine’s Special Soups & Stews Issue 2010

Thanks for stopping by Relishing It.  Hope you all have a wonderful weekend!

Laurie

Read Full Post »

Vegetarian Lentil Meatballs via Relishing It

The calendar says that Spring is on the way, though the snowstorm that rolled through the Midwest over the last four days had my family looking for more warming comfort food.  I obliged, by making these meatless “meatballs.”  Yes, I realize calling something that has no meat in it a meatball is a bit ridiculous, but it sounds more generally appealling that “lentilballs.”  And to be honest, it gives you a better idea of what to expect.  I kid you not, these lentil meatballs have the same taste, texture, and appearance of traditional meatballs.

Brown Lentils via Relishing It

Lentil Meatball Ingredients via Relishing It

Not to belabor the point of how much this version tastes like a traditional meatball, but my husband– a complete carnivore and self-described ‘bean-hater’– devours them.  They’re made much like a traditional meatball, except for the addition of ricotta cheese.  It really helps bind the ingredients together and provides a rich texture.  I loaded these ones up with garlic, onion, parmesan, and parsley, but another nice thing about this dish is that it can be easily modified to evoke other ethnic food flavors.  Add a little curry powder, cilantro, and ginger; or to make a Greek version, add mint and oregano, and serve it with feta and tzatziki.  We enjoyed this latest batch with my homemade canned tomato sauce from last summer for an Italian vibe.  The point is, these little numbers are versatile enough to allow you to follow your imagination.

Vegetarian Lentil Meatballs via Relishing It

Homemade Tomato Sauce via Relishing It

In our family, we generally live by the “eat meat, though not all the time” mantra. These lentil meatballs are a great alternative, whether you’re like us or eat strictly vegetarian, and you still want that meaty texture and flavor.  The fact that brown lentils are also budget-friendly is a nice bonus.  Now if you’re interested in more traditional meatballs, I’ve got those for you too.  Take a look here and here for a few of my other favorite recipes.  And these are an interesting take that makes a nearly-perfect soup.  Heck, give them all a try and let me know what you think.  Enjoy!

Vegetarian Lentil Meatballs via Relishing It

Vegetarian Lentil Meatballs via Relishing It

The Recipe:  Vegetarian Lentil Meatball

(makes 40 small meatballs)

2 cups dried brown lentils

1 bay leaf

3 teaspoons kosher salt, divided

6 garlic cloves, chopped

1/2 cup whole wheat breadcrumbs, lightly toasted

2 eggs, lightly beaten

1/2 cup chopped onion

1/3 cup chopped parsley

3/4 cup ricotta cheese (mine was part-skim)

3/4 cup grated parmesan or grana padano cheese

freshly cracked pepper

To prepare the lentils:  Rinse the lentils and put into a large saucepan with 2 cups water, bay leaf, and 1 teaspoon of kosher salt.  Bring to a boil, then reduce to a medium-low and simmer covered for about 25 minutes, or until all of the water has been absorbed into the lentils.  Turn off the burner and let the lentils sit for about 10-15 more minutes covered.  The lentils will be tender when done, but still hold their shape.  Remove the bay leaf, and place the lentils in a food processor and process for about 1 minute, or until they are broken up.  The appearance will look like that of cooked ground beef.

Preheat the oven to 400°F.  Line the largest baking sheet you have with parchment paper.  Set aside.

To make the meatballs:  In a large bowl, combine the puréed lentils, garlic, breadcrumbs, eggs, onion, parsley, ricotta, parmesan, black pepper and 2 teaspoons of salt by mixing together with your hands.  Be careful not to over mix, as with all meatball recipes. Form smallish balls using your hands or a scoop– you should yield about 40.  Place on the prepared baking sheet and bake for about 18 minutes.  They will be a nice golden brown on the top and bottom when they are finished baking.  Serve right away.  Enjoy!

Thanks so much for stopping by Relishing It today!

xo

Laurie

Read Full Post »

« Newer Posts

%d bloggers like this: