Feeds:
Posts
Comments

Posts Tagged ‘Whole Foods’

Curry-Scented Cauliflower with Golden Raisins | Relishing It

We joined a CSA recently!  For a vegetable-obsessed girl like me, this is big news.  So much so that I want to tell everyone I interact with…but that would be a bit weird, so I’ll just tell you.  I’m already anxious for June to roll around– for that first box to arrive, full of vegetables grown for my family by people that I know.   To be honest, we haven’t been CSA members for a couple of years now.  I know, I know.  You see, the previous CSA that we belonged to didn’t quite meet my family’s needs.  We ended up spending a ton of money every week to supplement the offering.  This year we dove back in, and decided to go with Bossy Acres.  The fabulous ladies that run this CSA are heavily involved in the Twin Cities food community.  I had heard remarkable things about their CSA from several friends.  And then, once I had a chance to talk with the owners about the excitement and passion that they put into their work, it made me realize that I wanted my family to be part of it.  And I am so darn excited!  Did I already mention that?

Curry-Scented Cauliflower with Golden Raisins | Relishing It

Curry-Scented Cauliflower with Golden Raisins | Relishing It

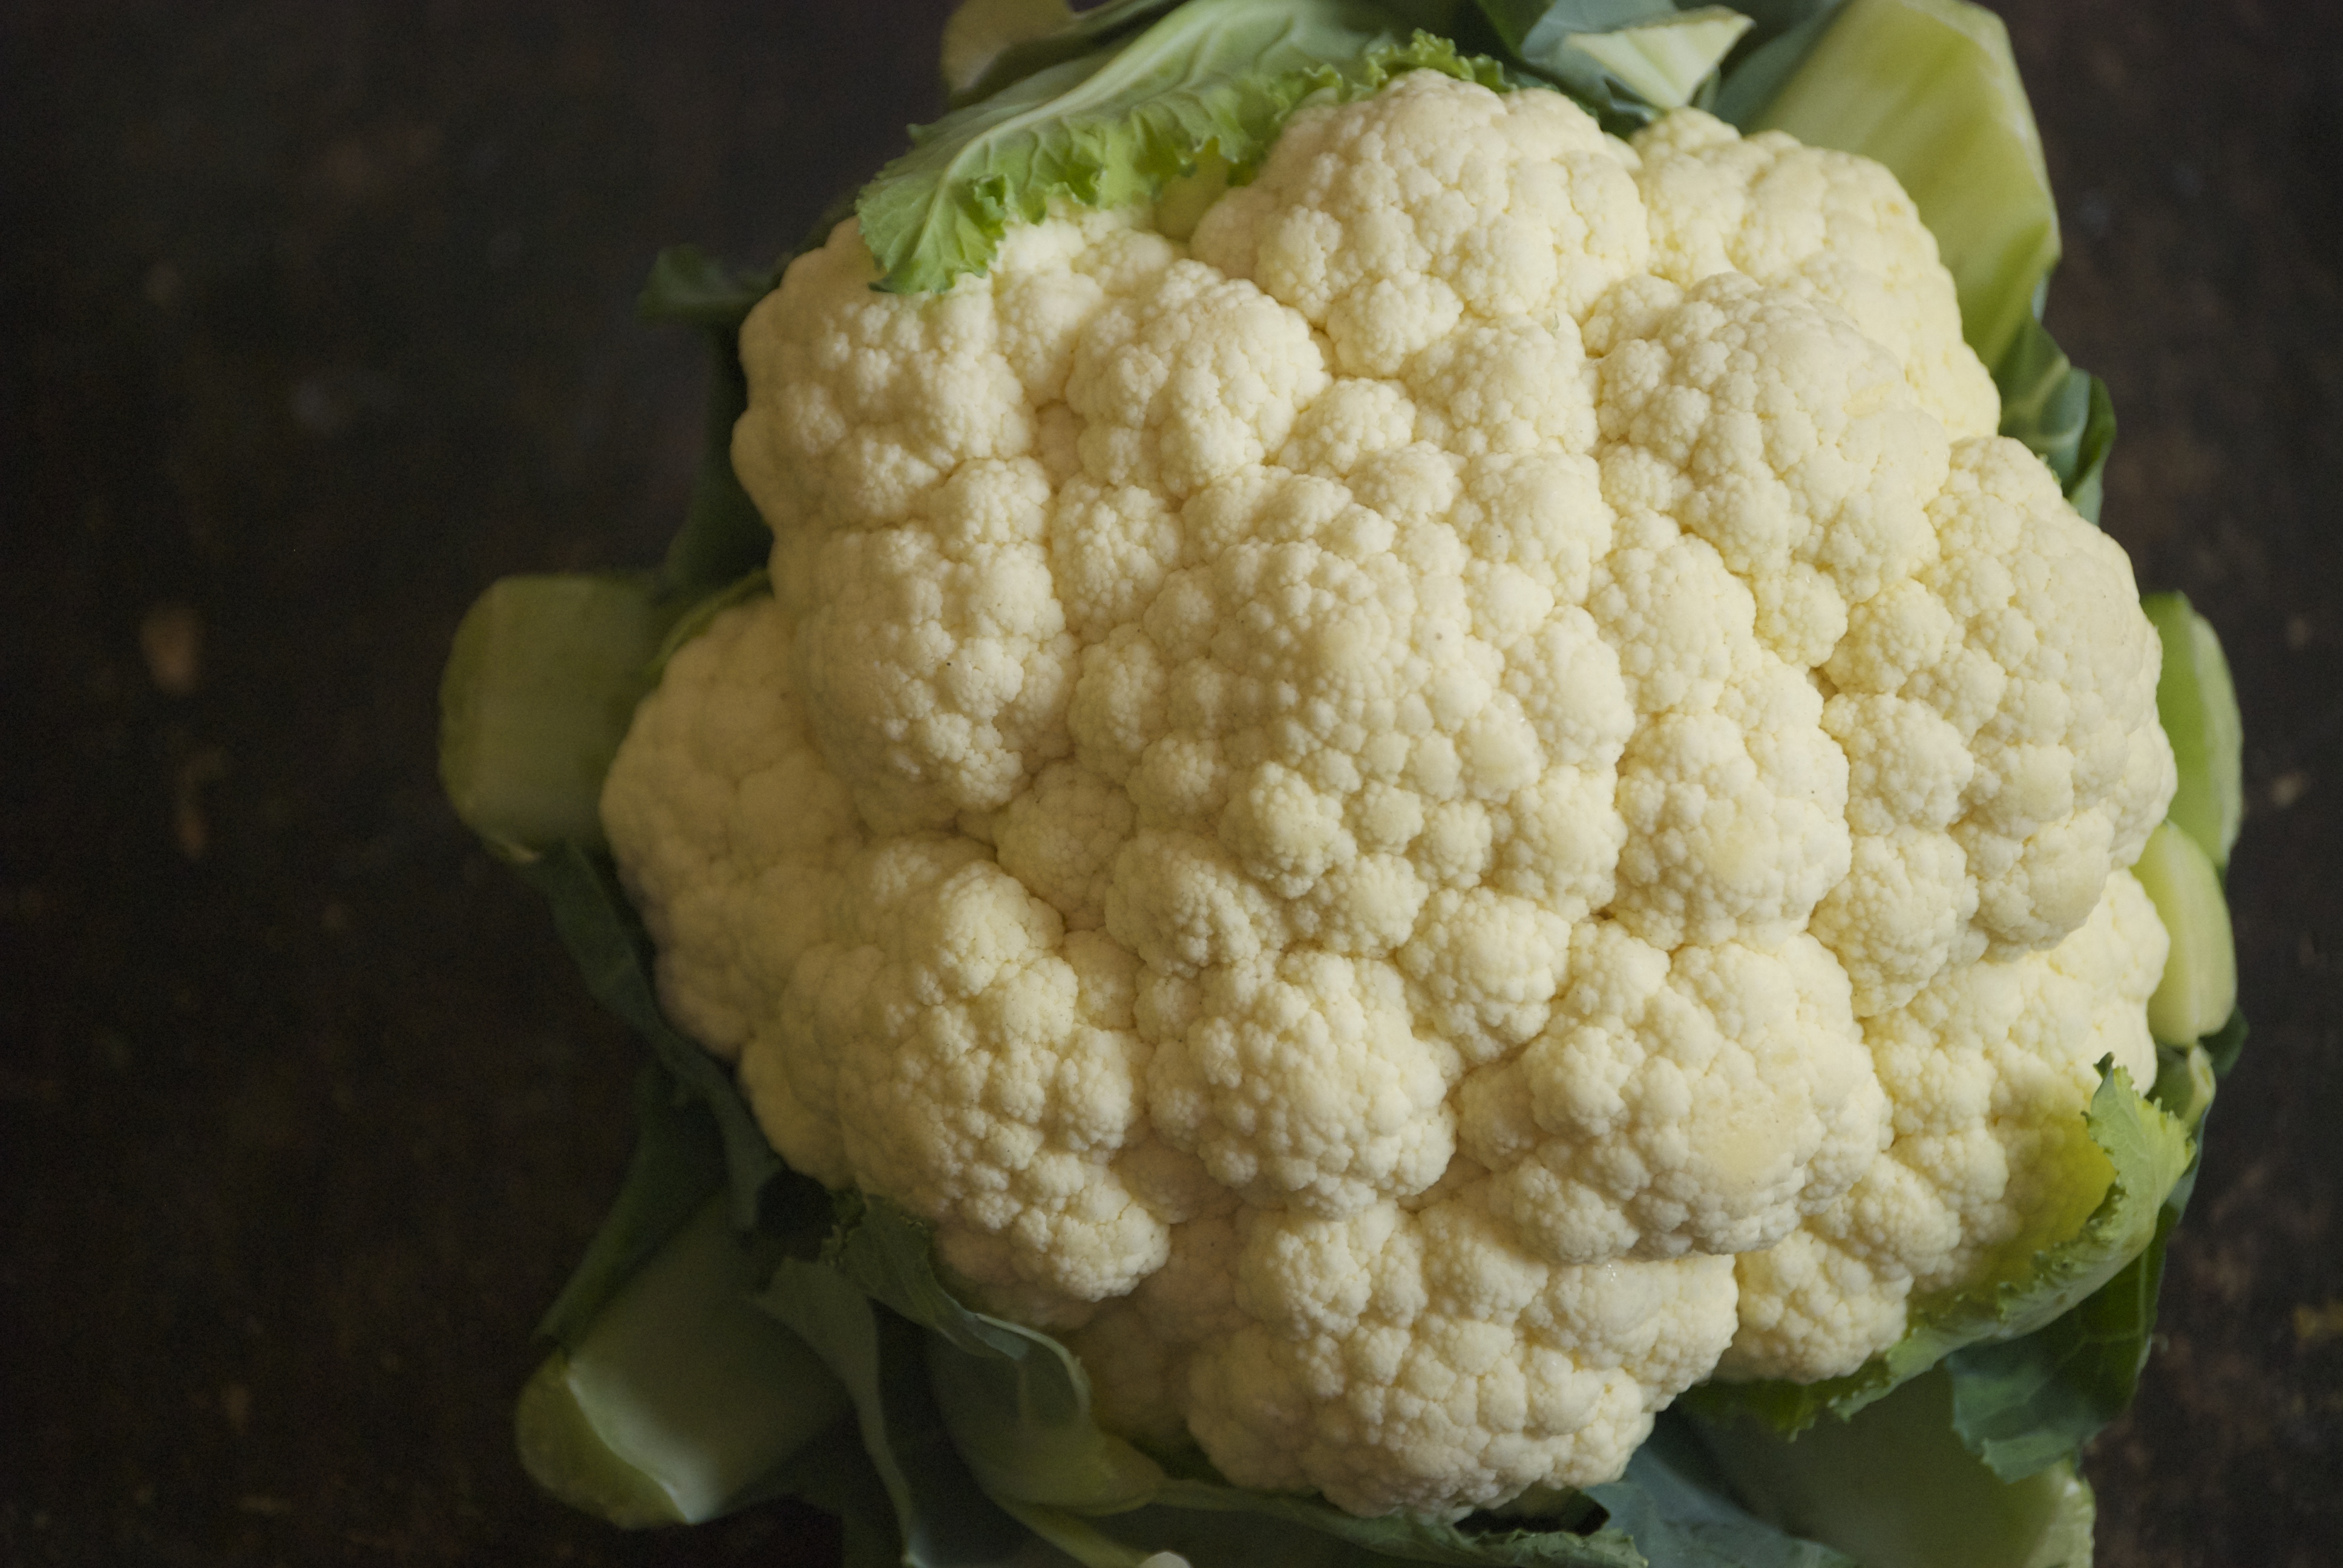
Alright, now that I’m done with my mini celebration it’s on to today’s post.  Even though this is THE NEVER-ENDING WINTER here in Minnesota, I’ve moved on to think about lighter, quicker fare.  Spring has to arrive eventually, right?  It’s just a matter of time before the farmers’ markets are loaded with fresh vegetables, and I’ll also be getting my first CSA delivery.  Waiting is hard.  I want strawberries and tomatoes now.  But until then, I’ll enjoy this gorgeous cauliflower.Curry-Scented Cauliflower with Golden Raisins | Relishing It

I love how hearty cauliflower is.  It’s reliable and always a good option in the Summer or Winter.  Out-of-season tomatoes and cucumbers can’t claim that.  I enjoy this side dish (though I eat it as a main course) when the cauliflower is roasted just a bit. Not entirely soft, but not raw either.  Once it’s done, I like to toss it immediately with red onion and golden raisins on the hot roasting pan.  It warms them through and takes the edge off the onion.  Infusing the spices in warmed olive oil is a great way to maximize the flavor.  This is a subtle dish.  It’s not swimming in a sauce or loaded with flavors that punch you in the face.  And it comes together in a matter of minutes.  The golden raisins are key– the slight sweetness that they add is crucial here.  Hope you enjoy!

Curry-Scented Cauliflower with Golden Raisins | Relishing It

The Recipe:  Curry-Scented Cauliflower with Golden Raisins

(serves 2-4)

1 large head of organic cauliflower, broken into small bite-sized pieces

1 small red onion, thinly sliced

1/3 cup organic golden raisins

handful of fresh cilantro

2 tablespoons extra-virgin olive oil, plus more for roasting

1 teaspoon hot curry powder  ( I love Penzys’ version)

1/2 teaspoon ground turmeric

1/2 teaspoon ground cumin

pinch of kosher salt to taste

lime wedges, for serving

Preheat an oven to 400°F.  Toss the cauliflower pieces with a drizzle of olive oil and place on a baking sheet. Roast for 15-20 minutes, or until the cauliflower has browned slightly but isn’t completely soft.  Remove from oven and immediately toss the sliced red onion and golden raisins on the hot pan with the cauliflower.

Meanwhile, prepare the curry-scented olive oil by placing 2 tablespoons of olive into a small skillet.  Mix the curry powder, turmeric, and cumin into the oil and heat on medium for about 1-2 minutes, or until the oil becomes warm and fragrant.  Make sure to stir it.  Remove from heat and pour over the vegetables.  Toss with cilantro.  Season with salt, if necessary.  Serve with a squeeze of lime.  Enjoy!

Thanks for stopping by Relishing It!

Laurie


Read Full Post »

Healthy Asian Peanut Slaw | Relishing it

I love a good slaw.  Basically, I love any salad that is made from cabbage and crunchy vegetables.  Sure, once summer rolls around I’ll be thrilled to dig into a plate of delicate, tender greens.  But, in the meantime, I never tire of crunchy, hearty vegetables.  They satisfy me when I’m hungry.  They have a great mouth-feel– as in, I actually feel like I’m eating something substantial.  Like I’m eating a meal.

Healthy Asian Peanut Slaw | Relishing It

Healthy Asian Peanut Slaw | Relishing It

Healthy Asian Peanut Slaw | Relishing It

Cabbage (and kale) are really my go-to winter salad fare.  Remember this salad?  I still eat it at least once a week.  The same goes for the one I’m sharing today.  I love combining Asian flavors into a slaw.  It just works.  Making a dressing using plain yogurt is a perfect way to “health it up”, yet still satisfies that need for something a bit more indulgent and creamy.

Healthy Asian Peanut Slaw | Relishing It

I used freshly ground peanut butter in this dressing, but you can buy good organic peanut butter at your market.   Be sure to look for a kind that only contains ground peanuts.  Added salt is fine.  If you have to use something else with other ingredients, just be warned that the flavor of the dressing may be a bit off, as those other kinds generally contain a lot of sugar.  Most of the other ingredients for the dressing are things that you probably have in your refrigerator already.  The lime juice is the perfect backdrop for the flavors.  And as for the vegetables, the combination of red cabbage, carrots, carrots, cilantro, and broccoli are wonderful together.  I love using broccoli in this finely-sliced form.  Broccoli has a wonderful flavor, but I don’t always like chewing on the florets, so this is a nice solution.  I’ve also added golden raisins to this slaw.  Taking a bite with one in it feels like hitting the lottery.  Perhaps I should just toss more in next time?!  Cheers– hope you enjoy the slaw!

Healthy Asian Peanut Slaw | Relishing It

The Recipe: Healthy Asian Peanut Slaw

(serves 1-2)

For the Asian Peanut Dressing:

2 tablespoons organic natural peanut butter (containing only peanuts and salt)

1/4 cup plain yogurt

1 tablespoon soy sauce

1 tablespoon fresh lime juice

1 teaspoon sesame oil

1 teaspoon garlic chili sauce

honey (optional)

For the Slaw:

2 medium carrots, grated on the large hole of a box grater

1/4 small head of red cabbage, thinly sliced

5-6 large broccoli florets, thinly sliced

1/4 large red pepper, julienned

small handful of cilantro leaves, stems removed

2-3 tablespoons golden raisins

chopped salted peanuts or cashews, for serving

In a medium bowl, whisk the ingredients for the dressing together.  Set aside.  In a larger bowl, combine all the ingredients for the slaw,  sans peanuts.  Pour the dressing onto the vegetables and mix together using tongs.  You may not want to pour all of the dressing on at once (I generally have a bit leftover).  It’ll depend on your personal taste.  Top with the chopped peanuts or cashews.  Enjoy!

As always, thanks for stopping by Relishing It today!

Laurie

Read Full Post »

Homemade Spaghetti Sauce with Mushrooms and Garlic | Relishing It

I’ve mentioned here before that my husband and I were high school sweethearts.  We’ve been together for many years, and if there is one dish that describes “us”, it is this spaghetti sauce.  We’ve been making it together for as long as I can remember.  And even though it has gone through a few subtle changes over the years (because I certainly wasn’t canning my own tomatoes in my dorm room), it has remained much the same as it did those many years ago.  Many of you have been asking for this recipe, so I figure it’s time to to finally write it down and share it.  I mention on here fairly frequently that one dish or another is a family favorite.  But this one is the family favorite.  If the kids get to choose a meal, this is what they pick.  Valentine’s Day rolls around, and this is what we have.  It’s a bit odd, because this dish is ordinary, yet very special to us.

Spaghetti Sauce with Mushrooms and Garlic | Relishing It

Spaghetti Sauce with Mushrooms and Garlic | Relishing It

A couple of things need mentioning.  As I’ve said, I can my own tomatoes.  I use roasted roma tomatoes for this sauce.  I love how thick and rich they become, compared to regular tomatoes with their abundance of water.  This sauce can be made with any variety of tomatoes, though I’ve settled on roasted romas as my favorite.  The key here is to know what to do if your sauce has extra liquid in it that you don’t necessarily want. Watery spaghetti sauce is, to be honest, gross.  Too much liquid, and it just doesn’t cling to the pasta.  My point, is that you should do your best to find some good quality canned roasted tomatoes.  Muir Glen is my recommendation, if you don’t can your own.  Canned San Marzanos are also another excellent choice.  Whatever type of tomatoes you choose, crushed or whole, etc– give them a few pulses in a food processor to break them up (or use your hands) so they aren’t chunky.  If the sauce is too watery near the end of the cooking time, remove the lid and let it reduce a bit.  Adding another dollop of tomato paste will also help.

Homemade Spaghetti Sauce with Mushrooms and Garlic | Relishing It

One more thing,  I normally don’t use fresh basil in this sauce– instead I pull a bit out of my freezer that I’ve preserved for the winter.   In the summer, when my basil is plentiful, I chop it and freeze it in muffin tins and ice cube trays.   Then I vacuum seal it.  When I need a bit of basil in the winter, I  just pull one out and pop it into whatever it is that I’m making.  I love this method.  So, if you happen to have a freezer full of the same, use it!  If you don’t, I’ve tested it with fresh basil, so you will know how much to use– feel free to add more, if you like.  Just please don’t used dried– the flavor is not even comparable.

Homemade Spaghetti Sauce with Mushrooms and Garlic | Relishing It

This sauce has a wonderfully earthy flavor from the herbs, garlic, and the crimini mushrooms.  It’s a complex array of flavors that I heighten by using a bit of anchovy.  As I’ve mentioned before, don’t be scared to use it.  It adds such a nice umami flavor.  The other integral ingredient is the bay leaf.  The almighty bay leaf, in my opinion.  It adds such a unique flavor that this sauce relies upon.  When the sauce is finished simmering, swirl in a tablespoon or two of good olive oil– it’s the perfect finish to the sauce.  I hope you and your family enjoy this dish as much as we do.

Homemade Spaghetti Sauce with Mushrooms and Garlic | Relishing It

The Recipe: Homemade Spaghetti Sauce with Mushrooms and Garlic

(serves 4-6)

2 pounds grass-fed ground beef

1 medium white onion, chopped

1 large bulb of garlic, peeled and roughly chopped  (yes, the entire bulb!)

1 quart roasted roma tomatoes, crushed

1 dried bay leaf

1 teaspoon freshly cracked black pepper

5-6 teaspoons kosher salt

1 1/2 teaspoons dried oregano

2 heaping tablespoons finely chopped fresh basil (about 17 large basil leaves)

1 tablespoon double-concentrated tomato paste

1/2 teaspoon finely chopped anchovies

8-9 ounces crimini mushrooms, thickly sliced

1-2 tablespoons good quality extra-virgin olive oil, for finishing ( California Olive Ranch, is my favorite)

Parmigiano-reggiano cheese and hot pepper flakes, for serving

In a large Dutch oven over medium-high heat brown the ground beef, then drain the fat.  Return the pan to the heat and add the onion, garlic, salt, and pepper to the beef.  Sauté for a couple of minutes until the onions are somewhat tender, stirring frequently.  Then add the crushed tomatoes, oregano, basil, tomato paste, anchovies, and bay leaf.  Stir.  Then finally add the mushrooms.   Reduce heat to medium-low and let simmer for about 30-40 minutes, covered.   Stirring frequently and carefully, as you don’t want the mushrooms to break apart.  Monitor the amount of liquid near the end of the cooking time.  Remove lid to reduce, if it seems too watery.  If it seems too thick, be patient– the mushrooms release a lot of liquid during the simmering time.  When it is done, remove the bay leaf and stir in 1-2 tablespoons of olive oil.  Adjust seasonings, if necessary.  Serve with freshly grated Parmigiano-reggiano cheese and hot pepper flakes, if desired.  Leftovers keep well in the refrigerator, or freezer.  Enjoy!

Thanks for stopping by Relishing It!

Laurie

Read Full Post »

Meyer Lemon and Thyme Roasted Chicken | Relishing It

Today’s recipe is one that looks impressive and tastes incredible, yet comes together with little effort.  Roasted chicken is another fine example of how good food does not have to be complicated.  It’s easy to prepare, and makes a perfect family meal that can be complimented by so many wonderful flavors.  I’ve used Meyer lemons for this version.  Whenever they are  in season, I prepare a lemon sauce and drizzle it over roasted chicken.  These lemons taste a bit different than traditional ones.  I detect a hint of a pine, as well as a little more sweetness.  They are perfect in this dish, since their skin is thinner and can be eaten– they almost become ‘candied’ when roasted.

Meyer Lemon and Thyme Roasted Chicken | Relishing It

I like to roast chicken on a high heat.  It creates such a nice, dark exterior that I just love.  Fear not, the inside remains wonderfully juicy.  One thing to be aware of– your chicken pieces should all be relatively the same size.  This will ensure even roasting.  The breasts should be cut in half if they are too large.

Meyer Lemon and Thyme Roasted Chicken | Relishing it

The sauce is a simple one.  It showcases the lemons perfectly.  I suppose it’s worth exploring the idea of marinating the chicken in a portion of the sauce for a few hours before roasting.  The lemon would really permeate the chicken.  But, to be honest with you, I’ve never bothered.  Let me know if you decide to give it a go.  If thyme isn’t your favorite herb, this dish is also delightful with rosemary.  Enjoy!

Meyer Lemon and Thyme Roasted Chicken | Relishing It

The Recipe:  Meyer Lemon and Thyme Roasted Chicken

(serves 4)

1 whole pasture-raised chicken cut into pieces (breasts cut in half, if too large)

1/2 cup fresh Meyer lemon juice (from about 5 Meyer lemons)

1/3 cup extra-virgin olive oil

2 tablespoons Dijon mustard

fresh thyme

1/2 tablespoon honey (more or less to taste)

1-2 Meyer lemons, thinly sliced for roasting

kosher salt and freshly cracked black pepper

Preheat the oven to 475°F.  Line a baking sheet with parchment paper.

In a small bowl, mix the lemon juice, Dijon, honey, and salt and pepper together.  Slowly whisk in the olive oil. Set aside.

Place the chicken on the parchment paper and pour 2/3 of the sauce over it, coating all sides of the chicken.   Reserve 1/3 of the sauce for serving.  Remove and discard the stems from some of the thyme and sprinkle the leaves over the chicken, along with salt and pepper.  Place the thinly sliced Meyer lemons on the pan, as well.  Bake for about 35 minutes on the middle rack.  Remove from the oven and serve with additional sauce and fresh thyme.  Salt and pepper, as needed.  Enjoy!

Thanks for stopping by Relishing It today!

Laurie

Read Full Post »

Hearty Soup of Beef Roast, Root Vegetables, and Warm Spices | Relishing It

I’ve mentioned my rural roots here in previous posts, but for those of you that are new to Relishing It, I grew up on a small dairy farm in western North Dakota.  And I still get terribly homesick from time to time.  So this is one of those recipes that reminds me of my childhood, and helps me cope with being away.  It’s strange, even though I’ve spent more of my life away from Regent ND, it still has my heart.  It’s still my home.  One of the hardest parts of growing older is wanting those comforts of the past, but coming to terms with the fact that they’ll never again be as you remember them.  It’s the double-edge of nostalgia, I suppose.  I miss being that carefree kid running around the farm.  I miss seeing my childhood friends.  I miss regularly seeing my aunts, uncles, and cousins.  And I miss talking with my grandparents, who have all passed away.

Black Butte, North Dakota | Relishing It

                                                             My view every morning for 18 years

When I was a teenager, I worked at the museum in town during the summers.  On my lunch breaks I would venture up to my grandparents’ house for lunch.  My grandma would always make sure to have something ready for me and the three of us would eat together and talk about our lives.  Even then, I really did realize that it was a special time and that one day I’d look back on it with a mixture of longing and gratitude.  My grandparents (on both sides of the family) were real salt-of-the-earth people.  They were hard-working, no-nonsense, and very kind.  I’m so lucky to have had them in my life.  So many of my interests now are things that they did and were interested in– preserving, fermenting, gardening, sausage-making, and even distilling alcohol.  The conversations we could have!

Hearty Soup of Beef Roast, Root Vegetables, and Warm Spices | Relishing It

The soup I’m sharing with you today is based on a soup that my Grandma Jesch used to make for me on some of those lunch breaks.   I only have the memory of the flavors to go off of, but I think this is a pretty good representation.  She would often simmer an entire beef roast for hours, and then turn it into this most amazing, hearty soup.  It has chunks of tender beef, along with root vegetables.  But, the flavors I remember most are the warm spices.  There was a hint of something unusual that drew me to this soup whenever she made it– cinnamon, star anise, and allspice are what I figured they might be– and here they work beautifully.  Also, you’d be a fool not to finish this dish with a splash of cream.  Hope you enjoy!

Soup of Roast Beef, Root Vegetables, and Warm Spices | Relishing It

The Recipe: Hearty Soup of Roast Beef, Root Vegetables, and Warm Spices

(serves 4)

2 tablespoons olive oil

About a 3 pound beef roast ( preferably grass-fed and bone-in)

1/2 white onion, chopped

3-4 garlic cloves, chopped

1 quart beef broth, preferably homemade

4 cups water

5-6 large carrots, cut into chunks

3-4 parsnips, cut into chunks (if too large, remove the woody center)

3 celery stalks, cut into chunks

8-10 smallish yellow potatoes, cut into chunks

1 cinnamon stick

1 star anise

1/2 teaspoon ground allspice

1 teaspoon dried thyme (or 1 1/2 teaspoons fresh)

1 dried bay leaf

kosher salt, and fresh black pepper, to taste

fresh parsley and heavy cream, for serving

Heat a large Dutch oven with olive oil in it.  Season the beef with salt and pepper.  Sear all sides of it until a deep golden color develops.  Remove beef from the pan.  Add the onion and garlic to the hot pan and sauté for a few minutes until tender.  Add the beef back to the pan, along with the beef stock, water and the spices of cinnamon, star anise, allspice, thyme, and bay leaf.  Bring to a high simmer, then reduce heat to medium, cover and let simmer for about 2 1/2 hours or until the beef is somewhat tender.  Next, add the celery, carrots, and parsnips to the pot and simmer until the beef is fully tender, or practically falling off of the bone, another 30-45 minutes, or so.  Then, add the potato chunks and cook for about 20 more minutes until they are tender.  Meanwhile, remove the beef from the pot and separate it into chunks using a fork– removing any visible fat, as well.  Return the pieces of beef to the pot when the potatoes are completely done.  Re-season with salt and pepper.  Remove and discard the star anise, cinnamon stick, and bay leaf.  Sprinkle with freshly chopped parsley and a splash of cream before serving.  Enjoy!

Thanks for stopping by today!

Laurie

Read Full Post »

Paella | Relishing It

I’ve been wanting to share this amazing recipe with you for awhile now, and since Valentine’s Day is approaching I figure it’s finally time.  I’m not sure why, but to me this is a romantic dish.  Maybe it’s the beautiful color, the seafood, the scent of saffron, or even the wine.  In any case, for me this is an ideal Valentine’s Day dinner.

Paella | Relishing It

Yes, the dish looks impressive, but it’s not difficult to make.  It comes together quickly and the cooking time is relatively short.  The most labor intensive task is actually vegetable chopping.  And the flavors– my oh my, they’re unbelievable.  First, there’s the saffron.  Along with providing the beautiful red/orange hue, it adds a wonderful flavor.  Saffron is an impressive spice, but keep in mind it’s also the most expensive one out there.  With that in mind, I’ve given you the option of using between  1/2 – 1 teaspoon for this dish.  I’ve made it both ways, and it’s turned out great each time.  Just don’t skip the saffron entirely, because it makes a difference here.

Saffron for Paella | Relishing It

Spanish Chorizo for Paella | Relishing It

The other main star of the dish is the Spanish chorizo.  This is an aged chorizo with a delicious smokey flavor.  It can be difficult to find, but again, it’s worth the search.  I get mine at the St. Paul Cheese Shop, for those of you who live nearby.  The rice in this dish is supposed to be separated– not creamy like a risotto.  Look for a spanish rice, such as Bomba (also called Valencia) or Calasparra as they will absorb the liquid properly.  Another option is the more readily-available short-grain rice, Arborio.  For my version of paella, I use shimp, mussels, and clams.  I know chicken is often a component, but I stick with the seafood.  You can use whichever you like– you know my theory on making the dish your own.  The seafood paired with the clam juice and wine create a wonderfully intense flavor with a hint of brininess.

Paella | Relishing It

Paella | Relishing It

Seafood Paella | Relishing It

There are many different methods to cook paella.  I settled on heating the oven really hot (to 500°F) and placing a pizza stone in it.  I use a 14-inch stainless-steel skillet, so it’s nice in that it heats evenly in the oven as opposed to sitting on a small burner.  The pizza stone adds additional heat to the bottom of the pan in hopes that it will create a tasty, caramelized crust on the bottom called socarrat.  If you have a smaller 12-inch pan– feel free to cook it on the stove top.  Just be sure to move the pan around a bit for an even heat, while being diligent about not stirring it. If you do use a 12-inch pan rather than a 14-inch, you won’t be able to fit as much meat/seafood into the dish.  Use your judgment, and it’ll turn out just fine.  And of course, if you’re lucky enough to be able to cook it over an open flame outdoors, kudos to you!

Paella | Relishing It

Paella | Relishing It

The Recipe: Seafood Paella

(serves 4)

2 tablespoons olive oil

1 red bell pepper, finely chopped

1 green bell pepper, finely chopped,

1 white onion, finely chopped

3 garlic cloves, finely chopped

1 tomato (preferably from a local greenhouse), finely chopped

2 teaspoons concentrated tomato paste

1 1/2 teaspoons smoked paprika

1 cup bottled clam juice

1 cup dry white wine, more if necessary

2 1/2 cups chicken stock (preferably homemade)

1/2- 1 teaspoon saffron (crushed using a mortar and pestle)

2 cups short grain rice–Bomba (Valencia), Calasparra, or Arborio

8 ounces (1/2 pound) spanish chorizo, cut into 1/4-inch slices

1/2 pound littleneck clams

1/2 pound mussels

1/2- 1 pound shrimp (peeled and deveined)

Lemon wedges, fresh parsley, and red pepper flakes  for garnish

Place a pizza stone into an oven and heat to 500°F for about a half hour.  Combine the chicken stock, clam juice, white wine, and saffron into a large sauce pan and bring to a high simmer.

Meanwhile, using a 14-inch skillet or a paella pan (12-inch will work, too) heat the olive oil and cook the chorizo over medium heat until some of the fat has rendered.  Remove the chorizo from the pan and add the red and green peppers, garlic, and the onions.  Sauté for a few minutes until tender.  Then add the tomato paste, spanish paprika, and the rice.  Sauté for about 1 minute.  Add the hot liquid and the chorizo to the skillet and place pan onto the pizza stone in the oven.  Do not stir after this point.  After 10 minutes, add the chopped tomatoes, mussels, and clams to the pan– crack side up.  Then, after 5 more minutes, push the shrimp into the rice and cook for about 5 more minutes.  If at any point the rice seems to be drying out too quickly, add more broth, water, or wine (go for the wine!) to the pan.  If the rice seems to be done cooking (it will only take about 20 minutes total) before the shrimp is done or the clams and mussels have opened up– just place tin foil over the entire dish to trap some of the steam.  I tend to do this when I place the shrimp into the dish. Discard any mussels and clams that ultimately never open up.  Serve with lemon wedges and fresh parsley.  Enjoy!

Thanks for stopping by today!

Laurie

Read Full Post »

Sunshine Smoothie with Kumquats and Turmeric | Relishing It

Another round of snow paired with a gray sky in the midwest this morning– at least the temperatures aren’t so bad.   I needed to brighten up my surroundings, so I blended up a Sunshine Smoothie.  I’ve likely mentioned this before, but I go through a bit of a kumquat love-fest this time of year.  They’re brilliant in this marmalade, perfect in vinaigrettes for salads, and they are downright fabulous blended into smoothies.

Sunshine Smoothie with Kumquats and Turmeric | Relishing It

This time, I’ve decided to craft a smoothie using kumquats as the star ingredient.  Yes, I love a smoothie loaded with greens as much as the next person (this one is my personal favorite), but sometimes I want something…a little less green.  The kumquats give this smoothie a fresh vibrancy that will wake you right up.  I also recommend using either fresh or frozen organic mango.  Plain yogurt is the protein that will keep you from getting hungry– I suggest using whole milk yogurt to also help with that.  And turmeric– a fantastic, healthy ingredient that you should eat more of anyway.  You can read about it’s specific properties here.  Curries are a great way to incorporate more turmeric into your diet, or throw a little into a soup, such as this one.  Adding just a bit to this smoothie completely works, too.  It pairs wonderfully with the cinnamon and citrus flavors.  No need to peel the kumquats, just cut them in half and remove the seeds.  Place everything in a blender or food processor and whiz it together.  Hope you enjoy!

Sunshine Smoothie with Kumquats and Turmeric | Relishing It

The Recipe:  Sunshine Smoothie with Kumquats and Turmeric

(makes 1 cup)

7-8 small organic kumquats, cut in half and seeds removed

1/3 cup diced fresh or frozen organic mango

1/3 cup organic whole milk yogurt

1/4 cup organic, unsweetened almond milk

1 teaspoon honey

1/4 teaspoon ground cinnamon

1/4 teaspoon ground turmeric

Place all of the ingredients into a blender or food processor and blend until smooth.  Serve with a sprinkle of cinnamon on top.  Enjoy!

Thanks for stopping by Relishing It today!

Laurie

Read Full Post »

Winter Salad with a Kumquat Vinaigrette | Relishing It

Apparently I’ve been craving a little color lately.  I recently bought a couple of brightly colored sweaters (orange and electric blue).  I just replaced my everyday-lipstick with a few colors that have a bit more pizzazz.  Yep, I just need to see a bit more color this time of year.  The dull gray skies and monotonous white snow just don’t do it for me by late January.   So…this colorful salad fits the bill perfectly.  And aside from the visual beauty, this one is delicious.  I could eat it every day.  Actually, I pretty much did for month straight last year.

Winter Salad with a Kumquat Vinaigrette | Relishing It

Winter Salad with a Kumquat Vinaigrette | Relishing It

Let’s start with the red cabbage.  I rely on it a lot during winter.  It tastes great, works both hot or cold, and it can hang out it your refrigerator for a while.  This last reason is important, because if you don’t happen to want to eat a salad every day, this ingredient will be waiting for you.  Tuscan kale is another great ingredient.  It’s perfect in soups or massaged and made into a simple salad.  Red peppers were on sale at our co-op the other day, so I bought a few of those too.  My kids love to snack on them all summer long, but they go through withdrawal in winter.  They were probably happier than I was when I brought them home.

Winter Salad with a Kumquat Vinaigrette | Relishing It

Finally, I present to you the kumquats.  They have such a fresh, powerful citrus flavor.  Take a look at this kumquat marmalade that I shared here a while back.  Kumquats always remind me of sunshine, which is obviously just what I need right now.  They’re sweet, tangy, and so fragrant.  I love them thinly sliced and tossed into salads– no need to peel them.  Just remove the few tiny seeds that will be inside. In this recipe, I blend them up (peel too) into a delicious vinaigrette that goes perfectly with any winter salad.  I also add a touch of honey to it to bring out the sweetness a bit more.  It’s a bit on the thick side for a vinaigrette, because the acidic component (the kumquats) is blended whole– but I think it’s absolutely lovely and the hearty winter vegetables work well with it.  The almonds are the perfect finishing touch to the salad.  I hope you give this little salad a try if you need to brighten up your day– I bet it will.  Enjoy!

Winter Salad with a Kumquat Vinaigrette | Relishing It

The Recipe:  Winter Salad with a Kumquat Vinaigrette

Serves 2

For the Vinaigrette:

10 kumquats, cut and seeded (leave the peel on)

1 teaspoon finely chopped shallot, white, or red onion

1 teaspoon honey

pinch of kosher salt

1/4 cup extra virgin olive oil

For the Salad:

About half of a small red cabbage, cored and finely sliced

handful of Tuscan kale (6-7 stalks) stems removed and thinly sliced into ribbons OR a handful of fresh spinach

1/2 red pepper, julienned

handful of almonds, coarsely chopped

3-4 kumquats, seeded and thinly sliced

To make the vinaigrette, place the kumquats into a small food processor and pulse a few times until they are finely chopped.  Add the shallot, honey, and salt.  Pulse a few more times until nearly smooth.  Add the olive oil and blend.  This vinaigrette will remain somewhat thick.  Adjust salt, if necessary.

It’s best to place your salad ingredients (sans almonds and kumquats) into a bowl and pour the vinaigrette on top of them.  Toss to coat.  Plate the salads and top with the almonds and kumquats.  Leftover vinaigrette can be stored covered in the refrigerator.  Let it come to room temperature before using.  Enjoy!

Thanks for stopping by Relishing It today!  Have a wonderful weekend.

xo

Laurie

Read Full Post »


LR edited-0098.jpg-0154

I’m sitting here at my desk on this blustery Minnesota morning, reading about blizzard warnings and drinking a hot coffee.  I’m also thinking about this wonderful, warming soup.  I really wish I had a bowl waiting for me downstairs.  Last week I shared with you how to make your own homemade chicken broth and I promised  that a few delicious soup recipes would follow, so here’s number one.  This Sopa De Lima (Mexican Chicken Lime Soup) has become one of our family favorites.  I love it because I’m partial to broth soups– they warm me up in such a perfect way.  I’m also a huge fan of citrus in my soups– I love to finish them with lemon, or in this case with lime.  It really brightens them up.  This soup comes together in no time at all if you’ve done a bit of prep work– i.e., made your broth ahead of time.

Sopa De Lima (Mexican Chicken Lime Soup) | Relishing It

Assuming you’ve made the broth ahead of time, make sure you reserved your chicken meat for this recipe.  This soup is so simple and doesn’t contain a lot of other major ingredients, so the broth really shines.  Honestly, the soup is basically just seasoned broth with chicken, a bit of tomato, puréed charred onion and a lot of fresh toppings.  And it’s amazing.  Traditionally, tortillas are deep-fried for the top of the soup, but even I take shortcuts sometimes.  I generally forego the deep-frying of the tortillas and instead opt to use good quality tortilla chips.  Having a large pot of hot oil on my stove is just a bit too much effort for me, with not enough reward– but, you can certainly choose to give it a go.

Sopa De Lima (Mexican Chicken Lime Soup) | Relishing It

I’ve found that I love the flavor of broiling the onions and garlic until they have a bit of char on them– not too much.  It really emphasizes the smokey flavor.  You’ll want to watch the garlic and most likely remove it from the oven before the onion is done.  Otherwise it may burn.  The toppings at the end are a personal choice, make it as spicy (with jalapeños and cayenne pepper) as you want.  Load it up with tortilla chips, aged white cheddar cheese, cilantro, more lime, and avocados.  I’m kicking myself for forgetting to put the avocados on the soup before I snapped the photos.  Rest assured I plopped some on it before I devoured the bowl.  They’re perfect here, so don’t forget the avocados.  Enjoy!

Sopa De Lima (Mexican Chicken Lime Soup)| Relishing It

The Recipe:  Sopa De Lima (Mexican Chicken Lime Soup)

(Serves 4)

2 quarts chicken broth (preferably homemade using this recipe)

About 4 cups shredded cooked chicken (use chicken from stock that you previously made OR boil or bake some bone-in, skin-on chicken breasts and thighs– then shred)

1 medium white onion, sliced

about 1 1/2 garlic bulbs, peeled (not just the cloves– the entire bulb!)

1 cup puréed or crushed canned tomatoes

1 teaspoon dried oregano

1/2 teaspoon dried thyme

1/2 teaspoon ground cumin

1/4 teaspoon ground cloves

1/4 teaspoon ground allspice

1 4-inch cinnamon stick

1 dried bay leaf

freshly ground black pepper and kosher salt, to taste

zest from two organic limes

1/4 – 1/3 cup fresh lime juice

Toppings: tortilla chips, cilantro, jalapeños, ground cayenne pepper, lime slices, aged white cheddar cheese (or monterey jack), and avocados

Place the sliced onion and peeled garlic cloves on a baking sheet.  Place in the oven and broil until color begins to develop, flipping once.  You may need to remove the garlic before the onion is done, so it does not burn.  Keep a watchful eye while broiling.

Begin the broth.  In a large Dutch oven or kettle, add the chicken broth, tomatoes, oregano, thyme, cumin, cloves, allspice, cinnamon, bay leaf, lime zest, and salt and pepper.  Bring to a boil, then reduce to medium and let cook for about 20-25  minutes.

Meanwhile, place the charred onion and garlic in a blender and add a bit of broth.  Blend until somewhat smooth.  Add the mixture to the soup.  Continue to cook the soup until you reach the 20-25 minute mark.  Remove the bay leaf and cinnamon.   Add the lime juice and taste.  Season with more salt and pepper, if necessary.

You can choose to add the chicken directly into the soup, but I generally heat in up in the microwave and portion it out among the bowls and ladle the hot soup over it.  Then add the final toppings– the tortilla chips, cheese, cilantro, jalapeños, lime slice, cayenne, and avocados.  Enjoy!

Thanks for stopping by Relishing it!

xo

Laurie

Read Full Post »

Deconstructed Stuffed Peppers | Relishing It

I’m willing to place a sizable bet that most of you are a little tired of turkey leftovers.  Well let’s switch it up then, with this little dish to revive your tastebuds.  This is one of those quick, healthy meals that I promised you a few weeks ago.  It’s loaded with healthy ingredients and the combination of flavors is one of my favorites– sauerkraut and beef.  (Remember this galette?)  This time I’ve also added the tang of tomatoes and the ever-so-slight crunch of green peppers.  Lovely.

Deconstructed Stuffed Peppers | Relishing It

A few comments on how I’ve titled this dish.  Let me go on record as saying I’m not a huge fan of the word “deconstructed” when it come to food.  It’s often misleading, pretentious, or both.  I know others have the same gripe about describing oneself as a “foodie”.  (Personally, I’m fine with foodie).  Anyway…here I couldn’t really come up with another way to describe this dish.  The fact is, it takes all of the wonderful components of stuffed peppers, and, well, deconstructs them.  There’s really no other way to describe it unless I decided to go with “pile of peppers, rice, ground beef, sauerkraut, and tomatoes”.  And for some reason that just doesn’t seem quite as appealing.

Deconstructed Stuffed Peppers | Relishing It

Just because this variation comes together more quickly, don’t for a moment think they aren’t as good as the original.  That would be a huge mistake, because this dish is about 10 times better than any traditional version.  Here’s why– you know that moment when you cut into what used to be a vibrant green pepper, and the liquid just floods out on to your plate because the pepper has baked far too long to ensure the filling reached the right temp?  Yeah, that doesn’t happen here.  No disappointing mushiness to the green pepper, no pieces of hamburger submerged in puddles of tomato-y water.  Here, the green peppers retain their vibrant green color and a bit of their crunch, because you decide what texture you’d like them to be.  The tomato sauce (or crushed tomatoes), whichever you choose to use, are the perfect base for the rice and ground beef.  The whole dish is finished with a healthy dose of really good sauerkraut to add that wonderful zip.  Use this saurkraut recipe to make your own, or buy a good quality version.  Bubbies has wonderful fermented products.  The entire dish takes only the amount of time that you need to make the brown rice.  So…get going, time’s a ‘wasting!   Enjoy!

Deconstructed Stuffed Peppers | Relishing It

The Recipe: Deconstructed Stuffed Peppers

(makes enough for 4 people)

1 cup dry long grain brown rice, rinsed

1 pound grass-fed ground beef

2 large green bell peppers, cut into large bite-size chunks

1 small white onion, diced

1/2 quart homemade tomato sauce, or a bit more  (your favorite purchased sauce or crushed tomatoes will work, too)

1 cup good quality sauerkraut

fresh parsley, for garnish

salt and pepper, to taste

Place the rinsed brown rice in a large saucepan with 2 cups of cold water and a sprinkle of salt.  Cover and bring to a boil, then reduce to a medium simmer and let rice cook for about 30 minutes or until it is tender and the water has been absorbed.  Fluff with fork.

Meanwhile, when the rice is about halfway through it’s cooking time, begin to brown the beef  over medium-high heat in a large skillet.  For this dish, I like to leave the beef in somewhat big chunks.  When it is cooked, drain and discard the grease.  Season the beef with salt and pepper and add add the onion to the pan.  Cook the onion until it begins to get tender, just 2-3 minutes.  Add the green peppers and cook just a few minutes until they are a bit tender, but still have a slight crunch to them.  Add the tomato sauce and warm through.  When the rice is ready, add it to the skillet and stir.  If the dish is hot enough, add the sauerkraut and stir just enough to warm the kraut, but not enough to cook it.  It’s lovely when it has a bit of a crunch to it.  Re-season with salt and pepper, if necessary.  Garnish with freshly chopped parsley.  Enjoy!

If you’re looking for gift ideas for the favorite foodie in your life, I’ve compiled a list of my favorites.  Stop over to Becki’s site, “Shopping’s My Cardio” and have a look!  Thanks for stopping by Relishing It today.  xo

Image 2

Read Full Post »

« Newer Posts - Older Posts »