Feeds:
Posts
Comments

Posts Tagged ‘Whole Foods’

Roasted Vegetable Panzanella with Eggplant | Relishing It

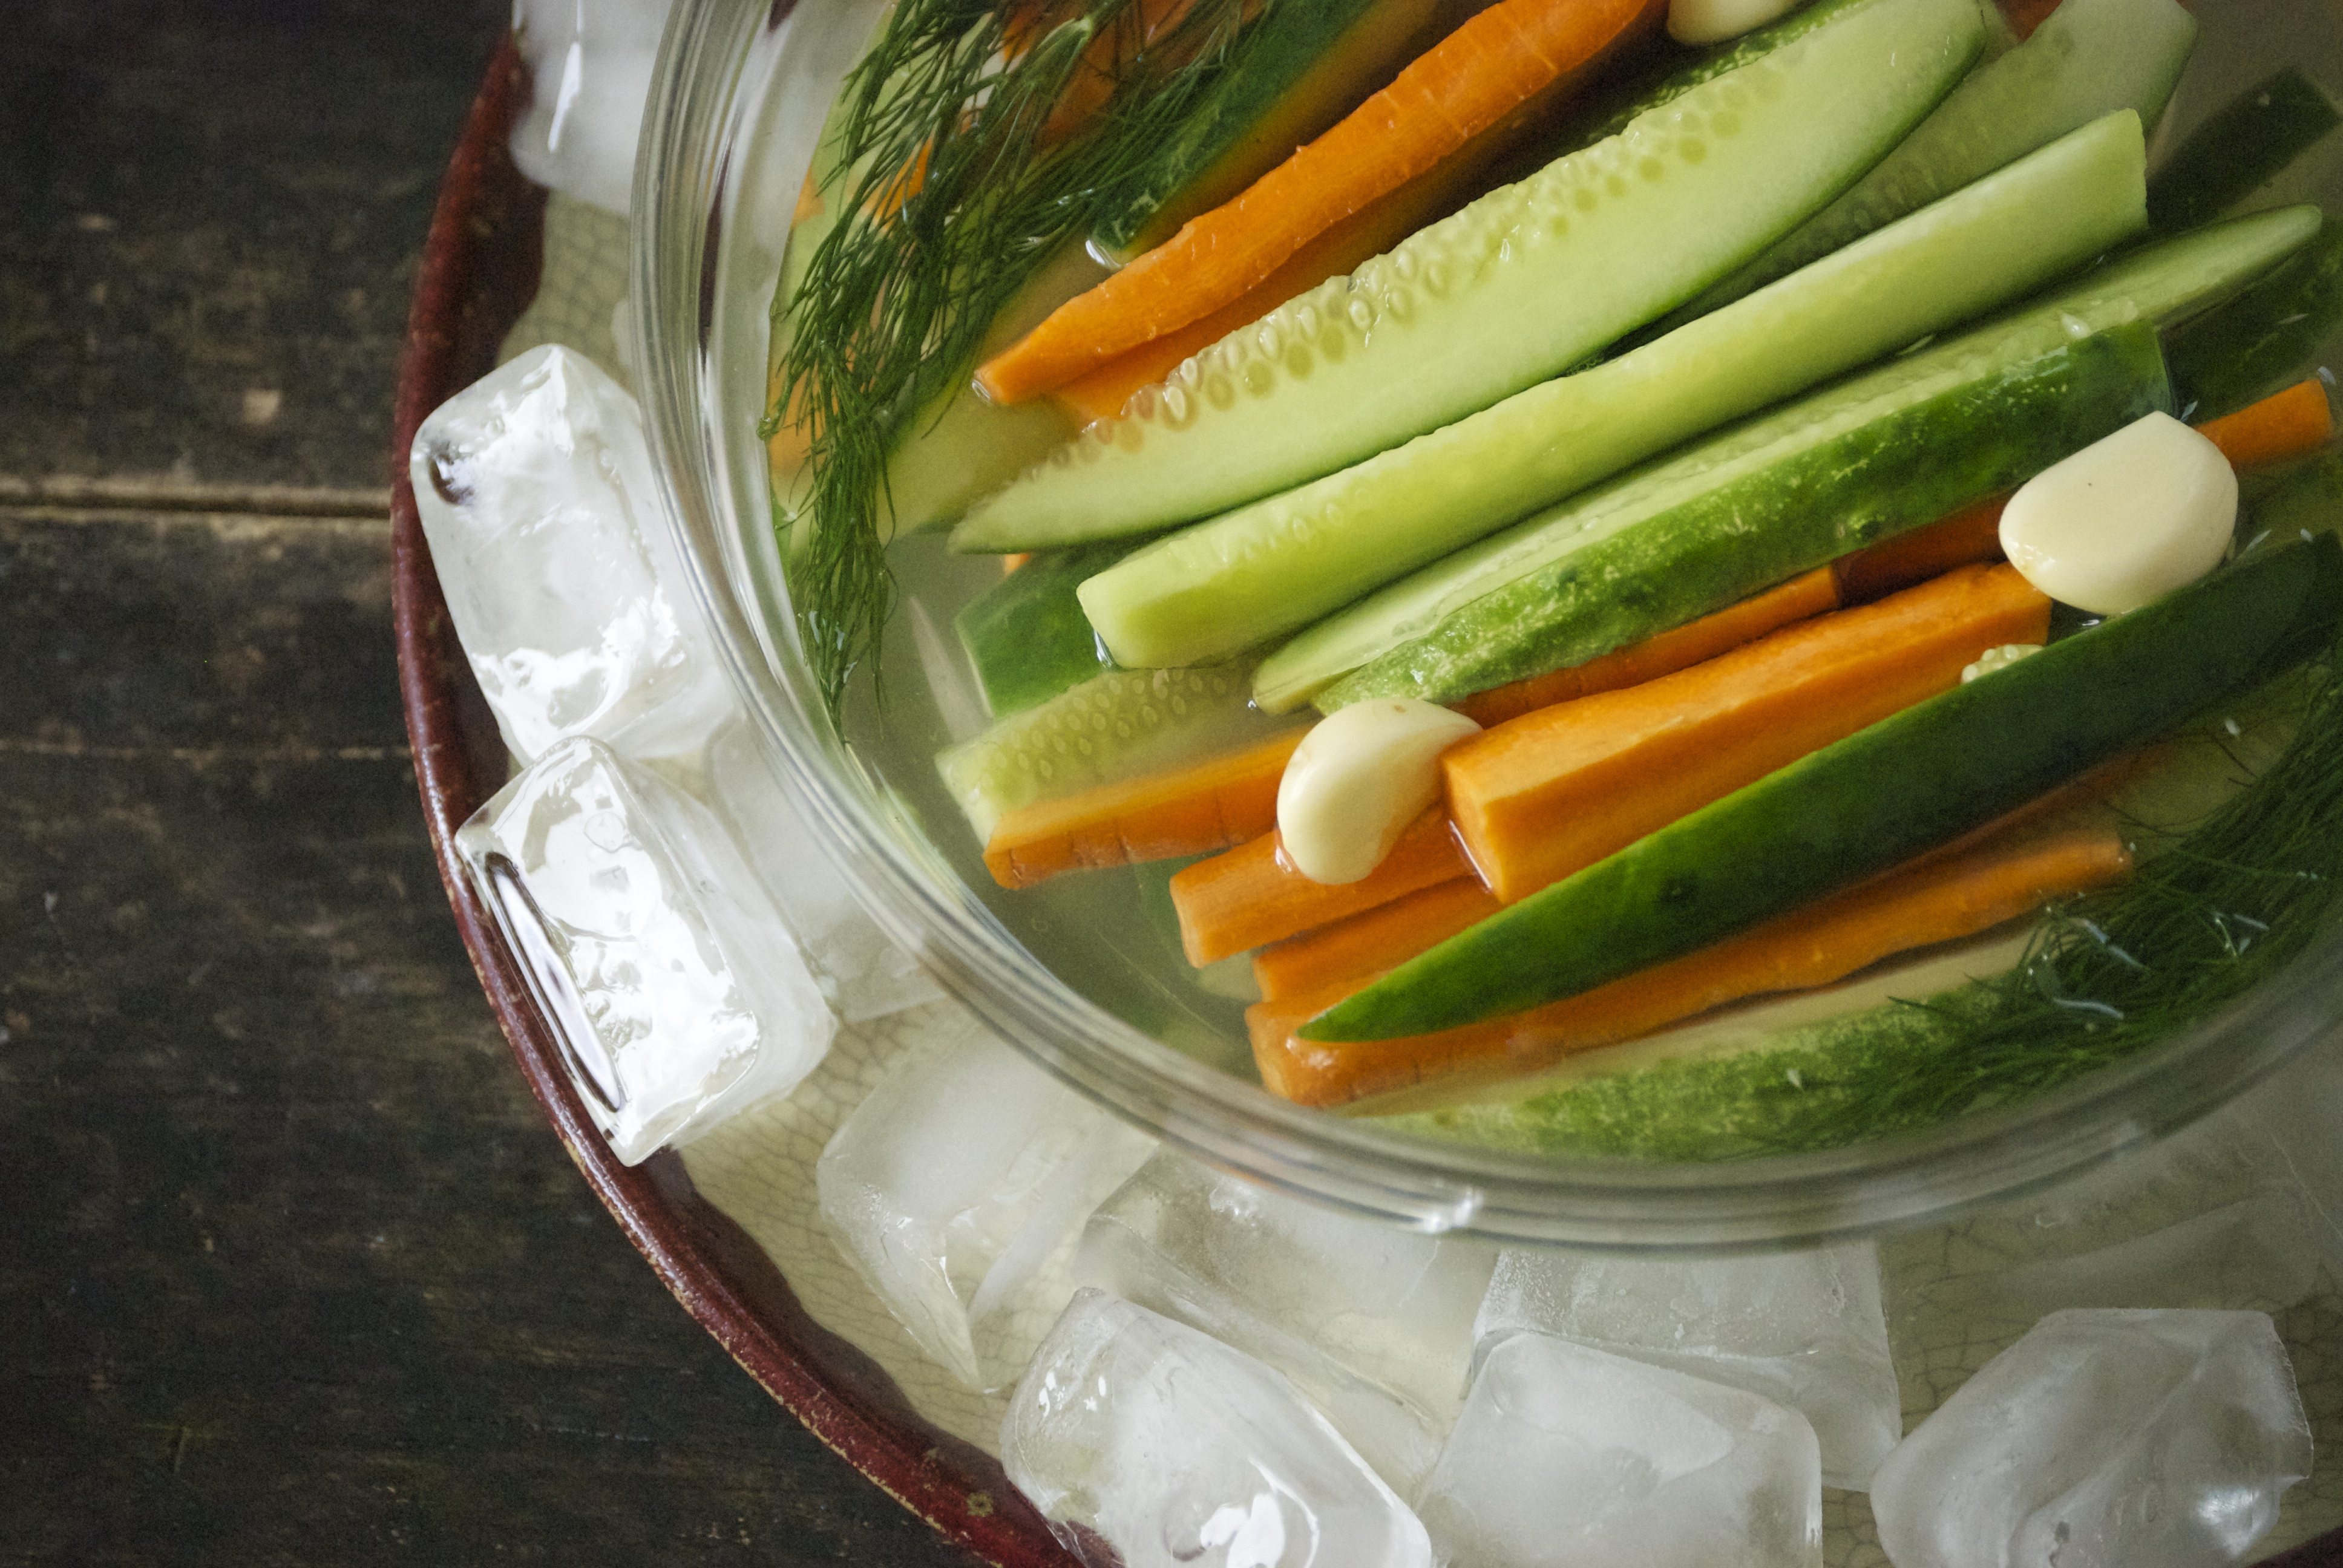
One of my favorite summer meals is panzanella.  If you’re not familiar with this little dish, it is simply a bowlful of seasonal vegetables with homemade croutons or bread and a dressing of some sort.  And it is wonderful.  This fresh version with tomatoes and peppers is one that I make frequently.

Roasted Vegetable Panzanella with Eggplant | Relishing It

Roasted Vegetable Panzanella with Eggplant | Relishing It

Roasted Vegetable Panzanella with Eggplant | Relishing It

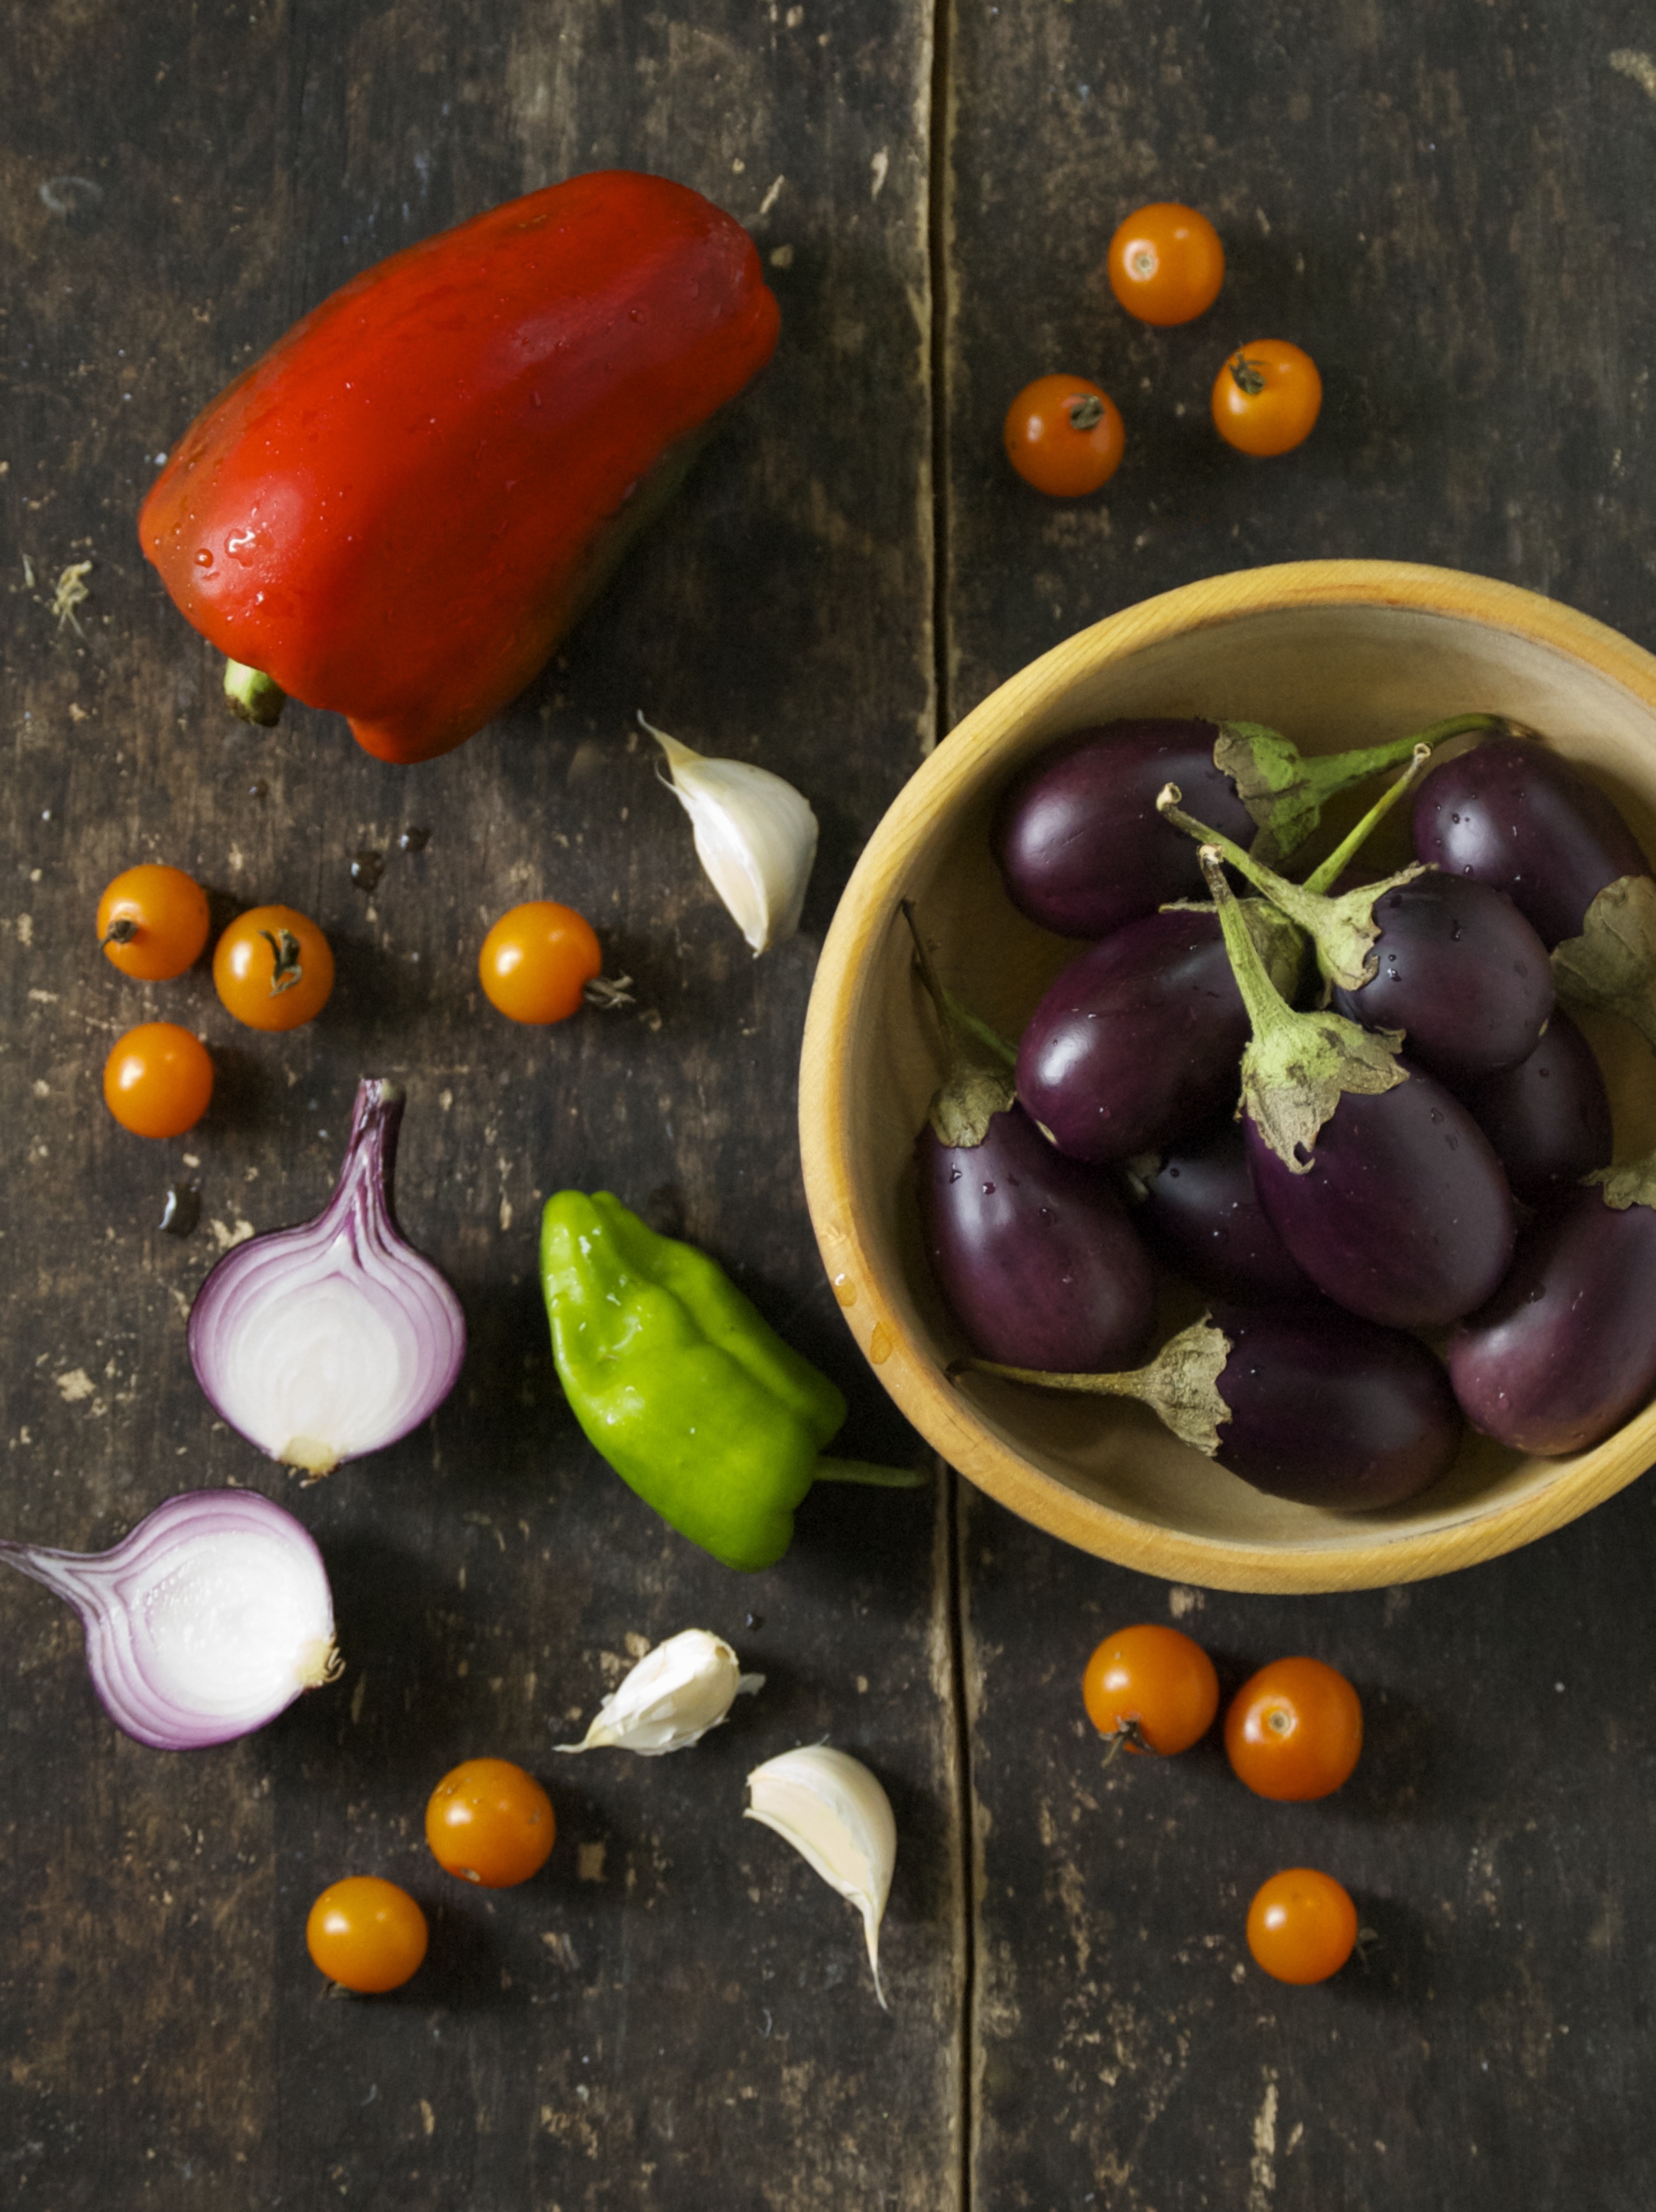
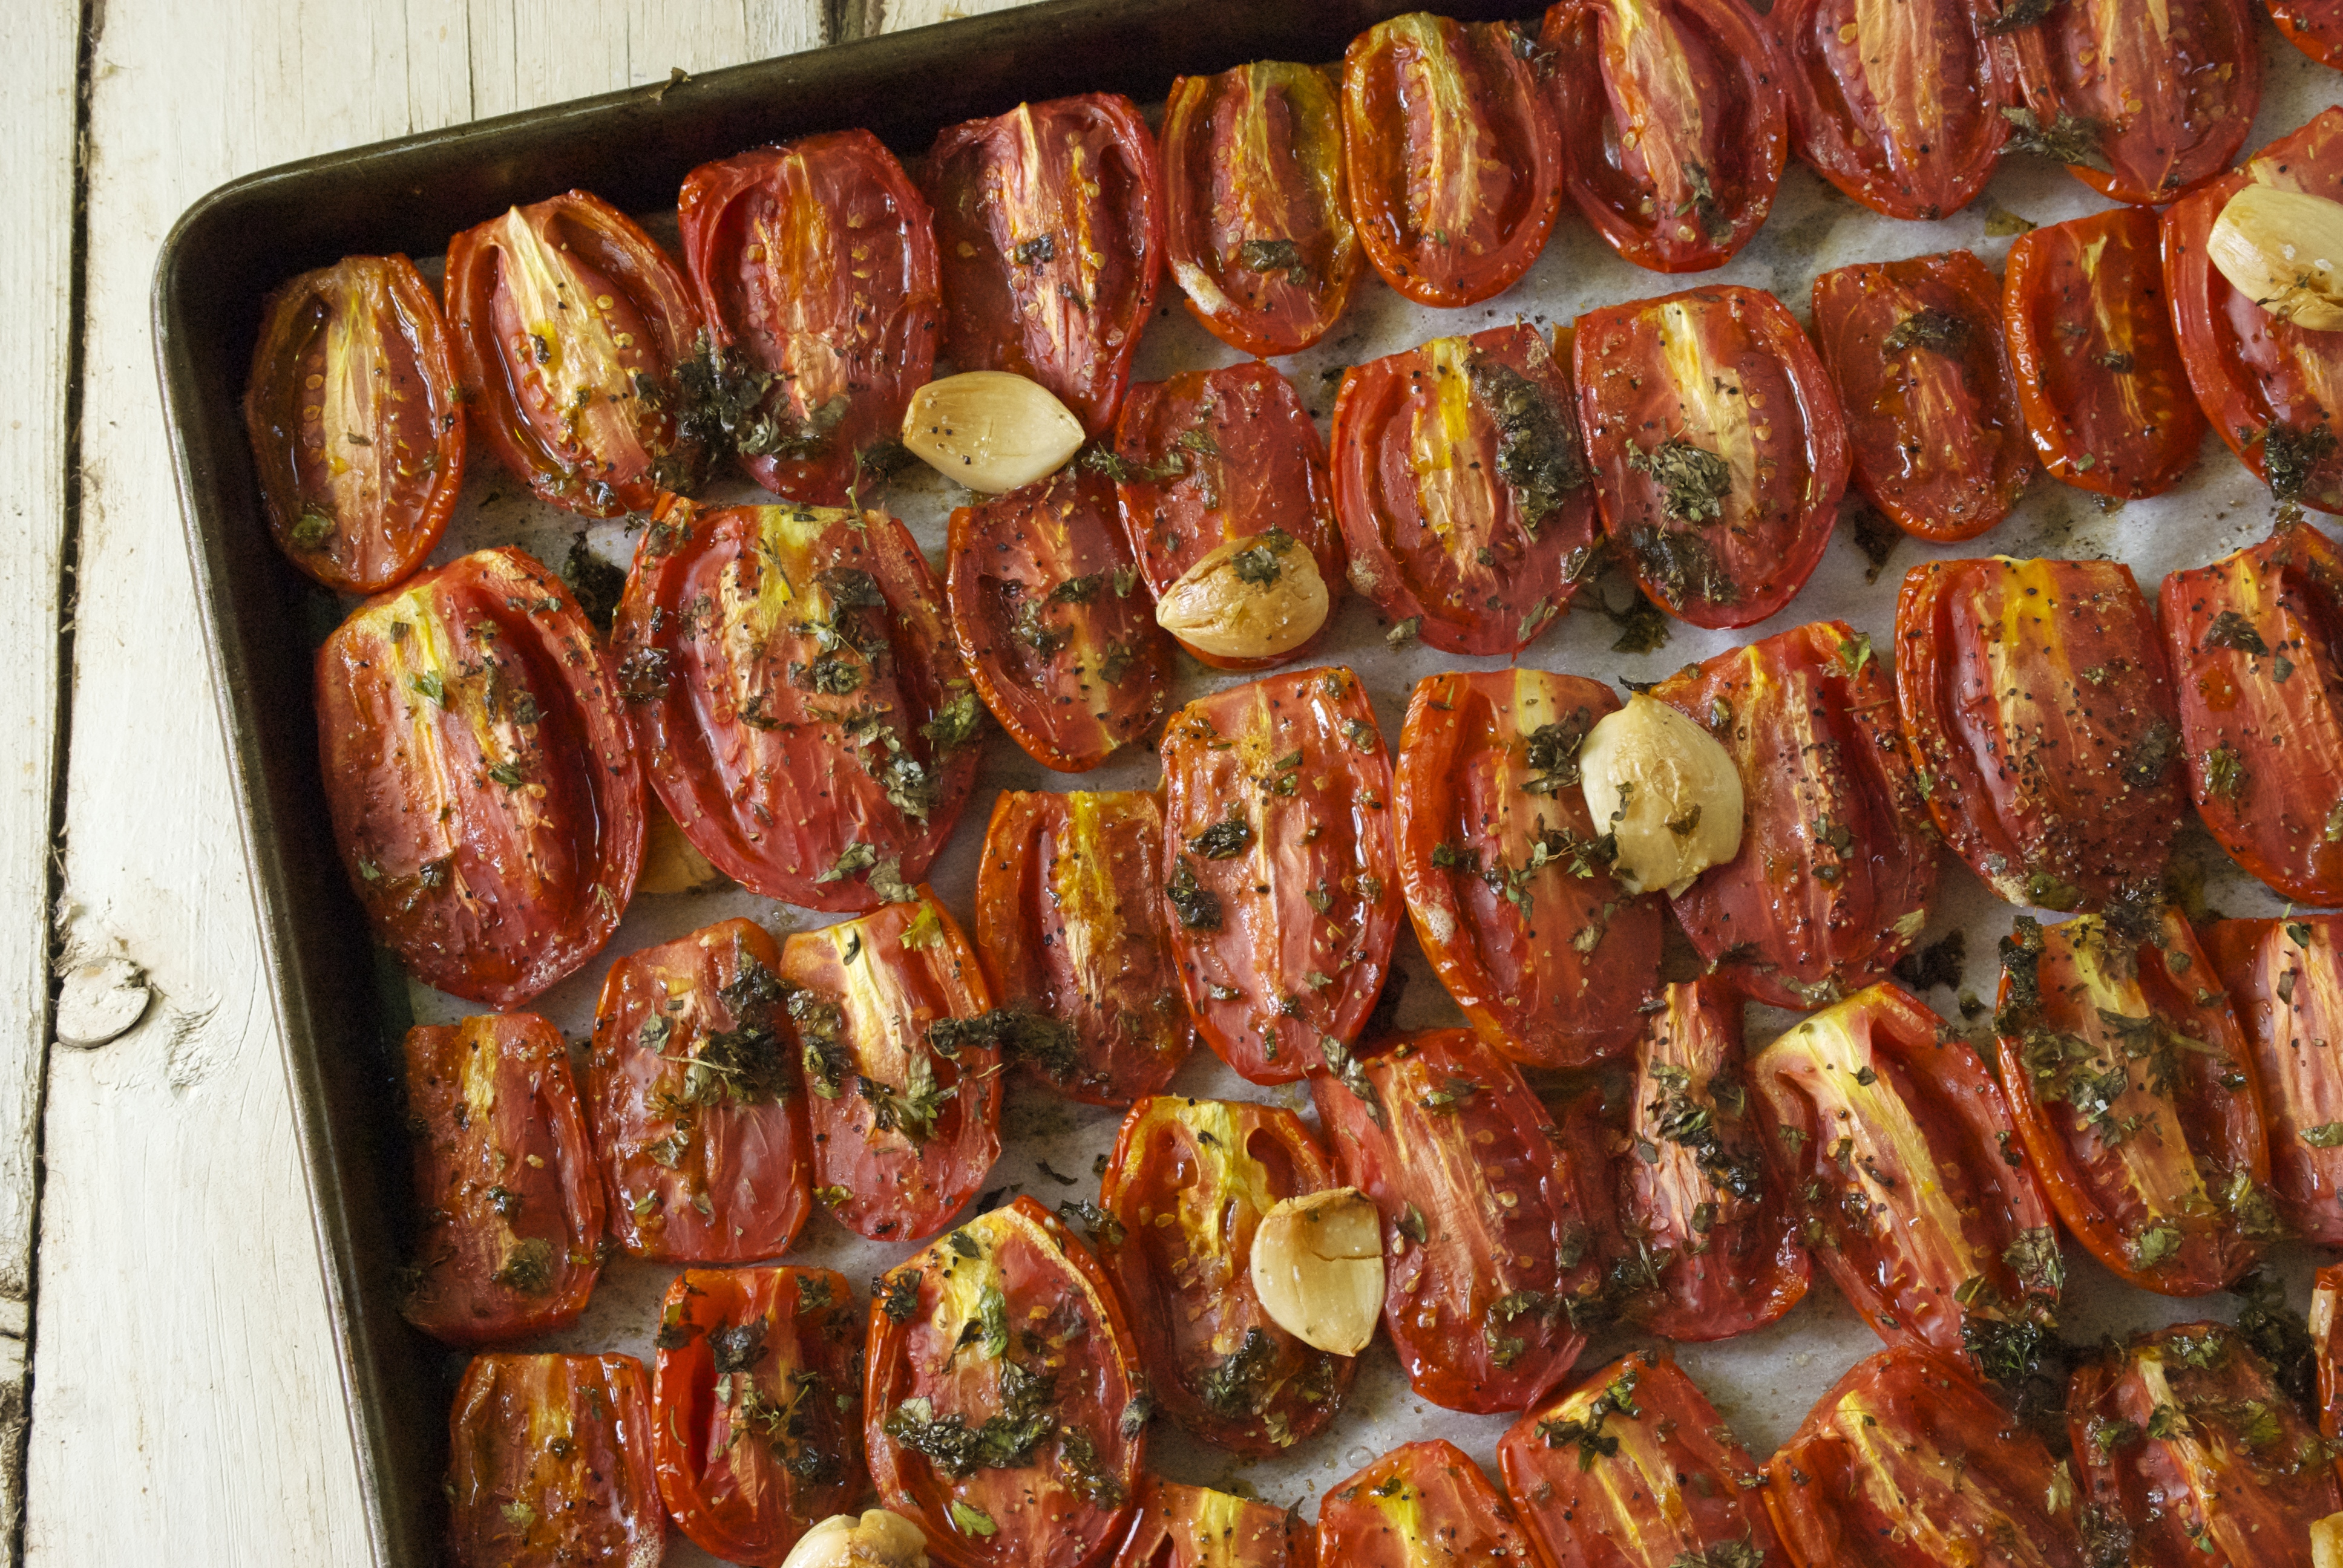
Today I wanted to create something just as pleasing, but a bit different.  I wanted to be both delicious and satisfying as well as be loaded with vegetables.  I know I’ve preached this before, but eating vegetables is key to keeping me feeling good, so I really try to pack them in throughout the day.  One of the vegetables that I wanted to rely on for this receipe is eggplant.  Why eggplant?  Well, because I can’t stop buying it at the farmers market– it’s just so darn gorgeous.  I have a weird relationship with this vegetable.  I don’t generally love the flavor, and at times I find the texture to be a bit…unique.  I needed to find a way to appreciate it, aside from the aesthetic, because admiring its beauty while it sits unused on my countertop is a bit wasteful.  And the other recipes I’ve tried have just seemed ho-hum or so loaded with other unhealthy things that it kind of defeated the point of eating healthy.  So that’s why eggplant.

Roasted Vegetable Panzanella with Eggplant | Relishing It

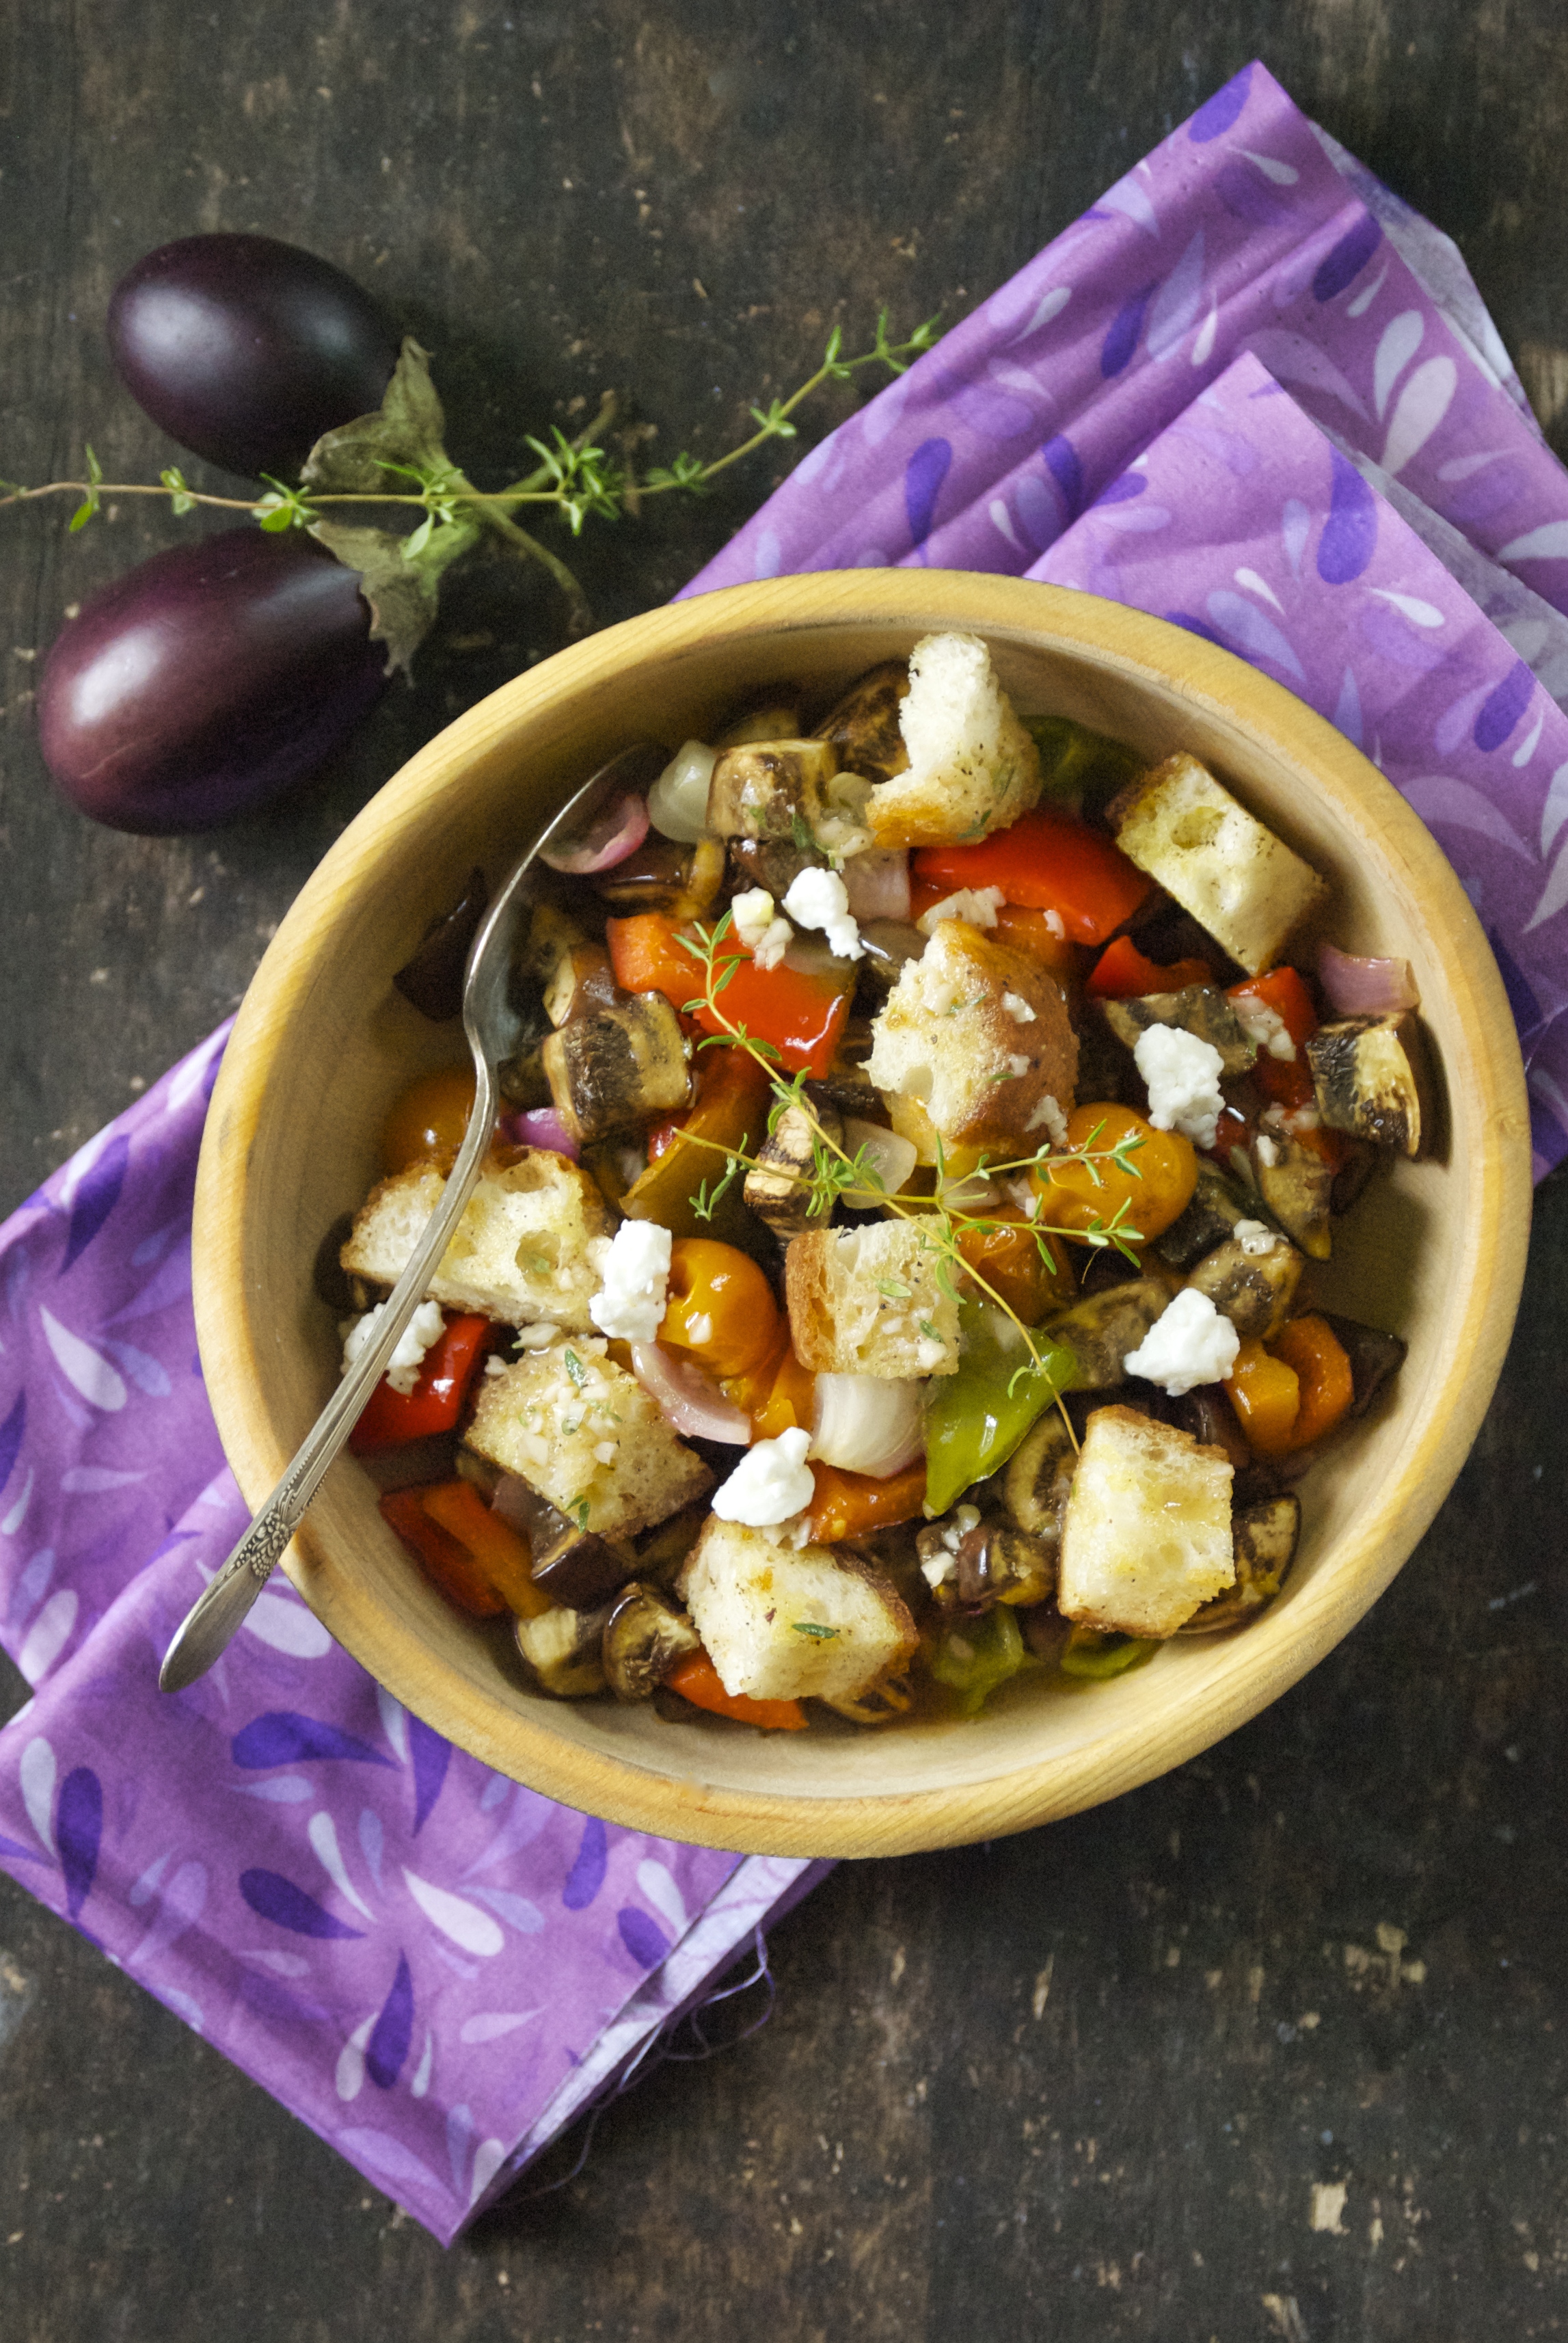
Thankfully, not only did I find a way to use it, I found a way to actually enjoy it!  This panzanella is everything that I wanted it to be.  Using small globe-like eggplants worked well in this recipe.  The seeds are smaller, which appeals to me.  The vegetables became tender and delicious when roasted.  Tossing them with homemade croutons, a red wine vinaigrette, and feta was a beautiful combination.  The feta melted slightly against the warm vegetables.  It was magical.  The smashed garlic cloves become soft and buttery.  Roast whatever vegetables you have on hand– it will work.  Change up the cheese, if you want.  Goat or ricotta salata will work well, too. Enjoy!

Roasted Vegetable Panzanella with Eggplant | Relishing It

The Recipe: Roasted Vegetable Panzanella with Eggplant

(serves 2)

about 10 small eggplants, diced

1-2 red peppers, cut into bite-sized pieces

handful of small cherry tomatoes

1 small red onion, diced

3 garlic cloves, smashed

1 hot pepper, optional

olive oil, salt, and pepper

1/4 – 1/2 baguette, cubed

Feta, goat, or ricotta salata cheese crumbles, to garnish

For the Vinaigrette:

1 garlic clove, finely minced

1/2 teaspoon Dijon mustard

3 tablespoons extra-virgin olive oil

1 tablespoon red wine vinegar

about 3-4 sprigs of fresh thyme, leaves removed

salt and pepper, to taste

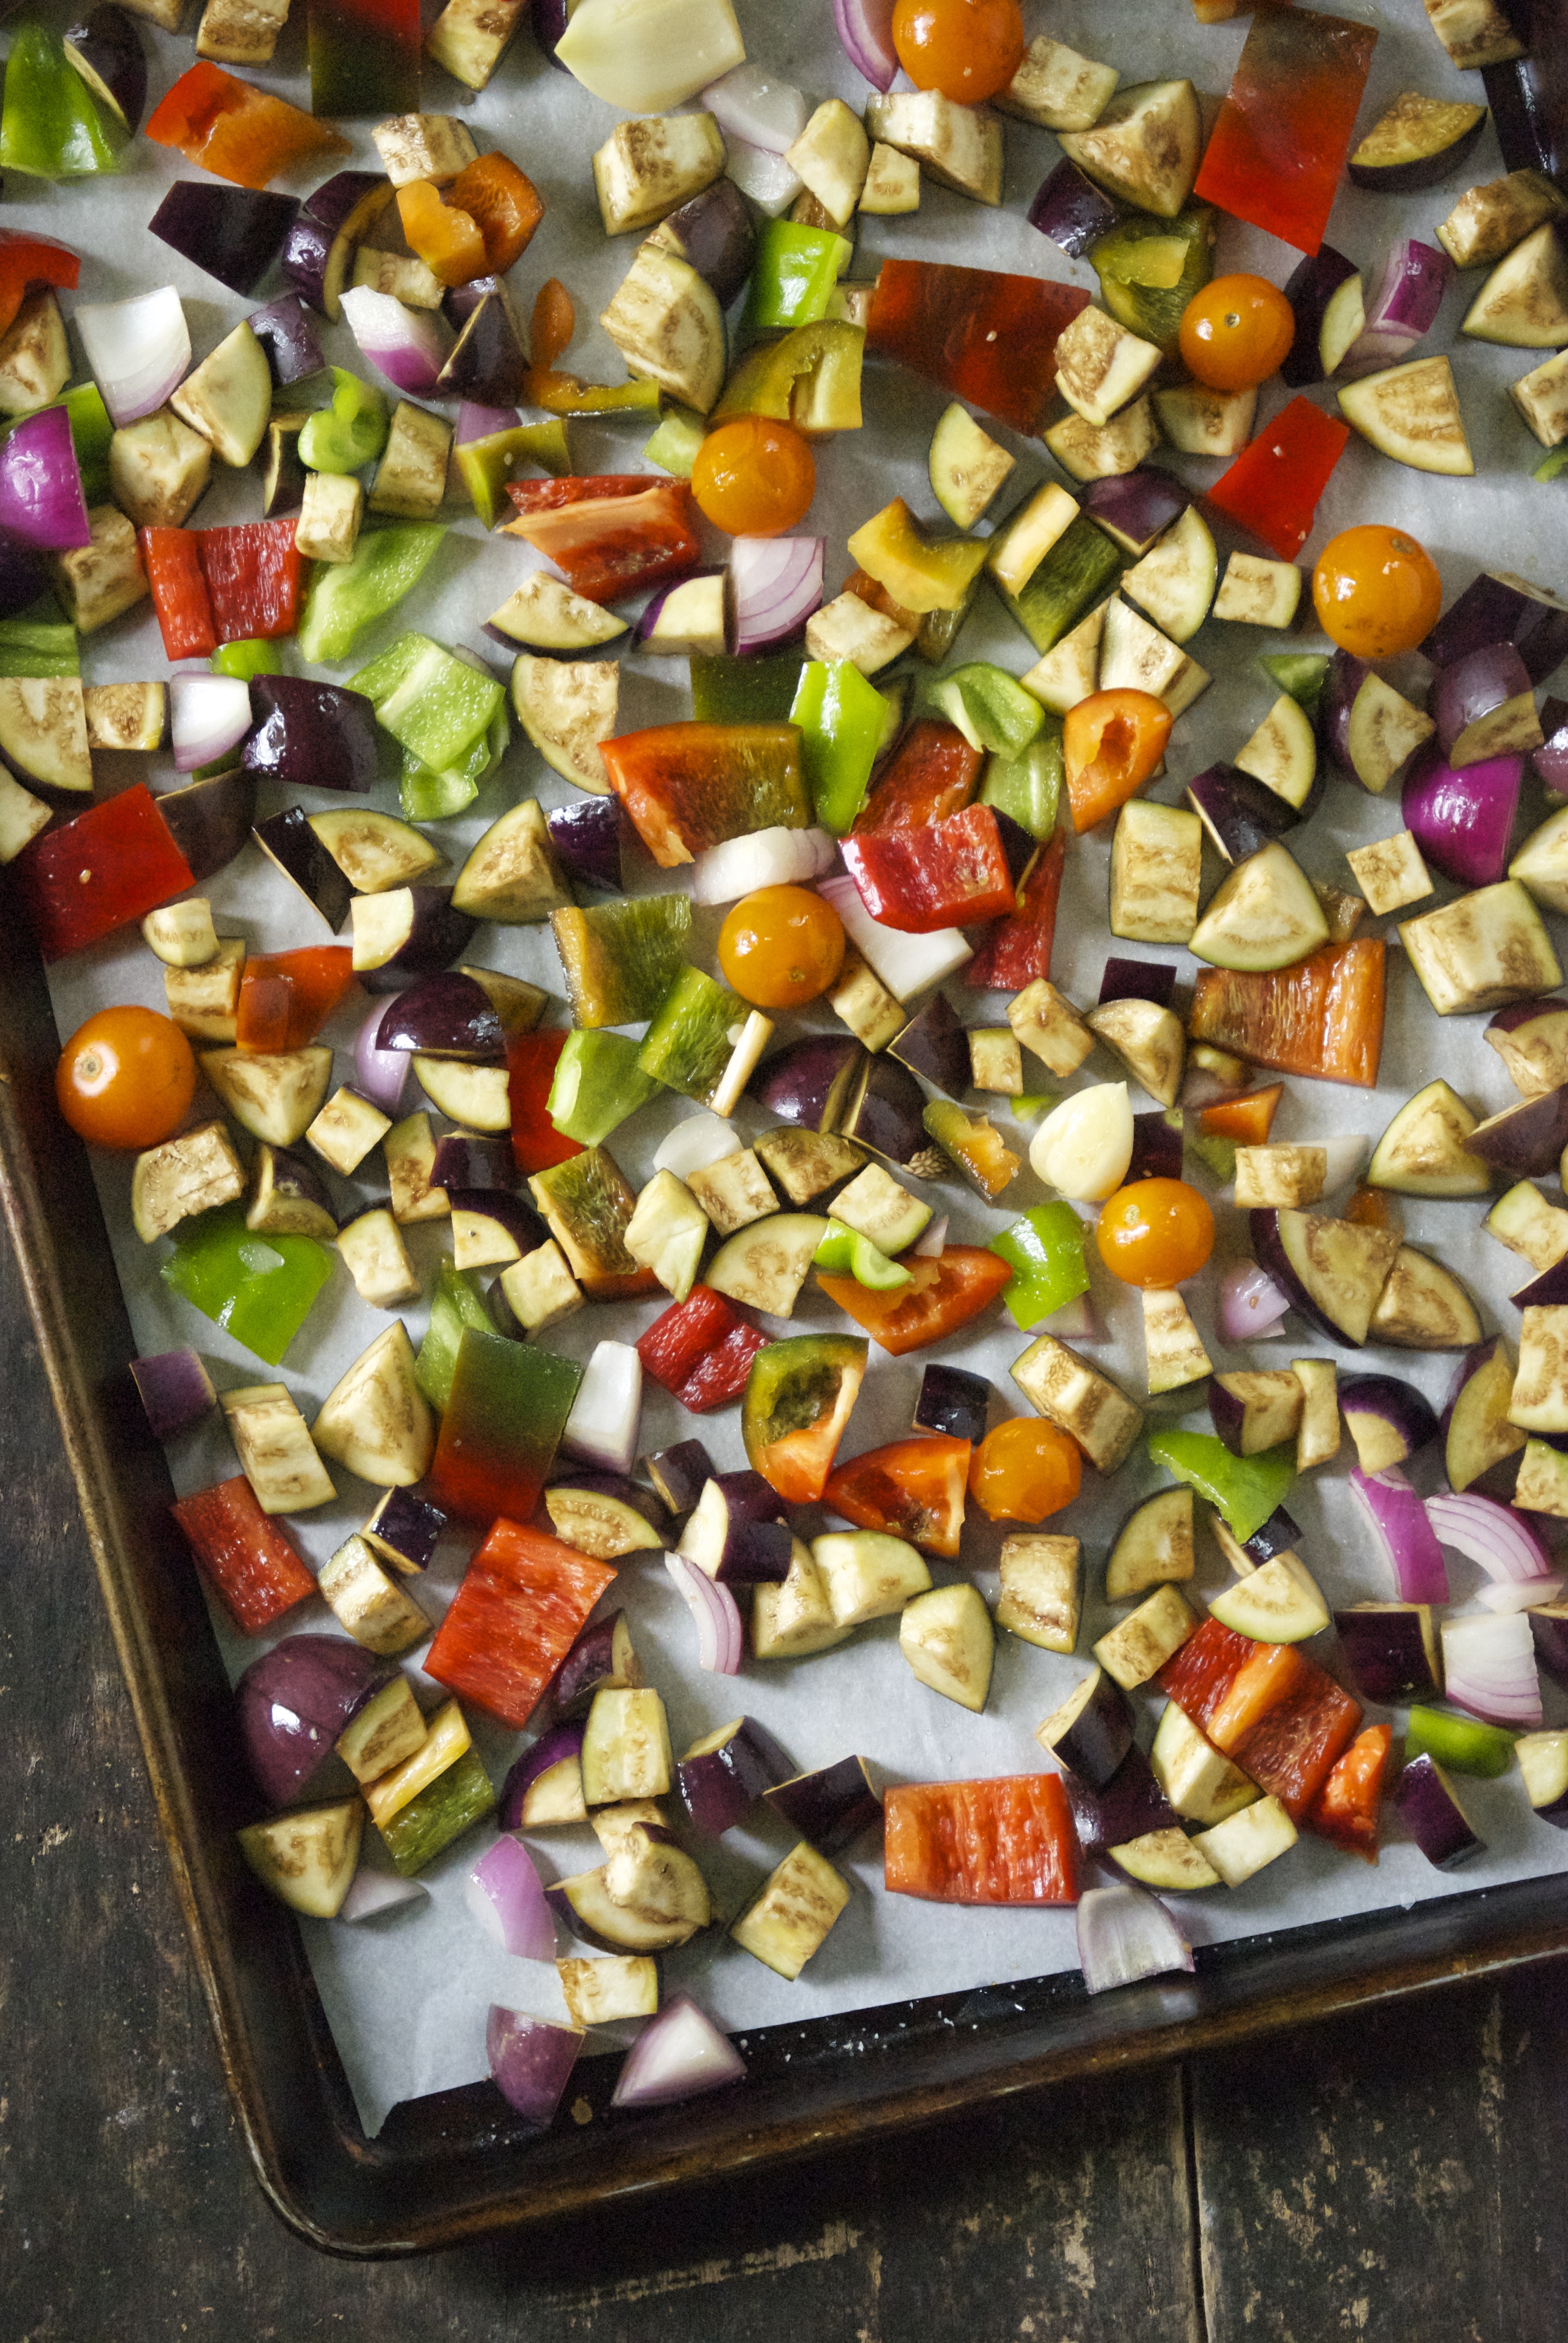
Preheat the oven to 375°F.  On a large baking sheet with parchment paper, toss the eggplant, peppers, onions, tomatoes, and garlic cloves together with 1-2 tablespoons of olive oil and a sprinkle of salt and pepper.  Roast for 20-25 minutes, or until the vegetables are tender.

Meanwhile, toss the cubed baguette with 1-2 tablespoons of olive oil and spread on another baking sheet.  Sprinkle with salt and pepper and bake on the bottom rack until just crispy, about 10 minutes.  Remove from oven.

Make the vinaigrette by mixing the garlic clove, mustard, thyme leaves, and red wine vinegar together.  Then whisk in the olive oil.  Season with salt and pepper.

When the vegetables are done roasting, mix them together with the homemade croutons.  Then toss everything with the red wine vinaigrette.  Re-season with salt and pepper, if necessary.  Serve with feta crumbles on top and even a few more thyme leaves.  Enjoy!

Thanks for stopping by Relishing It!

Laurie


Read Full Post »

Fresh Corn Salsa | Relishing It

I’ll get to the corn salsa in a minute– but first I want to talk about beer!  Admittedly, I’ve been drinking too darn much beer this summer.  Not at one time– nothing like that.  But this summer, more than any other, it’s just been so easy to sit outside with Radd in the evening and visit over a beer or two.  I suppose it’s partly to do with our mild weather– not too hot, not too humid.  It has been perfect, which is excellent for my happiness.  And while I probably don’t need those calories at the end of the day, instead of stressing, I’ve decided to embrace it.

Fresh Corn Salsa | Relishing It

Fresh Corn Salsa | Relishing It

So what have I been sipping on?  Mostly farmhouse ales and saisons.  Two that I love are Saison Dupont and a local farmhouse ale from Liftbridge called Farm Girl.  Speaking of local beer, I’ve also been enjoying a few others like Bent Paddle’s Paddle Break Blonde and Steel Toe’s Size 7 IPA.  Now before this post turns into an essay on local beer, let me just say this– our craft beer scene here in Minnesota is just incredible right now.  So many wonderful breweries and taprooms, and I’ve been testing them out like it’s my job.  I’m owning it, I don’t mind saying.  A few other great summer favorites (not local) are Leffe Blonde and Pyramid’s Apricot Ale.  There, that’s my beer confession.

Fresh Corn Salsa | Relishing It

So what goes smashingly well with summer beer?  Yup– chips and fresh corn salsa.  I love salsa of any variety– tomato, tomatillo… but, there’s something about fresh corn salsa that wins the salsa competition for me.  I would choose corn every time.  It’s fresh, slightly sweet, spicy, and loaded with that citrusy lime/cilantro flavor.  Not to mention, it is simple to make– so simple that it’s somewhat silly to even give a recipe.  But, I think the same can be said for most summer fare– fresh and simple and that’s just fine.  So, get out your chefs knife and start cutting up that corn.  Then pour yourself a glass of cold beer and soak up some summer fun.  Cheers!

Fresh Corn Salsa | Relishing It

The Recipe: Fresh Corn Salsa

6-8 ears of fresh corn, cut

1 large red onion, diced

1 bunch fresh cilantro, finely chopped

2 jalapeños, chopped (remove seeds/ribs if heat is a factor)

2 cloves garlic, finely minced

juice of one lime

kosher salt

In a medium-sized bowl mix all of the ingredients.  Add more lime juice to taste.  Season appropriately with salt.  You may need more salt than you are used to — corn needs a bit to bring out its wonderful flavor.  Let flavors meld for a bit before serving.  Store leftovers covered in the refrigerator.  Enjoy!

Fresh Corn Salsa | Relishing It

Thanks for stopping by Relishing It!

Laurie

Read Full Post »


Crunchy Refrigerator Pickles with Dill + Garlic | Relishing It

You know what’s awesome?  Handing your daughter a pickle and having her proclaim (without knowing where it was from) “This is amazin’!”.  That, my friends, is what I call winning.  She didn’t see me make the first batch of refrigerator pickles this year, but she’s been helping me make every batch since.  She is fascinated by the fact that it doesn’t take very long to transform a cucumber into a wonderful pickle.

Crunchy Refrigerator Pickles with Dill + Garlic | Relishing It

Crunchy Refrigerator Pickles with Dill + Garlic | Relishing It

I decided to wing-it this year and make up my own pickle recipe.  After waiting rather impatiently for my mom to send me her recipe (you’re in trouble, mother), I decided to conjure up my own version.  Sure, I’ve made lots of refrigerator pickles in the past, but nothing that kept me wanting to make the same batch again.  I was reaching too far, to be honest– over-complicating things.  I kept looking for something “interesting” that would blow me away.  Last year I even tried a version with mint, and while they were fine, they just were not what I was looking for.  I realized that what I was really after wasn’t complicated at all.  I wanted something that was really crunchy, fresh, garlicy, and had a clean dill taste.  Simple. Classic.  So, I stopped searching and just made them the way I wanted.  Duh.

Crunchy Refrigerator Pickles with Dill + Garlic | Relishing It

Crunchy Refrigerato Pickles with Garlic + Dill | Relishing It

The key for me to keeping them refreshing is to lessen the salt and vinegar amount a bit.  I remember this trick from my mom, which is why I probably loved her pickles so much.  Add a little filtered water to the vinegar and it creates the most refreshing brine.  Too much salt makes me want to stop eating something in a hurry, but just the right amount– and I can chomp on these babies all day long.  The dill and garlic are just what you’d expect them to be– delicious.  No surprises here.  I always add carrots to my refrigerator dills– they’re fantastic.  They take a bit longer to pickle than the cucumbers do.  Using young small cucumbers is the key to a crunchy pickle, as is not heating up the brine mixture.  Keep everything cold and you’ll have a fantastic crunch– I promise you.

Crunchy Refrigerator Pickles with Dill + Garlic | Relishing It

Crunchy Refrigerator Pickles with Dill + Garlic | Relishing It

These pickles are perfect to bring to a barbecue or neighborhood gathering.  Bring a huge bowl of them– they’ll disappear quickly.   There is nothing better than sinking your teeth into a cold, crunchy pickle on a hot summer evening.  National Night Out is next Tuesday in the US.  I plan on bringing a big bowl of these crunchy dills, and I think you should do the same.  Or just make a jar or two to keep in your refrigerator for when you need that tangy, satisfying crunch.

Crunchy Refrigerator Pickles with Dill + Garlic | Relishing It

The Recipe: Crunchy Refrigerator Pickles with Dill + Garlic

Smallish cucumbers, cut however you like– I prefer spears

carrots, cut into spears

3-4 cloves of garlic, peeled

1 1/2 teaspoons kosher salt ( I use Diamond Crystal–and weirdly this matters.  Different salt.  Different results.)

fresh dill

white vinegar

Make as many jars as you want.  Fill each clean quart jar with cucumber spears, carrots, 3-4 cloves of garlic, and fresh dill. Make sure everything is packed in there tightly.  Sprinkle with kosher salt.  Pour vinegar into the jar until it is  3/4 full.  Then finish filling the jar with filtered water, leaving about 1/2-inch space at the top.  Cover with lid and gently shake to combine.  Refrigerate.  Pickles will be ready within a few hours, but it’s best to wait at least a day for optimum results.  Carrots often take a bit longer to fully become pickled, but I generally eat them before the fact.  Enjoy!

Thanks for stopping by Relishing it!

Laurie


Read Full Post »

Roasted Tomatoes with Garlic and Herbs | Relishing It

The tomatoes have finally arrived here in Minnesota!  Yes, that sentence deserves an exclamation point.  It’s always a long wait for me throughout the year for these babies.  I love tomatoes, but the sad store-bought versions just won’t do.  So, I can or freeze as much as I can to make it through the winter, then patiently wait for them to appear at the farmers markets the next summer.  Every year I somehow trick myself into thinking that they should appear earlier than they really do.  Tomatoes need time and lots of sun.  I have a few plants in my yard again this year that are coming along nicely, but the bulk of my preserving comes from the farmers markets, where I can buy bushel upon bushel of these little red gems.

Roasted Tomatoes with Garlic and Herbs | Relishing It

I’ve mentioned here before that I love to can salsa.  I’ll be makes lots of batches of this recipe in the coming weeks.  I also can plain tomatoes, and a couple different versions of tomato sauce.  The version I’m sharing today is not a canned one–so, you can exhale now.  It’s actually my favorite tomato sauce and I preserve it by freezing it.  Super easy and ridiculously delicious.  I love to can, as it’s a great way to preserve and we happen to have a large storage room in the basement, so it works well for our family.  But, in all honesty, I love the taste of this un-canned sauce even more.  The flavors are spot-on and lemon juice (which is used in canning to keep the ph levels safe) is not needed.  I use roma tomatoes here (they are wonderful for sauces) as they have a lower water content.

Roasted Tomatoes with Garlic and Herbs | Relishing It


Roasting tomatoes is one of my favorite ways to eat them.  Something magical happens when that tomato caramelizes a bit. The flavor intensifies and I simply can’t stop popping them into my mouth.  I love to pair them with some delicious cheese and crusty bread.  Simple summer meals are the best.  When we’ve eaten our fill, I put the rest of the tomatoes, garlic, and herbs into the food processor and give it a few pulses until it become this thick, fragrant tomato sauce that can be used in so many ways.  At this point, I freeze the sauce, unless I want to use it in the next day or so.  Freeze it in whatever you like– freezer bags or vacuum seal it in a special bag (freeze first, then vacuum seal it closed) are both methods that work well.  I use this sauce all winter long and it is always a sad day when I pull the last one from the freezer.  I hope you give this version a try.  Enjoy!

Roasted Tomatoes with Garlic and Herbs | Relishing It

The Recipe: Roasted Tomatoes with Garlic and Herbs

Roma tomatoes, cut in half (as many as will fit on 1-2 baking sheets–depending upon how many you want to roast)

1 bulb of garlic, peeled and cloves separated (per baking sheet)

handful of freshly chopped herbs: basil, thyme, oregano, parsley (per baking sheet)

olive oil

kosher salt and fresh black pepper

Preheat oven to 375°F.  Line 1-2 large rimmed baking sheets with parchment paper (depending upon how many tomatoes you want to roast).  Fit the tomatoes snuggly, cut-side up, in a single-layer onto the pan, they will decrease in size as they cook.  Drizzle with olive oil.  Sprinkle with the chopped herbs, garlic, salt, and pepper.  Roast for about 40-50 minutes (if using two pans, rotate them half-way through).  Then increase temperature to 400°F and roast for at least another 10 minutes to caramelize the tomatoes, sometimes a bit longer.  Check the bottom of them for a dark caramel color.  Remove from oven when done.  If wanting to make sauce, place all of the roasted ingredients into a food processor, juices too (or by hand).  Pulse for a few times until mixed.  Place in freezer bags or bags that can be vacuum sealed (freeze first, then seal), or any other container you want to store them in.  Enjoy throughout the winter!

Thanks for stopping by Relishing It!

Laurie


Read Full Post »

Pickled Eggs with Fresh Beets and Dill | Relishing It

My Mom used to raise chickens on our farm when I was growing up.  To be honest with you, sometimes those crabby hens would scare the heck out of me, but I sure developed a love of the eggs they provided.  Farm fresh eggs– there is nothing better.  One of my favorite ways to eat them is pickled.  I previously shared a favorite recipe of mine for pickled eggs.  And though I absolutely love that version– the spicy heat is just too much for my kids.  Today’s version with beets and dill has absolutely no heat– but the flavor is unreal.  I was worried that my husband wouldn’t quite go for it.  I love beets, but I thought it might be too much for him to embrace.  I was completely wrong.  Even without the heat, he was loving them.

Pickled Beets with Fresh Beets and Dill | Relishing It

Beets and dill are an excellent combination.  Here, the eggs take on a beautiful deep purple hue and are laced with a dill flavor.  The beets and onions become perfectly pickled, as well.  Chopped up they work wonderfully atop egg-salad sandwiches, paired with pork, or just eaten as a snack.  The beets remain somewhat crunchy, which I love.  The eggs pickle rather quickly–and the lovely purple hue is present after just a day or so.  The longer the eggs sit in the vinegar, the less white from the eggs will be present.  Eventually the entire egg will be purple.  Which tastes amazing, but if dramatic effects are what you are after– it’s best to eat them within 5 days, or so.

Pickled Beets with Fresh Beets and Dill | Relishing It

Eggs are a perfect, portable protein to snack on– we pack them a lot for school lunches and for summer outings. Make sure to buy good quality eggs, preferably from a farmers market or co-op.  You’ll end up worrying a lot less when you feed them to your family. Give this version a try–I hope you enjoy it as much as I do!

Pickled Beets with Fresh Beets and Dill | Relishing It

The Recipe: Pickled Eggs with Fresh Beets and Dill

(makes 2 quarts)

10-12 hard-boiled eggs, peeled  *see note

2 beets, peeled and thinly sliced

1 small white onion, peeled and thinly sliced

6-8 garlic cloves

4 dried bay leaves

1 tablespoon pickling spice

1 teaspoon whole black peppercorns

1 teaspoon kosher salt

Fresh dill sprigs

white vinegar (enough to fill each jar)

Note: To properly boil eggs– add eggs to a large sauce pan filled with water.  Bring to a boil.  Boil for one minute, cover with lid, and remove from heat.  Let stand for 10 minutes.  Then immediately drain the eggs and place them in a bowl of cold water filled with ice.  This will stop the cooking process and yield a perfectly hard-boiled egg.

Divide all the ingredients between the two quart jars.  Layer the eggs, beets, and onions.  Fill each jar with enough vinegar to cover all of the ingredients.  Put lids on the jars and give a gentle shake to mix the ingredients.  Place in the refrigerator.  Eggs will be ready in about 2 days.  The flavor and color will deepen the longer they sit.  After about 2 weeks, their texture may start to change and be less firm, so it’s best to eat them before that happens. Enjoy!

Have a great day and thanks for stopping by Relishing It!

Laurie


Read Full Post »

Socca with Greek Vegetable Salsa | Relishing It

By now you must have heard of socca, right?  Well if you haven’t, it’s simply garbanzo bean (chickpea) flour made into a pancake or flatbread.  It’s a nice gluten-free alternative that tastes fantastic– I bet I eat it about once a week.  Chickpeas are a great source of protein with a wonderful flavor.  A while back I posted a different recipe for socca.  It’s still one of my favorites– especially with the sweet potatoes, kale, italian sausage, and creamy buttermilk dressing.  That one is more of a pancake, while this most-certainly is not.

Socca with Greek Vegetable Salsa | Relishing It

Socca with Greek Vegetable Salsa | Relishing It

This version is thinner and crispier, with the characteristics of a flatbread.  I like to eat this one as a piece of “bread” piled high with delicious toppings– usually vegetables.  Today I made a lovely little greek vegetable ensemble that works so well with the socca.  Other times, fresh corn, tomatoes, scallions, and cotija cheese serve the purpose.  You get the idea.  Use whatever you have around the house/garden and let the socca be the instrument to get it into your mouth.

Socca with Greek Vegetable Salsa | Relishing It

Socca with Greek Vegetable Salsa | Relishing It

It’s nice in that the ingredient list is small to make socca and the cooking time is barely five minutes.  The longest part of this process is waiting about 30 minutes for the flour to fully absorb the water.  Believe me, I’ve rushed this part before, and it’s not a huge deal.  But, if you can wait– you’ll end up with perfect, crispy-edged flatbread that is sturdy enough for toppings.  Rather than frying the flatbread, you cook it under the broiler– a technique that my friend, Angharad (another fellow socca lover), introduced me to.  It works really slick.  All sides get browned and crispy.  This meal is perfect to whip up on a moments notice and you’ll love it.  Trust me.

Socca with Greek Vegetable Salsa | Relishing It

Socca with Greek Vegetable Salsa | Relishing It

The Recipe: Socca with Greek Vegetable Salsa

(serves 1)

For the Socca:

1/2 cup chickpea flour (garbanzo bean flour)

1/2 cup water

pinch of salt

1 teaspoon olive oil, plus more for the pan

For the Greek Vegetable Salsa:

1/2 large cucumber, diced

2 radishes, diced

1/2 cup grape tomatoes, halved

1 red scallion, diced

2-3 tablespoons feta cheese, crumbled

3-4 tablespoons kalamata olives, chopped

2 peperoncinis, diced (optional)

handful fresh parsley and sprig of thyme, minced

drizzle of olive oil

salt and pepper, to taste

In a medium-sized bowl, whisk together the chickpea flour, water, salt, and olive oil.  Let rest for about 30 minutes.

Meanwhile, combine the ingredients for the Greek vegetable salsa in a medium-sized bowl.  Set aside.

After the batter has rested for 30 minutes, place the oven rack in the position closest to the broiler.  Heat a cast-iron skillet under the broiler for 5 minutes (this helps cook the bottom of the socca quickly).  Remove from the oven an add enough olive oil to coat the pan when swirled.  Then add the batter and swirl around until the bottom of the pan is evenly coated.  Place under the broiler and cook until the top is a deep golden brown, about 5-7 minutes.  You will probably have to move the pan around once or twice during this time, to bake evenly.  Remove from oven and use a spatula to carefully remove from the pan.  Drizzle with olive oil and sea salt.  Cut.  And serve with the greek vegetable salsa, or any other topping you would like.  Or eat it plain– it’s all delicious!  Enjoy!

Thanks for stopping by Relishing It!  Have a great day.

Laurie

Read Full Post »

Pincho Moruno (Adobo Marinated Chicken Kabobs) | Relishing It

Pincho Moruno.  That’s a fancy title, no?  Don’t be intimidated– this incredible dish is basically a kabob-like stick made of meat.  And since it’s grilling season, these spiced chicken thighs are a perfect addition to your barbecue rotation.  The recipe comes from this beautiful book by Jeffrey Weiss. It’s titled Charcutería: The Soul of Spain and it is a stunning, mouthwatering read. Jeffery is a professional chef with fifteen years under his belt. He is one of only a few Americans to win the ICEX culinary scholarship that allowed him to live in Spain and learn its regional cuisines, as well as to cook with some of Spain’s top chefs. From that experience comes this amazing cookbook.

Pincho Moruno (Adobo Marinated Chicken Kabobs) | Relishing It

After paging through it, I immediately knew what I wanted to make. I couldn’t stop thinking about the Pincho Moruno. I love to make kabobs in summer. Sometimes I marinate the meat, sometimes I don’t. This recipe includes a marinade so delicious you’ll want to make it over and over again. At first glance, you may think there are too many steps and the list of ingredients is too lengthy. But trust me, the steps are relatively quick– basically mixing dry spices together. And all of the spices listed were ones I already had in my spice cabinet. In fact, the only thing I didn’t have for this recipe was the chicken thighs– I’m guessing you’ll have most everything, too.

Pincho Moruno (Adobo Marinated Chicken Kabobs) | Relishing It

Pincho Moruno (Adobo Marinated Chicken Kabobs) | Relishing It

Pincho Moruno (Adobo Marinated Chicken Kabobs) | Relishing It Pincho Moruno (Adobo Marinated Chicken Kabobs) | Relishing It

Pincho Moruno (Adobo Marinated Chicken Kabobs) | Relishing It

The adobo sauce is the real star here.  I’ve always been a fan of adobo, but this was my first foray into making a homemade version.  It was far easier than I anticipated, and the flavor is, well, incredible.  The spices paired with the sherry vinegar, garlic, and olive oil are perfection.  You’ll want to invite friends over to show this one off– trust me.

Pincho Moruno (Adobo Marinated Chicken Kabobs) | Relishing It

Pincho Moruno (Adobo Marinated Chicken Kabobs) | Relishing It

The Recipe: Pincho Moruno (Adobo Marinated Chicken Kabobs)

About 2 pounds of boneless, skinless chicken thighs, cut into bite-sized pieces (pork tenderloin, lamb shoulder, pork belly, chicken or beef hearts are also options)

1 medium yellow onion, julienned

1/4 cup extra-virgin olive oil

2 tablespoons sherry vinegar

kosher salt, to taste

1 recipe Basic Adobo

4 tablespoons Moruno Spice

Basic Adobo:

5 cloves garlic, crushed

1 tablespoon kosher salt

1 tablespoon dried oregano

2 tablespoons pimentón dulce (sweet paprika)

1/4 cup extra-virgin olive oil

1/4 cup sherry vinegar

1/4 cup water

Moruno Spice: 

2 tablespoons cumin seeds

1 tablespoon coriander seeds

1 tablespoon fennel seeds

1 tablespoon black peppercorns

pinch of saffron threads

1 tablespoon dried oregano

1 tablespoon dried thyme

1 tablespoon pimentón dulce (sweet paprika)

1 tablespoon freshly ground black pepper

1 1/2 teaspoons ground turmeric

Begin by making the Basic Adobo.  In a food processor, or by hand, mix all of the ingredients together until it forms a bright red paste.  Use immediately, or store in the refrigerator for up to 7 days.

Next, mix together the Moruno Spice.  In a small dry skillet toast the cumin, coriander, and fennel seeds; peppercorns; and saffron threads for about 2-3 minutes, or until fragrant and toasted.  Use a mortar and pestle or spice mill to grind the spices into a fine powder.  Transfer to a small mixing bowl, and add the oregano, thyme, pimentón dulce, black pepper, and turmeric.  Stir and set aside.  (Note: This mixture will make a bit more than you will need for this recipe.  Leftovers can be stored in an airtight container for up to 6 months.)

In a large bowl, combine the Basic Adobo, 4 tablespoons of Moruno Spice, olive oil, sherry vinegar, and yellow onion together.  Season with salt to your taste.  Add the chicken and mix to coat evenly.  Cover and refrigerate between 4-24 hours.  Slip the chicken onto skewers when ready to grill.  If using wooden skewers, remember to soak them in water for 20 minutes beforehand.  Sprinkle with salt and pepper and cook to your desired doneness.  Enjoy!

Recipe adapted from Jeffrey Weiss’ Charcuteria: The Soul of Spain

Thanks for visiting Relishing It today!

Laurie


Read Full Post »

Spring Potato Salad with Ramps and Radishes | Relishing It

Finally.  Warm weather is finally here in Minnesota!  I know parts of the country have been having ridiculous heat waves recently, but we’ve been waiting (not-so-very) patiently for the weather to get nice here.  Yesterday  it finally did, and it was glorious!  It’s remarkable to see the change in attitude and manners once decent weather shows up.  Everyone– and I mean everyone– is just so much happier and more pleasant.  It’ll be another story once the high heat and humidity eventually find their way here.

Spring Potato Salad with Ramps and Radishes | Relishing It

Spring Potato Salad with Ramps and Radishes | Relishing It

I did my best yesterday to blind people with my extremely white Minnesota legs.  Not that this is any different than later in the summer.  I basically vary between stark white and just very pale.  Years ago I wished I had more color, but now I’m fine with my lack of sun-induced color, so I’ll continue to lather on the sunscreen.

Spring Potato Salad with Ramps and Radishes | Relishing It

Spring Potato Salad with Ramps and Radishes | Relishing It

Where was I going with all of this?  Oh yeah… summer, heat, shorts….potato salad!  Grilling last night was a no-brainer, so I made a bowl of one of my favorite summer potato salads to kick off the season.  In this version, I’ve accompanied the potatoes with spring ramps, radishes, celery, and parsley.  Ramps are fabulous, but are around for such a short time, scallions replace them when they are no longer available.  A delicate dressing of lemon, olive oil, garlic, and anchovies is poured on the warm yellow potatoes to really saturate them with flavor.  The crunchy vegetables are added later, once the potatoes have cooled a bit, then the remaining dressing is added.  This potato salad gets better and better the longer it sits.  And it’s perfect for picnics since it doesn’t contain any dairy.  I hope you give it a try!

Spring Potato Salad with Ramps and Radishes | Relishing It

The Recipe: Spring Potato Salad with Ramps and Radishes

3 pounds yellow potatoes, cut into bite sized pieces

1 bunch radishes, chopped

1 bunch ramps or scallions, chopped

handful of fresh parsley, chopped

2-3 stalks of celery, chopped

For the Dressing:

2 garlic cloves, finely chopped

2 teaspoons Dijon mustard

juice of 2 lemons (about 5 tablespoons)

3-4 small anchovies, smashed into a paste

1/2 cup good quality olive oil  (California Olive Ranch gets my vote)

salt and fresh cracked pepper

good crunchy sea salt to finish

Place a steamer in a large saucepan.  Add a bit of water to the bottom.  Add the potatoes and steam until potatoes are nearly done.  Turn off the burner and keep the cover on for an additional 10-15 minutes to ensure the potatoes are fully cooked.  This technique keeps the potatoes from being loaded with water, which sometimes happens when boiled, and from being over-cooked which can lead to mushiness.  Check them after 10 minutes, and if they’re tender, remove the lid.

Meanwhile, make the dressing.  In a medium bowl, add the garlic, anchovies, Dijon, lemon juice, and pinch of salt and pepper.  Whisk.  Then slowly add the olive oil, whisking the entire time.  Adjust seasonings, if necessary.  Remember that potatoes require a bit of salt to let their flavor shine through.  However, the anchovies will supply a lot of that saltiness, so I generally wait to make a final judgment about adding more salt until the potato salad has been refrigerated and the flavors have had a chance to meld together.

When the potatoes are done steaming, add them to a large bowl and pour about 2/3 of the dressing over them while they are hot.  Use a rubber spatula to gently fold the potatoes and dressing together.  Let sit until mostly cool, then add the vegetables and the remainder of the dressing.  Fold everything together, cover with plastic wrap, and refrigerate for a couple of hours.  When ready to serve, let it come to room temperature– the flavors are brighter when they are not completely cold.   Sprinkle with a crunchy sea salt before serving.  Enjoy!

Thanks for stopping by Relishing It!

Laurie

Read Full Post »

Strawberry Balsamic Vinaigrette with Spinach | Relishing It

Hey everyone!  I hope you all had a wonderful Easter (for those of you that celebrate it).  We had a fabulous week.  My parents made the trip to St. Paul to take care of our kids, while Radd and I took a quick trip to Chicago.  We went to see the rock band The National play at the Chicago Theater.  We’re slightly obsessed with this band.  In fact, I’d go so far as to say they’re the best band of all time.  I know that’s a bold statement, but I stand by it.  So there’s my little musical recommendation for you.  Chicago was fabulous and so was time away with my husband. The kids were spoiled by their grandparents, so everyone was happy.

Strawberry Balsamic Vinaigrette with Spinach | Relishing It

Let’s be honest, vacationing usually includes throwing caution to the wind and eating whatever one wants.  We did that.  And we drank too many craft beers and cocktails.  Getting back on track is always in order when we return home.  I’ve been eating lots of salads this week.  I had a few spinach salads with this strawberry balsamic vinaigrette and it is– as my five-year old would say “Amazin!”  I’m always hesitant about posting such easy recipes on my blog (this dressing only contains 3 ingredients).  I generally figure that everyone already makes it or uses this trick.  My sister-in-law (whom I chat with everyday on the phone) assures me that is not the case.  I was telling her about this dressing and I think she’ll be making it very soon.

Strawberry Balsamic Vinaigrette with Spinach | Relishing It

I usually make this dressing when my jam jar is pretty much empty, but there is still a slight film of jam in it.  I hate to waste, so I pour in some good balsamic vinegar and a splash of good olive oil, put the lid on, and give it a shake.  Voilà!  Out comes this delicious vinaigrette.  The strawberry jam and balsamic vinegar are a match made in heaven–cherry works great, too.   Of course you don’t have to wait until you’re nearly out of jam.  And you certainly don’t have to make just one portion, as I’ve given in this recipe.  Make a jar of it– it’ll keep well in your refrigerator.  It’s great poured onto spinach and topped with chopped almonds and hemp seeds, or whatever you happen to fancy.  Enjoy!

The Recipe: Strawberry Balsamic Vinaigrette with Spinach

(serves 1)

1 teaspoon good quality strawberry jam

1 tablespoon good quality balsamic vinegar

1 tablespoon good quality extra-virgin olive oil (California Olive Ranch is my favorite)

Combine ingredients in a jar and shake.  Season with salt and pepper, if necessary.  And add a bit more olive oil, if you prefer it less vinegary.  Increase amounts for a larger portion size.  Store extras in the refrigerator.  Toss with fresh spinach.  Top with chopped almonds, hemp seeds, or even blue cheese, if desired.

Thanks for stopping by Relishing It today!

Laurie

Read Full Post »

Homemade Caesar Dressing | Relishing It

Spring is finally here in Minnesota!  Last week I celebrated “Spring” with my kids, who had a week-long break from school.  We didn’t travel anywhere, which was wonderful.  It was a week full of library trips, swimming, coffee shops, board games, and a general feeling of contentment.  We read a ton of books.  We slept in.  We stayed up far too late.  We played video games (yes, I let me kids play video games, and I love that they do). We enjoyed every minute of freedom, and I enjoyed every minute of being with them.  I try not to get overly personal in this space, instead opting to focus on food and all the wonderful things about it.  But, sometimes I feel the need to say how proud I am of my kids.  They have grown into such incredible little people.  They are kind.  They are hilarious.  They are brilliant– and grounded.  They are compassionate.  I love to be with them, and that’s a pretty great feeling.

Homemade Caesar Dressing | Relishing it

Homemade Caesar Dressing | Relishing It

Changing seasons always has me in a bit of flux when it comes to making food.  Some days are warmer than others.  Soup would probably still be fitting, but I don’t want anymore soup for awhile.  Finding inspiration this time of year, in this particular place, can be a bit challenging.  So I wait patiently– hoping that inspiration comes.  It will.  It always does.  Ideas will pour out of my head soon enough, especially when I see the first asparagus of the season.  Or smell the first ramps.  I won’t be able to stop dreaming of moral mushrooms when I eat them for the first time this Spring.  Inspiration will come.

Homemade Caesar Dressing | Relishing It

Homemade Caesar Dressing | Relishing It

But, in the meantime– I will go for bike rides and long walks with my kids.  We will get muddy and splash in the puddles fed by the last few melting piles of snow.  I will see green emerging everywhere.  And I will eat this Caesar salad.  Because no matter the season, Caesar salad always sounds delicious to me.  Purchased dressing doesn’t even come close to this homemade version.  As with most dressings, it’s a cinch to make.  It’s as easy as putting all the ingredients into a mini food processor and whizzing it together.  Serve it with chicken, if you like.  Make some homemade croutons (which are also a cinch), or opt for a dusting of toasted breadcrumbs, as I often do.  I make my dressing with a raw egg yolk– I love the consistency it gives the dressing.  I use good eggs from local farmers.  You should use good eggs, too.  It will reduce any risks associated with using raw eggs.  This dressing is bright and a little nutty from the parmesan.  The anchovies give it a wonderful umami flavor that is a telltale sign of a good Caesar dressing.  Don’t skip them, as an important element will be lost.  Whip up this dressing and enjoy it on a bed of crisp romaine.  For added flavor, brush the romaine with a bit of olive oil and toss it on the grill for a few minutes until it is slightly charred around the edges.  It adds a whole extra layer of flavor!  Trust me, you’ll love it.  I’ve got to fly– my daughter wants to go pick up trash around the neighborhood.  True story.

Homemade Caesar Dressing | Relishing It

The Recipe: Homemade Caesar Dressing

(makes enough for 2 salads)

2 garlic cloves, minced

6 small anchovies, minced

2-3 tablespoons grated parmigiano reggiano cheese

2 tablespoons fresh lemon juice (from about 1/2 lemon)

1 egg yolk (free-range/organic)

1/4 cup good quality extra-virgin olive oil ( I prefer California Olive Ranch Olive Oil)

sea salt and cracked black pepper to taste

Place all of the ingredients, except the olive oil in a mini-food processor ( if you don’t have one, you may use a large bowl and a whisk.  Just be sure to mash the garlic and anchovies into a paste first.  Then, slowly whisk the olive oil into the other ingredients).  It’s best to wait to season this dressing with salt until the very end–the anchovies will provide much of the saltiness that is needed.  Pulse for a few times until the mixture is uniform and creamy.  With the lid on and the machine running, drizzle the olive oil through the small holes on the lid.  Be sure to scrape down the sides, as needed.  When it is creamy and completely incorporated, it is done.  Season with salt and pepper as needed.  Use immediately (this dressing does not have a long life because of the egg yolks, so use it the day it is made).  Enjoy!

Thanks for stopping by Relishing It!

Laurie


Read Full Post »

« Newer Posts - Older Posts »

%d bloggers like this: