Feeds:
Posts
Comments

Posts Tagged ‘Gluten-free’

Spring Potato Salad with Ramps and Radishes | Relishing It

Finally.  Warm weather is finally here in Minnesota!  I know parts of the country have been having ridiculous heat waves recently, but we’ve been waiting (not-so-very) patiently for the weather to get nice here.  Yesterday  it finally did, and it was glorious!  It’s remarkable to see the change in attitude and manners once decent weather shows up.  Everyone– and I mean everyone– is just so much happier and more pleasant.  It’ll be another story once the high heat and humidity eventually find their way here.

Spring Potato Salad with Ramps and Radishes | Relishing It

Spring Potato Salad with Ramps and Radishes | Relishing It

I did my best yesterday to blind people with my extremely white Minnesota legs.  Not that this is any different than later in the summer.  I basically vary between stark white and just very pale.  Years ago I wished I had more color, but now I’m fine with my lack of sun-induced color, so I’ll continue to lather on the sunscreen.

Spring Potato Salad with Ramps and Radishes | Relishing It

Spring Potato Salad with Ramps and Radishes | Relishing It

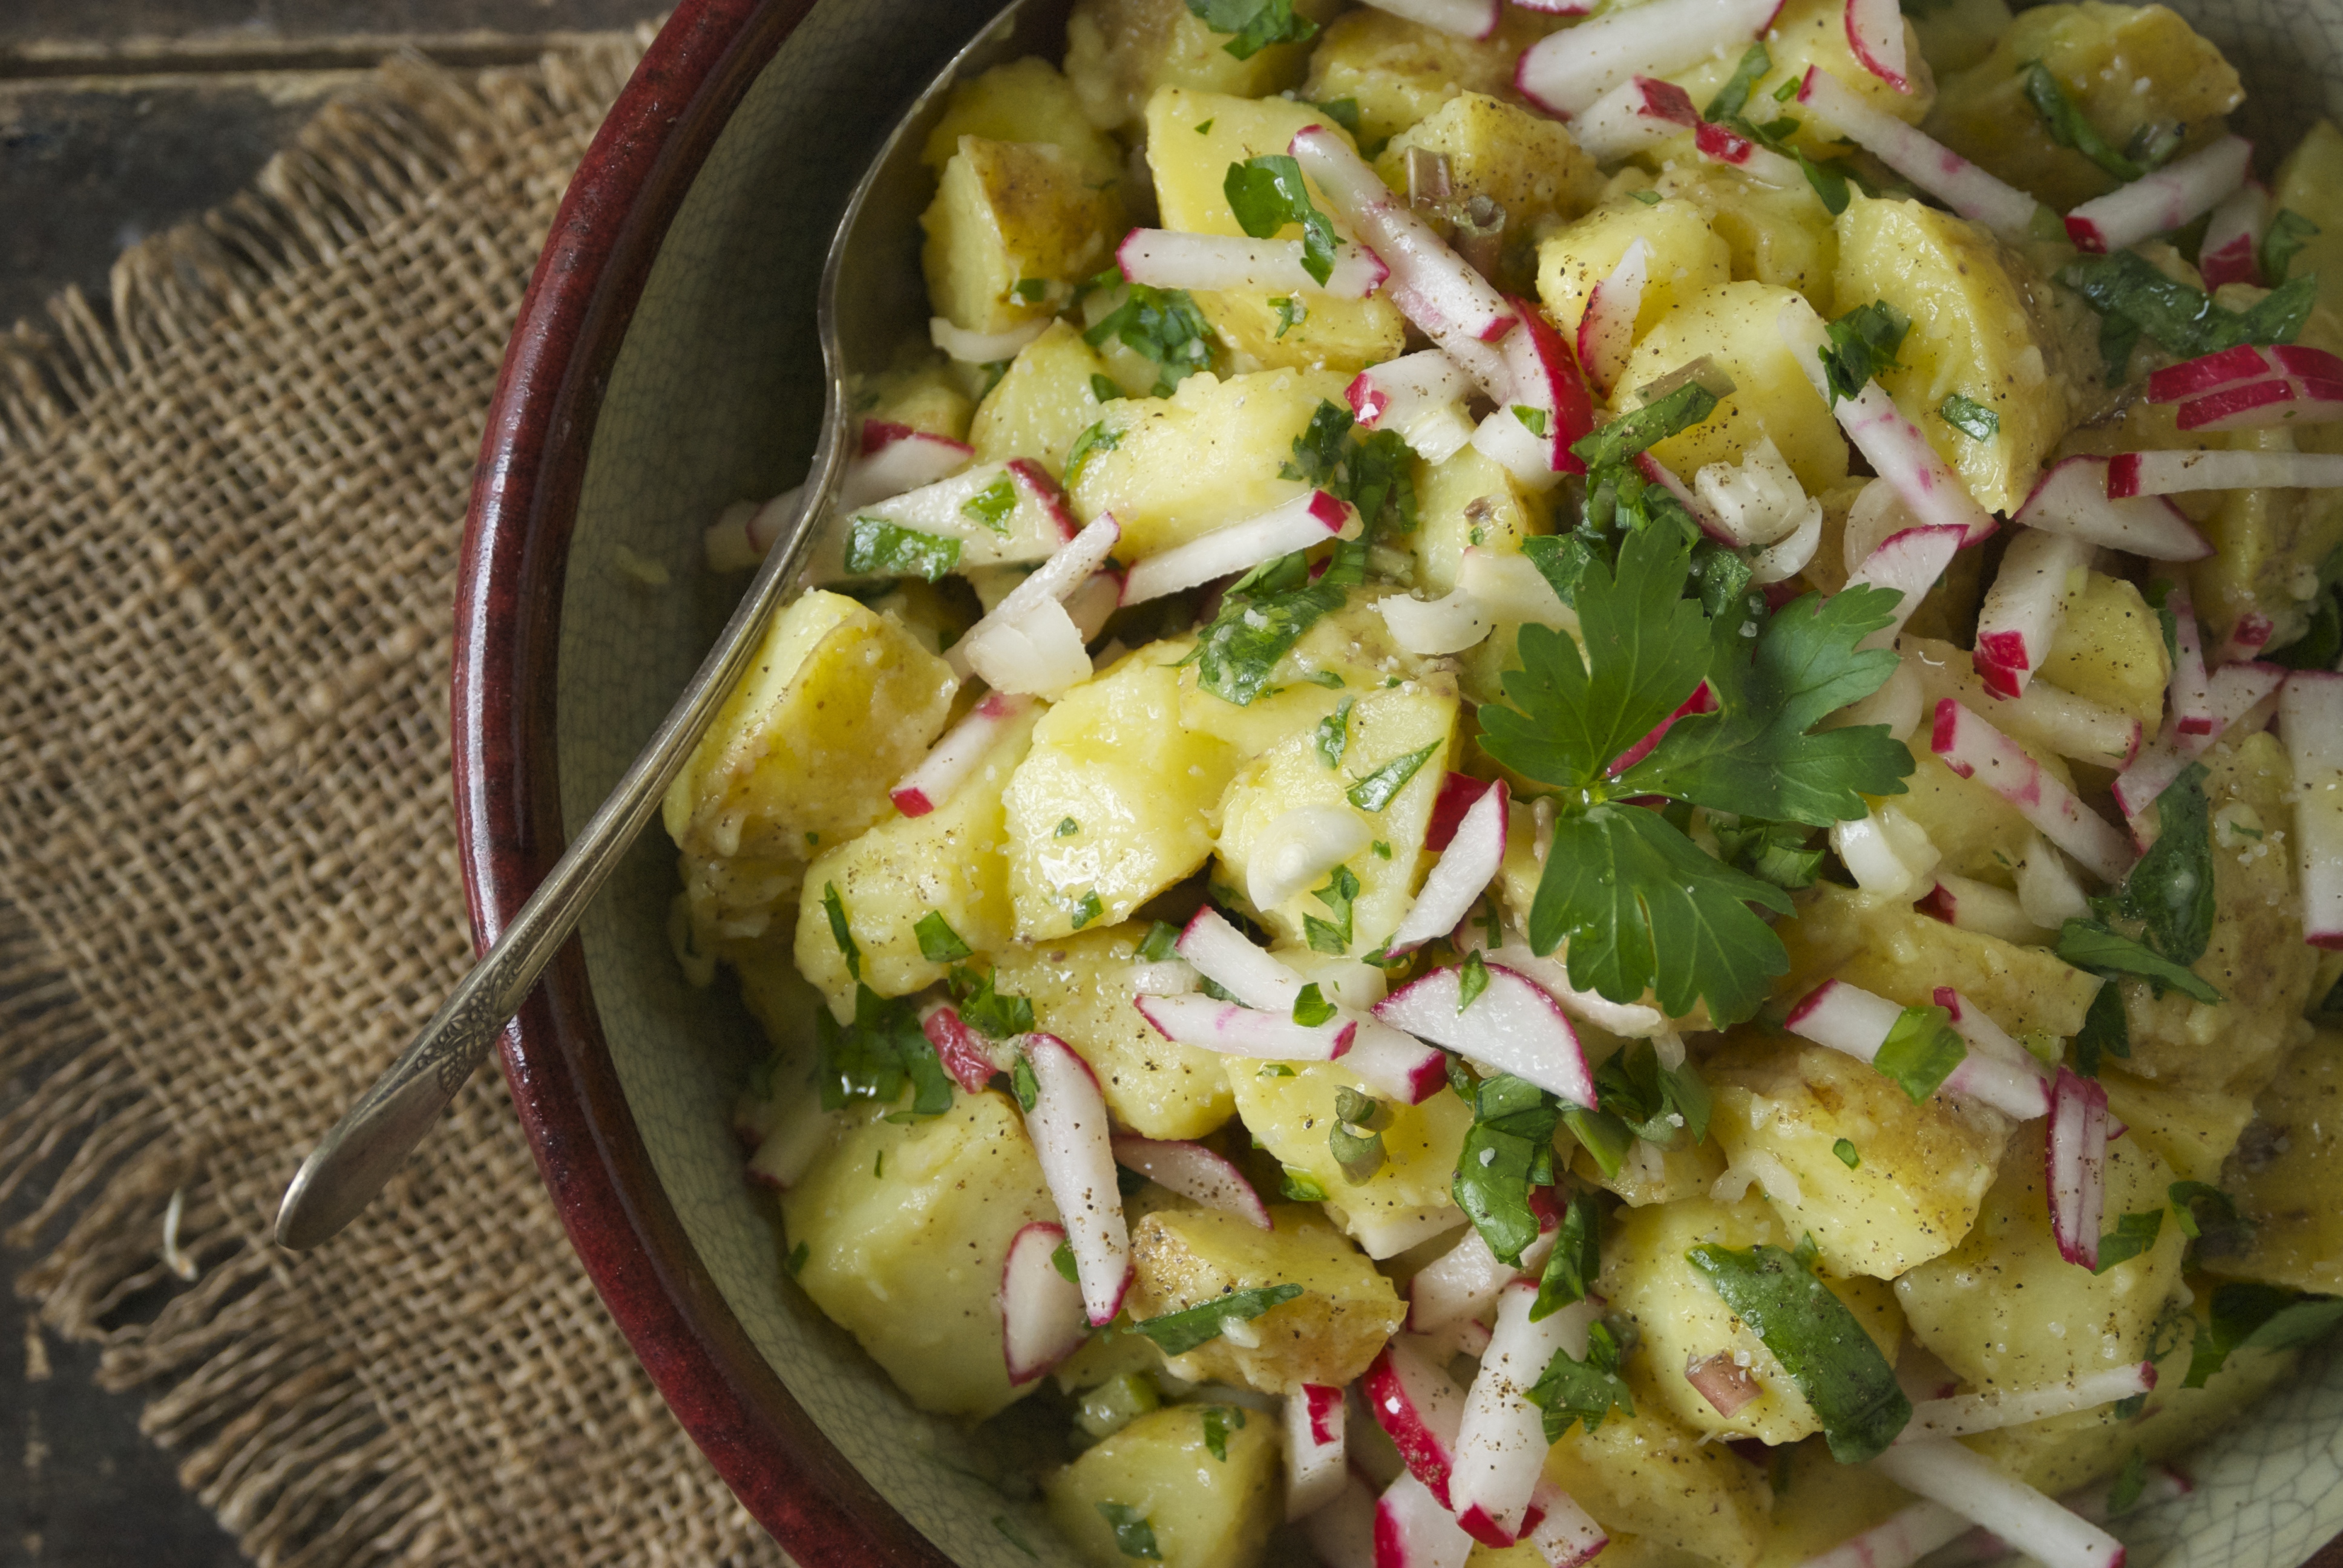
Where was I going with all of this?  Oh yeah… summer, heat, shorts….potato salad!  Grilling last night was a no-brainer, so I made a bowl of one of my favorite summer potato salads to kick off the season.  In this version, I’ve accompanied the potatoes with spring ramps, radishes, celery, and parsley.  Ramps are fabulous, but are around for such a short time, scallions replace them when they are no longer available.  A delicate dressing of lemon, olive oil, garlic, and anchovies is poured on the warm yellow potatoes to really saturate them with flavor.  The crunchy vegetables are added later, once the potatoes have cooled a bit, then the remaining dressing is added.  This potato salad gets better and better the longer it sits.  And it’s perfect for picnics since it doesn’t contain any dairy.  I hope you give it a try!

Spring Potato Salad with Ramps and Radishes | Relishing It

The Recipe: Spring Potato Salad with Ramps and Radishes

3 pounds yellow potatoes, cut into bite sized pieces

1 bunch radishes, chopped

1 bunch ramps or scallions, chopped

handful of fresh parsley, chopped

2-3 stalks of celery, chopped

For the Dressing:

2 garlic cloves, finely chopped

2 teaspoons Dijon mustard

juice of 2 lemons (about 5 tablespoons)

3-4 small anchovies, smashed into a paste

1/2 cup good quality olive oil  (California Olive Ranch gets my vote)

salt and fresh cracked pepper

good crunchy sea salt to finish

Place a steamer in a large saucepan.  Add a bit of water to the bottom.  Add the potatoes and steam until potatoes are nearly done.  Turn off the burner and keep the cover on for an additional 10-15 minutes to ensure the potatoes are fully cooked.  This technique keeps the potatoes from being loaded with water, which sometimes happens when boiled, and from being over-cooked which can lead to mushiness.  Check them after 10 minutes, and if they’re tender, remove the lid.

Meanwhile, make the dressing.  In a medium bowl, add the garlic, anchovies, Dijon, lemon juice, and pinch of salt and pepper.  Whisk.  Then slowly add the olive oil, whisking the entire time.  Adjust seasonings, if necessary.  Remember that potatoes require a bit of salt to let their flavor shine through.  However, the anchovies will supply a lot of that saltiness, so I generally wait to make a final judgment about adding more salt until the potato salad has been refrigerated and the flavors have had a chance to meld together.

When the potatoes are done steaming, add them to a large bowl and pour about 2/3 of the dressing over them while they are hot.  Use a rubber spatula to gently fold the potatoes and dressing together.  Let sit until mostly cool, then add the vegetables and the remainder of the dressing.  Fold everything together, cover with plastic wrap, and refrigerate for a couple of hours.  When ready to serve, let it come to room temperature– the flavors are brighter when they are not completely cold.   Sprinkle with a crunchy sea salt before serving.  Enjoy!

Thanks for stopping by Relishing It!

Laurie

Read Full Post »

Black Rice Ramen with Sesame Garlic Ginger Scallion Sauce | Relishing It

I just got back from an amazing walk.  The temperature was perfect at a nice cool 60 degrees, the birds were singing, and a beautiful assortment of tulips soaked up the sun.  A walk on a day like today is good for clearing my head.  So, now I’m home with a full cup of coffee, ready to tell you about this fantastic recipe that I conjured up.

Black Rice Ramen with Sesame Garlic Ginger Scallion Sauce | Relishing It

I recently came across organic black rice (forbidden rice) ramen noodles at my co-op.  You may remember this recipe that has black rice.  Or this one, with a bit of a Spring twist.  I love black rice– it’s ridiculously healthy.  So, when I found it in pasta form, I was excited.  I generally use brown rice noodles, so I’m thrilled to have another healthy option.  Fear not, if you can’t find black rice ramen– most any thin pasta will work here–regular ramen, vermicelli, angel hair pasta, just about anything really.

Black Rice Ramen with Sesame Garlic Ginger Scallion Sauce | Relishing It

This is a really quick dinner that can be whipped-up in about 20 minutes.  It’s versatile in that it can be served hot or cold, which is a nice option for the upcoming warmer months.  It’s also versatile in that you can pair any of your favorite vegetables with it and it will be fantastic.  Red peppers come to mind.  I’m on a broccoli kick…still.  And so are my kids, so that’s what I went with.  The vegetables can be roasted, quickly sautéed, or even raw.  You decide. I generally roast mine, but I know that will stop with the summer heat.   The sauce is simple and packed with flavor.  The sesame, garlic, ginger, and scallions all compliment one another.  The sauce is light– it barely coats the noodles and vegetables.  I didn’t want it loaded with oil (read calories), but I still wanted it potent.  When you toss all of the ingredients together, make sure to reserve a bit of pasta water.  You can use that to loosen everything up, if necessary.  Be sure to taste and re-season with more soy sauce or sesame oil, if you want a bit more punch.  Hope you enjoy!  We sure did.

Black Rice Ramen with Sesame Garlic Ginger Scallion Sauce | Relishing It

The Recipe: Black Rice Ramen with Sesame Garlic Ginger Scallion Sauce

(serves 2)

2 squares of ramen, (about 5 ounces total)

2 tablespoons olive oil or peanut, if you have it

4 teaspoons finely chopped fresh ginger

6 garlic cloves, finely chopped

1/2 teaspoon red pepper flakes

2 tablespoons rice vinegar

1/2 teaspoon hoisin sauce

4 teaspoons sesame oil

2 tablespoons soy sauce

4 scallions, thinly sliced

handful of broccoli and crimini mushrooms, bite-size

sesame seeds and chopped peanuts for garnish

(Note: This meal comes together rather quickly– you’ll need to work fast and be attentive.)

Preheat oven to 375ºF.  Bring a medium sauce pan filled with water to a boil.

On a baking sheet, roast the broccoli and mushrooms for 3-4 minutes, or until slightly tender.  Remove from oven.   Place the ramen in the boiling water and keep a watchful eye.  It will only need about 5 minutes to cook.  Test along the way.  Reserve some cooking water.  When tender, drain.

Meanwhile, in a medium-sized skillet over medium-low heat,  heat the olive oil and add the ginger, garlic, and red pepper flakes.  Sauté for about 1-2 minutes until aromatic.  Then add the vinegar, hoisin, sesame oil, and soy sauce and whisk together until warmed through.  Add most of the scallions, reserving a few for garnish.  Sauté for 30 seconds.  Toss in the vegetables and then the ramen.  Use tongs to toss everything together.  Loosen with 1-2 tablespoons of pasta water, if need be.  Taste.  Re-season with soy sauce and sesame oil, if desired.  Top with sesame seeds, chopped peanuts, and reserved scallions.  If wanting to make a cold version, run the pasta under cold water.   You may need a bit more oil to loosen the pasta, if cold.  Enjoy!

Thanks for stopping by Relishing It today!

Laurie

Read Full Post »

Curry-Scented Cauliflower with Golden Raisins | Relishing It

We joined a CSA recently!  For a vegetable-obsessed girl like me, this is big news.  So much so that I want to tell everyone I interact with…but that would be a bit weird, so I’ll just tell you.  I’m already anxious for June to roll around– for that first box to arrive, full of vegetables grown for my family by people that I know.   To be honest, we haven’t been CSA members for a couple of years now.  I know, I know.  You see, the previous CSA that we belonged to didn’t quite meet my family’s needs.  We ended up spending a ton of money every week to supplement the offering.  This year we dove back in, and decided to go with Bossy Acres.  The fabulous ladies that run this CSA are heavily involved in the Twin Cities food community.  I had heard remarkable things about their CSA from several friends.  And then, once I had a chance to talk with the owners about the excitement and passion that they put into their work, it made me realize that I wanted my family to be part of it.  And I am so darn excited!  Did I already mention that?

Curry-Scented Cauliflower with Golden Raisins | Relishing It

Curry-Scented Cauliflower with Golden Raisins | Relishing It

Alright, now that I’m done with my mini celebration it’s on to today’s post.  Even though this is THE NEVER-ENDING WINTER here in Minnesota, I’ve moved on to think about lighter, quicker fare.  Spring has to arrive eventually, right?  It’s just a matter of time before the farmers’ markets are loaded with fresh vegetables, and I’ll also be getting my first CSA delivery.  Waiting is hard.  I want strawberries and tomatoes now.  But until then, I’ll enjoy this gorgeous cauliflower.Curry-Scented Cauliflower with Golden Raisins | Relishing It

I love how hearty cauliflower is.  It’s reliable and always a good option in the Summer or Winter.  Out-of-season tomatoes and cucumbers can’t claim that.  I enjoy this side dish (though I eat it as a main course) when the cauliflower is roasted just a bit. Not entirely soft, but not raw either.  Once it’s done, I like to toss it immediately with red onion and golden raisins on the hot roasting pan.  It warms them through and takes the edge off the onion.  Infusing the spices in warmed olive oil is a great way to maximize the flavor.  This is a subtle dish.  It’s not swimming in a sauce or loaded with flavors that punch you in the face.  And it comes together in a matter of minutes.  The golden raisins are key– the slight sweetness that they add is crucial here.  Hope you enjoy!

Curry-Scented Cauliflower with Golden Raisins | Relishing It

The Recipe:  Curry-Scented Cauliflower with Golden Raisins

(serves 2-4)

1 large head of organic cauliflower, broken into small bite-sized pieces

1 small red onion, thinly sliced

1/3 cup organic golden raisins

handful of fresh cilantro

2 tablespoons extra-virgin olive oil, plus more for roasting

1 teaspoon hot curry powder  ( I love Penzys’ version)

1/2 teaspoon ground turmeric

1/2 teaspoon ground cumin

pinch of kosher salt to taste

lime wedges, for serving

Preheat an oven to 400°F.  Toss the cauliflower pieces with a drizzle of olive oil and place on a baking sheet. Roast for 15-20 minutes, or until the cauliflower has browned slightly but isn’t completely soft.  Remove from oven and immediately toss the sliced red onion and golden raisins on the hot pan with the cauliflower.

Meanwhile, prepare the curry-scented olive oil by placing 2 tablespoons of olive into a small skillet.  Mix the curry powder, turmeric, and cumin into the oil and heat on medium for about 1-2 minutes, or until the oil becomes warm and fragrant.  Make sure to stir it.  Remove from heat and pour over the vegetables.  Toss with cilantro.  Season with salt, if necessary.  Serve with a squeeze of lime.  Enjoy!

Thanks for stopping by Relishing It!

Laurie


Read Full Post »

Meyer Lemon and Thyme Roasted Chicken | Relishing It

Today’s recipe is one that looks impressive and tastes incredible, yet comes together with little effort.  Roasted chicken is another fine example of how good food does not have to be complicated.  It’s easy to prepare, and makes a perfect family meal that can be complimented by so many wonderful flavors.  I’ve used Meyer lemons for this version.  Whenever they are  in season, I prepare a lemon sauce and drizzle it over roasted chicken.  These lemons taste a bit different than traditional ones.  I detect a hint of a pine, as well as a little more sweetness.  They are perfect in this dish, since their skin is thinner and can be eaten– they almost become ‘candied’ when roasted.

Meyer Lemon and Thyme Roasted Chicken | Relishing It

I like to roast chicken on a high heat.  It creates such a nice, dark exterior that I just love.  Fear not, the inside remains wonderfully juicy.  One thing to be aware of– your chicken pieces should all be relatively the same size.  This will ensure even roasting.  The breasts should be cut in half if they are too large.

Meyer Lemon and Thyme Roasted Chicken | Relishing it

The sauce is a simple one.  It showcases the lemons perfectly.  I suppose it’s worth exploring the idea of marinating the chicken in a portion of the sauce for a few hours before roasting.  The lemon would really permeate the chicken.  But, to be honest with you, I’ve never bothered.  Let me know if you decide to give it a go.  If thyme isn’t your favorite herb, this dish is also delightful with rosemary.  Enjoy!

Meyer Lemon and Thyme Roasted Chicken | Relishing It

The Recipe:  Meyer Lemon and Thyme Roasted Chicken

(serves 4)

1 whole pasture-raised chicken cut into pieces (breasts cut in half, if too large)

1/2 cup fresh Meyer lemon juice (from about 5 Meyer lemons)

1/3 cup extra-virgin olive oil

2 tablespoons Dijon mustard

fresh thyme

1/2 tablespoon honey (more or less to taste)

1-2 Meyer lemons, thinly sliced for roasting

kosher salt and freshly cracked black pepper

Preheat the oven to 475°F.  Line a baking sheet with parchment paper.

In a small bowl, mix the lemon juice, Dijon, honey, and salt and pepper together.  Slowly whisk in the olive oil. Set aside.

Place the chicken on the parchment paper and pour 2/3 of the sauce over it, coating all sides of the chicken.   Reserve 1/3 of the sauce for serving.  Remove and discard the stems from some of the thyme and sprinkle the leaves over the chicken, along with salt and pepper.  Place the thinly sliced Meyer lemons on the pan, as well.  Bake for about 35 minutes on the middle rack.  Remove from the oven and serve with additional sauce and fresh thyme.  Salt and pepper, as needed.  Enjoy!

Thanks for stopping by Relishing It today!

Laurie

Read Full Post »

Hearty Soup of Beef Roast, Root Vegetables, and Warm Spices | Relishing It

I’ve mentioned my rural roots here in previous posts, but for those of you that are new to Relishing It, I grew up on a small dairy farm in western North Dakota.  And I still get terribly homesick from time to time.  So this is one of those recipes that reminds me of my childhood, and helps me cope with being away.  It’s strange, even though I’ve spent more of my life away from Regent ND, it still has my heart.  It’s still my home.  One of the hardest parts of growing older is wanting those comforts of the past, but coming to terms with the fact that they’ll never again be as you remember them.  It’s the double-edge of nostalgia, I suppose.  I miss being that carefree kid running around the farm.  I miss seeing my childhood friends.  I miss regularly seeing my aunts, uncles, and cousins.  And I miss talking with my grandparents, who have all passed away.

Black Butte, North Dakota | Relishing It

                                                             My view every morning for 18 years

When I was a teenager, I worked at the museum in town during the summers.  On my lunch breaks I would venture up to my grandparents’ house for lunch.  My grandma would always make sure to have something ready for me and the three of us would eat together and talk about our lives.  Even then, I really did realize that it was a special time and that one day I’d look back on it with a mixture of longing and gratitude.  My grandparents (on both sides of the family) were real salt-of-the-earth people.  They were hard-working, no-nonsense, and very kind.  I’m so lucky to have had them in my life.  So many of my interests now are things that they did and were interested in– preserving, fermenting, gardening, sausage-making, and even distilling alcohol.  The conversations we could have!

Hearty Soup of Beef Roast, Root Vegetables, and Warm Spices | Relishing It

The soup I’m sharing with you today is based on a soup that my Grandma Jesch used to make for me on some of those lunch breaks.   I only have the memory of the flavors to go off of, but I think this is a pretty good representation.  She would often simmer an entire beef roast for hours, and then turn it into this most amazing, hearty soup.  It has chunks of tender beef, along with root vegetables.  But, the flavors I remember most are the warm spices.  There was a hint of something unusual that drew me to this soup whenever she made it– cinnamon, star anise, and allspice are what I figured they might be– and here they work beautifully.  Also, you’d be a fool not to finish this dish with a splash of cream.  Hope you enjoy!

Soup of Roast Beef, Root Vegetables, and Warm Spices | Relishing It

The Recipe: Hearty Soup of Roast Beef, Root Vegetables, and Warm Spices

(serves 4)

2 tablespoons olive oil

About a 3 pound beef roast ( preferably grass-fed and bone-in)

1/2 white onion, chopped

3-4 garlic cloves, chopped

1 quart beef broth, preferably homemade

4 cups water

5-6 large carrots, cut into chunks

3-4 parsnips, cut into chunks (if too large, remove the woody center)

3 celery stalks, cut into chunks

8-10 smallish yellow potatoes, cut into chunks

1 cinnamon stick

1 star anise

1/2 teaspoon ground allspice

1 teaspoon dried thyme (or 1 1/2 teaspoons fresh)

1 dried bay leaf

kosher salt, and fresh black pepper, to taste

fresh parsley and heavy cream, for serving

Heat a large Dutch oven with olive oil in it.  Season the beef with salt and pepper.  Sear all sides of it until a deep golden color develops.  Remove beef from the pan.  Add the onion and garlic to the hot pan and sauté for a few minutes until tender.  Add the beef back to the pan, along with the beef stock, water and the spices of cinnamon, star anise, allspice, thyme, and bay leaf.  Bring to a high simmer, then reduce heat to medium, cover and let simmer for about 2 1/2 hours or until the beef is somewhat tender.  Next, add the celery, carrots, and parsnips to the pot and simmer until the beef is fully tender, or practically falling off of the bone, another 30-45 minutes, or so.  Then, add the potato chunks and cook for about 20 more minutes until they are tender.  Meanwhile, remove the beef from the pot and separate it into chunks using a fork– removing any visible fat, as well.  Return the pieces of beef to the pot when the potatoes are completely done.  Re-season with salt and pepper.  Remove and discard the star anise, cinnamon stick, and bay leaf.  Sprinkle with freshly chopped parsley and a splash of cream before serving.  Enjoy!

Thanks for stopping by today!

Laurie

Read Full Post »

Paella | Relishing It

I’ve been wanting to share this amazing recipe with you for awhile now, and since Valentine’s Day is approaching I figure it’s finally time.  I’m not sure why, but to me this is a romantic dish.  Maybe it’s the beautiful color, the seafood, the scent of saffron, or even the wine.  In any case, for me this is an ideal Valentine’s Day dinner.

Paella | Relishing It

Yes, the dish looks impressive, but it’s not difficult to make.  It comes together quickly and the cooking time is relatively short.  The most labor intensive task is actually vegetable chopping.  And the flavors– my oh my, they’re unbelievable.  First, there’s the saffron.  Along with providing the beautiful red/orange hue, it adds a wonderful flavor.  Saffron is an impressive spice, but keep in mind it’s also the most expensive one out there.  With that in mind, I’ve given you the option of using between  1/2 – 1 teaspoon for this dish.  I’ve made it both ways, and it’s turned out great each time.  Just don’t skip the saffron entirely, because it makes a difference here.

Saffron for Paella | Relishing It

Spanish Chorizo for Paella | Relishing It

The other main star of the dish is the Spanish chorizo.  This is an aged chorizo with a delicious smokey flavor.  It can be difficult to find, but again, it’s worth the search.  I get mine at the St. Paul Cheese Shop, for those of you who live nearby.  The rice in this dish is supposed to be separated– not creamy like a risotto.  Look for a spanish rice, such as Bomba (also called Valencia) or Calasparra as they will absorb the liquid properly.  Another option is the more readily-available short-grain rice, Arborio.  For my version of paella, I use shimp, mussels, and clams.  I know chicken is often a component, but I stick with the seafood.  You can use whichever you like– you know my theory on making the dish your own.  The seafood paired with the clam juice and wine create a wonderfully intense flavor with a hint of brininess.

Paella | Relishing It

Paella | Relishing It

Seafood Paella | Relishing It

There are many different methods to cook paella.  I settled on heating the oven really hot (to 500°F) and placing a pizza stone in it.  I use a 14-inch stainless-steel skillet, so it’s nice in that it heats evenly in the oven as opposed to sitting on a small burner.  The pizza stone adds additional heat to the bottom of the pan in hopes that it will create a tasty, caramelized crust on the bottom called socarrat.  If you have a smaller 12-inch pan– feel free to cook it on the stove top.  Just be sure to move the pan around a bit for an even heat, while being diligent about not stirring it. If you do use a 12-inch pan rather than a 14-inch, you won’t be able to fit as much meat/seafood into the dish.  Use your judgment, and it’ll turn out just fine.  And of course, if you’re lucky enough to be able to cook it over an open flame outdoors, kudos to you!

Paella | Relishing It

Paella | Relishing It

The Recipe: Seafood Paella

(serves 4)

2 tablespoons olive oil

1 red bell pepper, finely chopped

1 green bell pepper, finely chopped,

1 white onion, finely chopped

3 garlic cloves, finely chopped

1 tomato (preferably from a local greenhouse), finely chopped

2 teaspoons concentrated tomato paste

1 1/2 teaspoons smoked paprika

1 cup bottled clam juice

1 cup dry white wine, more if necessary

2 1/2 cups chicken stock (preferably homemade)

1/2- 1 teaspoon saffron (crushed using a mortar and pestle)

2 cups short grain rice–Bomba (Valencia), Calasparra, or Arborio

8 ounces (1/2 pound) spanish chorizo, cut into 1/4-inch slices

1/2 pound littleneck clams

1/2 pound mussels

1/2- 1 pound shrimp (peeled and deveined)

Lemon wedges, fresh parsley, and red pepper flakes  for garnish

Place a pizza stone into an oven and heat to 500°F for about a half hour.  Combine the chicken stock, clam juice, white wine, and saffron into a large sauce pan and bring to a high simmer.

Meanwhile, using a 14-inch skillet or a paella pan (12-inch will work, too) heat the olive oil and cook the chorizo over medium heat until some of the fat has rendered.  Remove the chorizo from the pan and add the red and green peppers, garlic, and the onions.  Sauté for a few minutes until tender.  Then add the tomato paste, spanish paprika, and the rice.  Sauté for about 1 minute.  Add the hot liquid and the chorizo to the skillet and place pan onto the pizza stone in the oven.  Do not stir after this point.  After 10 minutes, add the chopped tomatoes, mussels, and clams to the pan– crack side up.  Then, after 5 more minutes, push the shrimp into the rice and cook for about 5 more minutes.  If at any point the rice seems to be drying out too quickly, add more broth, water, or wine (go for the wine!) to the pan.  If the rice seems to be done cooking (it will only take about 20 minutes total) before the shrimp is done or the clams and mussels have opened up– just place tin foil over the entire dish to trap some of the steam.  I tend to do this when I place the shrimp into the dish. Discard any mussels and clams that ultimately never open up.  Serve with lemon wedges and fresh parsley.  Enjoy!

Thanks for stopping by today!

Laurie

Read Full Post »

Sunshine Smoothie with Kumquats and Turmeric | Relishing It

Another round of snow paired with a gray sky in the midwest this morning– at least the temperatures aren’t so bad.   I needed to brighten up my surroundings, so I blended up a Sunshine Smoothie.  I’ve likely mentioned this before, but I go through a bit of a kumquat love-fest this time of year.  They’re brilliant in this marmalade, perfect in vinaigrettes for salads, and they are downright fabulous blended into smoothies.

Sunshine Smoothie with Kumquats and Turmeric | Relishing It

This time, I’ve decided to craft a smoothie using kumquats as the star ingredient.  Yes, I love a smoothie loaded with greens as much as the next person (this one is my personal favorite), but sometimes I want something…a little less green.  The kumquats give this smoothie a fresh vibrancy that will wake you right up.  I also recommend using either fresh or frozen organic mango.  Plain yogurt is the protein that will keep you from getting hungry– I suggest using whole milk yogurt to also help with that.  And turmeric– a fantastic, healthy ingredient that you should eat more of anyway.  You can read about it’s specific properties here.  Curries are a great way to incorporate more turmeric into your diet, or throw a little into a soup, such as this one.  Adding just a bit to this smoothie completely works, too.  It pairs wonderfully with the cinnamon and citrus flavors.  No need to peel the kumquats, just cut them in half and remove the seeds.  Place everything in a blender or food processor and whiz it together.  Hope you enjoy!

Sunshine Smoothie with Kumquats and Turmeric | Relishing It

The Recipe:  Sunshine Smoothie with Kumquats and Turmeric

(makes 1 cup)

7-8 small organic kumquats, cut in half and seeds removed

1/3 cup diced fresh or frozen organic mango

1/3 cup organic whole milk yogurt

1/4 cup organic, unsweetened almond milk

1 teaspoon honey

1/4 teaspoon ground cinnamon

1/4 teaspoon ground turmeric

Place all of the ingredients into a blender or food processor and blend until smooth.  Serve with a sprinkle of cinnamon on top.  Enjoy!

Thanks for stopping by Relishing It today!

Laurie

Read Full Post »

Winter Salad with a Kumquat Vinaigrette | Relishing It

Apparently I’ve been craving a little color lately.  I recently bought a couple of brightly colored sweaters (orange and electric blue).  I just replaced my everyday-lipstick with a few colors that have a bit more pizzazz.  Yep, I just need to see a bit more color this time of year.  The dull gray skies and monotonous white snow just don’t do it for me by late January.   So…this colorful salad fits the bill perfectly.  And aside from the visual beauty, this one is delicious.  I could eat it every day.  Actually, I pretty much did for month straight last year.

Winter Salad with a Kumquat Vinaigrette | Relishing It

Winter Salad with a Kumquat Vinaigrette | Relishing It

Let’s start with the red cabbage.  I rely on it a lot during winter.  It tastes great, works both hot or cold, and it can hang out it your refrigerator for a while.  This last reason is important, because if you don’t happen to want to eat a salad every day, this ingredient will be waiting for you.  Tuscan kale is another great ingredient.  It’s perfect in soups or massaged and made into a simple salad.  Red peppers were on sale at our co-op the other day, so I bought a few of those too.  My kids love to snack on them all summer long, but they go through withdrawal in winter.  They were probably happier than I was when I brought them home.

Winter Salad with a Kumquat Vinaigrette | Relishing It

Finally, I present to you the kumquats.  They have such a fresh, powerful citrus flavor.  Take a look at this kumquat marmalade that I shared here a while back.  Kumquats always remind me of sunshine, which is obviously just what I need right now.  They’re sweet, tangy, and so fragrant.  I love them thinly sliced and tossed into salads– no need to peel them.  Just remove the few tiny seeds that will be inside. In this recipe, I blend them up (peel too) into a delicious vinaigrette that goes perfectly with any winter salad.  I also add a touch of honey to it to bring out the sweetness a bit more.  It’s a bit on the thick side for a vinaigrette, because the acidic component (the kumquats) is blended whole– but I think it’s absolutely lovely and the hearty winter vegetables work well with it.  The almonds are the perfect finishing touch to the salad.  I hope you give this little salad a try if you need to brighten up your day– I bet it will.  Enjoy!

Winter Salad with a Kumquat Vinaigrette | Relishing It

The Recipe:  Winter Salad with a Kumquat Vinaigrette

Serves 2

For the Vinaigrette:

10 kumquats, cut and seeded (leave the peel on)

1 teaspoon finely chopped shallot, white, or red onion

1 teaspoon honey

pinch of kosher salt

1/4 cup extra virgin olive oil

For the Salad:

About half of a small red cabbage, cored and finely sliced

handful of Tuscan kale (6-7 stalks) stems removed and thinly sliced into ribbons OR a handful of fresh spinach

1/2 red pepper, julienned

handful of almonds, coarsely chopped

3-4 kumquats, seeded and thinly sliced

To make the vinaigrette, place the kumquats into a small food processor and pulse a few times until they are finely chopped.  Add the shallot, honey, and salt.  Pulse a few more times until nearly smooth.  Add the olive oil and blend.  This vinaigrette will remain somewhat thick.  Adjust salt, if necessary.

It’s best to place your salad ingredients (sans almonds and kumquats) into a bowl and pour the vinaigrette on top of them.  Toss to coat.  Plate the salads and top with the almonds and kumquats.  Leftover vinaigrette can be stored covered in the refrigerator.  Let it come to room temperature before using.  Enjoy!

Thanks for stopping by Relishing It today!  Have a wonderful weekend.

xo

Laurie

Read Full Post »

Pho Ga (Vietnamese Chicken Noodle Soup) | Relishing It

When we moved to the Twin Cities from North Dakota in 1999, we were stunned by all of the wonderful restaurants.  More specifically, the ethnic food choices were mind boggling.  We simply did not have access to these types of food where we grew up. One of the very first places we tried was a small Vietnamese restaurant on the Midway in St. Paul.  It had recently been in the paper for having one of the best bowls of pho in town and the photograph that accompanied the article made my mouth water.  I didn’t know what pho was, but I knew I had to try it– and it. was. wonderful.   We still go to that restaurant occasionally during the Winter months, though now it’s more likely that you’ll find me making this dish at home.

Pho Ga (Vietnamese Chicken Noodle Soup) | Relishing It

It’s quite simple to make a delicious bowl of pho ga that can come together quickly so long as you have the homemade chicken broth ready.  And again, here you’ll want to use the homemade broth– it’ll make the difference.  I generally pull a couple of jars of broth and some shredded, cooked chicken from the freezer just a little while before we want to sit down for dinner.  Pho is all about a simple, flavorful base– some chicken, some rice noodles, and then load the top with fresh ingredients.  No two bowls of pho are identical, at least not in our house, because we all add our own little additions.  I love fish sauce and sriracha mixed into my broth– my kids, not so much.  I also load mine up with jalapeños, basil, sprouts, and a healthy squeeze of lime.  It’s sublime.

Pho Ga (Vietnamese Chicken Noodle Soup) | Relishing It

This soup will warm your body and if it were possible to do– I believe that it may actually warm your soul.  Think of a snowy, cold night tucked in at home.  Light a candle or two and nuzzle in.  Slurp on a bowl of this soup with your family or friends.  It makes the Winter months that much more enjoyable.

Pho Ga (Vietnamese Chicken Noodle Soup) | Relishing It

The Recipe:  Pho Ga | Vietnamese Chicken Noodle Soup

(Serves 4)

2 quarts homemade chicken broth (imperative for this recipe)

3- inch piece of fresh ginger, peeled

5 whole cloves

2 teaspoons whole coriander seeds

2 whole star anise

5 whole allspice berries

1 package (about 14 ounces) thin dried rice noodles

1 bunch scallions, thinly sliced

1 bunch fresh cilantro, stems removed

1/2 medium white onion, thinly sliced

About 4 cups shredded chicken,  (save from when making broth OR boil or bake chicken breasts/thighs)

1 bunch of fresh basil, regular or Thai, for garnish

fresh bean sprouts, for garnish

2 fresh jalapeños, for garnish

1-2 fresh limes, quartered, for garnish

Serve with the following condiments: fish sauce, sriracha sauce, hoisin sauce, red chili paste, and soy sauce

For this recipe, I’m assuming you have homemade chicken broth at the ready.  If you don’t– make some immediately.  If you don’t have time to wait the full 24 hours for it to simmer, that’s fine.  Three hours or so,  will work.  Follow these instructions and add the pho ga broth spices (fresh ginger, cloves, allspice berries, coriander seeds, and star anise) right into the pot.  Note:  You will have much more broth than the recipe calls for, but that’s not entirely a bad thing.  You may want to up the amount of spices, as well. 

Begin by adding two quarts of homemade chicken broth to a large saucepan or kettle.  Place the ginger into the pot along with a spice sachet or cheesecloth tied with string filled with the cloves, allspice berries, coriander seeds, and star anise.  Bring to a boil, then reduce to a medium simmer and let cook for about 45 minutes, so that the flavors can infuse.

Meanwhile, when the broth is nearly finished,  cook the rice noodles according to the package instructions (I generally cook them for less time than suggested)– they don’t take very long to cook, so keep a watchful eye.  You do not want the noodles to become mush.  Fill your individual bowls with the rice noodles,  shredded chicken, some sliced white onion, a bit of cilantro, and sliced scallions.

Remove the ginger and spice sachet from the broth.  Ladle the hot broth into the noodle filled bowls.  Serve with accompaniments– fresh basil, bean sprouts, fresh jalapeño, and lime.  Along with the condiments– fish sauce, sriracha sauce, hoisin sauce, soy sauce, and red chili paste.  Enjoy!

I hope you are all having a wonderful week so far.  Take Care!

Laurie

Read Full Post »

Homemade Chicken Broth | Relishing It

Hello, friends!  I hope you all had wonderful holidays.  Ours was busy, yet really fun.  We did a bit (17 hours!) of driving and managed to see a lot of our family.  Since Christmas is such a special time, I really try to keep the focus on my kids and making memories with them– thus the lack of blog posts for the last few weeks.  But yesterday I sent the little ones back to school after an additional two-days off due to the extremely cold weather here in Minnesota caused by the…POLAR VORTEX!  Have you heard about this thing?!  I’m kidding, of course you have.  It seems to be pretty much the only thing that’s been on the news for the last two weeks.  Well, we actually didn’t mind it much.  We played a lot of indoor games (Life, Jenga, Battleship, and Uno each saw some use), and we ate a lot of delicious soup.  Which, I guess, is my segue into today’s recipe.

I have two amazing soup recipes that I plan to share over the next week or so, but before I get ahead of myself, I want to talk about homemade chicken broth.  Homemade chicken broth is the cornerstone to both of these recipes.  While I know that making homemade broth is an old hat for some, for most the solution is picking up a box at the supermarket.  I’ll be honest, that’s occasionally been my solution too, though we recently got another freezer, so I’ve been making broth non-stop now that I have more space.  There are so many health benefits that come with good homemade chicken broth.  It was with good reason your Mother and Grandmother fed you chicken noodle soup when you were sick as a child– they knew what they were doing.

Homemade Chicken Broth | Relishing It

One of the nice things about making chicken broth is that it can be as easy or as involved as you want it to be.  Pretty much any amount of effort will most likely yield something far better tasting than what you get in those grocery store boxes.  Throw a chicken in a pot with a few vegetables, a few herbs, water, salt, and perhaps a glug of white wine.  There it is.  So what are you waiting for?

Alright, a little more detail.  Broth can be made with whole chickens, chicken parts, of just bones (though, technically this last one is called stock). I generally buy a whole (organic, pasture-raised, etc) chicken that is about 5 pounds.  And contrary to what you may have heard, the meat from the chicken is definitely still useable after you have simmered it to make broth.  The chicken retains its wonderful texture and moistness.  The key is that you have to know when to remove the chicken from the simmering pot.

Here’s how to do it:  after 2 1/2 – 3 hours of simmering, take the whole chicken out and remove the tender, fully cooked meat.  Then return the bones and skin to the pot and continue to simmer.  I normally simmer my broth for 24 hours– you can get so many healthy things out of that chicken the longer you simmer it.  However, if you can’t simmer it for 24 hours due to your schedule, anything longer than 3 hours will be just fine.  If you can stretch it to anywhere between 8 and 24 hours, it gets even better.

Homemade Chicken Broth | Relishing It

Monetarily speaking, it also makes sense to make your own.  The cost of the chicken alone is less than I would spend on the amount of broth I yield from one bird.  Plus, I get delicious tender, flavorful chicken that I can plan meals around.  I store my broth in the freezer in wide-mouth quart jars.  I’ve made the mistake of using regular jars and have had some crack. I also don’t put the lids on initially, leaving 1-inch- 1 1/2- inches of space at the top to allow enough room for the broth to expand as it freezes.  I then put the lids on after it has frozen.

You’ll find that once you make your first batch of broth, you won’t be able to turn back.  Honestly.  Enjoy– get started on that broth and I’ll meet you back here very soon to talk about some delicious soups you can make with it!

Homemade Chicken Broth | Relishing It

The Recipe: Homemade Chicken Broth

(Yields 5-6 quarts)

4-5 pound organic, pasture-raised whole chicken, or chicken parts, or bones

3-4 celery sticks, rough chopped

1 large carrot, rough chopped

1 large parsnip, rough chopped

1 onion, quartered (no need to peel)

1 bulb garlic, halved (no need to peel)

3/4 teaspoon whole black peppercorns

1 1/2 tablespoons dried thyme

3 dried bay leaves

handful of fresh parsley, rough chopped

About 2 tablespoons kosher or sea salt, more to taste

healthy glug of white wine, about 3/4 cup

Note: Remember, this is my version to make the broth.  If you don’t have all of the ingredients, don’t sweat it.  Use what you do have.  It’ll be delicious.  Also, when using the wine, if you’re not planning to finish the bottle,  portion it out into containers, freeze, and use some the next time you plan to make broth.  It works great!

Add all of the ingredients to a large, heavy-bottomed stock pot.  Fill with cold, filtered water– enough to cover ingredients by 1 inch to 1 1/2 inches.  Bring the ingredients to a near boil, skip off foam using a spoon, then reduce the heat to the lowest setting with the lid ajar ever so slightly.  You’ll want it to be on a very low simmer with the smallest amount of bubbles forming for the remainder of the time.  This will keep the evaporation to a minimum, as well as let the flavors deepen.

Simmer for about 2 1/2 hours.  Then carefully take the chicken from the pot and remove the meat.  At this point the chicken will shred beautifully.  You can use the meat immediately,  or freeze for another time.  Return the bones and skin to the pot and continue simmering for another 21 1/2 hours, or less time if need be.

When the broth is done, you will want to strain and discard the bones and vegetables– they’ve served their purpose.  Using the back of a large spoon, I often push the carrots and parsnips through the strainer– it gives the broth a wonderful color and flavor.  After you’ve removed the large chunks, you’ll want to pour the liquid through a cheesecloth, so it is nice and clear.  At this point, you can decide if you want to remove the fat from the broth or not.  Some people prefer the richness it adds and leave it in there.  I pour it into a gravy separator, the kind where the spout is on the bottom and the fat floats to the top.  If you don’t have that, you can also try a large resealable bag– the fat will float to the top and you can make a small cut on the bottom.  This may be tricky, so be careful.  Another option, is to wait until you place it into the jars or plastic containers, if using.  Once the broth is cold, the fat will harden and you can simply remove it.

When pouring into the jars, or plastic containers, if using– make sure to leave about a 1 1/2- inch space from the top of the jar.  The liquid will expand as it freezes.  Cool the broth completely before placing the the freezer.  I choose not to place the lids on them immediately, instead waiting until after they’ve fully frozen.  Thaw in warm water or place in the refrigerator when ready to use.  Enjoy!

Thanks for stopping by Relishing It today!

Laurie

Read Full Post »

« Newer Posts - Older Posts »