Feeds:
Posts
Comments

Posts Tagged ‘Healthy’

Pho Ga (Vietnamese Chicken Noodle Soup) | Relishing It

When we moved to the Twin Cities from North Dakota in 1999, we were stunned by all of the wonderful restaurants.  More specifically, the ethnic food choices were mind boggling.  We simply did not have access to these types of food where we grew up. One of the very first places we tried was a small Vietnamese restaurant on the Midway in St. Paul.  It had recently been in the paper for having one of the best bowls of pho in town and the photograph that accompanied the article made my mouth water.  I didn’t know what pho was, but I knew I had to try it– and it. was. wonderful.   We still go to that restaurant occasionally during the Winter months, though now it’s more likely that you’ll find me making this dish at home.

Pho Ga (Vietnamese Chicken Noodle Soup) | Relishing It

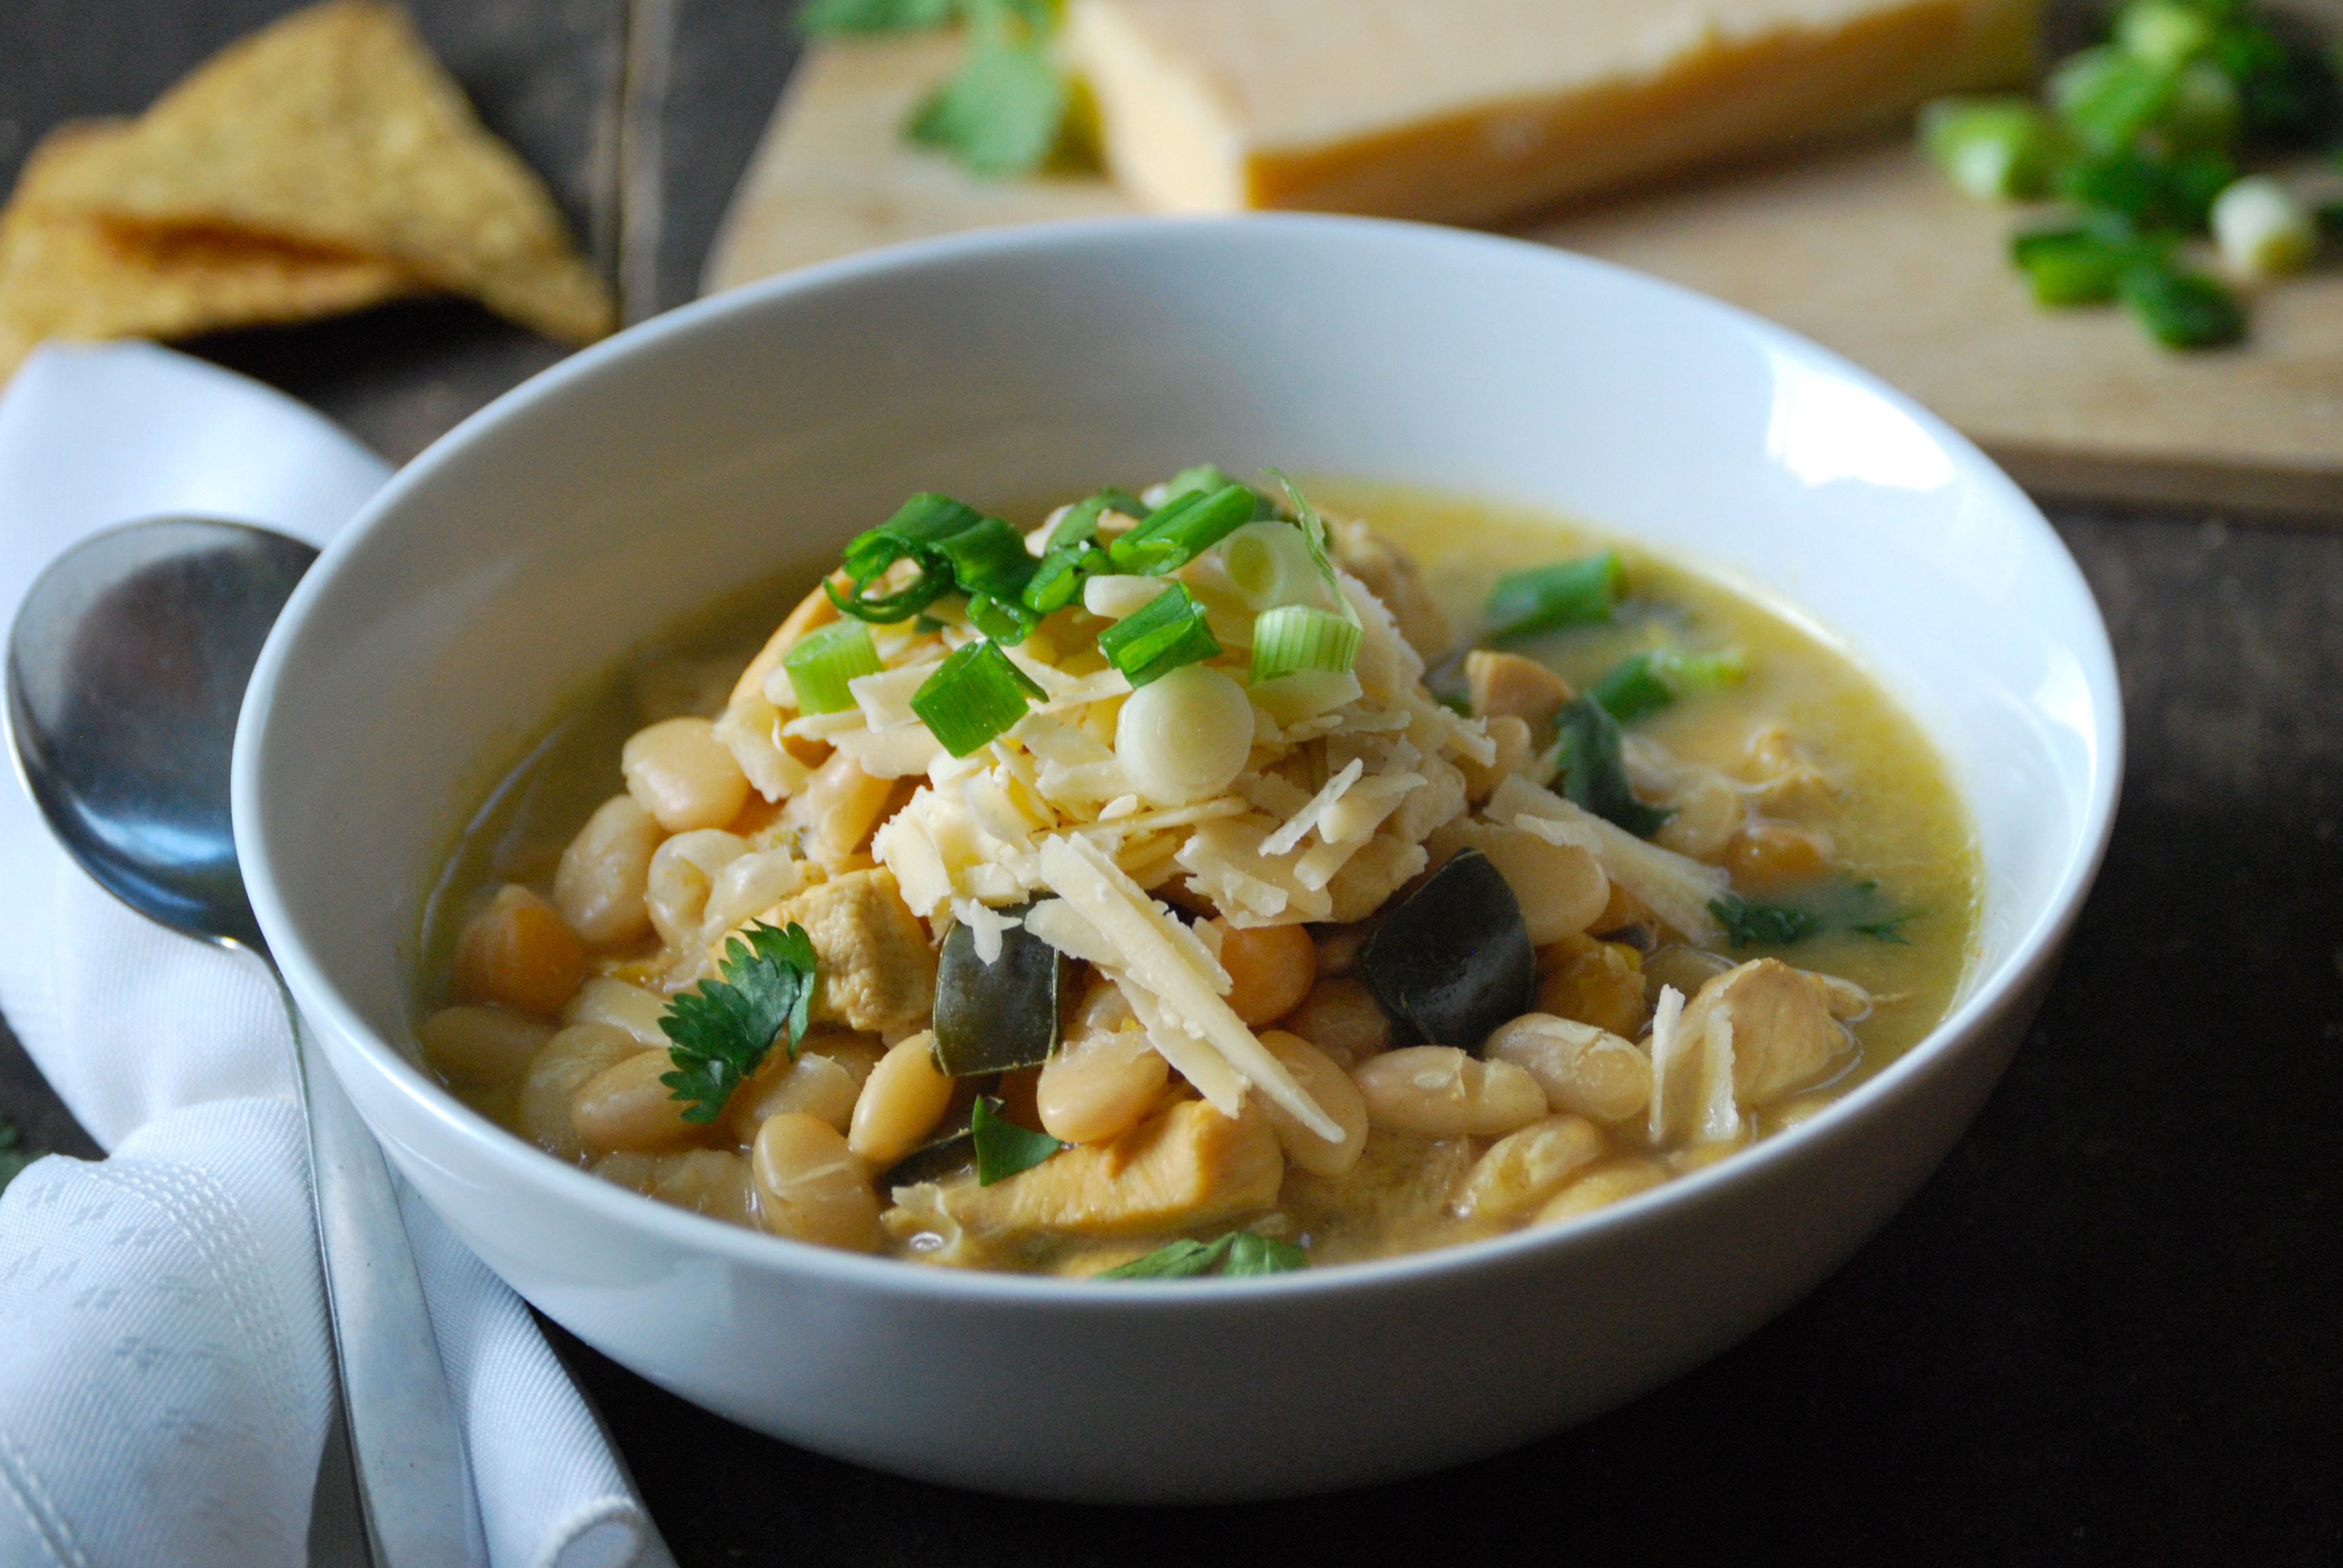
It’s quite simple to make a delicious bowl of pho ga that can come together quickly so long as you have the homemade chicken broth ready.  And again, here you’ll want to use the homemade broth– it’ll make the difference.  I generally pull a couple of jars of broth and some shredded, cooked chicken from the freezer just a little while before we want to sit down for dinner.  Pho is all about a simple, flavorful base– some chicken, some rice noodles, and then load the top with fresh ingredients.  No two bowls of pho are identical, at least not in our house, because we all add our own little additions.  I love fish sauce and sriracha mixed into my broth– my kids, not so much.  I also load mine up with jalapeños, basil, sprouts, and a healthy squeeze of lime.  It’s sublime.

Pho Ga (Vietnamese Chicken Noodle Soup) | Relishing It

This soup will warm your body and if it were possible to do– I believe that it may actually warm your soul.  Think of a snowy, cold night tucked in at home.  Light a candle or two and nuzzle in.  Slurp on a bowl of this soup with your family or friends.  It makes the Winter months that much more enjoyable.

Pho Ga (Vietnamese Chicken Noodle Soup) | Relishing It

The Recipe:  Pho Ga | Vietnamese Chicken Noodle Soup

(Serves 4)

2 quarts homemade chicken broth (imperative for this recipe)

3- inch piece of fresh ginger, peeled

5 whole cloves

2 teaspoons whole coriander seeds

2 whole star anise

5 whole allspice berries

1 package (about 14 ounces) thin dried rice noodles

1 bunch scallions, thinly sliced

1 bunch fresh cilantro, stems removed

1/2 medium white onion, thinly sliced

About 4 cups shredded chicken,  (save from when making broth OR boil or bake chicken breasts/thighs)

1 bunch of fresh basil, regular or Thai, for garnish

fresh bean sprouts, for garnish

2 fresh jalapeños, for garnish

1-2 fresh limes, quartered, for garnish

Serve with the following condiments: fish sauce, sriracha sauce, hoisin sauce, red chili paste, and soy sauce

For this recipe, I’m assuming you have homemade chicken broth at the ready.  If you don’t– make some immediately.  If you don’t have time to wait the full 24 hours for it to simmer, that’s fine.  Three hours or so,  will work.  Follow these instructions and add the pho ga broth spices (fresh ginger, cloves, allspice berries, coriander seeds, and star anise) right into the pot.  Note:  You will have much more broth than the recipe calls for, but that’s not entirely a bad thing.  You may want to up the amount of spices, as well. 

Begin by adding two quarts of homemade chicken broth to a large saucepan or kettle.  Place the ginger into the pot along with a spice sachet or cheesecloth tied with string filled with the cloves, allspice berries, coriander seeds, and star anise.  Bring to a boil, then reduce to a medium simmer and let cook for about 45 minutes, so that the flavors can infuse.

Meanwhile, when the broth is nearly finished,  cook the rice noodles according to the package instructions (I generally cook them for less time than suggested)– they don’t take very long to cook, so keep a watchful eye.  You do not want the noodles to become mush.  Fill your individual bowls with the rice noodles,  shredded chicken, some sliced white onion, a bit of cilantro, and sliced scallions.

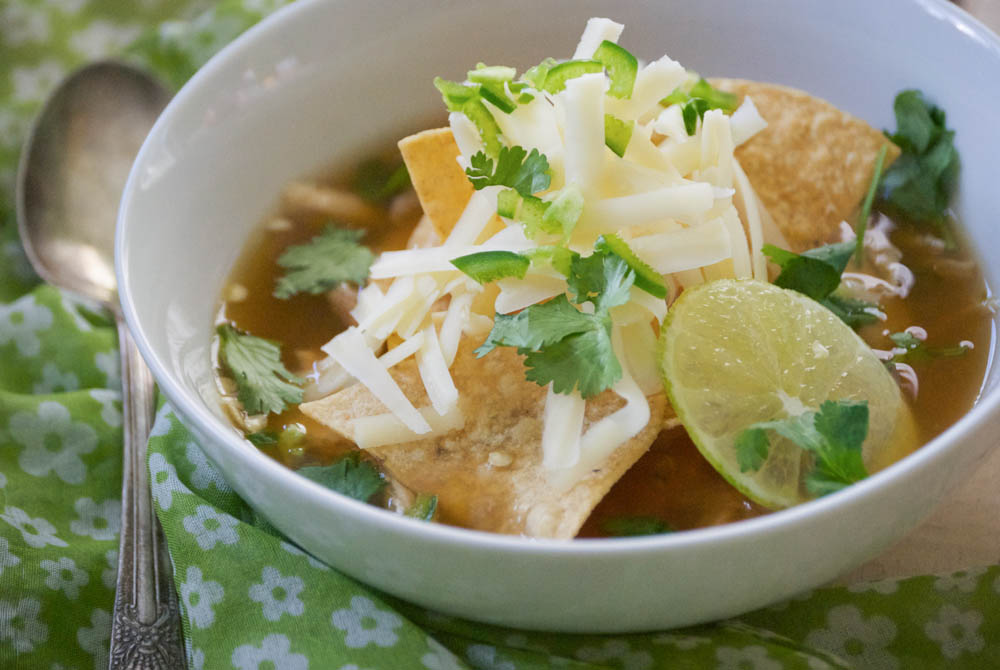
Remove the ginger and spice sachet from the broth.  Ladle the hot broth into the noodle filled bowls.  Serve with accompaniments– fresh basil, bean sprouts, fresh jalapeño, and lime.  Along with the condiments– fish sauce, sriracha sauce, hoisin sauce, soy sauce, and red chili paste.  Enjoy!

I hope you are all having a wonderful week so far.  Take Care!

Laurie

Read Full Post »


LR edited-0098.jpg-0154

I’m sitting here at my desk on this blustery Minnesota morning, reading about blizzard warnings and drinking a hot coffee.  I’m also thinking about this wonderful, warming soup.  I really wish I had a bowl waiting for me downstairs.  Last week I shared with you how to make your own homemade chicken broth and I promised  that a few delicious soup recipes would follow, so here’s number one.  This Sopa De Lima (Mexican Chicken Lime Soup) has become one of our family favorites.  I love it because I’m partial to broth soups– they warm me up in such a perfect way.  I’m also a huge fan of citrus in my soups– I love to finish them with lemon, or in this case with lime.  It really brightens them up.  This soup comes together in no time at all if you’ve done a bit of prep work– i.e., made your broth ahead of time.

Sopa De Lima (Mexican Chicken Lime Soup) | Relishing It

Assuming you’ve made the broth ahead of time, make sure you reserved your chicken meat for this recipe.  This soup is so simple and doesn’t contain a lot of other major ingredients, so the broth really shines.  Honestly, the soup is basically just seasoned broth with chicken, a bit of tomato, puréed charred onion and a lot of fresh toppings.  And it’s amazing.  Traditionally, tortillas are deep-fried for the top of the soup, but even I take shortcuts sometimes.  I generally forego the deep-frying of the tortillas and instead opt to use good quality tortilla chips.  Having a large pot of hot oil on my stove is just a bit too much effort for me, with not enough reward– but, you can certainly choose to give it a go.

Sopa De Lima (Mexican Chicken Lime Soup) | Relishing It

I’ve found that I love the flavor of broiling the onions and garlic until they have a bit of char on them– not too much.  It really emphasizes the smokey flavor.  You’ll want to watch the garlic and most likely remove it from the oven before the onion is done.  Otherwise it may burn.  The toppings at the end are a personal choice, make it as spicy (with jalapeños and cayenne pepper) as you want.  Load it up with tortilla chips, aged white cheddar cheese, cilantro, more lime, and avocados.  I’m kicking myself for forgetting to put the avocados on the soup before I snapped the photos.  Rest assured I plopped some on it before I devoured the bowl.  They’re perfect here, so don’t forget the avocados.  Enjoy!

Sopa De Lima (Mexican Chicken Lime Soup)| Relishing It

The Recipe:  Sopa De Lima (Mexican Chicken Lime Soup)

(Serves 4)

2 quarts chicken broth (preferably homemade using this recipe)

About 4 cups shredded cooked chicken (use chicken from stock that you previously made OR boil or bake some bone-in, skin-on chicken breasts and thighs– then shred)

1 medium white onion, sliced

about 1 1/2 garlic bulbs, peeled (not just the cloves– the entire bulb!)

1 cup puréed or crushed canned tomatoes

1 teaspoon dried oregano

1/2 teaspoon dried thyme

1/2 teaspoon ground cumin

1/4 teaspoon ground cloves

1/4 teaspoon ground allspice

1 4-inch cinnamon stick

1 dried bay leaf

freshly ground black pepper and kosher salt, to taste

zest from two organic limes

1/4 – 1/3 cup fresh lime juice

Toppings: tortilla chips, cilantro, jalapeños, ground cayenne pepper, lime slices, aged white cheddar cheese (or monterey jack), and avocados

Place the sliced onion and peeled garlic cloves on a baking sheet.  Place in the oven and broil until color begins to develop, flipping once.  You may need to remove the garlic before the onion is done, so it does not burn.  Keep a watchful eye while broiling.

Begin the broth.  In a large Dutch oven or kettle, add the chicken broth, tomatoes, oregano, thyme, cumin, cloves, allspice, cinnamon, bay leaf, lime zest, and salt and pepper.  Bring to a boil, then reduce to medium and let cook for about 20-25  minutes.

Meanwhile, place the charred onion and garlic in a blender and add a bit of broth.  Blend until somewhat smooth.  Add the mixture to the soup.  Continue to cook the soup until you reach the 20-25 minute mark.  Remove the bay leaf and cinnamon.   Add the lime juice and taste.  Season with more salt and pepper, if necessary.

You can choose to add the chicken directly into the soup, but I generally heat in up in the microwave and portion it out among the bowls and ladle the hot soup over it.  Then add the final toppings– the tortilla chips, cheese, cilantro, jalapeños, lime slice, cayenne, and avocados.  Enjoy!

Thanks for stopping by Relishing it!

xo

Laurie

Read Full Post »

Homemade Chicken Broth | Relishing It

Hello, friends!  I hope you all had wonderful holidays.  Ours was busy, yet really fun.  We did a bit (17 hours!) of driving and managed to see a lot of our family.  Since Christmas is such a special time, I really try to keep the focus on my kids and making memories with them– thus the lack of blog posts for the last few weeks.  But yesterday I sent the little ones back to school after an additional two-days off due to the extremely cold weather here in Minnesota caused by the…POLAR VORTEX!  Have you heard about this thing?!  I’m kidding, of course you have.  It seems to be pretty much the only thing that’s been on the news for the last two weeks.  Well, we actually didn’t mind it much.  We played a lot of indoor games (Life, Jenga, Battleship, and Uno each saw some use), and we ate a lot of delicious soup.  Which, I guess, is my segue into today’s recipe.

I have two amazing soup recipes that I plan to share over the next week or so, but before I get ahead of myself, I want to talk about homemade chicken broth.  Homemade chicken broth is the cornerstone to both of these recipes.  While I know that making homemade broth is an old hat for some, for most the solution is picking up a box at the supermarket.  I’ll be honest, that’s occasionally been my solution too, though we recently got another freezer, so I’ve been making broth non-stop now that I have more space.  There are so many health benefits that come with good homemade chicken broth.  It was with good reason your Mother and Grandmother fed you chicken noodle soup when you were sick as a child– they knew what they were doing.

Homemade Chicken Broth | Relishing It

One of the nice things about making chicken broth is that it can be as easy or as involved as you want it to be.  Pretty much any amount of effort will most likely yield something far better tasting than what you get in those grocery store boxes.  Throw a chicken in a pot with a few vegetables, a few herbs, water, salt, and perhaps a glug of white wine.  There it is.  So what are you waiting for?

Alright, a little more detail.  Broth can be made with whole chickens, chicken parts, of just bones (though, technically this last one is called stock). I generally buy a whole (organic, pasture-raised, etc) chicken that is about 5 pounds.  And contrary to what you may have heard, the meat from the chicken is definitely still useable after you have simmered it to make broth.  The chicken retains its wonderful texture and moistness.  The key is that you have to know when to remove the chicken from the simmering pot.

Here’s how to do it:  after 2 1/2 – 3 hours of simmering, take the whole chicken out and remove the tender, fully cooked meat.  Then return the bones and skin to the pot and continue to simmer.  I normally simmer my broth for 24 hours– you can get so many healthy things out of that chicken the longer you simmer it.  However, if you can’t simmer it for 24 hours due to your schedule, anything longer than 3 hours will be just fine.  If you can stretch it to anywhere between 8 and 24 hours, it gets even better.

Homemade Chicken Broth | Relishing It

Monetarily speaking, it also makes sense to make your own.  The cost of the chicken alone is less than I would spend on the amount of broth I yield from one bird.  Plus, I get delicious tender, flavorful chicken that I can plan meals around.  I store my broth in the freezer in wide-mouth quart jars.  I’ve made the mistake of using regular jars and have had some crack. I also don’t put the lids on initially, leaving 1-inch- 1 1/2- inches of space at the top to allow enough room for the broth to expand as it freezes.  I then put the lids on after it has frozen.

You’ll find that once you make your first batch of broth, you won’t be able to turn back.  Honestly.  Enjoy– get started on that broth and I’ll meet you back here very soon to talk about some delicious soups you can make with it!

Homemade Chicken Broth | Relishing It

The Recipe: Homemade Chicken Broth

(Yields 5-6 quarts)

4-5 pound organic, pasture-raised whole chicken, or chicken parts, or bones

3-4 celery sticks, rough chopped

1 large carrot, rough chopped

1 large parsnip, rough chopped

1 onion, quartered (no need to peel)

1 bulb garlic, halved (no need to peel)

3/4 teaspoon whole black peppercorns

1 1/2 tablespoons dried thyme

3 dried bay leaves

handful of fresh parsley, rough chopped

About 2 tablespoons kosher or sea salt, more to taste

healthy glug of white wine, about 3/4 cup

Note: Remember, this is my version to make the broth.  If you don’t have all of the ingredients, don’t sweat it.  Use what you do have.  It’ll be delicious.  Also, when using the wine, if you’re not planning to finish the bottle,  portion it out into containers, freeze, and use some the next time you plan to make broth.  It works great!

Add all of the ingredients to a large, heavy-bottomed stock pot.  Fill with cold, filtered water– enough to cover ingredients by 1 inch to 1 1/2 inches.  Bring the ingredients to a near boil, skip off foam using a spoon, then reduce the heat to the lowest setting with the lid ajar ever so slightly.  You’ll want it to be on a very low simmer with the smallest amount of bubbles forming for the remainder of the time.  This will keep the evaporation to a minimum, as well as let the flavors deepen.

Simmer for about 2 1/2 hours.  Then carefully take the chicken from the pot and remove the meat.  At this point the chicken will shred beautifully.  You can use the meat immediately,  or freeze for another time.  Return the bones and skin to the pot and continue simmering for another 21 1/2 hours, or less time if need be.

When the broth is done, you will want to strain and discard the bones and vegetables– they’ve served their purpose.  Using the back of a large spoon, I often push the carrots and parsnips through the strainer– it gives the broth a wonderful color and flavor.  After you’ve removed the large chunks, you’ll want to pour the liquid through a cheesecloth, so it is nice and clear.  At this point, you can decide if you want to remove the fat from the broth or not.  Some people prefer the richness it adds and leave it in there.  I pour it into a gravy separator, the kind where the spout is on the bottom and the fat floats to the top.  If you don’t have that, you can also try a large resealable bag– the fat will float to the top and you can make a small cut on the bottom.  This may be tricky, so be careful.  Another option, is to wait until you place it into the jars or plastic containers, if using.  Once the broth is cold, the fat will harden and you can simply remove it.

When pouring into the jars, or plastic containers, if using– make sure to leave about a 1 1/2- inch space from the top of the jar.  The liquid will expand as it freezes.  Cool the broth completely before placing the the freezer.  I choose not to place the lids on them immediately, instead waiting until after they’ve fully frozen.  Thaw in warm water or place in the refrigerator when ready to use.  Enjoy!

Thanks for stopping by Relishing It today!

Laurie

Read Full Post »

Deconstructed Stuffed Peppers | Relishing It

I’m willing to place a sizable bet that most of you are a little tired of turkey leftovers.  Well let’s switch it up then, with this little dish to revive your tastebuds.  This is one of those quick, healthy meals that I promised you a few weeks ago.  It’s loaded with healthy ingredients and the combination of flavors is one of my favorites– sauerkraut and beef.  (Remember this galette?)  This time I’ve also added the tang of tomatoes and the ever-so-slight crunch of green peppers.  Lovely.

Deconstructed Stuffed Peppers | Relishing It

A few comments on how I’ve titled this dish.  Let me go on record as saying I’m not a huge fan of the word “deconstructed” when it come to food.  It’s often misleading, pretentious, or both.  I know others have the same gripe about describing oneself as a “foodie”.  (Personally, I’m fine with foodie).  Anyway…here I couldn’t really come up with another way to describe this dish.  The fact is, it takes all of the wonderful components of stuffed peppers, and, well, deconstructs them.  There’s really no other way to describe it unless I decided to go with “pile of peppers, rice, ground beef, sauerkraut, and tomatoes”.  And for some reason that just doesn’t seem quite as appealing.

Deconstructed Stuffed Peppers | Relishing It

Just because this variation comes together more quickly, don’t for a moment think they aren’t as good as the original.  That would be a huge mistake, because this dish is about 10 times better than any traditional version.  Here’s why– you know that moment when you cut into what used to be a vibrant green pepper, and the liquid just floods out on to your plate because the pepper has baked far too long to ensure the filling reached the right temp?  Yeah, that doesn’t happen here.  No disappointing mushiness to the green pepper, no pieces of hamburger submerged in puddles of tomato-y water.  Here, the green peppers retain their vibrant green color and a bit of their crunch, because you decide what texture you’d like them to be.  The tomato sauce (or crushed tomatoes), whichever you choose to use, are the perfect base for the rice and ground beef.  The whole dish is finished with a healthy dose of really good sauerkraut to add that wonderful zip.  Use this saurkraut recipe to make your own, or buy a good quality version.  Bubbies has wonderful fermented products.  The entire dish takes only the amount of time that you need to make the brown rice.  So…get going, time’s a ‘wasting!   Enjoy!

Deconstructed Stuffed Peppers | Relishing It

The Recipe: Deconstructed Stuffed Peppers

(makes enough for 4 people)

1 cup dry long grain brown rice, rinsed

1 pound grass-fed ground beef

2 large green bell peppers, cut into large bite-size chunks

1 small white onion, diced

1/2 quart homemade tomato sauce, or a bit more  (your favorite purchased sauce or crushed tomatoes will work, too)

1 cup good quality sauerkraut

fresh parsley, for garnish

salt and pepper, to taste

Place the rinsed brown rice in a large saucepan with 2 cups of cold water and a sprinkle of salt.  Cover and bring to a boil, then reduce to a medium simmer and let rice cook for about 30 minutes or until it is tender and the water has been absorbed.  Fluff with fork.

Meanwhile, when the rice is about halfway through it’s cooking time, begin to brown the beef  over medium-high heat in a large skillet.  For this dish, I like to leave the beef in somewhat big chunks.  When it is cooked, drain and discard the grease.  Season the beef with salt and pepper and add add the onion to the pan.  Cook the onion until it begins to get tender, just 2-3 minutes.  Add the green peppers and cook just a few minutes until they are a bit tender, but still have a slight crunch to them.  Add the tomato sauce and warm through.  When the rice is ready, add it to the skillet and stir.  If the dish is hot enough, add the sauerkraut and stir just enough to warm the kraut, but not enough to cook it.  It’s lovely when it has a bit of a crunch to it.  Re-season with salt and pepper, if necessary.  Garnish with freshly chopped parsley.  Enjoy!

If you’re looking for gift ideas for the favorite foodie in your life, I’ve compiled a list of my favorites.  Stop over to Becki’s site, “Shopping’s My Cardio” and have a look!  Thanks for stopping by Relishing It today.  xo

Image 2

Read Full Post »

Vegetarian Lentil Taco Soup | Relishing ItBaby, it’s cold outside!  Or at least it is here in Minnesota.  There is definitely that ‘winter-is-coming’ chill in the air.  And this is just the start.  Wind chills will eventually plummet to -50 degrees F, snow will pile up on the sidewalks.  Ugh.  I always complain as autumn comes to a close, knowing that we face the long slog to April.  My body just isn’t acclimated to the cold for the first month or so.  Ah well, I guess there’s also the comforting expectation of snuggling into a warm blanket and a good book while the kids head out to play in the snow.  There is that to look forward to…

Homemade Taco Seasoning | Relishing It

Homemade Taco Seasoning | Relishing It

Vegetarian Lenti; Taco Soup | Relishing It

As soon as the weather turns, I start thinking about soup.  This particular one is a beauty.  It’s substantial– more like a cross between a soup and a stew.  It’s loaded with healthy protein from lentils and beans, though my favorite ingredient this time around is most definitely the corn.  It makes so many soups better.  It adds a nice flavor and a bit of texture, as well.  Not to mention, it pairs beautifully with the Mexican flavors.

Vegetarian Lentil Taco Soup | Relishing It

Let’s talk about those flavors, shall we?  Years ago I began making my own taco mix.  To be honest, it happened a bit by accident.  I ran out of my usual purchased taco seasoning, so I had to improvise.  Luckily, I keep a well stocked spice cabinet (Penzys really should send me a thank you note).  In looking at the recipe, don’t let the length of the list scare you.  I realize that not everyone has all of the spices on hand.  As long as you have the main ones (chili, paprika, garlic, onion, and cumin powder), you will be just fine.  But, if you do happen to have the others, even better.  Try this seasoning the next time you make traditional tacos– you’ll love it!

Vegetarian Lentil Taco Soup | Relishing ItThe soup is wonderful served with the usual taco accompaniments– sour cream, cilantro, jalapeños, and of course some tortilla chips. However, I also discovered another way that I like to eat the leftovers.  Since the legumes continue to soak up more broth overnight, the soup becomes a bit thicker.  I love to serve it atop baked spaghetti squash.  It’s delicious and makes a great gluten-free, paleo, and even vegan meal! So– perfect to serve to friends or family that might be trying to eat that particular way.  Stay warm, friends!

Vegetarian Lentil Taco Soup Over Spaghetti Squash | Relishing It

The Recipe: Vegetarian Lentil Taco Soup

(serves 4-6 comfortably)

2 cups dry brown lentils, rinsed

2/3 cup dry red beans (or 1 can), rinsed

2/3 cup dry black beans (or 1 can), rinsed

2 tablespoons olive oil

1/2 cup chopped white onion

3 garlic cloves, minced

1 quart puréed or crushed tomatoes

1 quart vegetable broth (or use chicken, if you’re not trying to stay vegetarian)

1 heaping cup frozen corn

1/2 cup chopped fresh cilantro

juice of one lime

scallions, jalapeños, sour cream (if vegan isn’t your aim) and limes as garnish options

For the Taco Seasoning:

(makes a scant 1/2 cup)

2 tablespoons ancho chili powder

1 tablespoon ground cumin

1 teaspoon sweet paprika

1 teaspoon garlic powder

1 teaspoon onion powder

2 teaspoons kosher salt

2 teaspoons coarse black pepper

1/2 teaspoon crushed red pepper flakes

1/2 teaspoon dried oregano

1/4 teaspoon smoked paprika

1/4 teaspoon ground allspice

To begin: soak and cook your red and black beans separately following standard directions to cook beans.  Honestly, I usually have extras in my freezer that I pull out to throw into this soup.  Beans freeze incredibly well, so feel free to make extras for that purpose. You’ll want about 1 1/2 cups of cooked red beans, and 1 1/2 cups of cooked black beans.  Or simple choose to use one can of each, rinsed.

Mix all of the taco seasoning ingredients together in small bowl, set aside.

Heat a large Dutch oven over medium-high heat and add the olive oil.   Begin to saute the onion and garlic for a couple of minutes until somewhat soft.  Add the taco seasoning to the onion mixture.  Then add the tomatoes, vegetables stock, cooked red and black beans, and the lentils.  Bring to a boil, then reduce heat to a medium simmer.  Cook covered for about 30-40 minutes, or until the lentils are tender, but have not fallen apart.  Stirring a couple of times along the way.  Make sure not to overcook the lentils, or they will turn to mush.  When the soup is done, add the frozen corn, cilantro, and juice of one lime.  Reseason with salt and pepper, if necessary.  Serve with sour cream, cilantro, jalapeños, and more lime.  Enjoy!

Thanks for stopping by Relishing It!

Laurie

Read Full Post »

Roasted Red Pepper Soup | Relishing It

You already have a nice stockpile of frozen red peppers to get you through the winter, right?  No?  Well it’s time to get on that.  I figure that here in Minnestota you can still get one, maybe two last visits in to the farmers market to stock up.  If you come across a box or two of red peppers–buy them!  You’ll be happy you did.

Roasted Red Pepper Soup | Relishing It

Roasted Red Pepper Soup | Relishing It

Roasted Red Pepper Soup | Relishing It

Now here’s what I want you to do with those peppers: broil them in the oven for just a few minutes until they are nice and black, then throw them in a large plastic resealable bag.  The trick here is that the steam in the bag will loosen the blackened skin.  When they’ve cooled a bit, slip off the skin with your fingers.  Next, put the peppers in a food processor, or chop with a knife.  Finally, place your chopped peppers in a plastic freezer bag, or vaccum seal it and freeze it.  Now you’re set.  Whenever you want to make this incredible soup this winter, you can do so in about 20 minutes.  How’s that for a quick dinner plan?

Roasted Red Pepper Soup | Relishing It

This roasted red pepper soup is one of my favorites.  It has a silky texture and amazing flavor.  Drizzle a little olive oil on top, and serve it with a piece of crusty homemade bread.  Of course, you can do so many other things with those roasted peppers, as well.  You can make roasted red pepper hummus, or throw them in your favorite pasta dish.  Really, the possibilities are endless.  Just get them now and freeze those babies!

Roasted Red Pepper Soup | Relishing It

The Recipe:  Roasted Red Pepper Soup

(serves 4)

About 8 large red peppers  (3 1/2 cups chopped roasted red peppers)

1/2 medium white onion  (3/4 cup chopped)

5 garlic cloves, minced

1 quart chicken broth  (4 cups)

1 large anchovy filet, minced

1 teaspoon chopped fresh thyme ( or 1/2 teaspoon dried)

1 teaspoon chopped fresh oregano ( or 1/2 teaspoon dried)

1 dried bay leaf

extra virgin olive oil

kosher salt and cracked black pepper

1 lemon

parsley, for garnish

To Prepare the Red Peppers:  Place oven rack close to the broiler unit.   Line a large baking sheet with parchment paper.  Cut the peppers in half and remove the insides.  Place peppers on baking sheet and press down with your hand to flatten them.  Place under broiler and broil them for about 15 minutes, or until they are very black.  You will need to move the pan around and perhaps even rotate some of the peppers using tongs.  Keep a close eye on them.  Once they are done, remove from the pan and immediately place in a large resealable plastic bag.  The steam will loosen the black skin.  After 10 – 15 minutes or so, remove from the bag and slip the skin off using your fingers.  It should come off easily.  Discard the blackened portion.  Chop the peppers in a food procesor or by hand.

To Make the Soup:  In a Dutch oven, heat about 3 tablespoons of olive oil at  medium/high heat.   Add the chopped onions and garlic and a generous sprinkle of salt.  Sauté for a couple of minutes until tender. Then add the peppers, chicken broth, oregano, thyme, anchovy, bay leaf, and salt and pepper to taste.  Bring to a boil and then reduce to a simmer for about 15- 20 minutes.  Remove bay leaf and purée  with an immersion blender or carefully pour the soup into a stand blender.  Blend until smooth.  Taste and re-season with salt and pepper, as needed.  Since there are so few ingredients in this soup, the amount of salt plays a big role in bringing out the flavors– make sure to salt it properly.  To serve, squeeze a bit of lemon to taste on the soup (also plays a big role), a drizzle of olive oil, and some fresh parsley.  Enjoy!

Hope you all have a lovely weekend!

xo

Laurie

Read Full Post »

Healthy Chocolate Zucchini Muffins | Relishing It

As you know I sent my little girl off to Pre-Kindergarten on Monday– and she is absolutely loving it.  I sometimes like to bake treats for their lunch boxes, or for an after-school sweet when they get home.  I distinctly recall getting off the school bus as a kid and walking into the house to the smell of something wonderful that my mom had made during the day.  She’d have batches of cookies ready, or even racks (yes, racks) of pies on the counter.  And she always timed it out so they were ready when my brother and I walked through the door.  However… I’m a little hesitant to bake such delights using all of that sugar on a daily– or even weekly– basis.  Don’t get me wrong, my kids get their share of sugar, but it’s nice to be able to put something a little healthier, something more substantial, into their little growing bodies.

Healthy Chocolate Zucchini Muffins | Relishing It

Healthy Chocolate Zucchini Muffins | Relishing It

Healthy Chocolate Zucchini Muffins | Relishing It

I was able to create a healthy muffin recipe that was made with whole grains, healthy coconut oil, and no processed sugar (alright, there are chocolate chips, but they’re optional…kind of.  You’ll want them in there).  These muffins are also loaded with vegetables, and your kids will be none the wiser!  What more could one want?  They are perfectly chocolate-y, but not overly sweet.  They stay very moist– quite like a small cake.  I really have no guilt about giving this treat to my kids, or eating it myself for that matter.  I hope you like them as much as we do!

Healthy Chocolate Zucchini Muffins | Relishing It

Healthy Chocolate Zucchini Muffins | Relishing It

The Recipe:  Healthy Chocolate Zucchini Muffins

(makes 12)

1 cup white whole wheat flour (whole wheat pastry flour works, too)

1/2 cup unsweetened cocoa powder

1/2 teaspoon kosher salt

1 teaspoon baking soda

1 teaspoon baking powder

1/2 cup virgin coconut oil (warmed to the liquid state, but not hot)

1/2 cup honey

2 eggs, at room temperature

1 teaspoon vanilla

1 1/2 cups coarsely grated zucchini (about 1 medium)

3/4 cup chocolate chips (Ghirardelli 60 % Cacao Bittersweet are the best, in my opinion)

Note:  The coarsely grated zucchini is definitely visible in these muffins, which is how I prefer them.  If you don’t fancy that, simply grate the zucchini finer.

Preheat the oven to 350°F.  Spray or butter a 12-cup muffin tin.  Set aside.

In a large bowl, sift, then whisk together the flour, salt, baking powder, baking soda, and cocoa.   Toss the chocolate chips into the mixture. Set aside.

In another large bowl, thoroughly mix the honey, coconut oil, vanilla, and eggs together until uniform.  Add the zucchini and mix until evenly coated.

Combine the two bowls together, mix until everything is wet.  Do not over mix. Evenly distribute the batter–1/4 cup per muffin is about right.  Bake for about 18 minutes, or until a tester inserted into a muffin comes out clean.  Remove from oven and let cool for about 3 – 5 minutes before removing from the pan.  Keeps well for days in an airtight container.  Enjoy!

Thanks for stopping by Relishing It!

Laurie

Read Full Post »

Healthy Banana Bread via Relishing it

I figure it’s finally time to share my favorite banana bread with all of you.  Really, what’s a food blog without a banana bread recipe, right?  I bet I make banana bread at least every couple of weeks.  My freezer is packed with bananas that don’t get eaten right away.  I just keep adding to the pile…one here, one there.  This recipe is a bit unusual because it calls for six bananas– so start saving up!

Healthy Banana Bread via Relishing It

Since we eat banana bread so often, I really wanted my version to be healthy.  I tweaked and tweaked and finally arrived at this recipe a while ago. It’s exactly what I wanted it to be.  Since over-ripe bananas are sweeter, you’ll only need a little bit of honey to get the sweetness just right.  No sugar added here.  The larger number of bananas really gives this bread deep flavor, as well as keeps it moist without much fat.  And speaking of fat,  I used a healthier virgin coconut oil in it.  The flavor combines perfectly with the bananas and chocolate.  I used a mixture of oat flour and whole wheat pastry flour for the base.  Combined, they give the bread a perfect texture– just slightly lighter than ordinary banana bread, but with enough heft to be satisfying.

Cacao Nibs for Healthy Banana Bread via Relishing It

Healthy Banana Bread via Relishing It

When it comes to the chocolate, you have a decision to make.  I prefer adding cacao nibs, but my kids/husband like chocolate chunks.  If you aren’t familiar with cacao nibs, they’re crushed cacao beans.  They are unsweetened and have a bit of a crunch that adds a nice texture.  They’re also loaded with antioxidants.  Alone they are somewhat bitter, but adding them to sweet things makes them delicious. Try throwing them into your next smoothie!  And lastly, I added chia seeds for more health benefits, because why not?

Healthy Banana Bread via Relishing It

A few reminders:  First, make sure to use really over-ripe bananas.  You’ll want that extra sweetness since you won’t be adding sugar.  I’m talking the blacker, the better.  Also, make sure you bake your banana bread long enough.  There is nothing worse than under-baked banana bread.  A longer bake time is better.  There are so many bananas in there that the chances of it being dry are very slim.  Hope you enjoy this as much as we do!

Healthy Banana Bread via Relishing It

The Recipe:  Healthy Banana Bread

(makes one loaf)

1/3 cup virgin coconut oil

1/4 cup honey

2 eggs, at room temperature

1 teaspoon vanilla

6 smashed over-ripe bananas (about 1 1/2 cup — a tablespoon or two extra is fine)

1/2 cup (2 1/4 ounces) oat flour

1  1/4 cup (7 ounces) whole wheat pastry flour

2 teaspoons baking powder

1 teaspoon kosher salt

1/2 cup cacao nibs  OR  1 cup chocolate chunks

1 tablespoon chia seeds (optional)

Preheat oven to 350°F.  Lightly grease a 9 x 5 loaf pan.  Set aside.

In a medium bowl, combine the oat flour, whole wheat pastry flour, chia seeds, salt, and baking powder with a whisk.  Set aside.

In a bowl of a stand mixer (or regular bowl if mixing by hand), add the honey and coconut oil.  Combine for a minute on medium speed until somewhat creamy.  Add the eggs and vanilla.  Mix for another minute, or so.  Then add the fork-smashed bananas.  Mix until well combined and somewhat smooth.  Next, sift the flour mixture over the wet ingredients.  Combine on low just until all of the ingredients are moistened.  Do not over-mix.  Add the cocoa nibs or chocolate chunks and fold in with a rubber spatula.  Scoop mixture into the prepared pan and smooth the top.  Bake for 45-48 minutes, or until a tester comes out clean from the middle of the loaf.  The center should feel somewhat firm when you feel it.  Let cool in pan for about 20 minutes, then run a knife around the edge and gently remove from pan.  Continue to let cool on a cooling rack.  For best results, after cutting into it, place the cut side down on a cutting board and leave the rest of the bread uncovered for the first day.  The texture will remain true this way.  Enjoy!

Thanks for stopping by Relishing it!  Hope you all are having a lovely Summer, so far!

Laurie

Read Full Post »

White Chili via Relishing It

If you’ve spent much time with me here on Relishing It, you already know that I love spending time in the kitchen, working my way through an intricate recipe.  Not much makes me happier than pouring through ingredients in the afternoon sun, with the sound of my little ones playing in the next room.  Yes, that’s my heaven.  But of course, the sun doesn’t stream through the windows much here in January, and– let’s be honest– kids generally have a way of needing something every 15 minutes.  So I often have to be more realistic, and for that I love turning to one-pot meals.  This white chili is a great meal that doesn’t require much attention.  It’s hot, healthy, delicious, and best of all, mostly tends to itself.  Perfect for a cold Sunday afternoon when you’re busy playing inside, or (lucky you) when you get a chance to just settle into the couch with a good book.

Dried Beans via Relishing It

We eat more than our fair share of chili here in the cold months.  I like that it’s relatively healthy, and that I get a chance to experiment with different ingredients and flavor combinations.  Last weekend I made a batch with cubed beef, dark chocolate, toasted cumin seed, an oyster stout beer, and dried ancho chiles that I toasted and ground myself.  Loved it!  But enough about that (for now).  Today’s recipe is for my favorite version of white chili.  I prefer this style to not be too heavy.  If you’ve ordered it in a restaurant, you probably know what I’m talking about.  To get the right consistency, I smash a few of the beans as a thickener, and then use evaporated milk to give it a nice creaminess.  The chickpeas have a wonderful, firm texture that holds up well, while the white cannellini beans add a nice silkiness.  The combination is sublime.  A generous squeeze of lime into the pot for the finish gives it vibrancy and freshness.

White Chili via Relishing It

White Chili via Relishing It

The Recipe: White Chili

(serves at least 4)

1 pound chicken breast, cubed OR about 2 cups shredded roasted chicken (see note 1)

2-3 tablespoons olive oil

1/2 large white onion, chopped

1 jalapeño, finely chopped

1 large poblano pepper, chopped

3 garlic cloves, finely chopped

1 1/3 cups dried chickpeas, soaked OR two 15 ounce cans (see note 2)

1 1/3 cups cannellini beans, soaked OR two 15 ounce cans (see note 2)

1 quart chicken broth

3 tablespoons ground cumin

2 teaspoons ground coriander

1 can evaporated milk

juice of 1/2 – 1 lime, to taste

kosher salt and cracked black pepper

cilantro, lime, green onions, and white cheddar cheese for garnishes

Note 1:  If you choose to use shredded roasted chicken, do not add it to the chili immediately or it will fall apart.  Add it after you purée some of the beans near the end of the cooking time.  Make sure it has enough time to warm through.

Note 2:  Soaking the beans overnight in the refrigerator is one way to prepare the beans ahead of time.  However, if that isn’t possible, place the dried chickpeas and cannellini beans in a large pot and cover with a few inches of water and a couple teaspoons of salt.  Bring the water to a boil.  Cover and remove from heat and let sit for at least two hours.  At this point, check the beans for doneness.  If they are not quite done, you may want to bring them back to a boil once again for a few minutes to soften up a bit more (I find that the chickpeas take a little longer). If you add them to the chili and they are not fully tender, they will soak up a bit more of the liquid.  When they are your preferred texture, drain and set aside.

In a large Dutch oven over medium-high heat, add the olive oil. When it is hot, add the chicken and a sprinkle of salt and pepper.  Brown for a few minutes until cooked through.  Remove the chicken from pan.  To the same pan add a bit more olive oil, if necessary, and the poblano pepper, jalapeño, onions, and garlic.  Sauté for a few minutes until somewhat tender.  Return the chicken to the pan, along with the cumin and coriander.  Cook for 1 minute and then add the chicken stock, chickpeas and cannellini beans.  Bring to a boil.  Reduce heat to low-medium and cook for about 30 minutes – 1 hour.  More if the beans need extra time to soften, less if they don’t.

When the texture of the chili seems right to you, remove about 1 1/2 cups of beans from the pot and place in a shallow bowl.  Use a fork to smash the beans and make smooth.    This will help thicken the chili naturally.  Return the smashed beans to the pot.  Add the evaporated milk and cook uncovered  for a few minutes longer.   Add the juice of 1/2 of a lime to start, and more if you choose.  Taste and re-season with salt and pepper, if necessary.  Enjoy!

Thanks for stopping in today! xo
Laurie

Read Full Post »

« Newer Posts