Feeds:
Posts
Comments

Posts Tagged ‘Summer’

Peach Sangria with Chamomile and Thyme | Relishing It

“Millions of peaches, peaches for me.  Millions of peaches, peaches for free”.  My apologies for putting that song in your head, but I end up humming it every time I make this wonderful sangria.  And while the comical stylings of the band The Presidents of the United States of America (I’m really showing my early 90’s musical roots here) may not be your thing, this drink will be.  If only peaches were free…if only.

Peach Sangria with Chamomile and Thyme | Relishing It

Peach Sangria with Chamomile and Thyme | Relishing It

It’s hard to not like sangria, to be honest.  What’s not to love?  Delicious wine spiked with fruit or fruit juices, sometimes sugar, sometimes bubbles. Yes, please.  Making sangria can be a bit like painting on a canvas.  There are so many colors and choices for your creation.  I enjoy both white and red sangria, but in either style fresh herbs are the key for me.  They give it a little more complexity that so many other versions seem to lack.

Peach Sangria with Chamomile and Thyme | Relishing It

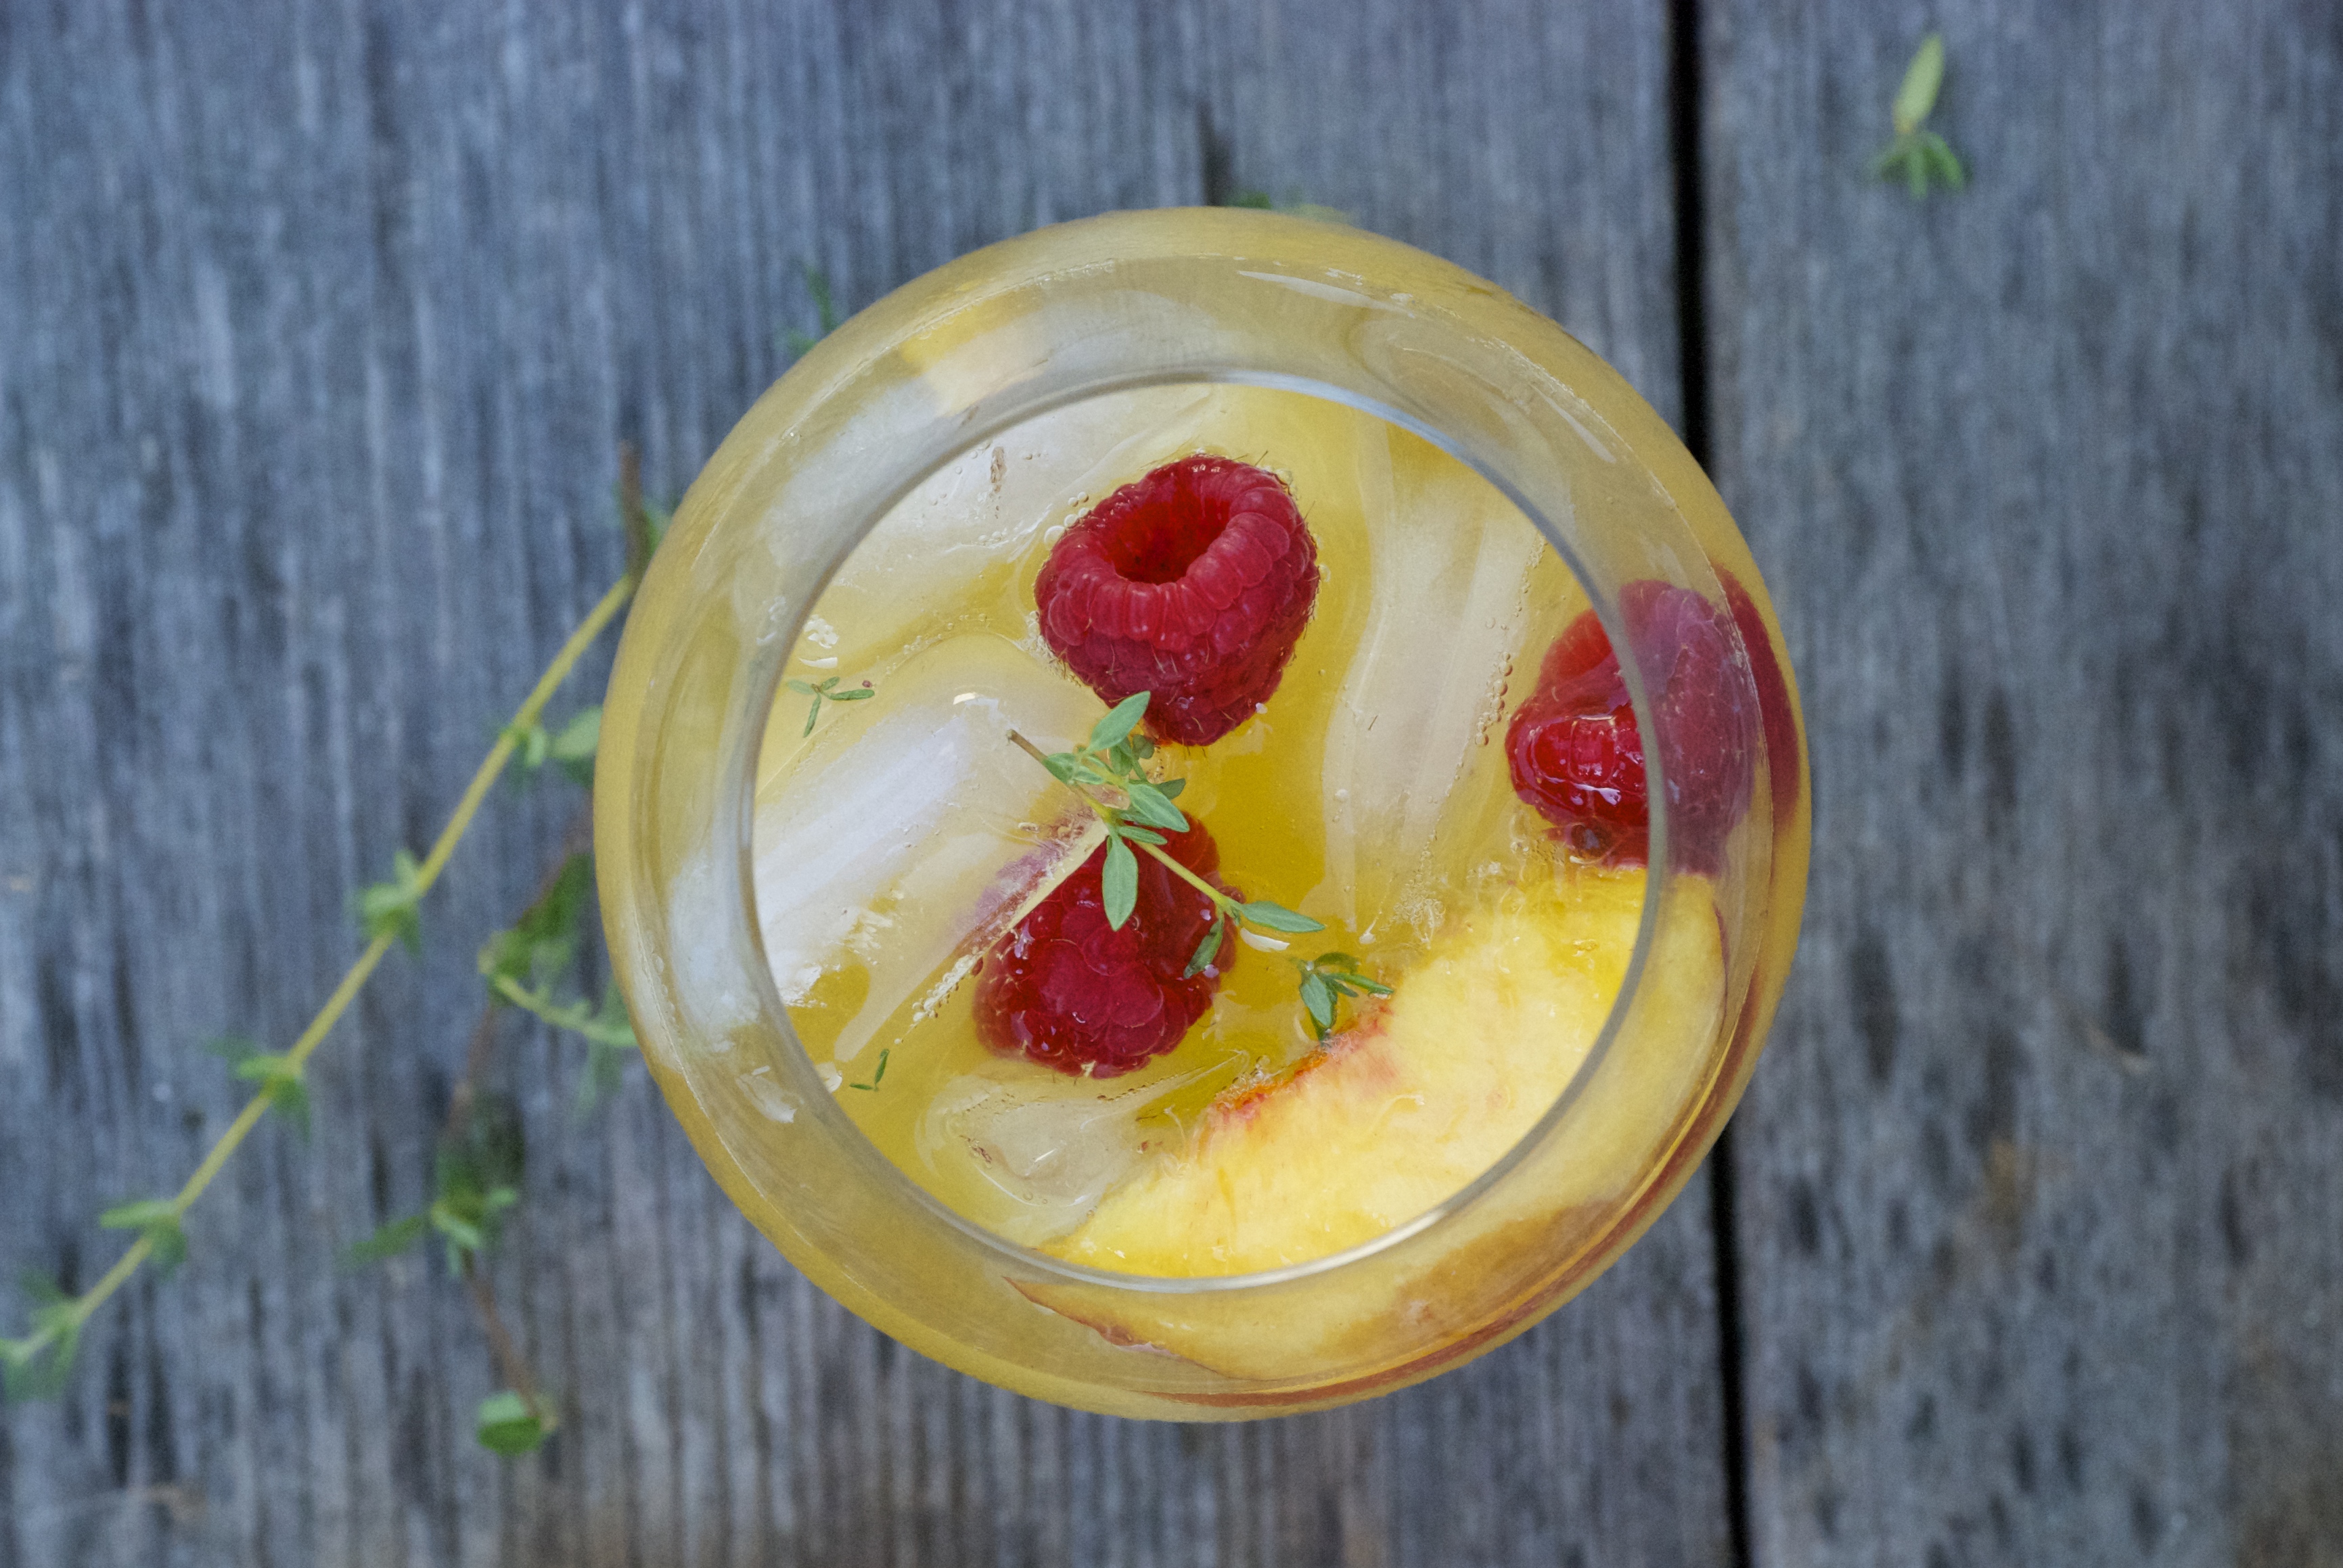
I’ve also recently been experimenting with fresh juices in my sangria.  We have a Breville Juice Fountain Plus and I like to put it to good use.  You may think you’ll waste a lot of the fruit by juicing it, but the truth is, you don’t.  I had almost no pulp when I juiced two peaches for this recipe– the only thing that was discarded was the peel. If you’ve been thinking of purchasing a juicer, summer is the perfect time to do it!  There are so many wonderful fruits and vegetables to experiment with. Of course, if you don’t have a juicer, you can simply peel the peach and purée in a blender– that method will work just fine.  I wanted to create an herby, mostly naturally-sweetened sangria.  Some recipes require a lot of sugar, but I’d rather avoid that if possible.  The addition of chamomile is subtle, but lovely.  And the fresh thyme works magically with the peaches– they’re a wonderful pairing.

Peach Sangria with Chamomile and Thyme | Relishing It

Using fresh juices in addition to chunks of whole fruits helps the flavors meld a bit quicker than just using whole fruit exclusively. It is something you should definitely try before the summer is over!  Enjoy the sangria and for goodness sakes, share some with your *neighbors!

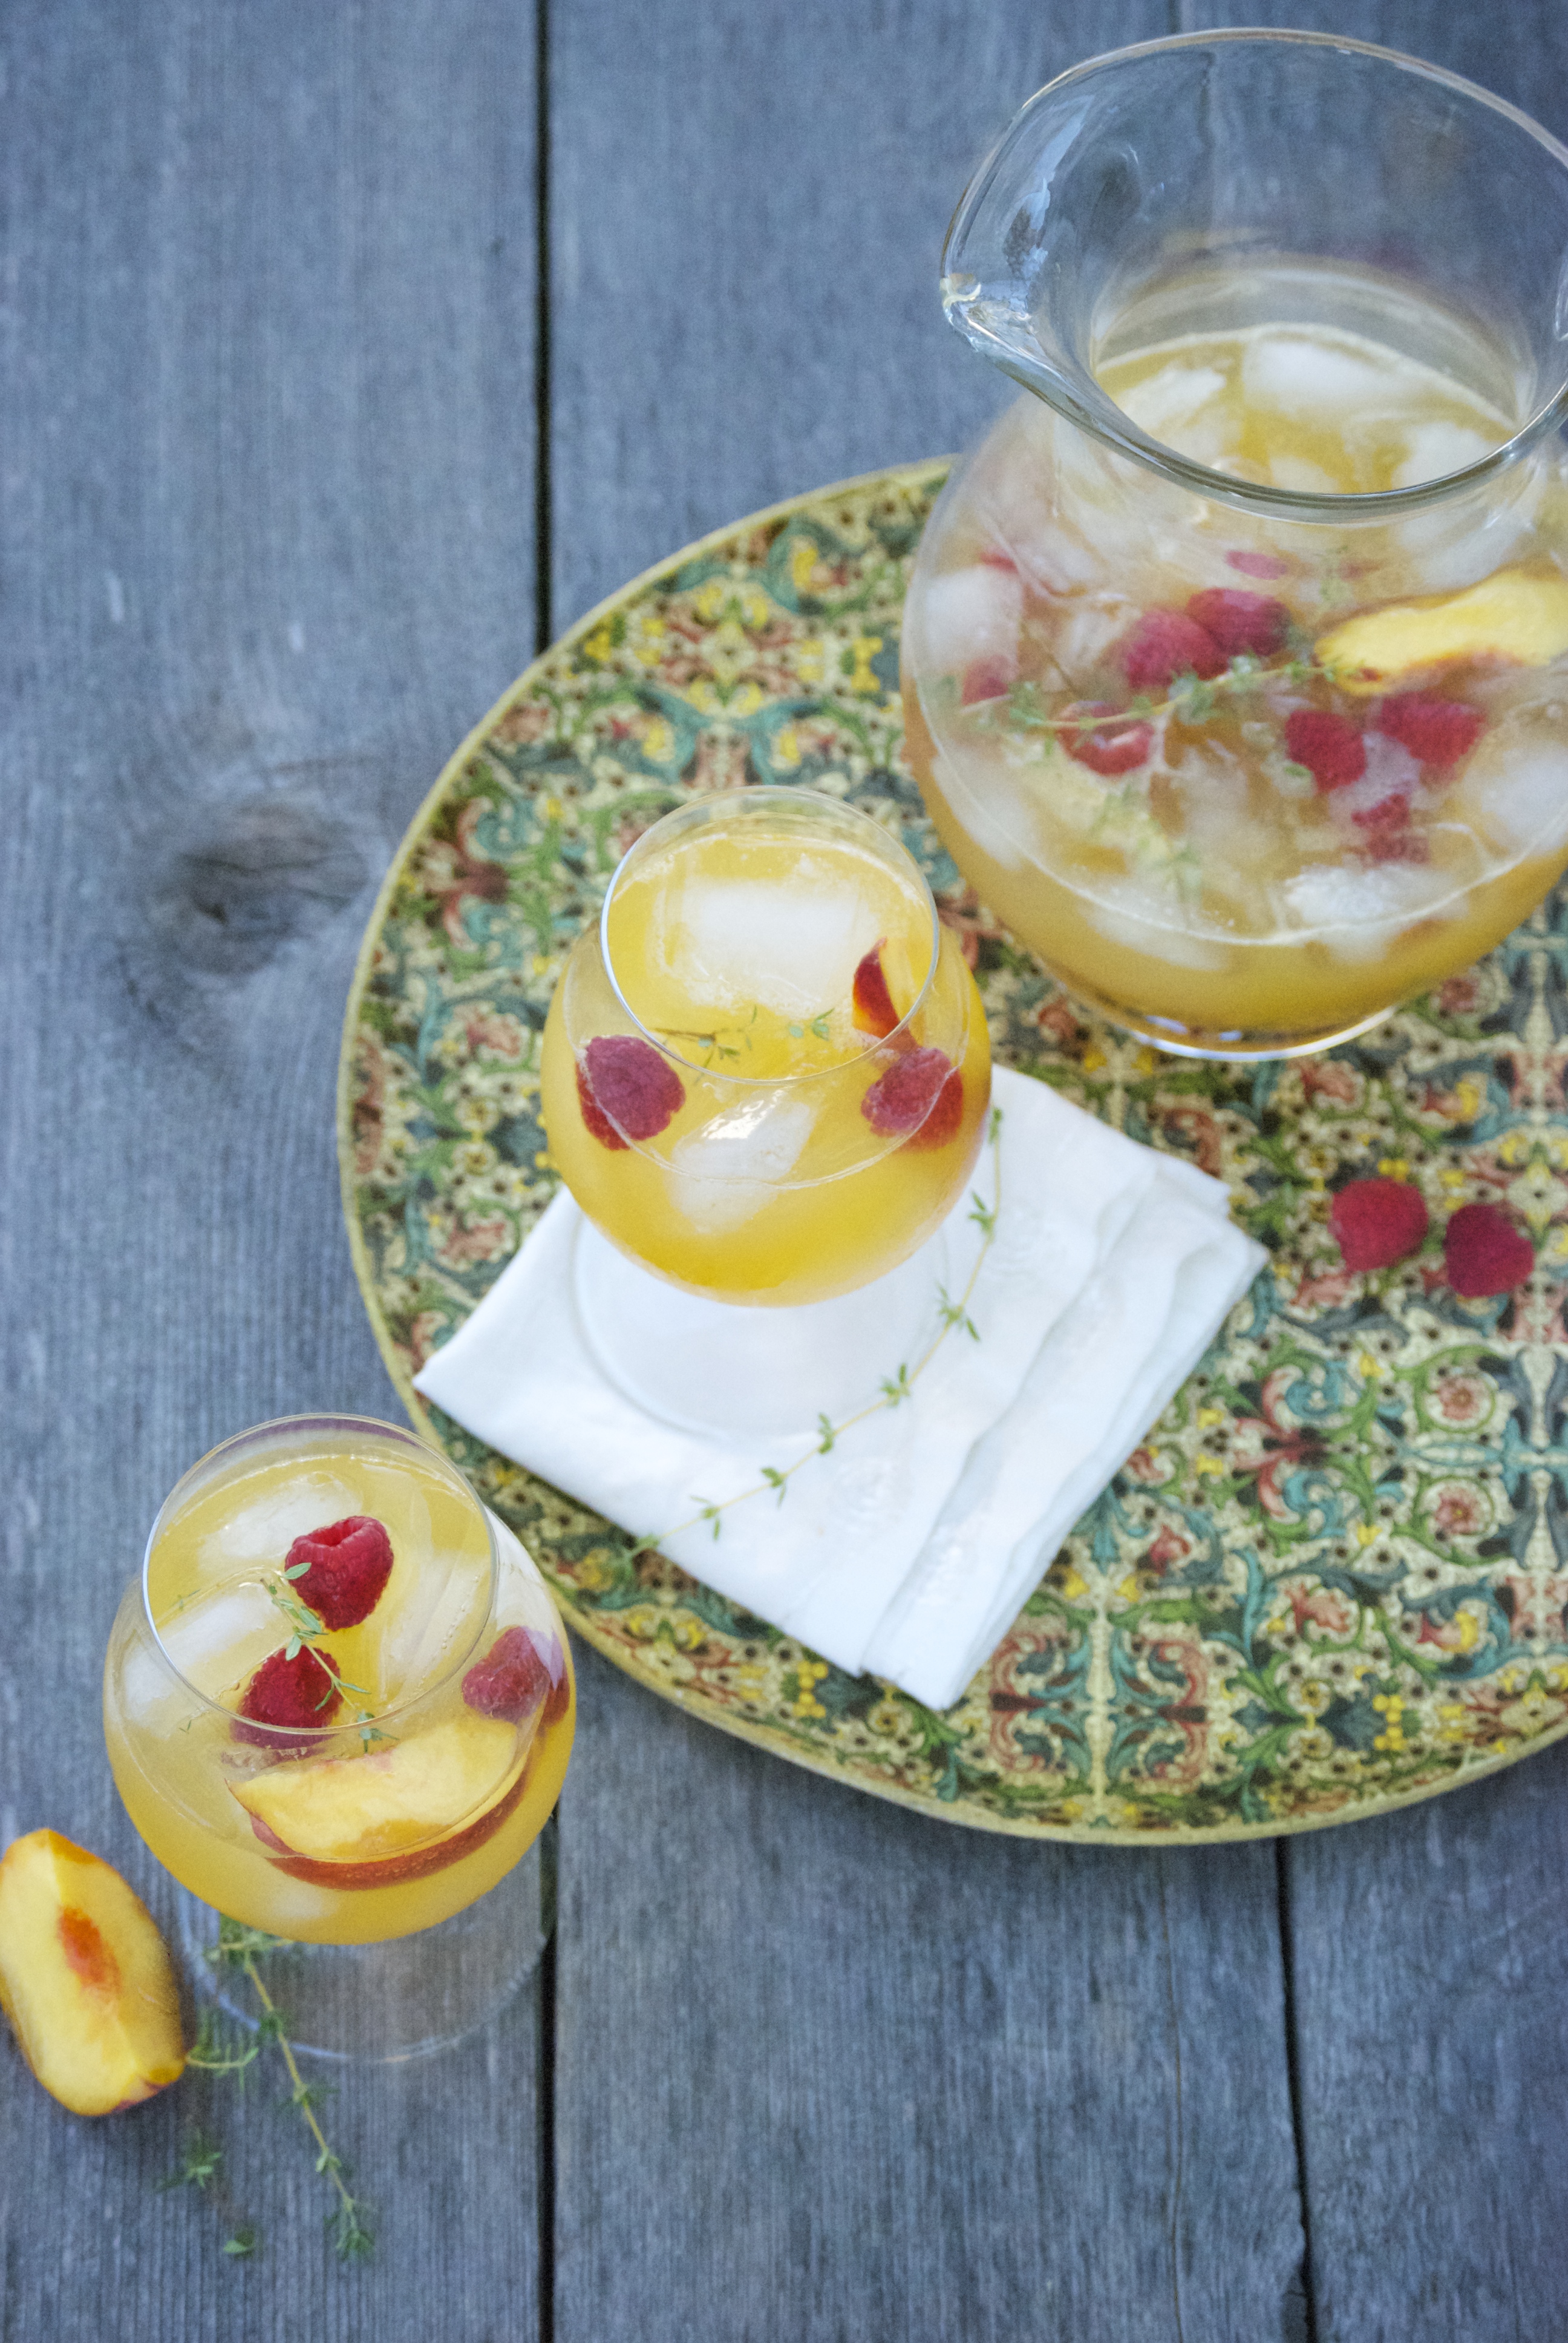
*Speaking of neighbors– shout out to my neighbor Allison and her lovely mother, Shirley for gifting me the gorgeous antique platter in the photos– thank you!

Peach Sangria with Chamomile and Thyme | Relishing It

The Recipe: Happy Hour: Peach Sangria with Chamomile and Thyme

(serves 4)

1 bottle of sparkling white wine, cava, prosecco, or regular white wine

3/4 cup fresh peach juice/purée (from 2 peaches)

1-2 bags of chamomile tea (steeped in 1/2 cup hot water, then cooled)

handful of fresh thyme sprigs

1/2 tablespoon superfine sugar (more or less to taste)

fresh raspberries and peach slices

ice

Begin by steeping the chamomile tea in hot water.  Refrigerate to cool completely.  Juice the peaches by either using a juicer or peel the peaches and purée in a blender.

In a large glass pitcher, add the sparkling white wine, peach juice, chamomile tea, fresh thyme sprigs, and  1/2 tablespoon superfine sugar.  Stir together well and even bruise the thyme with a wooden spoon to release the flavors more.  If time allows, let the flavors meld for 20 minutes or so in the refrigerator.  Then add the ice, fresh raspberries, and peach slices.  Serve in a glass over ice.  Enjoy!

Thanks for stopping by Relishing It!

Laurie

Read Full Post »

Fresh Corn Salsa | Relishing It

I’ll get to the corn salsa in a minute– but first I want to talk about beer!  Admittedly, I’ve been drinking too darn much beer this summer.  Not at one time– nothing like that.  But this summer, more than any other, it’s just been so easy to sit outside with Radd in the evening and visit over a beer or two.  I suppose it’s partly to do with our mild weather– not too hot, not too humid.  It has been perfect, which is excellent for my happiness.  And while I probably don’t need those calories at the end of the day, instead of stressing, I’ve decided to embrace it.

Fresh Corn Salsa | Relishing It

Fresh Corn Salsa | Relishing It

So what have I been sipping on?  Mostly farmhouse ales and saisons.  Two that I love are Saison Dupont and a local farmhouse ale from Liftbridge called Farm Girl.  Speaking of local beer, I’ve also been enjoying a few others like Bent Paddle’s Paddle Break Blonde and Steel Toe’s Size 7 IPA.  Now before this post turns into an essay on local beer, let me just say this– our craft beer scene here in Minnesota is just incredible right now.  So many wonderful breweries and taprooms, and I’ve been testing them out like it’s my job.  I’m owning it, I don’t mind saying.  A few other great summer favorites (not local) are Leffe Blonde and Pyramid’s Apricot Ale.  There, that’s my beer confession.

Fresh Corn Salsa | Relishing It

So what goes smashingly well with summer beer?  Yup– chips and fresh corn salsa.  I love salsa of any variety– tomato, tomatillo… but, there’s something about fresh corn salsa that wins the salsa competition for me.  I would choose corn every time.  It’s fresh, slightly sweet, spicy, and loaded with that citrusy lime/cilantro flavor.  Not to mention, it is simple to make– so simple that it’s somewhat silly to even give a recipe.  But, I think the same can be said for most summer fare– fresh and simple and that’s just fine.  So, get out your chefs knife and start cutting up that corn.  Then pour yourself a glass of cold beer and soak up some summer fun.  Cheers!

Fresh Corn Salsa | Relishing It

The Recipe: Fresh Corn Salsa

6-8 ears of fresh corn, cut

1 large red onion, diced

1 bunch fresh cilantro, finely chopped

2 jalapeños, chopped (remove seeds/ribs if heat is a factor)

2 cloves garlic, finely minced

juice of one lime

kosher salt

In a medium-sized bowl mix all of the ingredients.  Add more lime juice to taste.  Season appropriately with salt.  You may need more salt than you are used to — corn needs a bit to bring out its wonderful flavor.  Let flavors meld for a bit before serving.  Store leftovers covered in the refrigerator.  Enjoy!

Fresh Corn Salsa | Relishing It

Thanks for stopping by Relishing It!

Laurie

Read Full Post »


Crunchy Refrigerator Pickles with Dill + Garlic | Relishing It

You know what’s awesome?  Handing your daughter a pickle and having her proclaim (without knowing where it was from) “This is amazin’!”.  That, my friends, is what I call winning.  She didn’t see me make the first batch of refrigerator pickles this year, but she’s been helping me make every batch since.  She is fascinated by the fact that it doesn’t take very long to transform a cucumber into a wonderful pickle.

Crunchy Refrigerator Pickles with Dill + Garlic | Relishing It

Crunchy Refrigerator Pickles with Dill + Garlic | Relishing It

I decided to wing-it this year and make up my own pickle recipe.  After waiting rather impatiently for my mom to send me her recipe (you’re in trouble, mother), I decided to conjure up my own version.  Sure, I’ve made lots of refrigerator pickles in the past, but nothing that kept me wanting to make the same batch again.  I was reaching too far, to be honest– over-complicating things.  I kept looking for something “interesting” that would blow me away.  Last year I even tried a version with mint, and while they were fine, they just were not what I was looking for.  I realized that what I was really after wasn’t complicated at all.  I wanted something that was really crunchy, fresh, garlicy, and had a clean dill taste.  Simple. Classic.  So, I stopped searching and just made them the way I wanted.  Duh.

Crunchy Refrigerator Pickles with Dill + Garlic | Relishing It

Crunchy Refrigerato Pickles with Garlic + Dill | Relishing It

The key for me to keeping them refreshing is to lessen the salt and vinegar amount a bit.  I remember this trick from my mom, which is why I probably loved her pickles so much.  Add a little filtered water to the vinegar and it creates the most refreshing brine.  Too much salt makes me want to stop eating something in a hurry, but just the right amount– and I can chomp on these babies all day long.  The dill and garlic are just what you’d expect them to be– delicious.  No surprises here.  I always add carrots to my refrigerator dills– they’re fantastic.  They take a bit longer to pickle than the cucumbers do.  Using young small cucumbers is the key to a crunchy pickle, as is not heating up the brine mixture.  Keep everything cold and you’ll have a fantastic crunch– I promise you.

Crunchy Refrigerator Pickles with Dill + Garlic | Relishing It

Crunchy Refrigerator Pickles with Dill + Garlic | Relishing It

These pickles are perfect to bring to a barbecue or neighborhood gathering.  Bring a huge bowl of them– they’ll disappear quickly.   There is nothing better than sinking your teeth into a cold, crunchy pickle on a hot summer evening.  National Night Out is next Tuesday in the US.  I plan on bringing a big bowl of these crunchy dills, and I think you should do the same.  Or just make a jar or two to keep in your refrigerator for when you need that tangy, satisfying crunch.

Crunchy Refrigerator Pickles with Dill + Garlic | Relishing It

The Recipe: Crunchy Refrigerator Pickles with Dill + Garlic

Smallish cucumbers, cut however you like– I prefer spears

carrots, cut into spears

3-4 cloves of garlic, peeled

1 1/2 teaspoons kosher salt ( I use Diamond Crystal–and weirdly this matters.  Different salt.  Different results.)

fresh dill

white vinegar

Make as many jars as you want.  Fill each clean quart jar with cucumber spears, carrots, 3-4 cloves of garlic, and fresh dill. Make sure everything is packed in there tightly.  Sprinkle with kosher salt.  Pour vinegar into the jar until it is  3/4 full.  Then finish filling the jar with filtered water, leaving about 1/2-inch space at the top.  Cover with lid and gently shake to combine.  Refrigerate.  Pickles will be ready within a few hours, but it’s best to wait at least a day for optimum results.  Carrots often take a bit longer to fully become pickled, but I generally eat them before the fact.  Enjoy!

Thanks for stopping by Relishing it!

Laurie


Read Full Post »

Roasted Tomatoes with Garlic and Herbs | Relishing It

The tomatoes have finally arrived here in Minnesota!  Yes, that sentence deserves an exclamation point.  It’s always a long wait for me throughout the year for these babies.  I love tomatoes, but the sad store-bought versions just won’t do.  So, I can or freeze as much as I can to make it through the winter, then patiently wait for them to appear at the farmers markets the next summer.  Every year I somehow trick myself into thinking that they should appear earlier than they really do.  Tomatoes need time and lots of sun.  I have a few plants in my yard again this year that are coming along nicely, but the bulk of my preserving comes from the farmers markets, where I can buy bushel upon bushel of these little red gems.

Roasted Tomatoes with Garlic and Herbs | Relishing It

I’ve mentioned here before that I love to can salsa.  I’ll be makes lots of batches of this recipe in the coming weeks.  I also can plain tomatoes, and a couple different versions of tomato sauce.  The version I’m sharing today is not a canned one–so, you can exhale now.  It’s actually my favorite tomato sauce and I preserve it by freezing it.  Super easy and ridiculously delicious.  I love to can, as it’s a great way to preserve and we happen to have a large storage room in the basement, so it works well for our family.  But, in all honesty, I love the taste of this un-canned sauce even more.  The flavors are spot-on and lemon juice (which is used in canning to keep the ph levels safe) is not needed.  I use roma tomatoes here (they are wonderful for sauces) as they have a lower water content.

Roasted Tomatoes with Garlic and Herbs | Relishing It


Roasting tomatoes is one of my favorite ways to eat them.  Something magical happens when that tomato caramelizes a bit. The flavor intensifies and I simply can’t stop popping them into my mouth.  I love to pair them with some delicious cheese and crusty bread.  Simple summer meals are the best.  When we’ve eaten our fill, I put the rest of the tomatoes, garlic, and herbs into the food processor and give it a few pulses until it become this thick, fragrant tomato sauce that can be used in so many ways.  At this point, I freeze the sauce, unless I want to use it in the next day or so.  Freeze it in whatever you like– freezer bags or vacuum seal it in a special bag (freeze first, then vacuum seal it closed) are both methods that work well.  I use this sauce all winter long and it is always a sad day when I pull the last one from the freezer.  I hope you give this version a try.  Enjoy!

Roasted Tomatoes with Garlic and Herbs | Relishing It

The Recipe: Roasted Tomatoes with Garlic and Herbs

Roma tomatoes, cut in half (as many as will fit on 1-2 baking sheets–depending upon how many you want to roast)

1 bulb of garlic, peeled and cloves separated (per baking sheet)

handful of freshly chopped herbs: basil, thyme, oregano, parsley (per baking sheet)

olive oil

kosher salt and fresh black pepper

Preheat oven to 375°F.  Line 1-2 large rimmed baking sheets with parchment paper (depending upon how many tomatoes you want to roast).  Fit the tomatoes snuggly, cut-side up, in a single-layer onto the pan, they will decrease in size as they cook.  Drizzle with olive oil.  Sprinkle with the chopped herbs, garlic, salt, and pepper.  Roast for about 40-50 minutes (if using two pans, rotate them half-way through).  Then increase temperature to 400°F and roast for at least another 10 minutes to caramelize the tomatoes, sometimes a bit longer.  Check the bottom of them for a dark caramel color.  Remove from oven when done.  If wanting to make sauce, place all of the roasted ingredients into a food processor, juices too (or by hand).  Pulse for a few times until mixed.  Place in freezer bags or bags that can be vacuum sealed (freeze first, then seal), or any other container you want to store them in.  Enjoy throughout the winter!

Thanks for stopping by Relishing It!

Laurie


Read Full Post »

Zucchini Cauliflower Summer Gratin | Relishing It

Zucchini is not my favorite vegetable.  There, how’s that for an opening statement?  It truly isn’t, or wasn’t, rather.  It’s not that I really disliked zucchini, but in the past, if given the choice, I generally chose other ingredients to work with.  I thought of it as bland and lacking “personality.”  As it turns out, I’ve really come around to enjoying this wonderfully subtle vegetable.  It just took a little coaxing from a very good, very talented friend.

Zucchini Cauliflower Summer Gratin | Relishing it

Zucchini Cauliflower Summer Gratin | Relishing It

My friend, Amanda Paa, from HeartBeet Kitchen, has just published her very first cookbook, “Smitten with Squash”, dedicated entirely to that vegetable.  I first met Amanda a few years ago at a mutual food-blogger friend’s cabin.  I loved her ever-present smile and her calm demeanor.  She was chopping vegetables endlessly in the kitchen and more than happy to be doing so.  To say this girl is lovely doesn’t do her justice.  We both belong to the group Fortify (a local food group), so we continued to run into each other at events.  We eventually discovered that we live just a few blocks from one another.  We frequent the same restaurants, coffee shops, and farmers markets, and we never ever tire of talking about food together.  We’ve become wonderful friends and I couldn’t be happier to share a recipe from her new cookbook with you!

Zucchini Cauliflower Summer Gratin | Relishing It

Zucchini Cauliflower Summer Gratin | Relishing It

Zucchini Cauliflower Summer Gratin | Relishing It

It’s fun to have the inside scoop on someone’s book-writing journey.  In some small way, it made me feel like I was part of it.  She worked so hard and spent much of her winter huddled-up writing.  The result is this wonderful book full of recipes for both summer and winter squash.  Sweet or savory, she’s covered it all and then some. If you’re looking for inspiration for this particular vegetable, this is the cookbook you need.

During her creative process, I had the opportunity test a few of her recipes.  This wonderful zucchini cauliflower gratin is a heaping dish of chopped vegetables seasoned with herbs and parmesan cheese. There is just enough cream in it to give it a proper gratin feel, but the added milk keeps it from being too heavy.  And every single bite is laced with just enough rosemary to keep you wanting another.  Lastly, the parmesan crust on the top adds a little cheesiness, with a nice contrast in texture.  I pile this gratin high on my plate with no regrets.  It’s perfect paired with a grilled meat and a glass of wine.  Not to mention my kids and husband all love it, too.

Zucchini Cauliflower Summer Gratin | Relishing It

Zucchini Cauliflower Summer Gratin | Relishing It

I’m giving away a copy of Amanda’s book to one lucky reader (only in the US– sorry)!  You want this book, you really do.  She gets so creative with this vegetable– you’ll want to cook through the entire thing.  Even if you aren’t the winner, I would encourage you to order it from Amazon or Barnes and Noble— you won’t be disappointed.  To enter, follow the instructions on the Rafflecopter link below.  Good Luck!

Zucchini Cauliflower Summer Gratin | Relishing It And to you, Amanda– I am so happy to call you a friend.  You are one of the most selfless and giving people I’ve met.  Congratulations on your beautiful book– I’m truly excited to see what comes next for you.

Enter Giveaway Here — a Rafflecopter giveaway

Update: The winner is Carolsue Anderson!  Thanks to all who entered.

The Recipe: Zucchini Cauliflower Summer Gratin

(serves 4)

1 large head cauliflower

kosher salt

1 1/4 pounds zucchini, coarsely grated

2 tablespoons olive oil

3/4 cup chopped onion

2 garlic cloves, minced

1/2 teaspoon finely ground black pepper

2 tablespoons all-purpose flour (or gluten-free all-purpose flour)

1/4 cup milk

1/3 cup heavy cream

2/3 cup grated parmesan, divided (or more!)

1 tablespoon chopped fresh rosemary

3 tablespoons chopped fresh parsley

Prepare the cauliflower by removing the core and breaking the rest up into smaller pieces.  Then, using a food processor (or a sharp knife), pulse the cauliflower until they are tiny pieces that resemble rice grains.  Be care that the mixture doesn’t get mushy.  You may have to do this in batches.  You should yield about 3 1/2 cups.

Preheat oven to 375°F.  Lightly coat a shallow baking dish with olive oil and set aside. Stir 1 teaspoon salt and grated zucchini together, then place colander set over a bowl to drain.  In a large skillet, heat olive oil over medium-high heat, add onions and a big pinch of salt, and cook stirring, until softened, about 4-5 minutes.   Meanwhile, squeeze handfuls of zucchini over a bowl to catch the juices, removing most of the water from the zucchini, yielding 2/3 cup shreds.

When the onion is softened, reduce heat to medium and stir in the cauliflower, garlic, zucchini, 1/2 teaspoon kosher salt, and pepper.  Cook for about 7-8 minutes, until the vegetables are softened.  Sprinkle flour over the mixture and stir to combine.  Gradually stir in reserved zucchini water, milk, and cream, maintaining heat at medium so dairy does not curdle.  Cook for 2-3 minutes so liquid absorbs slightly. Remove from heat.  Stir in 1/3 cup parmesan, rosemary, and parsley.  Pour into prepared dish and bake for 20 minutes.  Remove from oven and top with remaining cheese (or more, if you like).  Return to the oven for another 10 or so minutes until gratin is brown and bubbly.  Sometimes I put the gratin under the broiler to brown up a bit faster for the final minute or two.  Enjoy!

Check out these other great blogs for more recipes from “Smitten with Squash”.  If you happen to live in the Twin Cities, be sure to stop by Solo Vino in St. Paul from 5:00-7:30 this evening for Amanda’s first book signing– I’ll be there, too!

A Farmgirl’s Dabbles — Bumper Crop Spicy Squash Pickles

Fresh Tart — Chimichurri Chicken and Vegetable Kabobs

Robin Writes — Garam Masala Dusted Pattypans & Crispy Chickpeas with Tahini Sauce

Dolly and Oatmeal — Banana and Oat Streusel Summer Squash Muffins

Healthy Green Kitchen — Cherry Tomato and Summer Squash Cobbler with Rosemary Biscuits

Thanks for stopping by Relishing It!

Laurie


Read Full Post »


Happy Hour: Rye Mule | Relishing It

Today’s cocktail is a lovely little three-ingredient number that is simple to make, and tastes fantastic.  This is a thirst quenching cocktail and I suppose you could even say that it can be a bit dangerous.  It’s one of those where you taste no alcohol– you’ve been warned.  The rye melds into the sea of ginger beer and lime, giving it the flavor of a crafted soda rather than an alcoholic beverage.   The lime offers a refreshing zing, while the ginger beer lends a subtle “bite”.  We happen to love this drink, and are so thankful to a certain friend from my husband’s hometown for introducing it to us (you know who you are D.S.).

Happy Hour: Rye Mule | Relishing It

I suppose I should note that you certainly don’t need to use a high-end rye for this drink.  In fact, it’s almost silly to do so.  The one I used was all we had in the house, but normally we use Bulleit Rye.  It works just fine, and is reasonably priced.  You may have noticed that I didn’t photograph the ginger beer.  My favorite brand is not very photogenic (it comes in a silver can), but I’ll tell it to you anyway.  I like “Gosling’s” ginger beer– it has a nice/strong ginger flavor, but more importantly– it’s really carbonated!  There are so many lovely bottles of ginger beer available nowadays, but I find that many of them really lack carbonation.  So,  I’ll be sticking to Gosling’s…in the ugly can.  Unless any of you have a good recommendation?  It’s almost the weekend, friends.  Cheers to you!

Happy Hour: Rye Mule | Relishing It

The Recipe: Rye Mule

(makes 1)

2 ounces Rye

4 ounces ginger beer

1 tablespoon fresh lime juice

Fill a high-ball cocktail glass with ice.  Add the rye, ginger beer, and lime juice.  Mix with a stirring stick.  Drink. 🙂

Thanks for stopping by Relishing it!

Laurie


Read Full Post »

Corpse Reviver No. 2 | Relishing It

The weekend is almost here, and I’m getting a little more giddy by the hour.  I’m smiling thinking of all the possible things to do.  That’s the brilliant thing about Friday, isn’t it?  It’s the potential.   This weekend we don’t have any concrete plans yet, and that makes my mind wander all the more.  Shall we explore these two great cities we live in a bit?  Take a drive out to the farm that’s been growing our CSA food? Find a beautiful lake or river to relax by?  As evening rolls around, perhaps have a cockta…?  Oh wait, that last one was a silly question.  Of course we’ll be having a cocktail.

Corpse Reviver No. 2 | Relishing It

In fact, I can say with some certainty that I’ll be having this cocktail– the Corpse Reviver No. 2.  It is without a doubt one of my favorite summer drinks.  Radd first introduced it to me last year and it was love at first taste.  He had been out of town, walked into a cocktail bar, and asked the bartender to make something “interesting.”  This is what he got (along with the recipe) and it blew him away.  We’ve been making it ever since.

So what’s with the weird name?  Apparently it was an old hangover cure that would revive your corpse after a long night in the pub.  It was first listed in the Savoy Cocktail Handbook by Harry Craddock in 1930, so it has been around for awhile.

Corpse Reviver No. 2 | Relishing It

This cocktail basically tastes like jacked-up lemonade with a twist.  That twist being a hint of anise flavor from the absinthe rinse.  It’s subtle and oh-so-very intriguing!  It’s a perfect sipping cocktail when it’s hot outside and the sun is shining down.  If you make this– I’m almost certain you will love it.  Have a wonderful weekend, friends!  Cheers!

Corpse Reviver No. 2 | Relishing It

The Recipe: Corpse Reviver No. 2

(serves 1)

1 oz. gin

1 oz. Cointreau (or Triple Sec)

1 oz. Lillet blanc

1 oz. freshly-squeezed lemon juice

Absinthe rinse.

Combine and shake the gin, Cointreau, Lillet, and lemon juice over ice and let rest for a minute or so.  While the ingredients are resting, pour about a half teaspoon of absinthe into a well-chilled cocktail glass and roll the glass allowing the absinthe to coat the sides.  Discard the absinthe that remains in the glass.  Give the ingredients another shake and strain it into your absinthe-rinsed glass.  Serve with a lemon twist.

Thanks for visiting Relishing It!  See you next week.

Laurie

Read Full Post »

Giardiniera | Relishing It

When I first started writing here on Relishing It more than three years ago, figuring out what to make and blog about was… a process… and sometimes a struggle.  Back then my focus was on making things that I thought you would want to see, which it turn, would bring you back here more often.  It wasn’t really about web traffic or anything like that– I guess it was more about validation.  Knowing that people were seeing what I could do.

I used to bake a lot more here.  Baking posts always get the ‘oohhs’ and ‘aahs’.  I also used to pour through cookbooks and magazines to discover that impressive dish that would be “blog-worthy”.  To be honest, it was a bit stressful, and more than a bit exhausting at times.  Fast forward to the present, and I’m much more comfortable with my posts.  I feel like I’m more true to myself and my interests– which is really why I started this blog in the first place.  It wasn’t to try to make money, or to show off complex recipes that I would make only once.  I really started Relishing It to build up a recipe index that reflects who I am, and to chronicle my relationship with food.  I go back to previous posts to reference recipes so often. Many are my absolute favorites, with a smidge of randoms and experiments while I was trying to figure this whole thing out.

I still do bake, but not as much.  It can appear more impressive, but it’s also more exacting, time consuming, and from a health perspective, just not very sustainable.  Now, I focus much more on food that I’m interested in , and that my family regularly eats.   Mostly-healthy, nutritious food that I can feel good about eating.  I still enjoy learning new techniques, I think I love to tinker in the kitchen now more than ever.  Blogging has been wonderful for that.  Where was I going with all of this? Well, I guess the point is, I no longer have to seek out things to blog about– the process is just so much more organic now. For awhile now, I’ve been just making things that make me happy, and that has made blogging so much easier.

Giardiniera | Relishing It

Giardiniera | Relishing it

Now that sumer is here, I’m eating a ton of vegetables.  And not just boring run-of-the-mill-broccoli-as-a-side-dish vegetables.  I love pickled vegetables, and with this recipe I hope that you will too.  It takes almost no time to make and tastes so much better than those store-bought versions.  Grab whatever vegetables you have, chop them up, add a few dried herbs, make a super-quick brine, throw it all in a jar, and put them in the fridge.  There you have it– you just made yourself giardiniera.  It’s wonderful on sandwiches (roast beef, in particular!), salads, or straight from the jar.  Once you taste this– you’ll be making it every week, it’s that easy, and it really is a perfect snack.  Many recipes have lots of sugar (not my deal) and some have olive oil mixed in.  I’m a little frugal with my olive oil, and don’t feel like it is necessary.  For me, this is a perfect balance  of vegetables, vinegar, and sugar (just a smidge to temper the vinegar).  Add spicy peppers, if you want.  Or don’t.  As I always say– make it yours!  I truly love this version and I hope you do, too.  Give them a try!

Giardiniera | Relishing It

Giardiniera | Relishing It

The Recipe: Giardiniera

(Makes 2 quarts)

* Chop a variety of your favorite vegetables to fit snuggly into 2 quart jars

The above mix contains:

1/2 head cauliflower, chopped into small florets

3-4 large carrots, peeled and cut into coins

2 celery stalks, chopped

6-7 large radishes, sliced

1/2 red onion, diced

1 red pepper, diced

4-5 garlic cloves, sliced

4 serrano peppers, sliced

2 teaspoons dried oregano

1 teaspoon dried thyme

2 teaspoons whole black peppercorns

For the Brine:

3 cups white vinegar

1 cup water

3 tablespoons granulated sugar

1 tablespoon kosher salt

2 dried bay leaves

Divide the chopped vegetables evenly between 2 sterilized quart jars.  Pack them in there!  Divide the oregano, thyme, and peppercorns between the two jars, as well.  Bring the brine ingredients to a boil– this infuses the bay leaves and dissolves the salt and sugar.  Remove from heat, then place one bay leaf in each jar.  Pour the brine into each of the jars while it is hot.  This will soften the vegetables just a bit.  Let cool at room temperature.  Place a lid on them, give a shake and refrigerate.  Contents will be fully ready within a day.  If you’re impatient, you may even try them sooner. Enjoy!

Thanks for stopping by Relishing It!  Hope you all have a wonderful weekend!

Laurie


Read Full Post »

Skillet Pizza on the Stovetop with Ramps, Mushrooms, and Smoked Mozzarella | Relishing It

When the weather changes, I find that my methods for cooking change, as well.  I’ve mentioned before that we live in an old Victorian house (110 years old to be exact).  We do not have central air, so we make-do with our window units.  When it’s a scorcher of a day, I generally avoid using the oven because the air conditioners just can’t keep up.  And this happens often during our Minnesota summers.  Honestly, sometimes it’s even too hot for me to stand next to a grill outside.  I’m painting quite a lovely picture of the hot mess that is me during the summer, aren’t I?  I’m not a fan of the heat, but I try to cope.

Skillet Pizza on the Stovetop with Ramps, Mushrooms, and Smoked Mozzarella | Relishing It

Skillet Pizza on the Stovetop with Ramps, Mushrooms, and Smoked Mozzarella | Relishing It

Skillet Pizza on the Stovetop with Ramps, Mushrooms, and Smoked Mozzarella | Relishing It

I love summer pizza, but since I’m unwilling to endure the added heat of firing up my pizza stone– at 500°F for thirty plus minutes– I turn to this skillet method.  A pizza loaded with fresh herbs, fresh mozzarella and all of those fresh tomatoes is my thing.   I used ramps, mushrooms, ricotta, and smoked mozzarella for this version, but you can use whatever you prefer.  If you can get your hands on some morel mushrooms, please do that and think of me when you eat it.  Please.  I’m very particular about my pizza crust.  If it’s not perfect, it’s not worth my time.  I like a nice crunch on the outside, tender on the inside (NOT doughy), and a lovely deep flavor throughout.  Over the years of making homemade pizza I learned something about myself– the longer the pizza dough hangs out it my fridge, the more I like it.  So, I never make pizza dough the day I want to eat it, and rarely even the day before.  I make it a few days prior and the flavor develops beautifully.  The texture is spot on, as well.  It’s loaded with air pockets from the yeast.

Skillet Pizza on the Stovetop with Ramps, Mushrooms, and Smoked Mozzarella | Relishing It

Skillet Pizza on the Stovetop with Ramps, Mushrooms, and Smoked Mozzarella | Relishing It

Using a cast-iron skillet works wonderfully for making pizza.  Use whatever size you have.  I have an old 10-inch.  Coat it with olive oil and let it heat up.  Then place the rolled-out dough in it.  Let it cook just a bit until it has a light golden color.  Add more olive oil, if necessary and flip it over.  Add the toppings and cover with a lid.  Cook over medium-high heat until the bottom of the crust is the color that you desire.  I like mine a little on the dark side.  When you get there, place the skillet (no lid) directly under the broiler for a few minutes to darken up the cheese (this will go quickly). Watch carefully, as broilers tend to be finicky.  You may even need to move the pan around for even browning.   Remove when pizza is a deep golden brown.  The entire process takes no time at all and you’re left with a delicious pizza that has an incredible crust.  Speaking of the crust– I jump back and forth from using two favorite recipes.  This one, which I’ve previously blogged about and the one I’m sharing today.  They are both fantastic.  Whichever one you choose,  just try to make it a few days in advance– it really does make a difference.  I like the crust recipe I’m sharing today because it fits wonderfully into a gallon-sized ice cream bucket and because it’s ridiculously easy to mix up.  Dump, stir, done.  You may not use the whole thing in one sitting, but you can either use it within two weeks, or even freeze it in plastic bags.  Enjoy the pizza!

Skillet Pizza on the Stovetop with Ramps, Mushrooms, and Smoked Mozzarella | Relishing It

The Recipe: Skillet Pizza on the Stovetop with Ramps, Mushrooms, and Smoked Mozzarella

(serves 1-2)

Pizza Dough 

(makes enough dough for 3-4 12-inch pizzas and will keep for 2 weeks in the refrigerator)

1 1/2 cups plus 4 teaspoons  (about 355 grams) water heated to 100°F

1/2 tablespoon granulated yeast

3/4 tablespoon kosher salt

3 tablespoons extra-virgin olive oil

3 3/4 cups (540 grams) all-purpose flour

Skillet Pizza:

(using a 10-inch cast-iron skillet)

3 ounces pizza dough

2 ounces smoked mozzarella, grated

1-2 ramps (or scallions) chopped

6 crimini mushrooms, thickly sliced (or Morels!)

a few dollops of ricotta cheese

1 garlic clove, thinly sliced

extra-virgin olive oil

Begin a few days in advance by preparing the pizza dough.  In a gallon-sized ice cream bucket (or anything of that size that has a non-airtight lid) add the heated water, yeast, salt, and olive oil.  Use a Danish dough hook or a wooden spoon to mix everything together.  Then add the flour and give it a really good stir using the hook to really incorporate everything.  You’ll want all of the flour to be wet.  The mixture will look shaggy.  Cover with the lid (I use a nail to poke a tiny hole in the top of mine (this lets the gases escape when it’s refrigerated).  Let it rise at room temperature for two hours.  Do not ever punch this dough down.  Technically, the dough could be used at this point.  But, this particular dough works better when cold.  And tastes a whole lot better after a night or two in the refrigerator.

When ready to make a skillet pizza, remove some dough from the refrigerator and let it warm up for a few minutes, as it is easier to work with.  Dust some flour on the counter and a bit on the dough (don’t be shy with the flour).  Form a ball.  Roll it out to the size of your skillet (if it doesn’t roll easily, just let it rest for a few minutes). Coat the skillet with a bit of olive oil and heat it over medium-high heat.  Shake off any excess flour from the pizza dough and place it in the skillet.  Cook for 1-2 minutes, then flip it, adding more olive oil if necessary.  The olive oil gives the crust a nice crunch to it.  Immediately place the sliced garlic clove, a heavy drizzle of olive oil, ramps, ricotta cheese, mushroom, and smoked mozzarella on top of the pizza.  Cover with a lid (to help it melt) and cook for about 5 more minutes, or until the crust is a deep golden brown.  Then remove it from the stove and place it directly under the broiler (no lid) for a few minutes until the cheese is your desired color.  Move the pan around, if necessary.  Remove from the oven, drizzle with olive oil and a sprinkle of good sea salt.  Enjoy!

Pizza Dough adapted from Artisan Pizza and Flatbread in Five Minutes a Day

Thanks for stopping by Relishing It!

Laurie


Read Full Post »

Pincho Moruno (Adobo Marinated Chicken Kabobs) | Relishing It

Pincho Moruno.  That’s a fancy title, no?  Don’t be intimidated– this incredible dish is basically a kabob-like stick made of meat.  And since it’s grilling season, these spiced chicken thighs are a perfect addition to your barbecue rotation.  The recipe comes from this beautiful book by Jeffrey Weiss. It’s titled Charcutería: The Soul of Spain and it is a stunning, mouthwatering read. Jeffery is a professional chef with fifteen years under his belt. He is one of only a few Americans to win the ICEX culinary scholarship that allowed him to live in Spain and learn its regional cuisines, as well as to cook with some of Spain’s top chefs. From that experience comes this amazing cookbook.

Pincho Moruno (Adobo Marinated Chicken Kabobs) | Relishing It

After paging through it, I immediately knew what I wanted to make. I couldn’t stop thinking about the Pincho Moruno. I love to make kabobs in summer. Sometimes I marinate the meat, sometimes I don’t. This recipe includes a marinade so delicious you’ll want to make it over and over again. At first glance, you may think there are too many steps and the list of ingredients is too lengthy. But trust me, the steps are relatively quick– basically mixing dry spices together. And all of the spices listed were ones I already had in my spice cabinet. In fact, the only thing I didn’t have for this recipe was the chicken thighs– I’m guessing you’ll have most everything, too.

Pincho Moruno (Adobo Marinated Chicken Kabobs) | Relishing It

Pincho Moruno (Adobo Marinated Chicken Kabobs) | Relishing It

Pincho Moruno (Adobo Marinated Chicken Kabobs) | Relishing It Pincho Moruno (Adobo Marinated Chicken Kabobs) | Relishing It

Pincho Moruno (Adobo Marinated Chicken Kabobs) | Relishing It

The adobo sauce is the real star here.  I’ve always been a fan of adobo, but this was my first foray into making a homemade version.  It was far easier than I anticipated, and the flavor is, well, incredible.  The spices paired with the sherry vinegar, garlic, and olive oil are perfection.  You’ll want to invite friends over to show this one off– trust me.

Pincho Moruno (Adobo Marinated Chicken Kabobs) | Relishing It

Pincho Moruno (Adobo Marinated Chicken Kabobs) | Relishing It

The Recipe: Pincho Moruno (Adobo Marinated Chicken Kabobs)

About 2 pounds of boneless, skinless chicken thighs, cut into bite-sized pieces (pork tenderloin, lamb shoulder, pork belly, chicken or beef hearts are also options)

1 medium yellow onion, julienned

1/4 cup extra-virgin olive oil

2 tablespoons sherry vinegar

kosher salt, to taste

1 recipe Basic Adobo

4 tablespoons Moruno Spice

Basic Adobo:

5 cloves garlic, crushed

1 tablespoon kosher salt

1 tablespoon dried oregano

2 tablespoons pimentón dulce (sweet paprika)

1/4 cup extra-virgin olive oil

1/4 cup sherry vinegar

1/4 cup water

Moruno Spice: 

2 tablespoons cumin seeds

1 tablespoon coriander seeds

1 tablespoon fennel seeds

1 tablespoon black peppercorns

pinch of saffron threads

1 tablespoon dried oregano

1 tablespoon dried thyme

1 tablespoon pimentón dulce (sweet paprika)

1 tablespoon freshly ground black pepper

1 1/2 teaspoons ground turmeric

Begin by making the Basic Adobo.  In a food processor, or by hand, mix all of the ingredients together until it forms a bright red paste.  Use immediately, or store in the refrigerator for up to 7 days.

Next, mix together the Moruno Spice.  In a small dry skillet toast the cumin, coriander, and fennel seeds; peppercorns; and saffron threads for about 2-3 minutes, or until fragrant and toasted.  Use a mortar and pestle or spice mill to grind the spices into a fine powder.  Transfer to a small mixing bowl, and add the oregano, thyme, pimentón dulce, black pepper, and turmeric.  Stir and set aside.  (Note: This mixture will make a bit more than you will need for this recipe.  Leftovers can be stored in an airtight container for up to 6 months.)

In a large bowl, combine the Basic Adobo, 4 tablespoons of Moruno Spice, olive oil, sherry vinegar, and yellow onion together.  Season with salt to your taste.  Add the chicken and mix to coat evenly.  Cover and refrigerate between 4-24 hours.  Slip the chicken onto skewers when ready to grill.  If using wooden skewers, remember to soak them in water for 20 minutes beforehand.  Sprinkle with salt and pepper and cook to your desired doneness.  Enjoy!

Recipe adapted from Jeffrey Weiss’ Charcuteria: The Soul of Spain

Thanks for visiting Relishing It today!

Laurie


Read Full Post »

Older Posts »

%d bloggers like this: