Feeds:
Posts
Comments

Posts Tagged ‘Eggs’

Curried Egg Salad via Relishing It

Last week, my little blog turned two.  It’s been a wonderful and busy couple of years.  I’ve made some incredible friends, both in real life and social media, that I would never have met had I decided not to try my hand at this blogging thing.  My children have grown– and no longer need quite as much minute-to-minute attention– which makes it a bit easier to do this sort of thing.  I guess I’ve also learned to better balance blogging along with taking care of my family.

That first year it felt like preparing, photographing, and writing consumed so much of my time.  I’m more efficient now, less focused on getting that perfect photo.  And while I still have a lot to learn, I realize that I’m not going to be  Cannelle et Vanille or What Katie Ate.  I adore those blogs, but that’s not why I’m here.  I’m comfortable being Laurie from Relishing It.  I’m here to show you some (hopefully) pretty photos of some (hopefully) healthy, tasty food, along with a few sweet indulgences.  I’m here to share ideas and thoughts about balanced eating and sustainable food production that can turn into conversations.  For me, food is more than sustenance.  It’s at the center of every gathering, it’s sharing and comparing cultural upbringings.  Most importantly, food is about taking care of my family.  I want to feed them well and keep them healthy, and I honestly believe that being aware of whether your food contains harmful chemicals, how it’s produced, and where it comes from can do that.  So, to you readers and friends that keep coming back to my little corner of the internet every week, I thank you.

Curried Egg Salad via Relishing It

Sweet Curry Powder via Relishing It

Now onto one of my favorite little dishes– egg salad!  I could eat egg salad every day of the year.  I’m serious.  This avocado egg salad is still the most popular post on Relishing It– by a long shot.  So today I figure it’s time to share an egg salad recipe that I actually like even a little bit more than that one.  This one relies on sweet curry powder and coconut milk for it’s primary flavors (it’s mayonnaise-free).  Those two ingredients combine to give this egg salad a wonderful, though not overpowering flavor.  And the cilantro, red onion, and garlic add a little freshness and complexity.  It’s simple and divine.

Curried Egg Salad via Relishing It

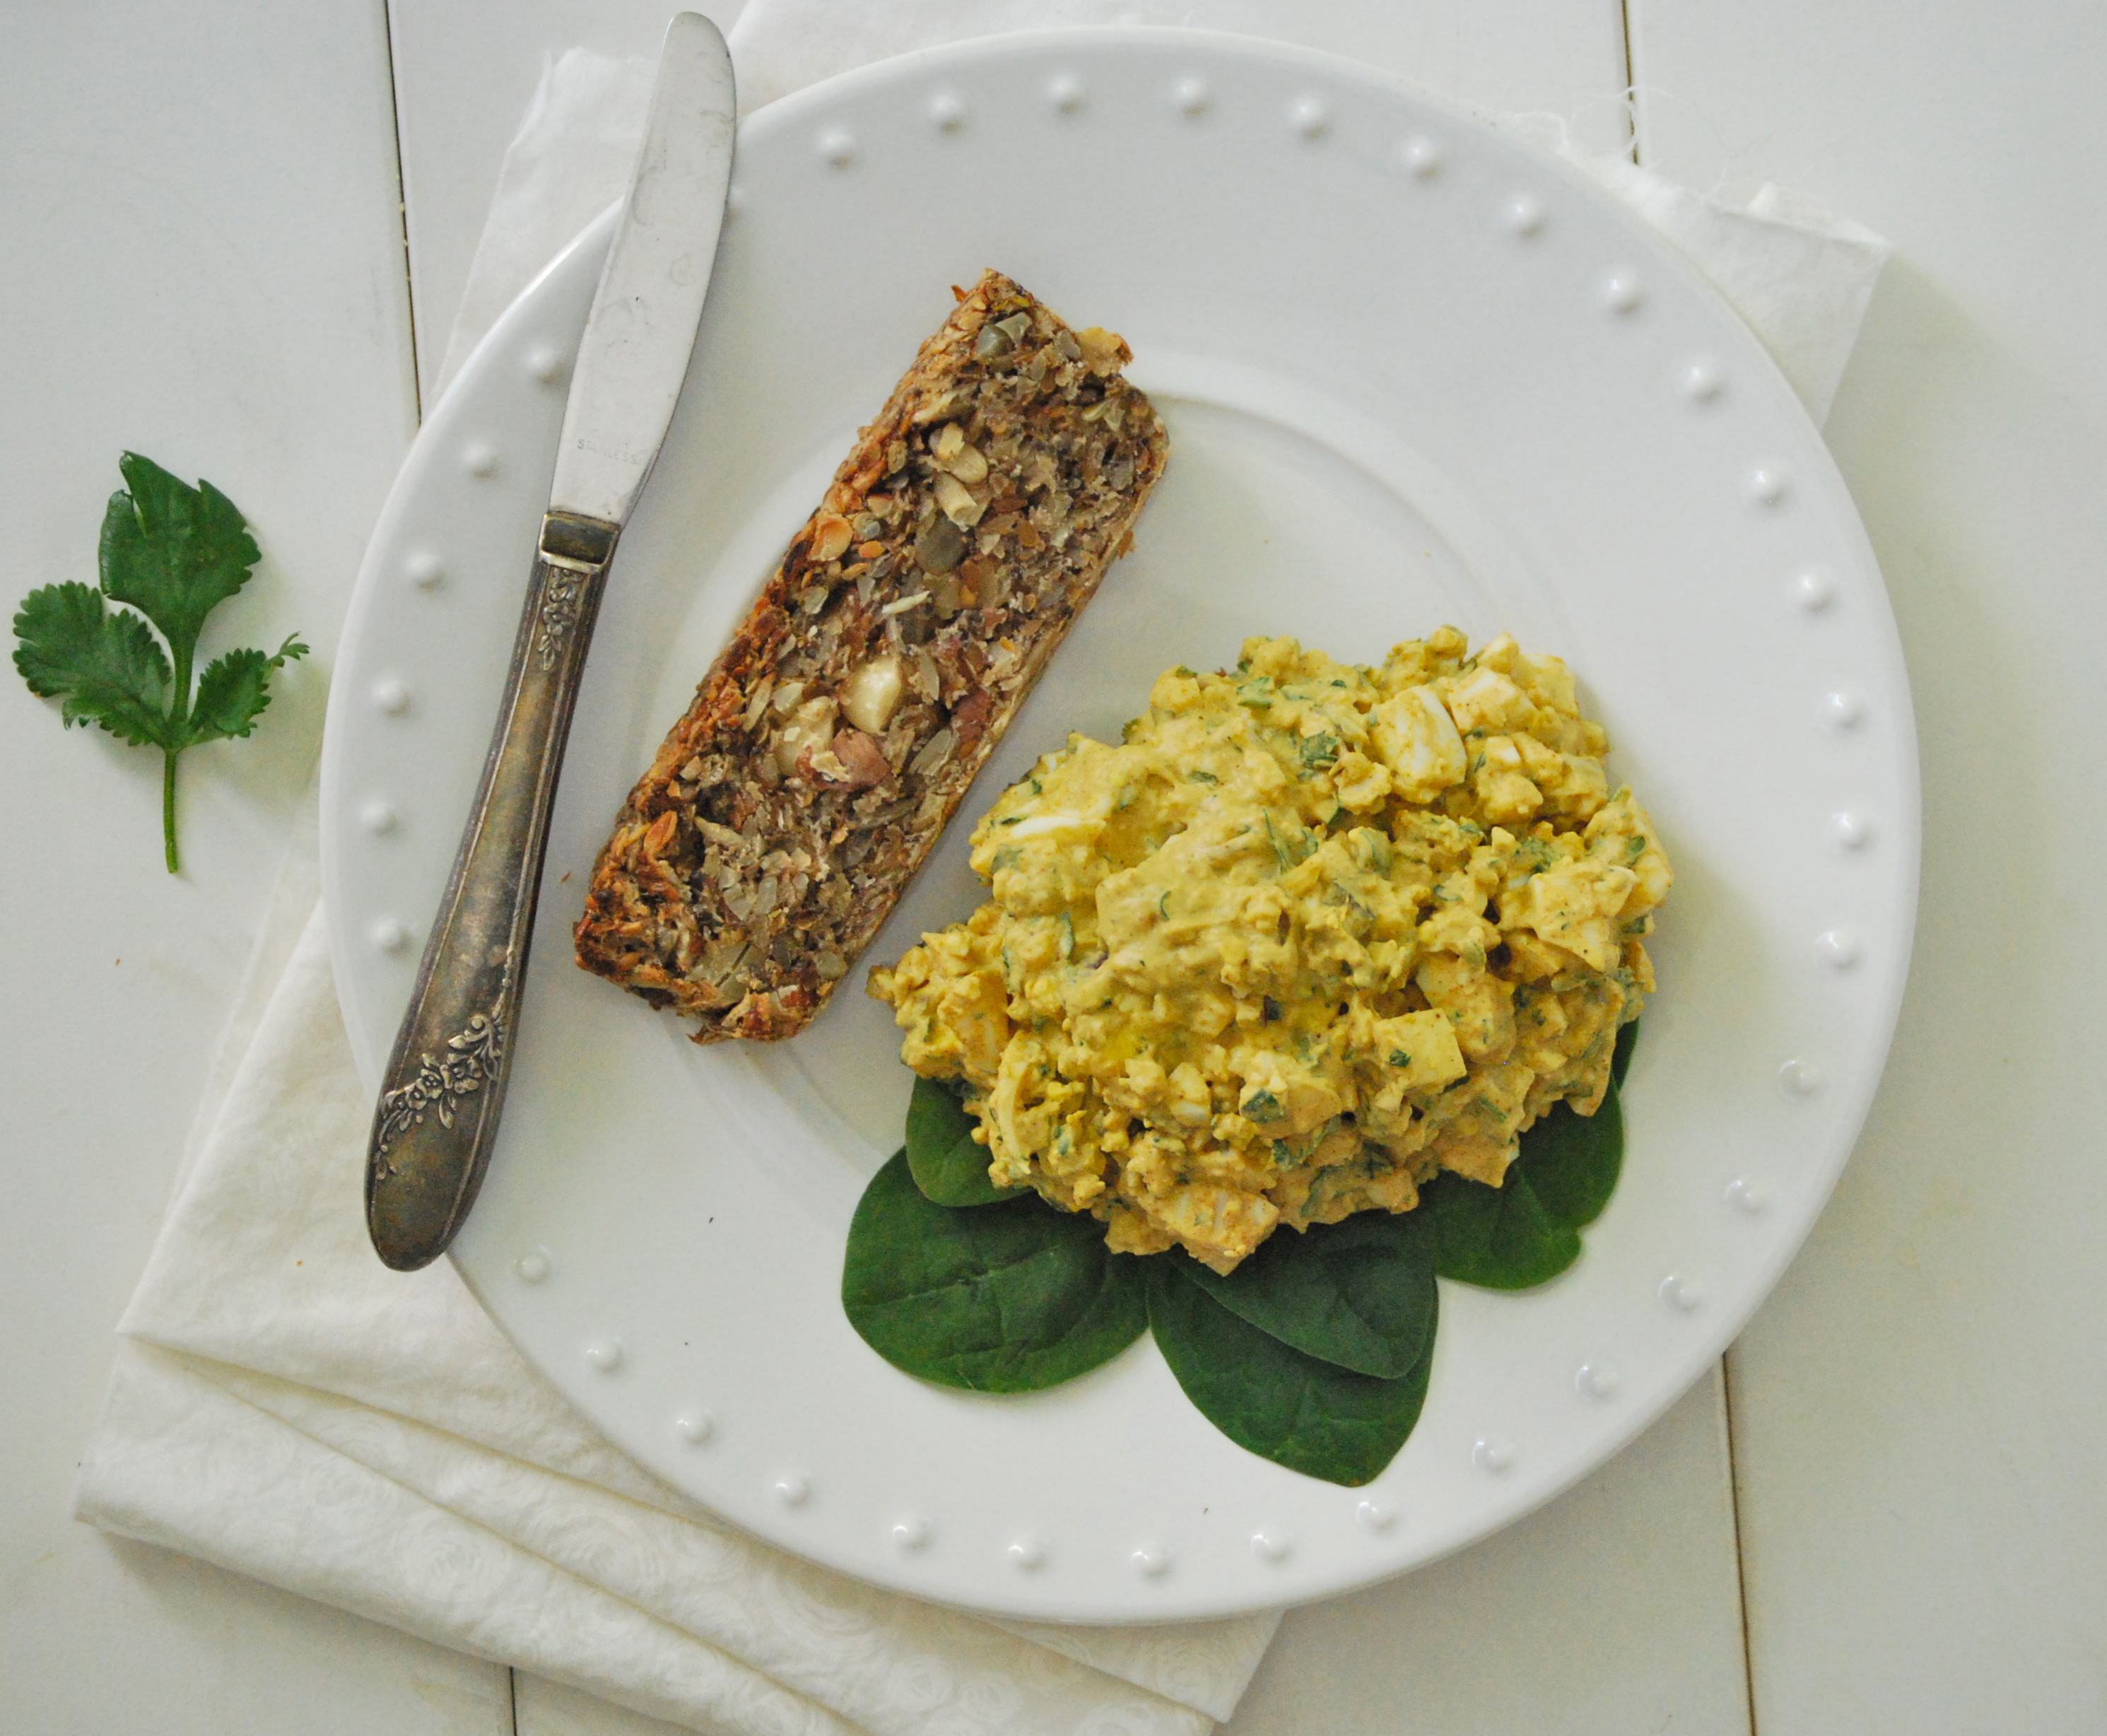
You may have noticed that the bread in these photos is…different.  Interested?  It’s actually a wonderful, hearty, gluten-free loaf that is full of healthy, delicious ingredients.  You can find the recipe at the My New Roots blog for Life Changing Loaf of Bread.  I love it with this– or any– egg salad.  I like to make a loaf and wrap the sliced leftovers in the freezer.  They are perfect when toasted.  Even if you’re not gluten-intolerant it’s worth giving it a try.  Enjoy!

Curried Egg Salad via Relishing It

The Recipe:  Curried Egg Salad 

(Serves 1)

2 hard-boiled eggs, peeled and chopped

1 tablespoon minced red onion

1 garlic clove, minced

1 tablespoon minced cilantro

1 teaspoon sweet curry powder

3 tablespoons coconut milk, (canned version)

1/4 teaspoon kosher salt

In a bowl, add the chopped eggs.  Using a fork, mash about 1/3 of them.  Add the rest of ingredients and gently mix together.  Cover and let sit in the refrigerator for about 20 minutes so the flavors can meld, or eat right away if you’re impatient like myself.  Enjoy!

Note:  Store your leftover coconut milk in a canning jar in the refrigerator– you will be amazed at how many wonderful things you can find to use it in!

Thanks for stopping by– have a great weekend!

xo

Laurie

Read Full Post »

A quick stroll through my dessert and cookie sections pretty much confirms that I have an insatiable sweet tooth.  Even so, when we go to our near-by patisserie, I choose a savory bite almost every time.  And if they’ve made a savory tartlet, my decision is easy.  Thankfully, I now have a recipe to make these little beauties at home– and this is one of the best tartlets I’ve ever had.

This wonderful, firm but flakey crust is made from olive oil rather than butter.  It lends a light floral, almost earthy, quality to the dish. Even though it is not par-baked, the crust becomes perfectly crispy on the outside, yet is still substantial enough to hold up to the liquid center.  Even after days in the refrigerator, the crust has an excellent texture.  And you know what that means– this is a great dish to make ahead of time.

The savory filling contains ramps, gouda, and goat cheese.  That’s right, it’s ramp season.  Remember last year when I was so excited and made this ramp pesto?  Well, I’m just as excited this year– and Radd is again making fun of the fact that I talk about ramps far too much.  If you don’t recall, or are unfamiliar with them, ramps are basically a wild leek.  They taste a bit like green onions combined with garlic.  If you find them, buy and enjoy them right away.  They’re not in season for long.  If you can’t find ramps, substitute green onions or leeks with a couple cloves of garlic.  It will still taste amazing.  I love the combination of ramps and goat cheese, and in this dish it really shines.  The goat cheese is soft and pillowy as you bite into the tartlet, while the gouda melts into the creamy center.  Enjoy!

The Recipe:  Ramp and Goat Cheese Tartlets

(Makes six 4-inch tarts or one 9 – 10-inch tart)

For the Savory Tart Dough:

3/4 cup all-purpose flour

1/2 cup white whole wheat flour

1/2 teaspoon kosher salt

1/2 teaspoon granulated sugar

2 large eggs, lightly beaten

1/4 cup olive oil

For the Tart Filling:

about 1  1/4 ounces goat cheese, crumbled

about 1  1/2 ounces gouda, grated

3 ramps, chopped (about 1/4 cup plus 1 tablespoon)

4 eggs

1/4 cup heavy whipping cream

kosher salt and black pepper, to taste

To make the Savory Tart Dough:  Place both flours, salt, and sugar in a food processor and pulse a few times to combine.  Add the eggs and olive oil and pulse about 10-15 times until the dough forms a ball.  Remove dough and place on a lightly floured work surface.  Knead  3-4 times, careful not to over work the dough.  Wrap in plastic wrap and place in the refrigerator for at least 1 hour.   Can be made ahead and kept in the refrigerator for up to 2 days or frozen.  The dough will defrost quickly at room temperature when you are ready to use it.

Preheat oven to 400°F.  Position rack in the center of the oven.  If making tartlets, measure out the dough into 6 equal portions, about 1  7/8 ounces each.  Roll the dough in a circle 1-inch larger than the tartlet pan or just press the dough evenly into the pans.  Distribute the goat cheese, gouda, and ramps evenly between the 6 pans.  In a small bowl, combine the eggs and cream and pour over each of the tarts, careful not to over fill them.

Place tartlets on a baking sheet and put into the oven.  Bake for about 35 minutes, or until the crust is a deep golden brown and the filling is puffed and becoming golden brown, as well.  Serve the tartlets warm or at room temperature.  They keep well for about 3 days in a covered container in the refrigerator and can be reheated in a 350°F oven.  Serve with a dollop of creme fraiche, if desired. Enjoy!

Source:  Olive Oil Crust adapted from Nick Malgieri’s How to Bake

Thanks for stopping by!

Laurie

Read Full Post »

My favorite meal of the day?  Easy.  Breakfast.  I don’t recall if I’ve mentioned that before, but it’s worth repeating.  Going out for breakfast is– hands down–the best part of the day.  The morning is full of potential.  Full of promise.  Now my family may ridicule me and my Saturday morning “Time to get up and rock and roll!” mantra, but it’s the weekend and I’m ready to get out the door.  I have coffee shops to get to and patisseries to explore.  But–and I know I’ve mentioned this–the boys (Radd and Aanen) are incorrigible homebodies.  So Aria and I compromise on occassion.  And those weekend mornings that we stay home are pretty great too.  Especially when the breakfast is as delicious as this one.

You are looking at the amazing combination of chorizo sausage, fire-roasted tomatoes, smoked paprika, and poached eggs.  And yes, it tastes as wonderful as it looks.  I love this breakfast dish.  I love the tongue-tingling spice from the chorizo, the acidity of the fire-roasted tomatoes, the smoky complexity of the spices, and of course, those fantastic eggs.  Throw a dollop of harissa on top, and you have a show-stopper for breakfast or brunch.  This one has personality, in spades.

A few pointers on the ingredients:  if you don’t have all of the spices listed, don’t worry.  Use the ones from the recipe that you do have. However…I think you really will want to track down the smoked paprika.  It’s one of the keys to making this dish so tasty.  And, you will use it a lot more than you think in other recipes.  It’s that good.  For the meat, I used ground chorizo sausage.  I’m fortunate enough to live just a few blocks from an excellent co-op, and just a few miles from a year-round farmers’ market.  Both have vast selections of locally produced meats.  The chorizo I use is wonderfully spiced and perfectly salty.  I didn’t add one fleck of salt here.  If you can’t find ground chorizo, just use whatever type you can find.  Cut it into small pieces.  Like the smoked paprika, this dish relies on the unique flavors that it provides.

The Recipe: Chorizo and Fire-Roasted Tomato Ragout with Poached Eggs

(serves 4)

1 tablespoon olive oil

1 pound ground chorizo

1/4 of a large white onion, chopped

2 cloves of garlic, minced

1 tablespoon smoked paprika

1/4 teaspoon EACH of ground ginger, ground allspice, ground coriander, ground turmeric, and ground cinnamon

2 cans of fire-roasted tomatoes (preferably Muir Glen Organic)

6-8 large eggs (depending upon how many you want)

1/4 cup chopped cilantro

2 tablespoons harissa, optional

In a large skillet, heat the olive oil over medium heat.  Add the chorizo and cook a few minutes until cooked through; drain the grease.  Add the onion and garlic to the pan of chorizo and sauté for 2-3 more minutes until softened.

Lower the heat and add all of the spices: smoked paprika, ginger, allspice, coriander, turmeric, and cinnamon.  Let them toast for about 30 seconds.  Add the tomatoes.  Turn the heat up to medium and cook until the mixture has thickened slightly, about 5 minutes.

Gently crack the eggs on top of the mixture, cover, and cook until the whites are set, but the yolk are still soft.  Sprinkle with cilantro and a drizzle of harissa before serving.  Enjoy with some crusty bread!

Adapted from a recipe by Food Blogger/Chef Emily C. Swantner of Epicurean Odyssey  via The Food 52 Cookbook by Amanda Hesser and Merril Stubbs

Hope you all have a lovely weekend!

Laurie

Join me on Twitter

Read Full Post »

Gougères

New Years Eve!  It’s that time of year when I get ready to open a bottle of champagne, nuzzle into a warm blanket with my hubby by the  fireplace, and watch people on television shiver in Times Square.  What?  Alright, I admit that we used to go out and tear it up, but for the last several years I’ve preferred the comfort of home and family to fighting the crowds and weather.  Now that doesn’t mean I don’t enjoy a few nice glasses of bubbly and good food on New Year’s Eve.  Honestly, if I could only choose one alcoholic beverage for the rest of my life, I would choose champagne EVERY TIME.  And every time I drink it, I make these incredible little gougères.

Gougères are little rich, perfect French pastries.  And since they’re French, they’re loaded with butter and cheese.  Basically they are  savory cream puffs.  They are crusty and golden on the outside and tender and eggy on the inside.  Pairing food with wine can be challenging, but matching these gougères with champagne is a no-brainer.  The cheese lends a wonderful saltiness, and the buttery richness of the pastry works so well with a good sparkler.  I’m telling you, the combination is divine.  If you can’t get your hands on a gruyere cheese, a nicely aged white cheddar is a good substitute.

As an added bonus, making them is almost fool-proof.  And it doesn’t take very long from start-to-finish to be nibbling on these little morsels.  Even better, you can make them ahead of time if you’re entertaining.  After the dough is made, drop them by a tablespoon onto a parchment paper lined cookie sheet– no need to space them far apart– and freeze.  Once they are frozen, throw them all into a freezer bag and keep until you’re ready to bake.  Use them directly from the freezer, no need to thaw.  They will require a bit longer to bake this way, but they’re very convenient.  These are wonderful to keep on hand if you happen to want to have a glass at night with your spouse, after your children go to sleep (ahem).

The Recipe: Gougères

(makes about 2 1/2 dozen)

1 stick (8 tablespoons) unsalted butter

1/2 cup whole milk

1/2 cup water

3/4 teaspoon kosher salt

1 cup all-purpose flour

5 larges eggs, at room temperature

1 1/2 cups (6 ounces) coarsely shredded gruyere cheese

Preheat oven to 425°F.  Line a large baking sheet with parchment paper.

In a medium saucepan over high heat, bring the butter, milk, water, and salt to a rapid boil.  Once it is boiling, add the flour all at once and vigorously stir the mixture with a wooden spoon. Lower heat to medium-low.  It should form a ball quite quickly.  Once the ball has formed, continue to “dry out” the mixture for another minute over the heat.  A slight crust should have formed on the bottom of the pan.  Remove dough from heat and let cool for a couple of minutes.

Add the dough to a bowl of a stand mixture fitted with a paddle attachment (or use a wooden spoon).  Begin to add the eggs one by one, being sure to fully incorporate each egg before adding another.  The dough will look as though it has separated, but rest assured that after the last egg is added, it will come together.  Lastly, mix in the shredded cheese.

Using a tablespoon, drop the dough onto the lined baking sheet.  Leaving about 2 inches between each of them.  Bake for about 15 minutes, or until the gougers are firm, beautiful golden brown, and have a wonderful smell to them.  If making them from the freezer, you will need to bake them a bit longer.  Enjoy these beauties warm or at room temperature and most definitely with a glass of champagne.

Source:  Adapted from Dorie Greenspan’s Around My French Table

Thanks for stopping by today — may you all have a safe and wonderful New Year’s!

Laurie

Join me on Twitter

Read Full Post »

I love when I can make a meal entirely out of ingredients that I have on hand.  No trip to the market required.  I love it even more when everything–with the exception of the olive oil and curry powder–is organic and locally-produced.  For today’s post I made this delicious, hearty frittata by raiding only my refrigerator and pantry.  This dish works well as either a breakfast or dinner option.  Even better, its both filling and healthy.

The two major components are vegetables and fresh eggs.  The vegetables can be easily adapted to fit taste– like I did, you can use whatever you have on hand.  I used onions, potatoes, and broccoli, though summer squash or asparagus would make a tasty variation.  Since I  seem to always have ricotta salata cheese on hand, I relied on it as well.  It added a nice creaminess.   Goat cheese or feta can be substituted as well.  Finally, I wanted something a little out-of-the-ordinary, so I turned to curry powder.  The spice added a nice complexity to this dish.  We really enjoyed this simple meal, and I hope you do too.

The Recipe:  Seasonal Frittata

2 tablespoons extra-virgin olive oil,  plus more for drizzling (melted butter would work, too)

1/2 onion, chopped

8 ounces new potatoes, unpeeled, sliced very thin

8 ounces chopped broccoli (or any other seasonal vegetable you prefer)

4-5 green onions, thinly sliced

9-10 large eggs, well beaten

1 tablespoon curry powder

1/4 cup crumbled ricotta salata cheese (or goat or feta)

salt and pepper

Heat the oil in a ovenproof 12-inch skillet (cast-iron worked great) over medium – high heat.  Stir in the onions and potatoes and a big pinch of salt and pepper.  Cover and cook, stirring occasionally, until the potatoes are just cooked.  About 5 minutes.  Stir in the broccoli and green onions and cook for a few more minutes until they are soft and to your liking.    Remove half of the mixture from the pan.

Whisk the eggs together with the curry powder and pour the eggs into the skillet.  Cook over medium-low heat until the eggs are just set and there isn’t much liquid in the pan.  To make sure this happens, run a spatula underneath the perimeter of the frittata and tilt the pan so the undercooked eggs run to the underside.  You want to avoid browning the bottom of the frittata.  Top with the set aside vegetables and sprinkle with the cheese.

Place under a broiler for a couple of minutes, until the top of the frittata is puffed and set and it has a somewhat golden look to it.  Keep a watchful eye, as it can burn quickly.  Remove from the broiler and let rest for a couple of minutes.  Drizzle with olive oil and serve either warm or at room temperature.  Enjoy!

Source:  Adapted fro Heidi Swanson’s Super Natural Every Day

Thanks for stopping by today — see you soon.

Laurie

Follow me on Twitter!

Read Full Post »

I made the long drive across the entire state of North Dakota to my home town yesterday.  It was me, my four-year-old and my two-year-old…in a car…for 8 1/2 hours.  I made the same drive last Summer, also without Radd (who’ll be joining us later this week), and was so proud of myself for having arrived with my little kids and sanity intact that you’d have thought I split the atom.  Fortunately it went well again this year, though was about as fun as you’d expect.  


Since I’m heading back to my roots this week, I thought I’d share a little treasure from my childhood–pickled eggs.  It seems a bit odd to follow up French-style recipes for clafoutis and galettes with ‘pickles-in-a-jar’, but there’s something to be said for comfort food.  I grew up with jars of these treats sitting on our counter.  While pouring over childhood pictures recently, I noticed that there was an egg jar in the background in so many photos.  My Mom made the best pickled eggs– we absolutely loved ’em.

In continuing with my food philosophy, I use high-quality eggs in all of my baking and cooking.  I’m talking about eggs that come from a farm where the chickens roam freely and peck at nutritious food– not the cheap, supermarket eggs that sell for $1 a dozen, as these generally come from perpetually-caged chickens that have never seen daylight.  Yes, organic/cage-free eggs are a bit more expensive, but compared to your other proteins (meat) they are affordable.  Free-range cage-free eggs are not only a great source of protein, but they provide healthy Omega-3’s.  They’re also relatively low in calories.

Through the years, my brother and I have made adjustments to our Mom’s pickled-egg recipe.  We’ve been on a quest to improve upon ‘the best’ by making it a bit spicier.  This is my latest version. Now if you don’t fancy spicy food– you can skip the chili peppers and the red pepper flakes.  My family prefers to eat these eggs with a basket of pretzels, a few drops of Chalupa (or a Louisiana-style) sauce, and a nice cold beer.  Perfect.

The Recipe:  Pickled Eggs

Roughly 2 dozen eggs, hard boiled

1 liter white vinegar

1 jar hot chili peppers and the juice (Mezzetta is my favorite brand for these)

1 white onion, thickly sliced

1 bulb garlic, cloves peeled and left whole

1 teaspoon pickling spice

1 tablespoon peppercorns

To boil the eggs:  Gently place the eggs in a 4 quart sauce pan.  Cover with cold water.  Let cook over medium heat until water begins to boil.  Boil for 1 minute only.  Cover and remove from heat immediately.  Set a timer for 12 minutes.  After that, pour out the hot water and run cold water over the eggs to stop the cooking process.  Let cool completely before peeling.  (Note: older eggs peel more easily than fresh ones)

Once your eggs are cool and peeled, start layering your ingredients into your jar.  This doesn’t have to be precise.  Once the eggs, onions, garlic, hot chili pepper and their juice, peppercorns, and pickling spice are in the jar — you can add the white vinegar.  Make sure you have enough liquid to cover the eggs.  These eggs will start to taste “pickled” in about 3 days, and will keep getting better and hotter the longer they sit.  They can be stored, tightly sealed on your counter.  Enjoy!

Read Full Post »

Cherry Clafoutis

My husband, Radd, and I celebrated our 10 year anniversary this past Fall by taking an unforgettable trip to Portland, OR.  What an incredible city!  One of the many highlights was stumbling upon THE most impressive bookstore I’ve ever set foot in– Powell’s.  We wandered it’s labyrinthine rooms, stairwells, and aisles for hours.   Though I’d heard buzz about Dorie Greenspan’s new book, it was at Powell’s that I first saw– and of course bought– Around My French Table.  It’s one of my favorite cookbooks, so unsurprisingly the plane ride home went far too fast.

This recipe comes from that cookbook.  Cherry Clafoutis– a fancy French name for a very simple dessert.  A clafoutis (cla-foo-tee) is like a cross between a cake and a custard– almost like a flan.  Aside from the cherries, it’s silky and smooth– there’s very little flour, with cream, milk, and eggs as the main ingredients.  The traditional French way to prepare this dessert is to leave the cherries whole (including the pits), cover with the batter, and bake.  Purists believe the pits add a nutty, more intensely complex flavor.  I’ve baked a clafoutis in the traditional method, and yes the flavor was delicious.  Despite this, I’ve decided that the reward wasn’t worth the trouble– especially since I wanted my children to be able to eat the dish without me having to worry about them eating a cherry pit.  To get that “nutty” flavor without the pit, I added a teaspoon of almond extract.

I enjoy making clafoutis because they’re easy, yet different.  No special equipment is required, and the majority of the prep time is in pitting the cherries.  And if you don’t have a cherry pitter, no problem.  Put a cherry on top of a long-necked bottle and poke through the center with a chopstick– or anything else long and slender.  Simple.  Enjoy your clafoutis with powdered sugar alone, or ignore those purists and pile a scoop of vanilla ice cream on top.

The Recipe:  Cherry Clafoutis

1 pound sweet cherries, stemmed and pitted

3 large eggs (room temperature)

1/2 cup sugar

pinch of salt

1 teaspoon pure vanilla extract

1 teaspoon almond extract

1/2 cup all-purpose flour

3/4 cup heavy cream  (room temperature, if possible)

1/2 cup 2% milk  (room temperature, if possible)

Confectioners’ sugar, for dusting

Preheat oven to 350°F and place rack in the center.  Liberally butter a 9-inch deep-dish pie pan (or another baking pan with a 2-quart capacity).

Place the cherries in a single layer into the pie-pan.

Whisk the eggs, in a medium bowl, (note: to get eggs to room temperature more quickly, place them in a bowl of warm water for about 5 minutes) until they’re foamy, then add the sugar and whisk for another minute.  Whisk in the salt and the vanilla and almond extracts.  Add the flour and whisk vigorously  (when adding flour to baked goods, normally you should be gentle — this is an exception) until the batter is smooth.  While still whisking, gradually pour in the milk and cream and whisk until blended.  Tap the bowl on the counter to remove any air bubbles and pour the batter over the cherries.

Bake the clafoutis for 35-45 minutes, or until it’s puffed and lightly browned, and most importantly, a knife inserted into the center comes out clean.  Transfer the clafoutis to a cooling rack and allow it to cool until it’s barely warm, or until it’s room temperature.

Dust with confectioners’ sugar and serve with whipped cream or ice cream.  This dessert is best eaten on the day it is made, however, leftovers should be covered and chilled.  Enjoy!

Source:  Adapted from Dorie Greenspan’s Around My French Table

Thanks so much for stopping by!  Hope you all have a wonderful weekend.

Laurie

Follow me on Twitter!

Read Full Post »

Too soon for another asparagus recipe?  Of course not.  Actually this recipe isn’t really about the asparagus, though it is beautiful and works well as an accompaniment to the real star– these gorgeous morel mushrooms.  Like asparagus, morels are now in season in Minnesota.  These rather odd looking mushrooms tend to grow in moist conditions and are often found around dying or dead Elm, Sycamore, and Ash trees.  Old apple orchards are another place to hunt for them.  Morels have an unbelievable, almost indescribable flavor.  As you’d expect, it’s very earthy, but there’s some other unique complexity there as well.  I can’t place it, but it is incredible. The texture is firm and meaty– there’s real substance.

I’ve always wanted to be a mushroom forager, but simply haven’t had the time– yet.  From what I can tell, foraging is both a science (separating the poisonous from the edible) and an art (instinct about where and when to hunt.)  There’s also mystery and secretiveness.  Foragers don’t like to share their hunting grounds.  Exciting!  Though perhaps this is more a reflection of my entertainment standards than anything else.

My husband surprised me with a small bag of morels this week.  He saw some at a Farmer’s Market for a better price than I’d found anywhere else.  Here’s the bad news:  morels are expensive.  Remember that “part science/part art” comment above?  There’s a cost for that.  Even so, you shouldn’t let the price deter you because you won’t need many to make a dish shine.  Their powerful flavor is apparent even in small quantities.  For this dish, I borrowed an idea from my friend Matt, who swears that sauteing them in butter is the best way to enjoy morels.  That’s what I did here, and it turned out beautifully.   This is less a ‘recipe’ and more me just combining three separate ingredients.  With morels, keep in simple in order to focus on the flavor of the mushroom.

The Recipe: Morels with Roasted Asparagus and Crispy Fried Eggs

(Serves 2)

1 bunch thin asparagus (ends trimmed, peeled if necessary)

2 tablespoons olive oil

1/4 pound  morel mushrooms

4 tablespoons salted butter

2 free-range eggs

Flour, for coating the mushrooms

salt and freshly cracked pepper

To Prepare the Mushrooms:  Cut the mushrooms in half, lengthwise.  Place in a bowl of cold water with 2 tablespoons of salt.  This will kill any bugs that may be on the mushrooms.  Let them sit for a few hours or overnight.  Rinse with cold water when ready to use and pat dry.  Allow to air dry a bit, if time permits.  (Note:  People are quite divided on the subject of wiping them off with a damp cloth or submerging into water.  Do whatever you want.  This worked for me.)

To Roast the Asparagus:  Pre-heat oven to 400°F.  Place asparagus on a rimmed baking sheet and toss with the olive oil. Sprinkle with salt and pepper.  Roast for 10-12 minutes, or until tender.

Meanwhile:  In a medium-sized skillet, heat the butter.  Lightly coat the mushrooms in the flour.  Place into the hot butter and saute for around 2 minutes on each side, depending upon the size of your mushrooms.  When finished, remove mushrooms and place on a paper towel.

In the same skillet, using the butter the mushrooms were sauteed in, cook the eggs to your liking.  I prefer mine over-easy.

To assemble: Place the roasted asparagus on a plate and put the egg on the top.  Then sprinkle with the crispy mushrooms.  Finish with salt and pepper, if necessary.  Enjoy!

I hope you enjoy the morels as much as I do.  For other inspirational ideas, check out my friend, Amy’s blog, “Green Your Plate”.  Thanks for stopping by today — have a great weekend!

Laurie

Follow me on Twitter!

Read Full Post »

%d bloggers like this: