Feeds:
Posts
Comments

Spiced Ginger Cookies | Relishing It

About once or twice every holiday season, I find myself craving a good ginger cookie.  They taste like Fall, perfectly distilled into a little round treat.  The warm, earthy spices, the bits of heat from the ginger, along with the unique flavor from the molasses are magical.  And since I only eat ginger cookies once or twice a year, I want them to be fantastic– really something special.  This, friends, is that class of ginger cookie.

Spiced Ginger Cookies | Relishing It

Spiced Ginger Cookies | Relishing It

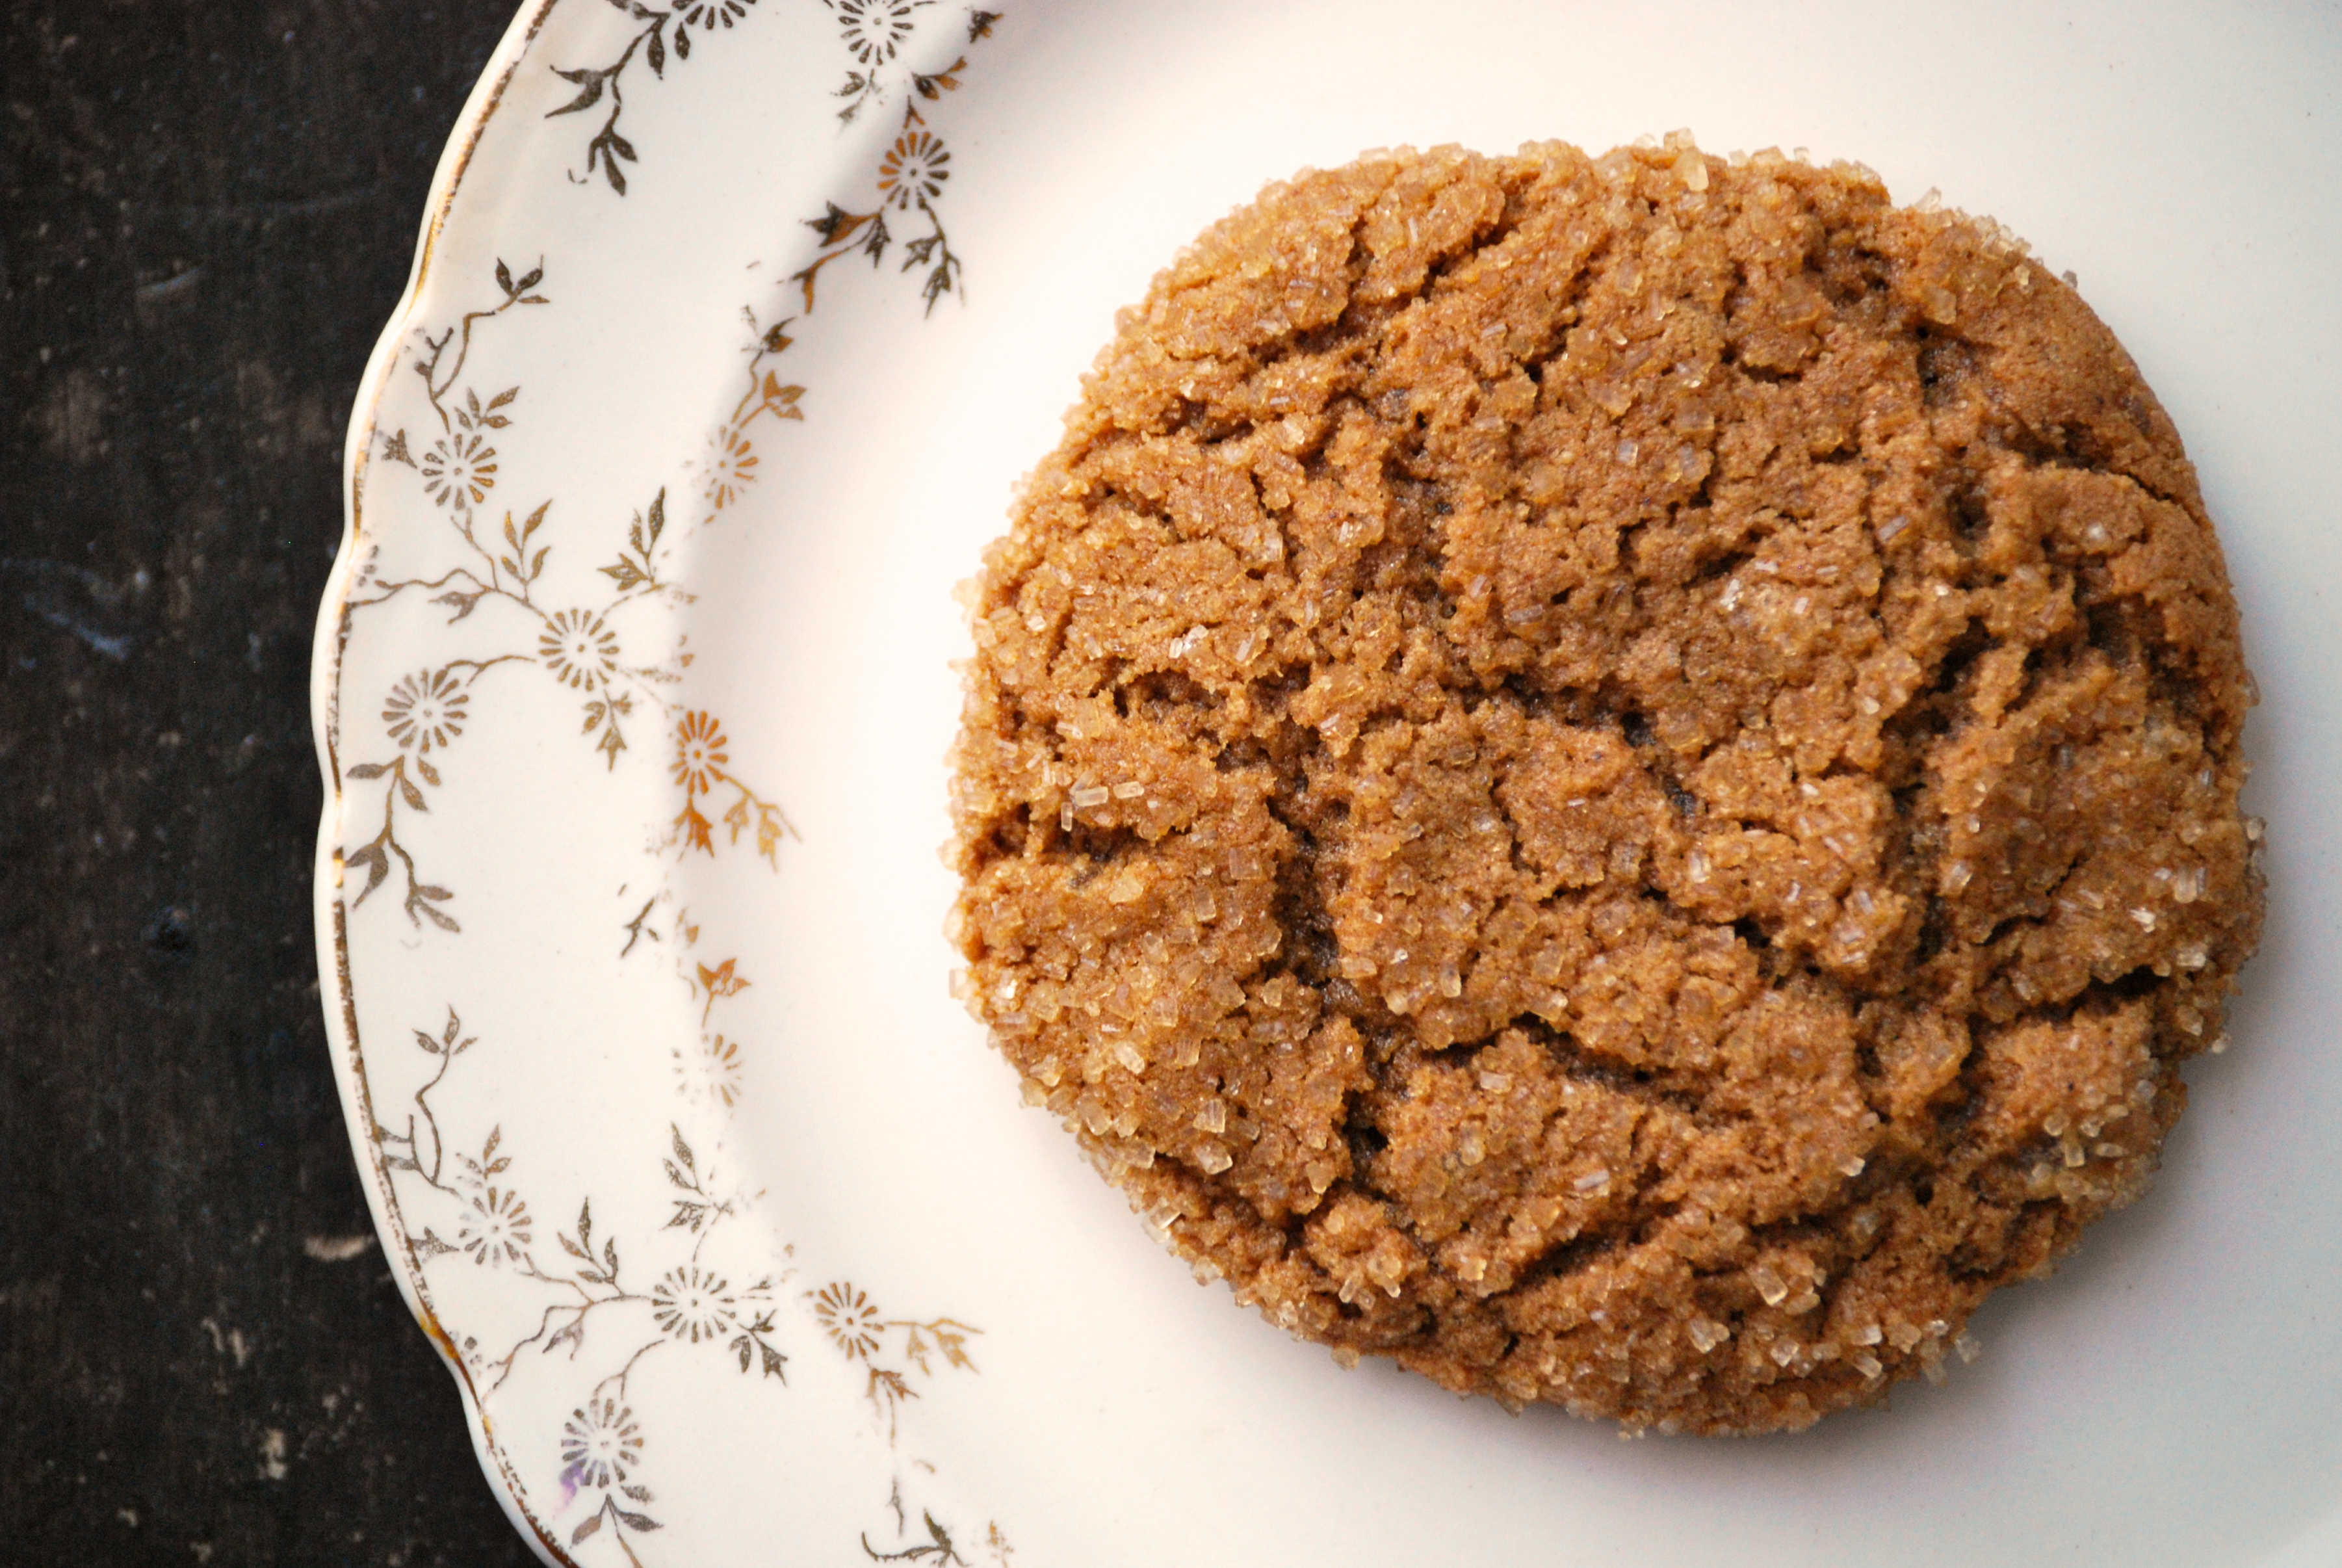
A couple years ago, my friend made these cookies and they blew me away.  The little bits of candied ginger really stood out.  She pointed me to the recipe and I’ve been making them ever since– with my own tweaks, of course.   I actually thought about crafting my own recipe this year, but then realized that there was really not a point.  This is the ginger cookie that I want.  It’s perfectly crisp on the outside, wonderfully chewy on the inside.  It’s spice combination is perfect, and there is  just enough molasses to bring it all together without being overpowering.  I love this ginger cookie.  And it’s even better rolled in  demerara or turbinado  sugar.  The extra crunch from the large granules is key.  Also, try it with a light sprinkle of sea salt on the very top.  Amazing.  And there’s an added bonus– these keep a bit longer than an average cookie, so making them ahead for gift-giving or cookie exchanges is a great option.  I hope you enjoy these cookies this holiday season!

Spiced Ginger Cookies | Relishing It

The Recipe: Spiced Ginger Cookies

(makes about 30)

2 cups white whole wheat flour

2 1/2 teaspoons ground ginger

2 teaspoons baking soda

1 teaspoon ground cinnamon

1 teaspoon ground cloves

1 teaspoon kosher salt

3/4 cup crystallized ginger, chopped finely

1 cup packed brown sugar

3/4 cup unsalted butter (1 1/2 sticks)

1 large egg (at room temperature)

1/4 cup mild-flavored molasses

Some sort of raw sugar for rolling, Turbinado or Demerara work well

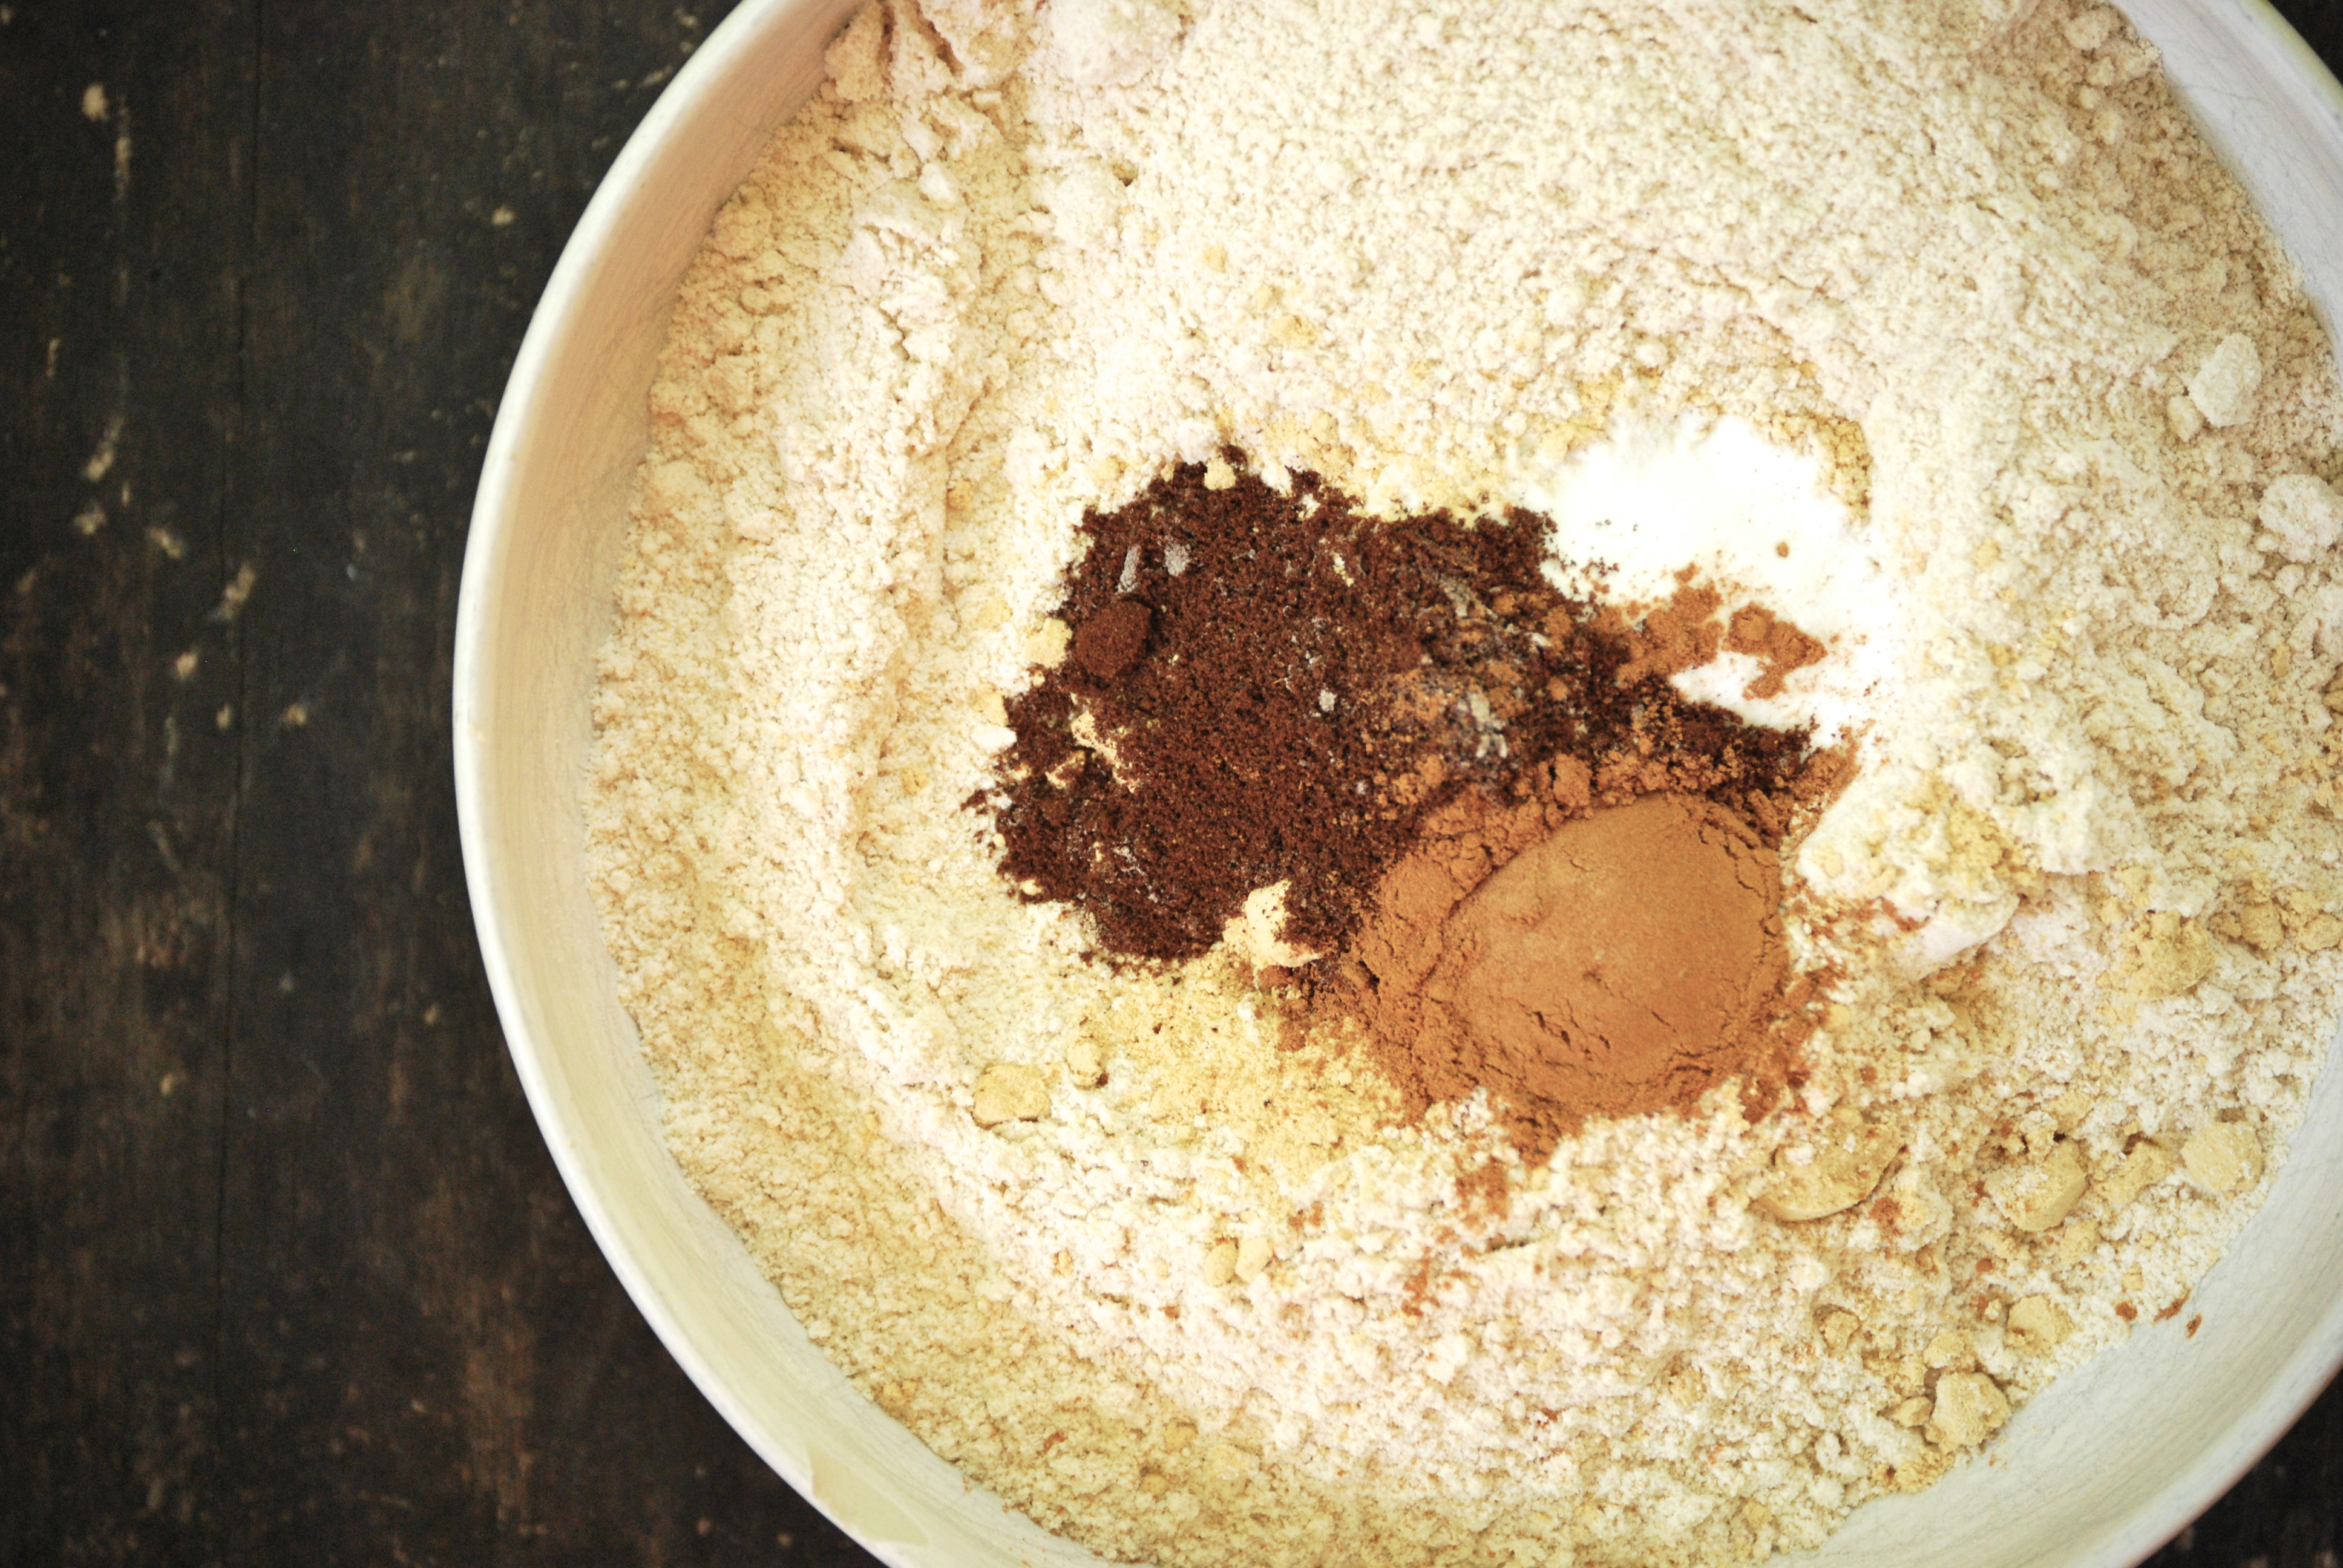
Whisk together the flour, ground ginger, baking soda, cinnamon, ground cloves, and salt in a medium-sized bowl.  Next, sift them together.  This will get rid of any lumps that ground spices sometimes form.  Stir in the crystallized ginger.  Set aside.

In a bowl of a stand mixer fitted with a paddle attachment (or by hand), cream the butter and brown sugar together for about 3 minutes on medium speed or until light and fluffy.  Next, add the egg and molasses to the mixture and continue to mix on medium speed for another 2-3 minutes.  It is integral in any cookie recipe to cream the butter,sugar, and egg together long enough.

Add the dry ingredients to the bowl and mix until just fully incorporated.  Cover the bowl with plastic wrap and refrigerate for 1 hour.

Meanwhile, preheat your oven to 350°F.  Line a baking sheet with parchment paper.  When the dough is chilled, roll it out into balls  ( I used a 1 1/2 tablespoon scoop) and roll them into the raw sugar.  Press down slightly ( but not too much) to flatten them a bit– or else they’ll end up being fairly puffy cookies.  Bake for 12 minutes.  Remove from oven and let cool for 2 minutes on the pan, then move to a cooling rack.  They keep  well for days in an airtight container.  Enjoy!

Source:  Adapted from Bon Appetit Magazine

Thanks for stopping by Relishing It!  Have a great weekend.

Laurie

Vegetarian Lentil Taco Soup | Relishing ItBaby, it’s cold outside!  Or at least it is here in Minnesota.  There is definitely that ‘winter-is-coming’ chill in the air.  And this is just the start.  Wind chills will eventually plummet to -50 degrees F, snow will pile up on the sidewalks.  Ugh.  I always complain as autumn comes to a close, knowing that we face the long slog to April.  My body just isn’t acclimated to the cold for the first month or so.  Ah well, I guess there’s also the comforting expectation of snuggling into a warm blanket and a good book while the kids head out to play in the snow.  There is that to look forward to…

Homemade Taco Seasoning | Relishing It

Homemade Taco Seasoning | Relishing It

Vegetarian Lenti; Taco Soup | Relishing It

As soon as the weather turns, I start thinking about soup.  This particular one is a beauty.  It’s substantial– more like a cross between a soup and a stew.  It’s loaded with healthy protein from lentils and beans, though my favorite ingredient this time around is most definitely the corn.  It makes so many soups better.  It adds a nice flavor and a bit of texture, as well.  Not to mention, it pairs beautifully with the Mexican flavors.

Vegetarian Lentil Taco Soup | Relishing It

Let’s talk about those flavors, shall we?  Years ago I began making my own taco mix.  To be honest, it happened a bit by accident.  I ran out of my usual purchased taco seasoning, so I had to improvise.  Luckily, I keep a well stocked spice cabinet (Penzys really should send me a thank you note).  In looking at the recipe, don’t let the length of the list scare you.  I realize that not everyone has all of the spices on hand.  As long as you have the main ones (chili, paprika, garlic, onion, and cumin powder), you will be just fine.  But, if you do happen to have the others, even better.  Try this seasoning the next time you make traditional tacos– you’ll love it!

Vegetarian Lentil Taco Soup | Relishing ItThe soup is wonderful served with the usual taco accompaniments– sour cream, cilantro, jalapeños, and of course some tortilla chips. However, I also discovered another way that I like to eat the leftovers.  Since the legumes continue to soak up more broth overnight, the soup becomes a bit thicker.  I love to serve it atop baked spaghetti squash.  It’s delicious and makes a great gluten-free, paleo, and even vegan meal! So– perfect to serve to friends or family that might be trying to eat that particular way.  Stay warm, friends!

Vegetarian Lentil Taco Soup Over Spaghetti Squash | Relishing It

The Recipe: Vegetarian Lentil Taco Soup

(serves 4-6 comfortably)

2 cups dry brown lentils, rinsed

2/3 cup dry red beans (or 1 can), rinsed

2/3 cup dry black beans (or 1 can), rinsed

2 tablespoons olive oil

1/2 cup chopped white onion

3 garlic cloves, minced

1 quart puréed or crushed tomatoes

1 quart vegetable broth (or use chicken, if you’re not trying to stay vegetarian)

1 heaping cup frozen corn

1/2 cup chopped fresh cilantro

juice of one lime

scallions, jalapeños, sour cream (if vegan isn’t your aim) and limes as garnish options

For the Taco Seasoning:

(makes a scant 1/2 cup)

2 tablespoons ancho chili powder

1 tablespoon ground cumin

1 teaspoon sweet paprika

1 teaspoon garlic powder

1 teaspoon onion powder

2 teaspoons kosher salt

2 teaspoons coarse black pepper

1/2 teaspoon crushed red pepper flakes

1/2 teaspoon dried oregano

1/4 teaspoon smoked paprika

1/4 teaspoon ground allspice

To begin: soak and cook your red and black beans separately following standard directions to cook beans.  Honestly, I usually have extras in my freezer that I pull out to throw into this soup.  Beans freeze incredibly well, so feel free to make extras for that purpose. You’ll want about 1 1/2 cups of cooked red beans, and 1 1/2 cups of cooked black beans.  Or simple choose to use one can of each, rinsed.

Mix all of the taco seasoning ingredients together in small bowl, set aside.

Heat a large Dutch oven over medium-high heat and add the olive oil.   Begin to saute the onion and garlic for a couple of minutes until somewhat soft.  Add the taco seasoning to the onion mixture.  Then add the tomatoes, vegetables stock, cooked red and black beans, and the lentils.  Bring to a boil, then reduce heat to a medium simmer.  Cook covered for about 30-40 minutes, or until the lentils are tender, but have not fallen apart.  Stirring a couple of times along the way.  Make sure not to overcook the lentils, or they will turn to mush.  When the soup is done, add the frozen corn, cilantro, and juice of one lime.  Reseason with salt and pepper, if necessary.  Serve with sour cream, cilantro, jalapeños, and more lime.  Enjoy!

Thanks for stopping by Relishing It!

Laurie

Easy Homemade Sauerkraut | Relishing It

I grew up in a small town in western North Dakota settled way-back-when mostly by German immigrants. Not surprisingly, sauerkraut has always been a part of my family’s meals. My grandmothers, aunts, and my mom have always made their own.  I can’t tell you how many times in my childhood I had to trudge down the stairs to the cool basement to retreive another jar of kraut from the shelves packed with canned goods. It was always there– an endless supply. I loved sauerkraut as a kid, and still do. I’m that person who orders it on pizza any chance I get.  My favorite way to eat it is simply really cold, in a bowl.  I like my sauerkraut to have a lot of crunch to it.

Easy Homemade Sauerkraut | Relishing It

I don’t exactly make my sauerkraut the same way the rest of my family does.  My version tastes the same– I’ve nailed down the technique that gives that deliciously tangy and crunchy sauerkraut.  But, I don’t can my batches. There are so many good, healthy things happening when you ferment food, that I just can’t bring myself to ruin those benefits by heating it up too much. Instead, I make small batches and let it ferment for a few weeks at room temperature, and then refrigerate.  If you’re not familiar with fermentation and the health benefits, be sure to look into it.

Easy Homemade Sauerkraut | Relishing It

I’ve made saurkraut in a traditional crock in th past, which though seemingly fun, didn’t give me the results I was looking for. I loved the idea of the crock sitting out and fermenting for all to smell and see, but there was no crunch when it was all said and done. I’ll find another use for that crock, though.

Easy Homemade Sauerkraut | Relishing It

Easy Homemade Sauerkraut | Relishing It

I’ve found that my sauerkraut turns out precisely how I want it when I pack it into mason jars and let it ferment on the counter for a couple of weeks.  It becomes deliciously tangy and stays crisp and crunchy.  Every few days in the beginning of the fermentation process, I’ll open the jar to release some of the gas.  It doesn’t take long for the cabbage to take on that tell-tale sauerkraut scent.  The first time or two that you do this, there will be quite a lot of bubbles and fizzing action.  Exciting! After about 2-3 weeks of sitting out at room temperature, I test it out and when it’s the perfect tanginess– I put it in the refrigerator, ready to eat. Then I start another batch, and the process just rolls along. I always have fresh sauerkraut to use in my favorite dishes, such as this Rustic Potato, Sauerkraut, and Beef Galette.  Or mix it into this beautiful Ham, Bean, and Sauerkraut Soup by Fresh Tart.   I hope you give this a try.  It’s ridiculously easy and the rewards are fantastic.

Easy Homemade Sauerkraut | Relishing It

The Recipe:  Easy Homemade Sauerkraut

(makes about 2 quarts)

5 pounds of fresh cabbage, cored and sliced into ribbons (not too thick, not too thin).  Reserve a couple of the large outer leaves to use later.

3 tablespoons kosher or sea salt  (nothing with chemicals, please)

2 sterilized mason jars with lids  (preferably regular mouth jars– the “shoulders” on the sides will keep the cabbage pressed down and submerged in the liquid better)

I’ve  found that if I slice my cabbage too thin, it doesn’t have the crunch that I’m looking for.  Too thick, and it’s awkward to chew.  Using a chef’s knife works the best for me.  Slice it into not-too-thin, but not-too-thick ribbons (use your best judgement and refer to the photos).

Place the sliced cabbage in a huge bowl and sprinkle with salt.  Use a masher, if you have one,  to mix the salt and cabbage together.  Bruising the cabbage a bit with the masher with soften the cabbage up and release some of the water from it.  Inevitably, I turn to my hands and massage the cabbage and salt together.  Let it sit for about an hour, or so.   Keep massaging it a couple of times throughout that hour, or place a plate directly on top of the cabbage and something heavy on the plate to weigh it down.  The pressure will release the water faster.  There should be a pool of liquid that has formed.  Pack it into the mason jars and push down– the liquid should come above the cabbage.  Next, fold the extra cabbage leaf and place on top of the cabbage.  This will push your cabbage down so it remains in the liquid to ferment.  Put the cover on the jar and wait.  After a day or two, open the jar and let the gas out.  There will be a lot of bubbles and fizzing action.  This is good!  It’s beginning to ferment.  Check it again every couple of days.  Occasionally, mold may form on top of the cabbage.  This is fine and normal.   Just scoop it out and continue to ferment.  I’ve found that mold occurs more often when using the crock method, as opposed to mason jars.

 After about 2-3 weeks (depending upon how tangy you like your sauerkraut), remove the cabbage leaf and place the jar in the refrigerator to use.  I’m not exactly sure how long it will last in the refrigerator, as we always use ours before it’s even a question.  It should be fine for a few weeks, possibly a couple months.  Enjoy!

Thanks for stopping by Relishing It!

Laurie

Roasted Potatoes with a Curry Dipping Sauce | Relishing It

Sometimes you make mistakes.  Sometimes, you have to admit when you’ve simply been wrong.  Now don’t get too excited– this isn’t some juicy confession.  I’m talking about my misguided idea that potatoes should be avoided.  That they aren’t “good for you.”  I ate them sparingly for years, but then it occured to me, they’re a whole food.  Nature makes them all on it’s own.  Come on!  They’re potatoes.  Why did I think this was a bad thing?  Yes, they’re a carbohydrate, but I’m cool with that.  I need carbs in this body.  They give me energy.  I know I shouldn’t go crazy and pile starches onto my plate every meal, but, the same can be said about almost every food.  Well, maybe not broccoli…or kale…but you get the point.

Roasted Potatoes with a Curry Dipping Sauce | Relishing It

I’m glad I’ve rediscovered my love of potatoes.  I’ve probably mentioned here in the past that my Mom has always had an amazing garden.  When I was a little girl, we lived on a farm where there was plenty of space for her to grow almost anything.  Even so, rather than restrict them to the garden, the potatoes had a special HUGE section in a field near the house.  My grandparents would come over and we’d have potato-planting parties out in that field.  True story.  My favorite part was when, after a few months, we’d all head back out to the field and dig ’em up.  I can still see my Dad, with the salt shaker that he’d bring out into the field (seriously), shining up a few potatoes to crunch-away on while we dug.

Crispy roasted potatoes are amazing.  Here I’ve paired them with a delicious coconut curry dipping sauce.  The most important thing to keep in mind when making roasted potatoes is that you simply can’t cut them up and put them in the oven.  You need to cook them a fair amount beforehand.  Some people choose to boil them slightly, I always steam my potatoes.  I find that they don’t get saturated and fall apart this way.  It also keeps them from losing some of their nutrients.  For convenience, you can steam up a big batch of potatoes in the beginning of the week and leave them sit in your fridge– that way they’re ready to use whenever you need them.  You’d be surprised how many ways you can find to use them.

Roasted Potatoes with a Curry Dipping Sauce | Relishing It

The curry sauce here is delicious.  It’s simple and not overly fancy.  You should have most of these ingredients on hand already.  With the crispy potatoes, it makes a brilliant combination.  I hope you give these a try!

The Recipe:  Roasted Potatoes with a Coconut Curry Dipping Sauce

(serves 4)

1 pound small, yellow potatoes

1/3 cup finely chopped white onion

3 garlic cloves, finely minced

1 teaspoon finely minced fresh ginger

1 1/2 tablespoons sweet curry powder (I love Penzys’ version)

1/4 teaspoon ground turmeric

1/4 teaspoon garam masala

pinch of sugar, to taste

1 1/2 cups chicken broth, (1 tablespoon reserved)

1 teaspoon tomato paste

1/2 cup coconut milk

1 tablespoon cornstarch

salt and pepper

fresh cilantro for serving

In a large sauce pan, place a steamer basket (or you can choose to simply boil them) and fill with the potatoes and a bit of water.  Cover with a tight fitting lid and steam until the potatoes are tender when tested.  I steam my small potatoes whole, but if you only have large ones– just cut them up before steaming.  Make sure to not over-steam them, as they will fall apart.  I’m not going to give an exact time, as it will depend upon the size of your potato.  It’s best to just test them.  When they feel as if they’re nearly done.  Remove from heat and let them sit covered for a few minutes to finish cooking and then let cool.  At this point you can either put them in the refrigerator to use at a later time, or continue with the recipe.

Preheat the oven to 450°F.  Quarter the potatoes and place on a large baking sheet that has been coated with a thin layer of olive oil.  Drizzle a bit more olive oil on top of them and toss.  Sprinkle with salt and pepper.  Keep in mind that potatoes tend to need a lot of salt.  Don’t be too shy.  Roast for about 15 minutes, then carefully flip the potatoes.  Yes, I do this individually, because I really enjoy crispy potatoes and I want all the sides to be properly golden browned.   It doesn’t take that long.  Roast for another 15 minutes.  Give another toss and test them.  Roast longer if necessary (again, much will depend upon how big your potatoes were cut).  Mine are usually done after 30 minutes.  Taste.  re-season, if necessary.

While your potatoes are roasting, begin the curry.  In a medium-sized skillet, heat 2 tablespoons of olive oil.  Add the onion, garlic, and ginger and sauté for a couple of minutes until somewhat tender.  Add the curry powder, turmeric, and garam masala and toast for abut 30 seconds.  Add the chicken broth (sans 1 tablespoon), tomato paste and coconut milk and a pinch of sugar.  Whisk together until smooth.  Cook over medium heat for about 10-15 minutes,  stirring frequently.  Taste as you go, add more salt or sugar, if necessary.  In a small bowl, mix 1 tablespoon cornstarch with 1 tablespoon chicken broth until it’s smooth.  Whisk mixture into the skillet and cook for about another 10 minutes until the mixture is somewhat thickened.  Reseason, if necessary.

Immediately sprinkle chopped cilantro on the hot, crispy potatoes when removed from the oven and serve along side the curry sauce.  The potatoes are best eaten immediately.  Enjoy!

photo

Last week was a busy one.  Along with the excitement of Halloween and indulging in far too much candy, our precious girl turned five!  You add so much happiness and joy to our lives, Aria.  We love you so much– Happy birthday!

Thanks for stopping by!

Laurie

Rustic Potato, Sauerkraut, and Beef Galette | Relishing It

Autumn.  The best of all the seasons, even if it’s only brief here in Minnesota.  Yes, Spring is a close second, but when Autumn rolls around, I’m really, truly happy.  I love the brilliantly colored, crisp, maple leaves that my daughter brings me as bouquets for our dining room.  We live in an old Victorian with dark wood and decor in our living and dining rooms.  I always think about re-painting to brighten things up, but when Fall rolls around, it feels so comfortably warm and cozy, and I’m thankful I haven’t changed a thing.

Rustic Potato, Sauerkraut, and Beef Galette | Relishing It

Rustic Potato, Sauerkraut, and Beef Galette | Relishing It

Rustic Potato, Sauerkraut, and Beef Galette | Relishing It

Rustic Potato, Sauerkraut, and Beef Galette | Relishing It

On of my favorite Fall (and even winter, for that matter) dishes is this amazing Rustic Potato, Sauerkraut, and Beef Galette.  The combination of beef and sauerkraut is incredible.  It’s also a bit nostalgic for me.  I grew up with huge pots of meatballs that had been simmering in tangy sauerkraut for hours.  Wonderful stuff.  This galette showcases those flavors.  Just like my other galettes, the crust is crisp and light.  The potatoes add substance, while the fresh mozzarella ensures that the dish is moist enough.  Of course, you can substitute another mild cheese, like grated regular mozzarella, if you like.  I really wanted the tang from the sauerkraut to be showcased here, rather that hidden underneath a more assertive cheese.  I’m planning to share with you all a quick sauerkraut recipe and technique very soon.   I really hope you give this galette a try– I think you’ll really enjoy it!

Rustic Potato, Sauerkraut, and Beef Galette | Relishing It

The Recipe:  Rustic Potato, Sauerkraut, and Beef Galette

Use this pie crust recipe  (with 1/2 tablespoon chopped fresh rosemary and 1/2 tablespoon chopped fresh thyme mixed into the dough)

1/2 pound ground beef

1/4 cup chopped white onion

2 garlic cloves, minced

1/2 teaspoon kosher salt

black pepper

3/4 pound small steamed yellow potatoes, sliced

1/2 cup sauerkraut, drained a bit

6 slices of fresh mozzarella  (or a bit more)

1 teaspoon fresh chopped parsley, plus more for garnish

olive oil

1 egg mixed with 1 teaspoon water, for an egg wash

Follow these directions to make the pie dough.  You will only be using one of the dough balls for this recipe.  Freeze the other one for another time.  Add the fresh herbs when you are mixing the dough.  Refrigerate for 2 hours.  Proceed.

Preheat your oven to 375°F.

In a large skillet, brown the ground beef over medium/high heat.  Drain and discard the grease.  To the skillet of ground beef add the chopped onions, garlic, 1/2 teaspoon kosher salt, and a bit of black pepper (you may want to add a glug or two of olive oil, if the pan seems a little dry). Sauté for a couple of minutes until the onions are tender.  Remove from heat and set aside.

On a lightly floured piece of parchment paper, roll the pie dough out to a 12-inch circle using a lightly floured rolling pin.  Place the sliced potatoes on the dough, leaving about 1 1/2-inch space around the edge.  Sprinkle salt and pepper on the potatoes.  Next, put the sauerkraut on top, followed by the chopped parsley.  Then add the ground beef mixture, and finally place the fresh mozzarella on the very top.  Fold the edges of the dough up and pinch together to seal the seams as much as possible.  Use a pastry brush to apply the egg wash to the edge of the dough.  Sprinkle salt and pepper on the egg wash.

Slide the parchment paper with the galette onto a baking sheet and bake for 43-45 minutes or until the crust is a deep golden brown.  (Keep in mind that every oven is a bit different.  If you don’t already have an oven thermometer, I highly recommend you get one.  Cheap ones are about $7 and work great.  My oven runs 15 degrees hot.)  Top the galette with chopped parsley and a drizzle of olive oil before serving.  Enjoy!

Thanks for stopping by Relishing It today!

xo

Laurie

Roasted Red Pepper Soup | Relishing It

You already have a nice stockpile of frozen red peppers to get you through the winter, right?  No?  Well it’s time to get on that.  I figure that here in Minnestota you can still get one, maybe two last visits in to the farmers market to stock up.  If you come across a box or two of red peppers–buy them!  You’ll be happy you did.

Roasted Red Pepper Soup | Relishing It

Roasted Red Pepper Soup | Relishing It

Roasted Red Pepper Soup | Relishing It

Now here’s what I want you to do with those peppers: broil them in the oven for just a few minutes until they are nice and black, then throw them in a large plastic resealable bag.  The trick here is that the steam in the bag will loosen the blackened skin.  When they’ve cooled a bit, slip off the skin with your fingers.  Next, put the peppers in a food processor, or chop with a knife.  Finally, place your chopped peppers in a plastic freezer bag, or vaccum seal it and freeze it.  Now you’re set.  Whenever you want to make this incredible soup this winter, you can do so in about 20 minutes.  How’s that for a quick dinner plan?

Roasted Red Pepper Soup | Relishing It

This roasted red pepper soup is one of my favorites.  It has a silky texture and amazing flavor.  Drizzle a little olive oil on top, and serve it with a piece of crusty homemade bread.  Of course, you can do so many other things with those roasted peppers, as well.  You can make roasted red pepper hummus, or throw them in your favorite pasta dish.  Really, the possibilities are endless.  Just get them now and freeze those babies!

Roasted Red Pepper Soup | Relishing It

The Recipe:  Roasted Red Pepper Soup

(serves 4)

About 8 large red peppers  (3 1/2 cups chopped roasted red peppers)

1/2 medium white onion  (3/4 cup chopped)

5 garlic cloves, minced

1 quart chicken broth  (4 cups)

1 large anchovy filet, minced

1 teaspoon chopped fresh thyme ( or 1/2 teaspoon dried)

1 teaspoon chopped fresh oregano ( or 1/2 teaspoon dried)

1 dried bay leaf

extra virgin olive oil

kosher salt and cracked black pepper

1 lemon

parsley, for garnish

To Prepare the Red Peppers:  Place oven rack close to the broiler unit.   Line a large baking sheet with parchment paper.  Cut the peppers in half and remove the insides.  Place peppers on baking sheet and press down with your hand to flatten them.  Place under broiler and broil them for about 15 minutes, or until they are very black.  You will need to move the pan around and perhaps even rotate some of the peppers using tongs.  Keep a close eye on them.  Once they are done, remove from the pan and immediately place in a large resealable plastic bag.  The steam will loosen the black skin.  After 10 – 15 minutes or so, remove from the bag and slip the skin off using your fingers.  It should come off easily.  Discard the blackened portion.  Chop the peppers in a food procesor or by hand.

To Make the Soup:  In a Dutch oven, heat about 3 tablespoons of olive oil at  medium/high heat.   Add the chopped onions and garlic and a generous sprinkle of salt.  Sauté for a couple of minutes until tender. Then add the peppers, chicken broth, oregano, thyme, anchovy, bay leaf, and salt and pepper to taste.  Bring to a boil and then reduce to a simmer for about 15- 20 minutes.  Remove bay leaf and purée  with an immersion blender or carefully pour the soup into a stand blender.  Blend until smooth.  Taste and re-season with salt and pepper, as needed.  Since there are so few ingredients in this soup, the amount of salt plays a big role in bringing out the flavors– make sure to salt it properly.  To serve, squeeze a bit of lemon to taste on the soup (also plays a big role), a drizzle of olive oil, and some fresh parsley.  Enjoy!

Hope you all have a lovely weekend!

xo

Laurie

Orecchiette with Sausage, Broccoli, and Sun-Dried Tomatoes | Relishing It

As much as I love to dabble in the kitchen all day long, I admit that there are days when our family is busy or I just don’t feel like dedicating  that much time to dinner.  The problem is, I don’t like to fall back on some overly-processed meal-in-a-box as the alternative.  Sound familiar?  I’ve found that it’s helpful to have a few quick, delicious dishes up my sleeve, and in talking with friends and family I’ve come to realize that I need to blog more about those types of meals.  If you need a little inspiration, I hope you find it in a few of the coming recipes for quick meals that I’ll be writing about throughout the winter.

Orecchiette with Sausage, Broccoli, and Sun-Dried Tomatoes | Relishing It

This orecchiette with sausage, broccoli, and sun-dried tomatoes, takes barely any time at all.  Maybe 30 minutes to get it on the table, if even.  I love to load a meal up with a healthy vegetable– the broccoli (or broccoli rabe, if you prefer) is just lovely in this dish.  Pairing it with sweet italian sausage is always a good decision.  Make sure to buy a good sweet italian sausage– we get ours locally and the spices are amazing!  And remember all of those sun-dried tomatoes I’ve been making?  The ones I put in a jar of olive oil are absolutely sublime in here.  If you didn’t dedicate the time to preparing your own, you can always buy a jar at your local market.  I like to kick this dish up with a few sprinkles of red pepper flakes and some freshly grated parmesan.  So, even if you’re pressed for time, I hope you can sit down and enjoy a delicious home-cooked meal.  Enjoy!

Orecchiette with Sausage, Broccoli, and Sun-Dried Tomatoes | Relishing It

The Recipe:  Orecchiette with Sausage, Broccoli, and Sun-Dried Tomatoes

(serves 4)

1 pound sweet Italian sausage

1 large head broccoli, cut into small florets (around 4 1/2 cups)

1/2 pound dried orecchiette

4 garlic cloves, minced

1/4 – 1/3 cup extra virgin olive oil  (or substitute part of it with the olive oil from sun-dried tomatoes, if you can spare any)

1/3  cup chopped sun-dried tomatoes in olive oil

1/3 cup (or more) parmesan cheese, for garnish

red pepper flakes, for garnish

Fill a large saucepan with water and bring to a boil.

In a large 12-inch skillet over medium-high heat, brown the sweet italian sausage.  Drain grease.  Meanwhile, cook the pasta.  To the skillet add the olive oil (if you can spare any from the sun-dried tomatoes, the flavor is incredible), garlic, and broccoli and cook until the broccoli is tender, but not mushy– about 5 minutes.  When the pasta is al dente (follow the cooking instructions), reserve a bit of the water, and drain the rest.  Add the hot pasta to the pan of sausage and broccoli.  Toss in the sun-dried tomatoes.  If more moisture is needed, either loosen with more olive oil, or a bit of pasta water.  Salt and pepper, as needed.  This is big– don’t forget the salt!  Top with parmesan cheese and red pepper flakes.  Enjoy!

Thanks for stopping by Relishing It!

Laurie

The Best Apple Bars | Relishing It

I know it’s a bit much to say that these are the best apple bars that exist in the world.  But the truth is, I’ve never had better.  These are the apple bars that I grew up with– the ones that my Mom made.  I begged for these beauties throughout my childhood.  And I haven’t found a better apple bar in the last 30 years.

The Best Apple Bars | Relishing It

The Best Apple Bars | Relishing It

The Best Apple Bars | Relishing It

This is almost identical to recipe that my Mom used– it still has the wonderful unique qualities that make these bars so good.  There are crushed cornflakes on the bottom layer, which may sound a bit odd.  But they add something amazing– something magical– to the texture of the bars.  I wouldn’t say it’s a “crunch”, but whatever it is, it’s necessary.  The meringue is still there, too.  Meringue on apple bars isn’t standard, but on these it adds a little wow-factor in both appearance and texture.   I sometimes increase the amount of meringue, because my daughter and I fancy it so much.

The Best Apple Bars | Relishing It

The one thing that I did change about the recipe is substituting butter for the shortening that my Mom used.  I’ve actually made them both ways in order to see if using shortening was worth it (I don’t generally cook with shortening).  I used a butter-flavored shortening for comparison, and while it did lack a bit in flavor, it also made for a sturdier crust.  In the end, I decided that butter was the better option.  The crust is still amazing, and I’d rather put good, quality butter into my kids’ diet than shortening.  So, you can decide which route you want to go– either way will make an amazing apple bar.

The Best Apple Bars | Relishing It

A side note:  I’ve been a mother for seven years as of yesterday.  This sweet boy has brought so much joy to my life.  He’s an old soul, a funny trickster, and has a huge heart.  I’ve loved every day with him.  Happy Birthday to our sweet Aanen!

IMG_4776

The Recipe:  The Best Apple Bars

For the Dough:

2 1/2 cups (11 7/8 ounces) all-purpose flour

1 tablespoon granulated sugar

1 teaspoon kosher salt

1 cup (2 sticks) cold, unsalted butter, cubed (or coarsely grated, if frozen)

1 egg yolk in a measuring cup, then filled with milk to reach 2/3 cup total

For the Filling:

about 9 medium apples (or more), thickly sliced

1 cup granulated sugar

1 teaspoon cinnamon

pinch of kosher salt

1 cup coarsely crushed cornflakes

1-2 egg whites (depending upon how much meringue you like)

For the Icing:

about 1 cup powdered sugar

splash of milk

To Make the Dough:  In a large bowl, whisk the flour, 1 tablespoon granulated sugar, and salt together.  Use a pastry blender to cut in the butter until it is crumbly (it should resemble small peas).  Then, use a fork to mix in the egg yolk and milk mixture.  Mix until all of the dry ingredients are wet.  Put the mixture onto a flour surface and knead a couple of times and divide into two.  Wrap in plastic wrap and refrigerate for about 2 hours.  (Follow these photos, if you feel the need for visual help.)

Preheat oven to 350°F.  Peel and slice the apples.  You may need more or less apples depending upon the size of them.  You’ll want enough apples to fill the pan to the top.   In a medium bowl, toss the apples, cinnamon, sugar, and a pinch of salt together.

On a lightly floured surface, roll one ball of dough out to fit into a 9 x 13 x 1 inch pan.  It should hang over the edge just a bit.  Sprinkle the crushed cornflakes onto the pan.  Then top with the apples.  Roll out the other ball of dough to fit on the top.  Fold the two layers of dough together along the edge and then press together with a fork to prevent leaking.  Meanwhile, using a stand mixer, or handheld, beat the egg white(s) until somewhat stiff.  Gently place the egg whites on the top of the bars.  This can be somewhat unruly and you may have to use your fingers.  Bake for about 50 minutes, or until the crust is a deep golden brown.  Make sure the meringue doesn’t get too dark.  Remove from oven and let cool completely.  Mix the powdered sugar and milk together and drizzle over the bars.   These bars are best eaten within the first two days.  Store leftovers underneath a tea towel.  Enjoy!

Thank you so much for stopping by Relishing It!  Have a wonderful weekend.

xo

Laurie

Sun-Dried Tomatoes with Rosemary and Thyme | Relishing It

Alright, I’m using “sun-dried” very loosely here, as these little beauties are not…well…sun-dried at all.  I just couldn’t bring myself to call these “sitting on a counter in a dehydrator” tomatoes.  No, I like to imagine that they were patiently crafted in Italy, with tables upon tables of tomatoes laying out in the sun, as I sipped a Chianti and and read a good book.  Alas, my reality is Minnesota, and I used a food dehydrator.  Not quite as romantic, is it?  Even so, these tomatoes are fantastic, and seriously recommend you give making them a try.

Sun-Dried Tomatoes with Rosemary and Thyme | Relishing It

I love having a nice supply of sun-dried tomatoes to get me through the winter.  Buying jarred versions at the market can be expensive, and to be honest, they’re just so simple to make.  You can use any type of tomato, though smaller ones will require less cooking time.  Roma’s are a fantastic choice– simply cut them in half or quarters.  The tomatoes take time to dehydrate– perhaps a day or more for the thicker end pieces.  I sprinkle mine with rosemary, thyme, with a little sea salt and cracked black pepper.   The flavors are wonderful!

Su-Dried Tomatoes with Rosemary and Thyme | Relishing It

You can snack on them as soon as they’re dried, or preserve them to use later.  As for the texture, some like them a bit chewier– I made sure mine were completely dry since I intended to preserve them.  It’s really up to you how dry you want them to be.  These tomatoes can be kept in airtight containers (plastic bags work well), vacuum sealed, or even stored in the freezer.  I also made a jar of sun-dried tomatoes in olive oil, and they are ridiculously delicious.  These would make fabulous gifts around the holidays if you’re looking for something homemade to share.  I hope you give these a try!

Sun-Dried Tomatoes with Rosemary and Thyme | Relishing It

Sun-Dried Tomatoes with Rosemary and Thyme | Relishing It

The Recipe:  Sun-Dried Tomatoes with Rosemary and Thyme

any variety of tomatoes, sliced or halved

fresh rosemary, chopped

fresh thyme, chopped

sea salt and fresh cracked pepper

To Dehydrate the Tomatoes:  Slice the tomatoes or half them, depending upon their size.   Sprinkle with the chopped herbs, salt and pepper.  It will take about 24 hours to dehydrate a full load, sometimes longer depending upon how thick the tomatoes are sliced.  Store in a resealable bag and use within a few weeks.  Freeze any amount you want to keep longer.

To Oven-Dry them:  Preheat oven to 200°F.  Slice tomatoes and sprinkle with chopped herbs, salt and pepper.  Place on a large baking sheet lined with parchment paper.  It will generally take between 2-6 hours (possibly more) to dry the tomatoes– much will depend upon how thickly they are sliced.  Store in a resealable bag and use within a few weeks.  Freeze any amount you want to keep longer.

To make Sun-Dried Tomatoes in Olive Oil:  Prepare dehydrated tomatoes by dipping them in white wine vinegar (this help keep bacterial growth from occuring) and shaking off any excess.  Place in a small jar along with 1/2 cup of red wine vinegar.  Then fill the jar up with olive oil.  Make sure that all of the tomatoes are submerged.  Store in the refrigerator and try to use within 2 weeks.  If placing fresh herbs or garlic into your mix, you must use up the jar within 1 week.  The olive oil will become hard in the refrigerator, simple let sit at room temperature for a few minutes before using.  Be mindful to use clean utensils when removing the tomatoes from the jar.

Thanks for stopping by Relishing It today!

Laurie

Tomato Galette with Herbs and Fresh Mozzarella | Relishing It

I have just a few more tomato recipes that I want to share with all of you before tomato season disappears with the nice weather.  The first is this wonderful Tomato Galette with Herbs and Fresh Mozzarella.  As my husband stated after taking a bite, “That’s one of the best things I’ve eaten all summer.  Maybe ever”.  True story.

Tomato Galette with Herbs and Fresh Mozzarella | Relishing It

Tomato Galette with Herbs and Fresh Mozzarella | Relishing It

Tomato Galette with Herbs and Fresh Mozzarella | Relishing It

Yes, yes, tomatoes and fresh mozzarella are a heavenly match– we all know that, right?  But generally, fresh mozzarella isn’t baked into a galette with tomatoes due to its water content.  Much harder cheeses are the norm.  Obviously I was a bit hesitant in trying the fresh mozzarella– I had visions of a huge sloppy mess ruining that wonderful crust.  There was even a moment during the baking time when I peered into the oven and almost cried.  There was a lot of liquid pooling.  I was certain the galette was ruined.  I mention this, because if you see the same pooling– just wait it out.  By the end of the baking time, the water was gone and a beautiful crisp crust was left behind with cheese that had bubbled up into a golden brown.  The smell of the the baked tomatoes and cheese with the herbs was unbelievable.

Tomato Galette with Herbs and Fresh Mozzarella | Relishing It

Tomato Galette with Herbs and Fresh Mozzarella | Relishing It

This galette comes together so quickly, especially if you have pie crusts hanging out in your freezer (have I mentioned that you definitely should get on that?).  And it’s a perfect meal when you want to fancy things up a bit.  Add a salad to the side, and perhaps a glass of wine and you’re set.  Now go and enjoy the heck out of those tomatoes before they’re gone for the season!

Tomato Galette with Herbs and Fresh Mozzarella | Relishing It

The Recipe:  Tomato Galette with Herbs and Fresh Mozzarella

(serves 4 or 1, depending upon how hungry you are)

1 single All-Butter Pie Crust

2-3 ripe tomatoes, sliced

about 1/4 pound of fresh mozzarella, sliced

a hefty sprinkling of chopped fresh rosemary and thyme, plus more for garnish

1 egg mixed with 1 teaspoon water, for egg wash

salt, pepper, plus olive oil for drizzling

Preheat oven to 375°F.

Follow the instructions for the All-Butter Pie Crust.  After it has chilled it will be ready to use.  Roll the dough out into an 11-inch circle (not the typical 12-inch, because I want the crust to be a bit sturdier) on a piece of floured parchment paper.  Place the mozzarella into the center of the dough, leaving about 1 1/2 inch border.  Sprinkle the chopped herbs on the cheese.  Then place the tomatoes on top of that.  Fold up the sides of the galette and pinch the seams together.  Using a pastry brush, apply the egg wash to the dough.  Then sprinkle salt and pepper onto the egg wash.  Slide the galette and parchment paper onto a large rimmed baking sheet.  Bake for 45-50 minutes or until the crust is a deep golden brown and the cheese has bubbled up and browned a bit, too.  Remove from oven and let cool for a few minutes.  Drizzle with olive oil and sprinkle with fresh herbs, salt and pepper before serving.  Enjoy!

Thanks for stopping by today!

Laurie