Feeds:
Posts
Comments

Posts Tagged ‘Gluten-free’

Deconstructed Stuffed Peppers | Relishing It

I’m willing to place a sizable bet that most of you are a little tired of turkey leftovers.  Well let’s switch it up then, with this little dish to revive your tastebuds.  This is one of those quick, healthy meals that I promised you a few weeks ago.  It’s loaded with healthy ingredients and the combination of flavors is one of my favorites– sauerkraut and beef.  (Remember this galette?)  This time I’ve also added the tang of tomatoes and the ever-so-slight crunch of green peppers.  Lovely.

Deconstructed Stuffed Peppers | Relishing It

A few comments on how I’ve titled this dish.  Let me go on record as saying I’m not a huge fan of the word “deconstructed” when it come to food.  It’s often misleading, pretentious, or both.  I know others have the same gripe about describing oneself as a “foodie”.  (Personally, I’m fine with foodie).  Anyway…here I couldn’t really come up with another way to describe this dish.  The fact is, it takes all of the wonderful components of stuffed peppers, and, well, deconstructs them.  There’s really no other way to describe it unless I decided to go with “pile of peppers, rice, ground beef, sauerkraut, and tomatoes”.  And for some reason that just doesn’t seem quite as appealing.

Deconstructed Stuffed Peppers | Relishing It

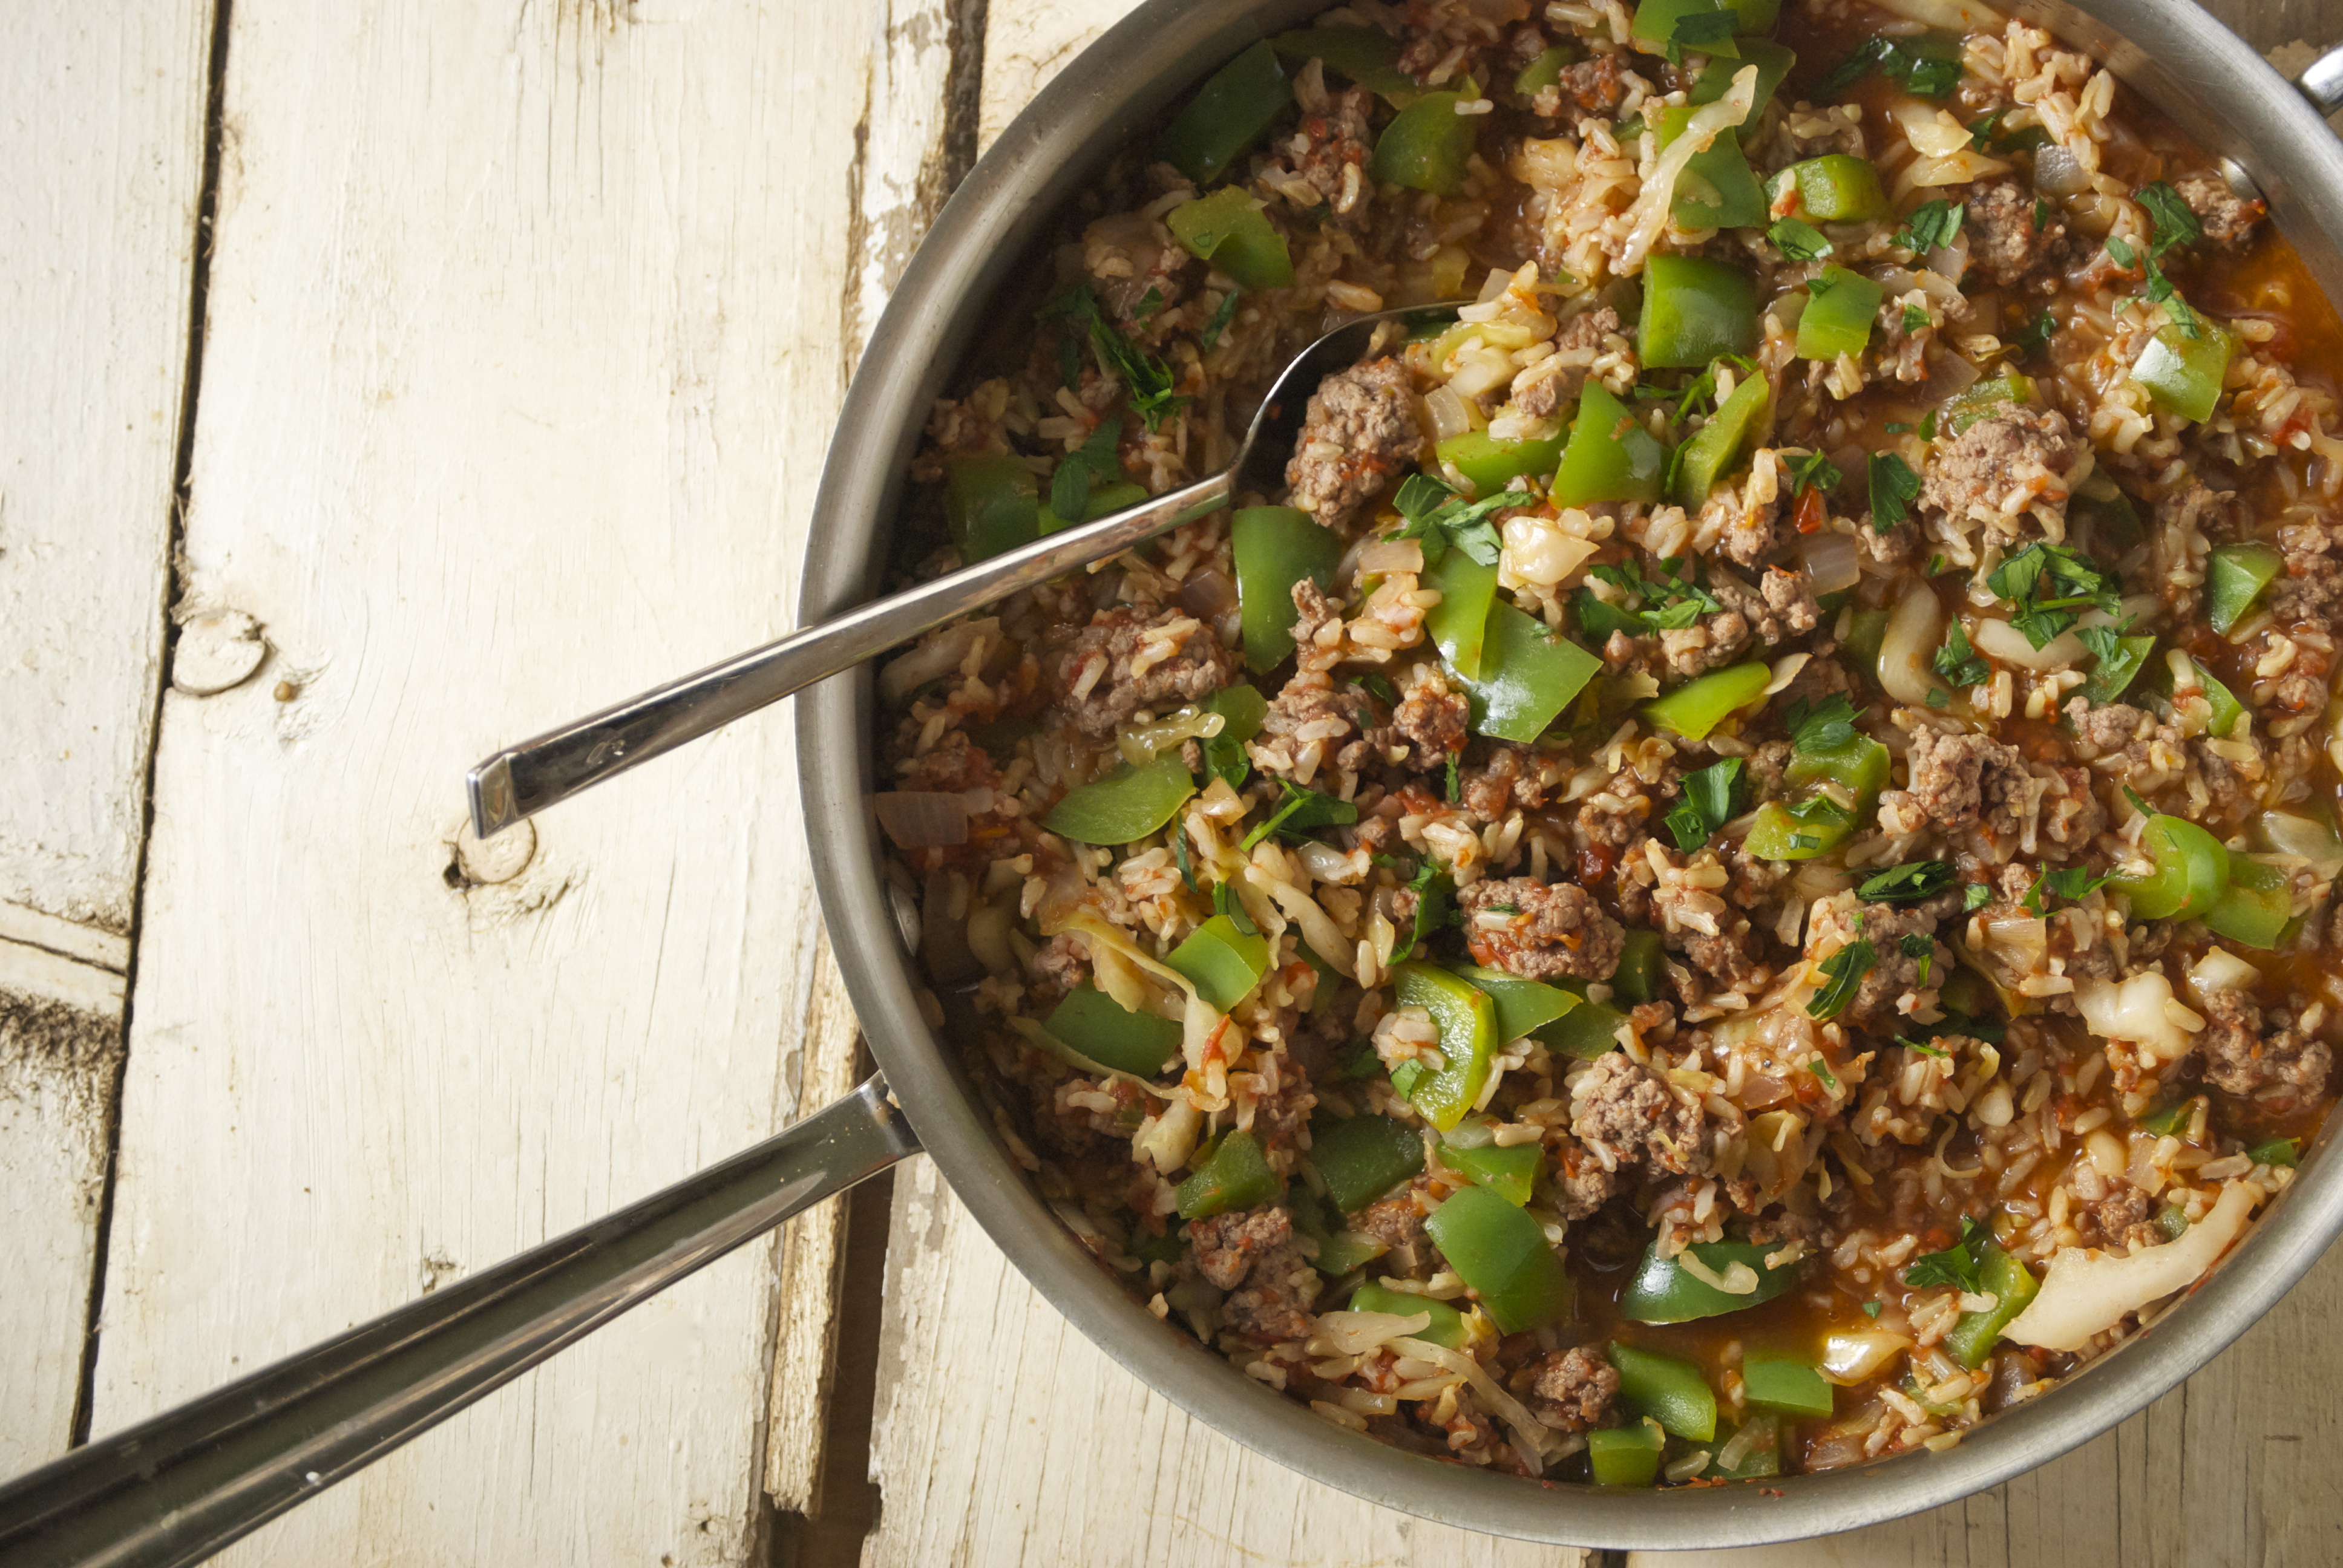
Just because this variation comes together more quickly, don’t for a moment think they aren’t as good as the original.  That would be a huge mistake, because this dish is about 10 times better than any traditional version.  Here’s why– you know that moment when you cut into what used to be a vibrant green pepper, and the liquid just floods out on to your plate because the pepper has baked far too long to ensure the filling reached the right temp?  Yeah, that doesn’t happen here.  No disappointing mushiness to the green pepper, no pieces of hamburger submerged in puddles of tomato-y water.  Here, the green peppers retain their vibrant green color and a bit of their crunch, because you decide what texture you’d like them to be.  The tomato sauce (or crushed tomatoes), whichever you choose to use, are the perfect base for the rice and ground beef.  The whole dish is finished with a healthy dose of really good sauerkraut to add that wonderful zip.  Use this saurkraut recipe to make your own, or buy a good quality version.  Bubbies has wonderful fermented products.  The entire dish takes only the amount of time that you need to make the brown rice.  So…get going, time’s a ‘wasting!   Enjoy!

Deconstructed Stuffed Peppers | Relishing It

The Recipe: Deconstructed Stuffed Peppers

(makes enough for 4 people)

1 cup dry long grain brown rice, rinsed

1 pound grass-fed ground beef

2 large green bell peppers, cut into large bite-size chunks

1 small white onion, diced

1/2 quart homemade tomato sauce, or a bit more  (your favorite purchased sauce or crushed tomatoes will work, too)

1 cup good quality sauerkraut

fresh parsley, for garnish

salt and pepper, to taste

Place the rinsed brown rice in a large saucepan with 2 cups of cold water and a sprinkle of salt.  Cover and bring to a boil, then reduce to a medium simmer and let rice cook for about 30 minutes or until it is tender and the water has been absorbed.  Fluff with fork.

Meanwhile, when the rice is about halfway through it’s cooking time, begin to brown the beef  over medium-high heat in a large skillet.  For this dish, I like to leave the beef in somewhat big chunks.  When it is cooked, drain and discard the grease.  Season the beef with salt and pepper and add add the onion to the pan.  Cook the onion until it begins to get tender, just 2-3 minutes.  Add the green peppers and cook just a few minutes until they are a bit tender, but still have a slight crunch to them.  Add the tomato sauce and warm through.  When the rice is ready, add it to the skillet and stir.  If the dish is hot enough, add the sauerkraut and stir just enough to warm the kraut, but not enough to cook it.  It’s lovely when it has a bit of a crunch to it.  Re-season with salt and pepper, if necessary.  Garnish with freshly chopped parsley.  Enjoy!

If you’re looking for gift ideas for the favorite foodie in your life, I’ve compiled a list of my favorites.  Stop over to Becki’s site, “Shopping’s My Cardio” and have a look!  Thanks for stopping by Relishing It today.  xo

Image 2

Read Full Post »

Vegetarian Lentil Taco Soup | Relishing ItBaby, it’s cold outside!  Or at least it is here in Minnesota.  There is definitely that ‘winter-is-coming’ chill in the air.  And this is just the start.  Wind chills will eventually plummet to -50 degrees F, snow will pile up on the sidewalks.  Ugh.  I always complain as autumn comes to a close, knowing that we face the long slog to April.  My body just isn’t acclimated to the cold for the first month or so.  Ah well, I guess there’s also the comforting expectation of snuggling into a warm blanket and a good book while the kids head out to play in the snow.  There is that to look forward to…

Homemade Taco Seasoning | Relishing It

Homemade Taco Seasoning | Relishing It

Vegetarian Lenti; Taco Soup | Relishing It

As soon as the weather turns, I start thinking about soup.  This particular one is a beauty.  It’s substantial– more like a cross between a soup and a stew.  It’s loaded with healthy protein from lentils and beans, though my favorite ingredient this time around is most definitely the corn.  It makes so many soups better.  It adds a nice flavor and a bit of texture, as well.  Not to mention, it pairs beautifully with the Mexican flavors.

Vegetarian Lentil Taco Soup | Relishing It

Let’s talk about those flavors, shall we?  Years ago I began making my own taco mix.  To be honest, it happened a bit by accident.  I ran out of my usual purchased taco seasoning, so I had to improvise.  Luckily, I keep a well stocked spice cabinet (Penzys really should send me a thank you note).  In looking at the recipe, don’t let the length of the list scare you.  I realize that not everyone has all of the spices on hand.  As long as you have the main ones (chili, paprika, garlic, onion, and cumin powder), you will be just fine.  But, if you do happen to have the others, even better.  Try this seasoning the next time you make traditional tacos– you’ll love it!

Vegetarian Lentil Taco Soup | Relishing ItThe soup is wonderful served with the usual taco accompaniments– sour cream, cilantro, jalapeños, and of course some tortilla chips. However, I also discovered another way that I like to eat the leftovers.  Since the legumes continue to soak up more broth overnight, the soup becomes a bit thicker.  I love to serve it atop baked spaghetti squash.  It’s delicious and makes a great gluten-free, paleo, and even vegan meal! So– perfect to serve to friends or family that might be trying to eat that particular way.  Stay warm, friends!

Vegetarian Lentil Taco Soup Over Spaghetti Squash | Relishing It

The Recipe: Vegetarian Lentil Taco Soup

(serves 4-6 comfortably)

2 cups dry brown lentils, rinsed

2/3 cup dry red beans (or 1 can), rinsed

2/3 cup dry black beans (or 1 can), rinsed

2 tablespoons olive oil

1/2 cup chopped white onion

3 garlic cloves, minced

1 quart puréed or crushed tomatoes

1 quart vegetable broth (or use chicken, if you’re not trying to stay vegetarian)

1 heaping cup frozen corn

1/2 cup chopped fresh cilantro

juice of one lime

scallions, jalapeños, sour cream (if vegan isn’t your aim) and limes as garnish options

For the Taco Seasoning:

(makes a scant 1/2 cup)

2 tablespoons ancho chili powder

1 tablespoon ground cumin

1 teaspoon sweet paprika

1 teaspoon garlic powder

1 teaspoon onion powder

2 teaspoons kosher salt

2 teaspoons coarse black pepper

1/2 teaspoon crushed red pepper flakes

1/2 teaspoon dried oregano

1/4 teaspoon smoked paprika

1/4 teaspoon ground allspice

To begin: soak and cook your red and black beans separately following standard directions to cook beans.  Honestly, I usually have extras in my freezer that I pull out to throw into this soup.  Beans freeze incredibly well, so feel free to make extras for that purpose. You’ll want about 1 1/2 cups of cooked red beans, and 1 1/2 cups of cooked black beans.  Or simple choose to use one can of each, rinsed.

Mix all of the taco seasoning ingredients together in small bowl, set aside.

Heat a large Dutch oven over medium-high heat and add the olive oil.   Begin to saute the onion and garlic for a couple of minutes until somewhat soft.  Add the taco seasoning to the onion mixture.  Then add the tomatoes, vegetables stock, cooked red and black beans, and the lentils.  Bring to a boil, then reduce heat to a medium simmer.  Cook covered for about 30-40 minutes, or until the lentils are tender, but have not fallen apart.  Stirring a couple of times along the way.  Make sure not to overcook the lentils, or they will turn to mush.  When the soup is done, add the frozen corn, cilantro, and juice of one lime.  Reseason with salt and pepper, if necessary.  Serve with sour cream, cilantro, jalapeños, and more lime.  Enjoy!

Thanks for stopping by Relishing It!

Laurie

Read Full Post »

Caprese Salad with a Basil Vinaigrette | Relishing It

Now I’ve mentioned here before how much I love tomotoes, but just in case you’re new to Relishing It, let me emphasize this.  It’s not just that I love tomotoes– I’m obsessed with them.  Every summer I wait.  And wait.  And wait until the first ripe tomotoes show up at the farmers’ market.  And then I try to fit them into almost every meal.  For the record, I don’t buy tomatoes when they’re not in season for a number of reasons.  First, obviously, is the taste.  Out-of-season tomatoes tend to be stiff and flavorless.  Second, I have serious ethical concerns about the industrial tomato industry, which is where many of our “winter” tomatoes come from.  Take a look at ‘Tomatoland’, a brilliant book by Barry Estabrook if you’re interested in just how terrible the industry is.  Here’s a link to the NY Times review.  Now that THAT is out of the way…

Caprese Salad with a Basil Vinaigrette | Relishing It

I love creating all sorts of dishes with tomatoes.  This heirloom tomato tart is among my favorite summer dishes.  And this tomato Jam is a versitle spread for both sweet and savory things.  If you’ve ever wanted to make your own homemade ketchup–this recipe is a good one to try.  I also can salsa every year to share with family and friends, and can a huge supply of plain tomatoes that help get us through the winter.

Caprese Salad with a Basil Vinaigrette | Relishing It

Basil Vinaigrette | Relishing It

As much as I love to use them as an ingredient, nothing beats eating them in their natural state.  They are so juicy and slightly tender.  A sprinkle of salt brings out their amazing robust flavor.  I love a good caprese salad.  However, I’ve discovered that I’m not a huge fan of eating whole basil leaves.   A few here and there are fine, but I much prefer the basil flavor to come through in a delicious vinaigrette that I can let my tomatoes and fresh mozzarella swim in.  Every bite gets a little basil burst.  It works for me, and I hope it works for you!  Enjoy!

Caprese Salad with a Basil Vinaigrette | Relishing It

The Recipe:  Caprese Salad with a Basil Vinaigrette

Heirloom tomatoes, big and small

Fresh mozzarella

Extra basil leaves, for garnish

Sea salt and freshly ground pepper

For the Basil Vinaigrette:

(makes enough for a small platter)

2 tablespoons white wine vinegar

1 garlic clove, sliced

1/2 cup packed fresh basil

2 large anchovy fillets in olive oil, minced

1/3 cup extra virgin olive oil

sea salt and pepper, to taste

To make the Basil Vinaigrette:  Place all of the ingredients except the olive oil in a mini food processor.  Pulse it a few times to finely chop the basil.  Scrape the sides, as needed.  Slowly add the olive oil and continue running the machine until the vinaigrette is a relatively smooth consistency.  Use immediately, or store covered in the refrigerator for a few days.  Let it come to room temperature before using.

Arrange the heirloom tomatoes and fresh mozzarella on a platter, using as many as you would like (double the vinaigrette recipe, if making a larger portion).   Pour the dressing over and sprinkle with sea salt and pepper.  Eat immediately.  Enjoy!

Thanks for stopping by Relishing It!  Have a lovely weekend.

xo

Laurie

Read Full Post »

Homemade Mayonnaise via Relishing It

Are you ready for another do-it-yourself recipe?  This time it’s homemade mayonnaise.  And yes, there’s a pattern here– I love making my own condiments.  If you missed them, here’s are a few recipes for ketchup, mustard, and tomato jam.  They taste more interesting, and to be honest, better than the same old highly-processed formulas you find at the grocery store.  Making your own mayonnaise is easy, and despite what you may have read, doesn’t take long.  There’s only one catch– you’ll need to use it up within a week since it contains a raw egg yolk.  Trust me, you won’t have a problem finishing it off with all the fresh produce out this time of year.  Sandwiches, BLTs (fresh tomatoes, yay!), potato salad, aioli’s, everything tastes better with homemade mayonnaise.

Homemade Mayonnaise via Relishing It

Homemade Mayonnaise via Relishing It

Homemade Mayonnaise via Relishing It

Homemade Mayonnaise via Relishing It

Homemade Mayonnaise via Relishing It

I like to make my mayonaisse with healthy olive oil, which gives it a wonderful layered flavor.  You can use canola instead if you prefer something more subtle.  Or feel free to do a mix, just make sure you equal the amount of oil listed in the recipe and you’ll be fine.  One other note on this recipe that’ll make it almost foolproof.  A trick I learned from food writer, Melissa Clark.  Add one teaspoon of water to the mixture.  It’s such a simple step, but it can make a huge difference on whether or not the mayonnaise turns out perfectly silky.  That’s it.  It works every time for me.  Now get in there and whip up your own batch of homemade mayonnaise.  And don’t forget you can make it as interesting as you like by adding fresh herbs, spices, or harissa. Or you can simply fold it into a bowl of steamed fingerlings and top with freshly chopped parsley.  It’s one of the quickest and most delicious potato salads around.  Enjoy!

Homemade Mayonnaise via Relishing It

Fingerling Potato Salad with Homemade Mayonnaise via Relishing It

Fingerling Potato Salad with Homemade Mayonnaise via Relishing It

The Recipe: Homemade Mayonnaise

1 teaspoon Dijon mustard

1 pasteurized egg yolk, at room temperature

1 tablespoon lemon juice (from 1/2 large lemon)

1/4 teaspoon fleur de sel

1 teaspoon water

3/4 cup extra virgin olive oil (I prefer California Olive Ranch— both for the fantastic quality and the great price)

In a medium sized bowl, whisk all of the ingredients together, except the olive oil, for a minute or so until frothy.  Then, while continuously whisking, slowly begin adding the olive oil a drop at a time.  As it begins to thicken, you may start adding it in a very thin stream, remembering to whisk the entire time.  The slower you add the olive oil, the better chance you have of it not breaking.   The whole process will take about 15 minutes, or so.  Transfer it to a jar, and store in the refrigerator.  Re-season with salt, if necessary.  Use within one week.  Enjoy!

Thanks for stopping by!

Laurie

Read Full Post »

Salad of Green and Yellow Split Peas with Pesto via Relishing It

In case you haven’t caught on yet, I’m a huge advocate of having a pantry stuffed with dried goods.  Legumes, grains, you name it, I’ve got it in a mason jar ready for use.  And on those occasions when I notice it isn’t stocked full, I briefly panic and then run out to replenish whatever is missing.  I guess it’s almost a compulsion, since it’s not like I’m going to not have access to food– I live a few blocks from our co-op.  I may be a little crazy, but I embrace it.

Salad of Green and Yellow Split Peas with Pesto via Relishing It

Summer is a great time to combine those dried goods with some of the season’s freshest offerings.  I love the combination of peas and pesto.  Using dried yellow and green split peas here works beautifully and is absolutely stunning to look at.  The sliced scallion on top provides a nice crunch and a burst of freshness.  This salad is also very filling– it’s one of those that can be a stand-alone meal.  And with a smaller portion size, it pairs wonderfully with most any grilled foods.

Salad of Green and Yellow Split Peas with Pesto via Relishing It

Salad of Green and Yellow Split Peas with Pesto via Relishing It

About this time of year, I also start to make large batches of pesto to freeze for the winter.  I’ll pop a small portion into ice cube trays or muffin tins to fully freeze.  I then pop them out, wrap them in plastic wrap, and put them into freezer bags (or use my vacuum sealer).  It’s a wonderful treat in the cold winter months to have pesto to mix into pasta or to dollop into soups.  If you choose to do this– a word of advice.  If you blanch your greens for just 30 seconds or so, then put it into an ice bath to stop the cooking process and proceed with the recipe–your pesto will remain a beautiful, vibrant green, even after it has been frozen.  I always use this method if I’m planning to freeze my pesto, or even if I know I’m going to have leftovers that may sit in my refrigerator for a few days.  The color just ‘pops’.  One more trick regarding pesto, remember you have the option to add a bit of water instead of more olive oil to loosen it up if it’s a bit thick.  Either way, be sure to season it appropriately with kosher salt– the right amount can make the pesto sing!  Enjoy!

Salad of Green and Yellow Split Peas with Pesto via Relishing It

The Recipe: Salad of Green and Yellow Split Peas with Pesto

(serves 4-6)

Large bed of leafy lettuce leaves

1 cup dried green split peas

1 cup dried yellow split peas

1 bunch of sliced scallions to garnish

For the Pesto:

1 cup packed basil leaves

1/4 cup packed Italian leaf parsley

3 cloves garlic, smashed

1/4 cup grated parmesan or grana padano cheese

1/4 cup walnut halves, toasted and roughly chopped

1/3 – 1/2 cup extra virgin olive oil, or more

sprinkle of hot pepper flakes

kosher salt and freshly ground pepper, to taste

To cook the Split Peas:  Rinse the peas and place in a large saucepan.  Cover with salted water, making sure that about two inches of water are above the peas.  Bring to a boil, then reduce to a medium/low.  Cook for about 25 minutes, then begin testing them for doneness.  You may need to cook them longer, depending upon how high your heat was.  You will want them to be soft, but retain their shape.  Be careful not to overcook them, or they will turn to mush.  When done, drain the water and let cool.

To make the Pesto:  As I stated above, you can choose to blanch the greens or not, depending upon how fast you’re going to use the pesto.  You decide.  Place either the blanched or unblanched basil and parsley into a small food processor (use a large one, if making a bigger batch).  Pulse a few times to chop up a bit.  Add the parmesan, walnuts, garlic, red pepper flakes, and a pinch of salt and pepper.  Pulse a couple more times to combine.  With the machine running on low, slowly begin adding the olive oil.  Scrape down the sides, as necessary.  Add as much olive oil to reach your desired consistency.  Or, add a few tablespoons of water at the very end to loosen it up a bit.  Re-season with salt and pepper.  Use right away, or place in the refrigerator with plastic wrap tightly pushed onto it’s surface, or freeze.

Place the lettuce leave onto a large platter.  Mix the cooled split peas with about 1/3 cup of the pesto, use more if desired.  Add salt and pepper, if needed.  Pour mixture over the lettuce, top with sliced scallions, and a drizzle of good olive oil.  Enjoy!

Thanks for stopping by today!

xo

Laurie

Read Full Post »

Smashed Summer Pea Spread via Relishing It

I’ve mentioned here more than once that as the weather warms, I try to prepare more simple, fresh foods.  This spread is a perfect example.  I love peas.  Their slightly sweet flavor, that beautiful pop of color– they make every dish better.  When they start to become available at the local farmers markets, we eat them by the pound.  But– and here’s some real talk now– they rarely make it into a recipe.  By the time we’re done shelling them, they have been mostly eaten raw.  And if not, they’re a stand-alone side for our summer meals.  Here, I wanted to keep things simple, yet incorporate peas as the star ingredient.

Smashed Summer Pea Spread via Relishing It

Smashed Summer Pea Spread via Relishing It

For this dish I’ve added a few simple ingredients and a different style of preparation in order to turn ordinary peas into a delicious and healthy appetizer.  Sun-dried tomatoes, garlic, mint, and a bit of anchovy really work with the subtle flavor of peas. Don’t be scared of the anchovy– it adds depth, a bit of saltiness, but doesn’t taste fishy.  Add a few other nibbles, and you’ve got yourself a meal.  Make them with your freshly shelled peas, if you have them, or just rely on a bag of frozen organic ones from the freezer.  It just takes a few minutes from start to finish to get this delicious spread on the table.

Smashed Summer Pea Spread via Relishing It

Smashed Summer Pea Spread via Relishing It

My favorite way to serve this spread is on a grilled baguette brushed with olive oil and sprinkled with sea salt and black pepper.  It is heavenly.   And if you’re worried about the bread, no problem.  I also serve it along with other vegetables, including radishes and endive.  It’s brilliant.  As for the endive, if you’re not familiar with it, you should become so.  It’s a wonderful vegetable that is fantastic served with spreads– the shape makes it easy to fill.  It tastes great, and is a wonderful option if you are gluten-free or just trying not to consume as much wheat.  These smashed summer peas are a delicious healthy option for your 4th of July celebration (for my American friends) this weekend.   It’s easy to get caught up in the moment and over-indulge on chips, burgers, and all other sorts of less-healthy foods in the midst of celebrating.  With this on your table, you don’t have to worry about it.  Hope you enjoy!

Smashed Summer Pea Spread via Relishing It

Smashed Summer Pea Spread via Relishing It

The Recipe: Smashed Summer Pea Spread

10 ounces fresh or frozen organic peas (If using fresh, blanch for a minute or so.  If using frozen, just thaw)

2 garlic cloves, finely minced

3 large sun-dried tomatoes, minced

1-2 anchovies, finely minced

1/2 – 1 teaspoon kosher salt

juice of 1/4 small lemon

2 tablespoons extra virgin olive oil

4 large mint leaves, finely minced

In a medium-sized bowl, add the peas, garlic, anchovies, sun-dried tomatoes, lemon, salt, olive oil, and mint.  Using a potato masher or fork, smash the ingredients together.   The final texture is up to you.  I like it to be a little bit creamy, with definite chunks of ingredients within it.  Taste and re-season, if necessary.  Serve it with endive, radishes, and grilled bread.  Enjoy!

I hope you all have a wonderful and safe 4th of July!

Cheers!

Laurie

Read Full Post »

Chickpea and Black Rice Salad via Relishing It

So now that school is out, I’m trying to get my bearings straight.  We are four days into summer vacation, and while I am more than thrilled to have my son home all day long, it’s not without its…complications.  Aanen has this amazing contagious personality– he is truly a joy to be around.  He and his sister get along swimmingly.   And I love not having to pack his lunch every morning and rush him off to school.  Mornings around our house are brilliant.  However…it’s the rest of the day that gets a bit more hectic.  We’re I’m missing my schedule.  I knew exactly how much I could squeeze into a day and how much I could get done.  Now play dates, outings, parks, and pools have all taken its place.  And though I absolutely love all of these things, it’s hard to get any real work done.  I know I’m not unique in this situation or these feelings, but it sure feels good to ramble on about it.

Chickpea and Black Rice Salad via Relishing it

So how does that tie-in to today’s post?  Well, in the hustle and bustle of our summers we tend to eat much simpler food.  It’s easy to do with all of the fresh produce, so I’m absolutely fine with it.  I’ll often make a huge salad or two at the beginning of the week from legumes and grains and we’ll nibble on it for a few days.  It works well when we’re constantly running out the door.  This salad in particular keeps well.  And it’s absolutely perfect to pack for picnics.

Chickpea and Black Rice Salad via Relishing It

Chickpea and Black Rice Salad via Relishing It

I’ve always been a fan of chickpeas.  They’re loaded with protein, and they’re substantial enough to turn a salad into a meal.  If you’re not familiar with black rice, give it a chance.  Here’s a previous dish that I made using it.  I love black rice, sometimes called “forbidden rice”.   It’s nutty and similar in taste to wild rice.  It’s loaded with antioxidants, vitamins, minerals, and fiber.  You can read more about it here.  I realize that some of you may not the able to find black rice and that’s ok.  Quinoa is also a wonderful substitute and is loaded with its own health benefits.  Radishes give this meal a nice little crunch and they are so wonderful this time of year.  The preserved lemon adds a burst of brightness that makes you smile every time you bite into a tiny piece.  If you haven’t made preserved lemons yet, do it now.  They add so much to summer salads.  Here’s a recipe from my blog.  Or you can do the salt pack method, which is how I made this last batch.  This is a recipe for that method.  Obviously, if you don’t have preserved lemons on hand, you should still give this salad a try.  The parsley and subtle shallot vinaigrette bring all of the flavor together and I love the fact that it’s so healthy!  Makes me feel better about all of the ice cream that my kids are devouring.  Hope you enjoy!

Chickpea and Black Rice Salad via Relishing It

The Recipe:  Chickpea and Black Rice Salad with a Shallot Vinaigrette

2 cups dried chickpeas, cooked (see note)

1 cup black rice, cooked  (see note)

1 bunch radishes, chopped

2 tablespoons finely chopped preserved lemon

1 bunch Italian parsley, chopped

For the Shallot Vinaigrette:

1 -2 tablespoons finely chopped shallot, or red onion

2 tablespoons fresh lemon juice, from 2 small lemons

1 tablespoon white wine vinegar (champagne or plain rice vinegar can also be substituted)

about 1/3 cup extra virgin olive oil, or a bit more

sea salt and cracked pepper, to taste

Note:  To cook dried chickpeas, place in a large saucepan covered with cold, salted water.  Bring to a boil.  Let boil for a few minutes.  Cover and turn off the heat.  Let sit for 1-2 hours.  Bring to a boil again and cook for a few more minutes until they are your desired tenderness.  To make the black rice, place in a large saucepan and cover with cold, salted water by a couple inches.  Bring to a boil, then reduce heat just a bit.  Let cook until the rice is tender (about 25 minutes).  Drain the water.

To make the Shallot Vinaigrette:  Place the chopped shallot in a bowl, or jar, and sprinkle with a little salt.  Pour the vinegar and lemon juice on top and let soften for about 15 minutes.  Then whisk in the olive oil, or give the jar a shake.  Season to taste with salt and pepper.  Place in the refrigerator, let it warm up for a few minutes before you plan to use it.

Place the rice and chickpeas into a large serving bowl along with the parsley, radishes, and preserved lemon.  Pour as much dressing over the salad as you like.  Start with a little and add more, you will not need to use the entire amount that you made.  Toss the ingredients together and let the flavors meld for a bit.  You can even refrigerate it and let it warm a bit before serving.  This salad will keep well for days.  Enjoy!

Thanks for stopping by Relishing It!

xo

Laurie

Read Full Post »

Perfect Pavlovas via Relishing It

Hi friends!  I hope you are all well.  For my part, I’m suffering from a bit of a summer cold, so this post is a bit brief.  In my recent lemon curd ice cream post (which several of you mentioned you were going to make!  Yay!), I referred to these brilliant little pavlovas.  What better time than now to show you how to make them?

Perfect Pavlovas via Relishing It

In that last post, I noted that you should freeze your leftover egg whites from the ice cream.  They hold-up very well in the freezer, so you can preserve them for up to a year.  When you’re ready, thaw them in the refrigerator the night before you plan to use them.  And make sure you label them with a date and amount so you can use up the older ones first. My freezer has a rather large gathering of frozen egg whites just hanging around from all the ice cream and lemon curd batches.   Angel food cake is one way to use them up (which I happen to have a recipe for that I need to share) and so are these delicious pavlovas (crispy French meringues).

Perfect Pavlovas via Relishing It

This recipe is spot on for everything that I love about a great pavlova.  I want the inside to be soft and chewy (check) and the outside to be firm and crisp (also, check). Make them individually (you will yield about 6) or make a huge one to share.  Once it’s baked, you have a lot of possibilities.  In the photos you see here, we enjoyed them with freshly whipped cream, pears, chocolate sauce, and a sprinkle of almonds.  But, another favorite way is with freshly whipped cream, loaded with fresh berries,  and a bit of mint.  Or, a perfect way to use up some of that leftover lemon curd from the ice cream is it spoon it onto the pavlova along with, you guessed it, freshly whipped cream.  All of these combinations are fantastic.  A couple added benefits to this dessert– it can be made days (even weeks) ahead of time and kept in an airtight container (with low humidity) and it can also be enjoyed by your gluten-intolerant friends, since they do not contain any flour.

Perfect Pavlovas via Relishing It

One word of advice that I’ve learned through making countless pavlovas.  Don’t even attempt to make them when it is humid outside.  I’m serious here.  They’ll fall apart into a weepy mess.  So along with being a baker you get to play meteorologist with this one.  Which, as I recently had a conversation about with one of my Instagram friends, would be about the best job ever.  Enjoy!

Perfect Pavlovas via Relishing It

The Recipe:  Perfect Pavlovas

(Makes 6 individual or 1 large)

1/2 cup (4 1/4 ounces) egg whites, about 4 eggs  *See Note

1/2 teaspoon cream of tartar

1/2 cup + 1 tablespoon superfine sugar (4 ounces)  *See Note

1 cup powdered sugar (4 ounces)

Note:  If using frozen egg whites, make sure to thaw in the refrigerator overnight.  If you don’t have superfine sugar, you can simply put granulated sugar in a food processor for a couple of minutes.

Extra advice:  As I stated already, do not even attempt to make on humid days– it won’t work.  Make sure your utensils and egg whites are free of any grease.  Do not use parchment paper or a greased and floured baking sheet– the meringue will often stick to them.  Use aluminum foil.  Do not open the oven door during the first three quarters of cooking time, this helps prevent cracks.  

Preheat oven to 200°F.  Line a large baking sheet with aluminum foil.

In a bowl of a stand mixer using the whisk attachment (or a bowl and hand mixer) beat the eggs until frothy.  Add the cream of tartar, beat on medium speed while slowly adding 2 tablespoons of superfine sugar.  When soft peaks form when the whisk is raised, add 1 more tablespoon of superfine sugar.  Increase speed to high.  When stiff peaks form when the beater is raised, slowly add the remaining superfine sugar and beat until very stiff and glossy.

Stop the mixer, and sift the powdered sugar over the meringue and fold in using a rubber spatula.  Spread onto the foil-lined baking sheet.  Use an offset spatula or butter knife to create some crevices.  It helps to have the sides a bit higher than the center when it comes to filling them later.  Bake for 2 – 2  1/2 hours, depending upon your oven.  Mine are generally perfect after just 2 hours.  Alternately, if your oven has a pilot light, you can bake them for 1 hour, turn off the oven, and leave them in there overnight.  You will know the pavlovas are done when you insert a knife into the middle for doneness– if will be tender/soft in the middle, but crisp on the outside.  They will be slightly sticky right away, but will continue to dry at room temperature.  Store in an airtight container for several weeks.  Enjoy!

Source:  Adapted from Rose Levy Beranbaum’s The Cake Bible

Thanks for stopping by Relishing It!

Laurie

Read Full Post »

Carnitas Tacos and Fresh Tomatillo Salsa via Relishing It

I’m now well into my sixth month of being obsessed with tacos.  Seriously, we’ve been eating them at least once a week for more than a half year, and I’m not even close to getting sick of them.  Tacos al pastor?  Sure.   Spicy shredded beef?  Yes.  And then there are these amazing carnitas tacos that we’ve been enjoying.  They’re perfect to prepare in advance (and I live for meals like this in the summer), they’re healthy (if you don’t go overboard), and they’re oh so tasty.

Carnitas Tacos and Fresh Tomatillo Salsa via Relishing It

Carnitas Tacos and Fresh Tomatillo Salsa via Relishing It

Carnitas Tacos and Fresh Tomatillo Salsa via Relishing It

Carnitas, or “little meats”, can be served simply as a stand-alone dish, but I love it in these tacos even more.  It’s a new addition to my repetoire, which also includes these, and these— both of which are also favorites.  This carnitas version combines the lively flavors of lime and orange, which pair beautifully with pork, cumin, and garlic.  The recipe couldn’t be simpler–  you can make it on the stovetop.  Perfect for when firing up the oven in the summer heat doesn’t sound so tantalizing.  Put all of the ingredients into a pot, no sautéing required.  When cutting your pork shoulder up into cubes, don’t trim off any fat– you’re going to need that so the meat doesn’t get dry.  Let it cook down for about 2 hours and then sear the pork at the end.  That’s it.  Did I mention that it’s completely delicious?

Fresh Tomatillo Salsa via Relishing It

Carnitas Tacos and Fresh Tomatillo Salsa via Relishing It

The fresh tomatillo salsa is a fantastic compliment to the carnitas.  You may be tempted to buy a ready-made salsa from the store, but don’t.  The freshness of this topping cannot be bottled and you’ll end up spending more on a store-bought version that pales in comparison.  It only takes a minute to either chop or pulse the ingredients together– definitely worth your time.  And as far as toppings go, I’m stuck on queso fresco cheese, white onions, and cilantro.  The combination is sublime and it tastes so fresh.  Hope you enjoy them as much as my family does.

Carnitas Tacos and Fresh Tomatillo Salsa via Relishing It

The Recipe: Carnitas Tacos and Fresh Tomatillo Salsa

For the Carnitas:

4 pounds boneless pork shoulder, cut into 2-inch cubes (do not trim the fat)

2/3 cup freshly squeezed orange juice (about 3 oranges)

1/3 cup freshly squeezed lime juice (about 3 limes)

1 1/2 teaspoon cumin seed, toasted then ground

2 teaspoons kosher salt

6-7 garlic cloves, chopped

Corn tortillas, queso fresco cheese, limes, cilantro, and white onions for toppings

For the Tomatillo Salsa:

4 tomatillos

1/2 medium white onion

4 garlic cloves

1 jalapeño

small handful of cilantro (around 1/3 cup)

juice of 1 lime

kosher salt

To make the Carnitas:  Place all of the ingredients into a large Dutch oven.  Add enough water to just cover the pork.  Bring to a boil, then simmer the pork uncovered for about 2 hours.  Do not touch the pork.  Let it do it’s thing.  After 2 hours, bring the heat up to medium/high and begin reducing the liquid for about the next 45 minutes.  When the liquid is mostly gone, sear all the sides of the pork pieces.  They will be tender and practically fall apart.  Keep a watchful eye at this point, as you don’t want them to burn.

To make the Tomatillo Salsa:  Rough chop the ingredients and place them into a food processor and give them a few pulses until the salsa is your desired consistency.  Alternatively, you can chop all of the ingredients by hand.  Make sure to season correctly with salt.

Source:  Carnitas recipe adapted from The Homesick Texan

Thanks for stopping by Relishing It today!

Laurie

Read Full Post »

Simple Carrot Salad with Harissa and Cilantro via Relishing It

Spring has finally arrived in Minnesota!  And by Spring, I mean it officially reached 80 degrees here yesterday.  Last night we grilled for the first time this season, and it was wonderful.  My husband is one of those guys that would be happy eating cereal for dinner several nights a week if I let him, yet he considers the grilling of a steak a sacred process.  He’s a master, and the New York strip that he grilled-up last night was heavenly.  I mean this now, I’d put it up against any fancy restaurant’s offering.  Anyway, I know we’ll be doing a lot more grilling now that the weather has turned, so I came up with this carrot salad that is a fantastic side dish.  It’s also perfect if you’re in the mood for a light lunch.

Simple Carrot Salad with Harissa and Cilantro via Relishing It

Simple Carrot Salad with Harissa and Cilantro via Relishing It

Simple Carrot Salad with Harissa and Cilantro via Relishing It

It seems as though carrots are often just an afterthought in most dishes.  Need a little color in some soup, throw a carrot in!  (Well, except in this soup– one of my favorites– where they’re the star.)  I happen to love carrots.  They have that nice slightly-sweet flavor, a wonderful crunch, and amazing longevity.  In this salad they take center stage.  The flavors are bright, yet there is a nice, complex, smokiness to give it depth.  Remember a couple of weeks ago when I made that homemade Harissa?  It is brilliant combined with these ingredients.  The ricotta salata cheese lends a bit of saltiness to this dish.  If you can’t find ricotta salata, feta is a good substitute.  Personally, I prefer ricotta salata for most salads, because its subtlety allows the other flavors to be more pronounced.  And the creaminess is a welcome addition to most any salad.  The cilantro and lime add that little zing of acidity that compliments the harissa and carrots wonderfully.  If your Harissa is a little on the thick side, feel free to thin it out with a few drops of water or olive oil.  Don’t overdo it though, since there is a squeeze of lime juice at the end that loosens everything up.

Simple Carrot Salad with Harissa and Cilantro via Relishing It

The Recipe:  Simple Carrot Salad with Harissa and Cilantro

(serves 1)

2 carrots, peeled, then thinly sliced with a vegetable peeler

1/2 cup long ribbons of red cabbage

handful of cilantro

1 tablespoon Homemade Harissa or store bought

lime wedges

2 tablespoons of crumbled ricotta salata cheese

sea salt, to taste

This is more of an idea, than a recipe.  Make as much or as little as you want.  This amount will serve one beautifully.  Cut the carrot anyway that you want, though I prefer long beautiful ribbons made by using a vegetable peeler.  They’re just so pretty that way!  Toss all of the ingredients, except the ricotta salata and lime into a large bowl.  Using tongs, gently incorporate the Harissa onto the vegetables.  Add more if you like.  If your Harissa is a bit on the thick side, add a bit of water or olive oil to thin it out.  Plate your salad and top with crumbled ricotta salata cheese and a couple squeezes of lime juice.  Add a sprinkle of salt, if necessary.  Enjoy!

Have a lovely week and thanks for stopping by Relishing it!

xo

Laurie

Read Full Post »

« Newer Posts - Older Posts »