Feeds:
Posts
Comments

Posts Tagged ‘lemon’

Lemon Curd Ice Cream via Relishing It

My kids wait for ice cream season all winter long.  During those cold months here in Minnesota hot cocoa tides them over, but once the weather warms up, they clamor for ice cream nearly every day.  It’s fun to go out and about when the weather is warm.  And a nice little jaunt to some of our favorite ice cream shops always seems like a perfect ending to a day.

Lemon Curd Ice Cream via Relishing It

At home, I’ve been experimenting a lot with my ice cream machine lately.   And I’ve come up with some pretty amazing batches– roasted balsamic strawberry was a favorite of mine.  The kids loved the malted chocolate with chunks of malted milk balls.  I’m sure I’ll get to sharing those recipes at some point.  But for now, all four of us agree that this lemon curd ice cream is one of the best ice creams we’ve ever eaten.  Full stop.  And honestly, if you knew my family, you would know that that really means something.

Lemon Curd Ice Cream via Relishing It

Lemon Curd Ice Cream via Relishing It

Making the lemon curd requires an extra step, but it really doesn’t take that long.  Just make sure to allow enough time for the curd to cool completely in the refrigerator.  You will have a bit of curd leftover, which is a bonus.  Freeze it, if you like, or spread it on good bread, pound cake, or pile it on meringues (speaking of which– I have a recipe I’ll share soon for these.  Freeze your egg whites from making the ice cream).

Lemon Curd ice Cream via Relishing It

My favorite way to serve the ice cream is with a drizzle of good olive oil, a sprinkle of fresh herbs, and a touch of fleur de sel (or any good sea salt).  The olive oil goes brilliantly with the lemon.  Rosemary, lavender, or thyme are all wonderful on top — just a bit, not too much.  And the fleur de sel brings all of the flavors together.  Together, you get a perfect balance between the sweet and tart flavors.  Trust me, you will enjoy this combination.  It would also be fabulous made into a cocktail and topped with champagne.  Or stick it on a cone.  Anyway you serve it will be amazing.  Enjoy!

Lemon Curd Ice Cream via Relishing It

The Recipe: Lemon Curd Ice Cream

2 cups heavy cream, divided

1 cup milk

2/3 cup granulated sugar

1 teaspoon vanilla

dash of kosher salt

1 tablespoon (packed) lemon zest

5 egg yolks

1 cup lemon curd (see note)

Note:  Substitute lemon for the orange in this recipe.  Make sure to allow enough time for the curd to cool completely in the refrigerator.  I recommend making it a day ahead of time.

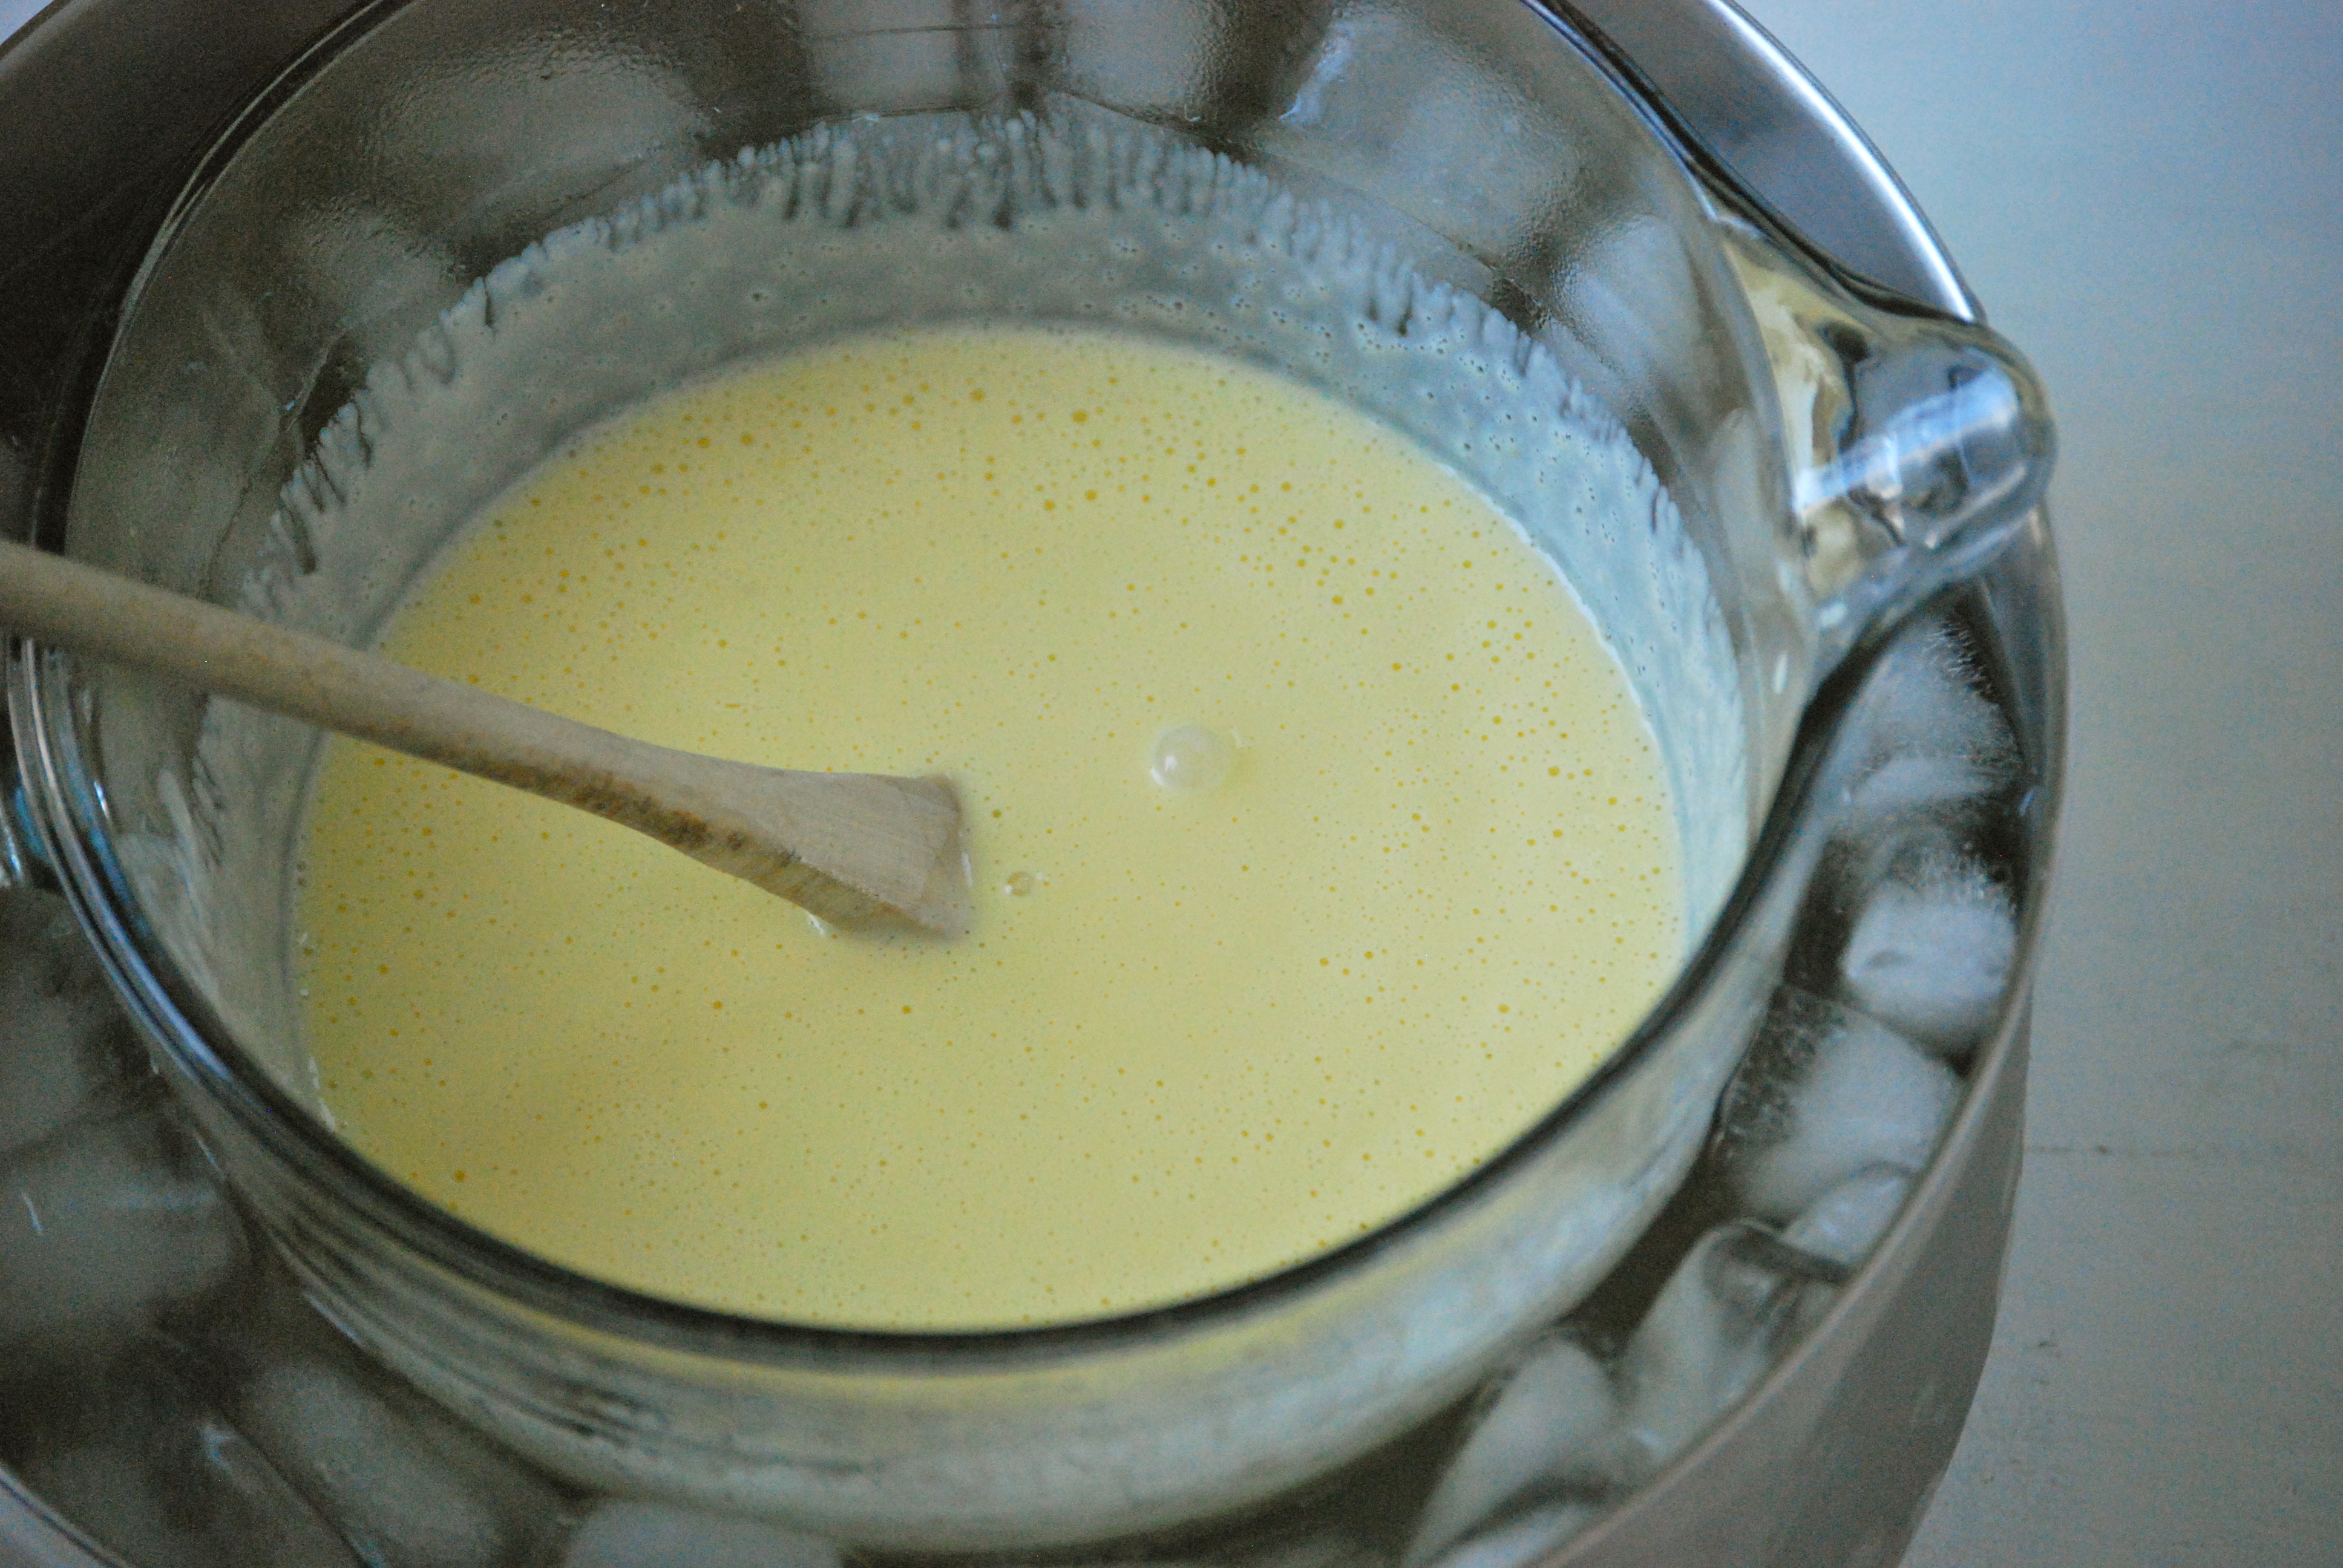
In a large sauce pan, heat 1 cup of cream, milk, sugar, vanilla, salt, and lemon zest together.  Bring to a simmer just until tiny bubbles appear.  Remove from heat and let infuse for 1 hour.  After the hour bring mixture back to a small simmer.  Have the egg yolks in a large bowl and slowly ladle half of the milk/cream mixture into the eggs, whisking the entire time.  Pour the egg mixture into the the remaining milk/cream mixture in the sauce pan.  Cook until the temperature reaches 175°F.  Do not let it boil.  Remove from heat.  Meanwhile, have a large bowl filled with ice/water and a smaller bowl that will hold all of the ice cream mixture in it.  Have the remaining cup of cream in the bowl so it is very chilled (this will help the warm milk/cream mixture cool faster).  Place a strainer over the bowl, and pour the milk/cream mixture into the strainer so that it will combine with the remaining cup of cream.  Stir the mixture until the temperature reduces to 70°F.  Whisk in the lemon curd at this point.  Chill for at least 4 hours in the refrigerator or overnight.  Place into an ice cream maker at this point and follow instructions.

Source:  Adapted from this recipe.

Thanks for stopping by Relishing It today!
xo

Laurie

Read Full Post »

Whole Grain Lemon Ricotta Pancakes via Relishing It

Mother’s Day is less than a week away, so I thought I’d give you a breakfast recipe to help you treat that special lady right this Sunday.  These pancakes are the perfect “something special” to show your mom, grandma, or wife just how much they mean to you.  And if you make sure to clean up once everything is made, she’ll appreciate it all the more.

Whole Grain Lemon Ricotta Pancakes via Relishing It

Lemon ricotta pancakes are one of our favorite Spring breakfast dishes.  The flavors here combine to give a fresh twist on the old pancake routine.  As usual, I’ve tossed in a few tricks from my “make things more healthy” repetoire.  Using white whole wheat flour not only makes these more healthy, but it adds a bit more substance than you’ll find in a typical lemon ricotta pancake, which tends to be feather-light.  I’ve also used coconut oil throughout the recipe– both in the pancakes, as well as for the frying oil.  The coconut flavor pairs beautifully with the lemon here.  Just a quick side note, I love coconut oil.  Absolutely love it.  I try to use it as a substitute whenever the dish allows.   I used just a touch of honey as the sweetener in these pancakes,  since I don’t like them overly sweet.  Add a bit more, if you like.  Or top them with a lovely fruit purée.  The ricotta gives them a wonderful, creamy texture, and the lemon– well it’s simply fabulous.

Whole Grain Lemon Ricotta Pancakes via Relishing it

I’m lucky enough to have two beautiful women in my life that I get to honor on Mother’s Day– my Mom and my Mother-in-Law. Both are strong, compassionate, women who have helped guide and nurture me and my family.  They’re incredible grandmothers to my children, and that means the world to me.  (I love you both!)  I’ll be traveling to North Dakota later this week with my kiddos to celebrate with my Mom– so I’ll be back here at Relishing It next week. I hope all of you Moms have a great, sun-filled day surrounded by your loved ones!

Whole Grain Lemon Ricotta Pancakes via Relishing It

The Recipe:  Whole Grain Lemon Ricotta Pancakes

2 cups white whole wheat flour

2 teaspoons baking powder

1/2 teaspoon kosher salt

Juice and zest of 3 smallish lemons

2 tablespoons virgin coconut oil, melted

3/4 cup ricotta cheese

1 teaspoon vanilla

2 tablespoons honey, or more to taste

1 1/4 – 1 1/2 cup milk

2 eggs

virgin coconut oil, for frying

In a large bowl, whisk together the flour, baking powder, and salt.  In another bowl, combine the coconut oil, lemon juice/zest, ricotta cheese, honey, eggs, vanilla, and 1 1/4 cup milk.  Pour the liquid ingredients into the dry ingredient and combine them using a wooden spoon.  Add a bit more milk, if necessary.  Be careful not to over mix.  Let the batter rest for a few minutes.

Heat some coconut oil in a large skillet.  When it is hot enough, ladle batter into the pan– make the pancakes as big, or as small as you like.  When they begin to get speckled with “holes”, it’s time to flip them over.  Repeat the procedure, adding more coconut oil to the pan each time.  Serve with your favorite pancake toppings.  Enjoy!

Thanks for stopping by Relishing It!  xo

Laurie

Read Full Post »

Homemade Harissa via Relishing It

If you’ve spent much time reading food blogs or magazines, you probably know what harissa is, but for those of you that don’t (Hi Dad!), let me fill you in.  Harissa is a North African condiment made mostly from peppers and spices.  And it is amazing.  Like a punch-of-flavor-to-your-tongue amazing.  It’s often found on Moroccan tagines, but I’ve found so many more day-to-day uses for it.  I love to slather it on sandwiches.  Try it on this meatloaf with a bit of mayonnaise and some hot peppers.  Heavenly.  It’s also fantastic on an egg sandwich where the yolk is still a bit oozy.  Crunchy salads, or paired with carrots– harissa transforms an ordinary meal into something divine.

Homemade Harissa via Relishing It

Lemon for Homemade Harissa via Relishing It

Homemade Harissa via Relishing It

Homemade Harissa via Relishing It

If you’ve been visiting Relishing It for awhile, or taken a stroll through the ‘menu’ section, you know that I love to make my own condiments.  It’s not difficult, and to be honest, they just taste better than those bottled versions that are mass manufactured and sit on the shelf for months.  This mustard, ketchup, and red curry paste are a few of my favorites.  Harissa isn’t quite so common, but there really are a ton of recipes out there, and they are all a bit different.  Some use tomatoes, some don’t.  Some use fresh herbs, others stick with dried spices.  For this harissa, I was looking for something a bit smokey, but not too spicey.  I also wanted it to have a fresh, herb flavor.  If you want more of a kick, you can simply add more cayenne pepper or choose a hotter variety of dried peppers for the base.  One nice thing about this recipe is that you can easily manipulate it to suit your own tastes.  For my  part, I think this one turned out perfectly, so I won’t be changing a thing.  Top your Harissa with a bit of olive oil to store in the refrigerator for an extended period of time, it should last a few months this way.  But…it won’t.  You’ll eat it up in no time.  It’s that good.  Hope you enjoy!

Homemade Harissa via Relishing It

Cheddar and Stout Meatloaf via Relishing It

The Ultimate Meatloaf Sandwich with Homemade Harissa via Relishing It

The Recipe:  Homemade Harissa

(Makes about 1 cup)

5 dried Ancho chile peppers

5 dried Guajillo chile peppers

3 cloves garlic, chopped

1 teaspoon cumin seed, toasted and ground with a mortar and pestle (or use the flat side of a large knife to smash them)

1 teaspoon coriander seed, toasted and ground with a mortar and pestle

2 teaspoons fresh lemon juice

2 tablespoons fresh parsley, chopped

2 tablespoons fresh cilantro, chopped

pinch of ground cayenne pepper, more to taste

3 tablespoons extra virgin olive oil

3 tablespoons champagne vinegar (white or red wine vinegar will also work)

1 tablespoon tomato paste

sea salt, cracked black pepper, to taste

3 tablespoons soaking liquid, or more, if needed

Place the dried peppers into a medium sized bowl.  Pour enough boiling water over them so they are covered.  Place a small plate on top of them to keep them submerged.  Cover the entire bowl with another larger plate, to keep the heat in.  Let sit for 1 hour.

When the peppers are soft, begin by reserving some of the soaking liquid.  Remove the peppers from the water.  Remove the stem and carefully dump out the seeds.  Place the peppers and the remaining ingredients into a food processor.  Process for a few minutes until completely smooth.  Taste.  Adjust seasonings and thickness, if necessary.  Store in a jar with a lid in the refrigerator.  Cover with a layer of olive oil, if intending to keep for an extended period of time (several months).  I don’t cover mine with olive oil, but I generally use it within a few weeks.  Enjoy the heck out of this!

Thanks for stopping by today, friends! xo

Laurie

Read Full Post »

Lemon Madeleines via Relishing It

Pretty much every weekend we have a family debate about what to do in the morning.  My husband argues that we should just enjoy our coffee at home so he can finish watching the soccer match.  The little ones respond that we should stay indoors so they can play all morning.  But I always push for getting out to one of our fabulous local bakeries.  And no offense to American-style bakeries, with their cupcakes and jelly doughnuts, but that’s not exactly what I’m talking about.  I love French-style bakeries.  I love their delicate pastries that are so flakey they almost fall apart when you look at them.  Two bakeries here in the Twin Cities really stand out– Rustica and Patisserie 46.   I love the vibe at both of these beautiful venues.  They’re always buzzing, and once you’ve picked that perfect pastry from their huge selections, it’s wonderful to just sit back and take it all in.  On those weekends that I lose “the great morning debate,” I often make French treats at home.  These bostock are one of my favorites.  Another are these wonderful lemon madeleines.  They’re little bites of happiness.

Lemon Madeleines via Relishing It

Making these madeleines are as simple as can be.  The only thing to be aware of is that you should let the batter rest for a few hours before you bake them (and truth be told, sometimes I don’t wait as long as I’m supposed to and they still turn out fine).  This version is a beautiful lemon laced with a bit of vanilla.  Simple and basic are often the best.  If you can get you hands on Meyer lemons, use them instead of regular– they make a difference.  Sometimes, when I want to change things up, I make a spiced orange and honey version.  Use your imagination, so long as you keep the key ingredients the same.  The main difference in my homemade version is that I use white whole wheat flour.  While they’re not quite as light as those made with all-purpose flour, I think I actually prefer them this way.  The texture is about midway between a cookie and cake.  I guess what I mean is that the inside is soft and moist, while the edges are crisp.  And while you can save some for later, they’re best eaten on the day they’re made.  They’re so good, that they won’t be around more than a day anyway.

If you’re looking for other receipes to satisfy your lemon cravings, take a look these desserts.  This lemon yogurt cake remains one of my favorites, as do these luscious lemon bars.  This lemon pull-apart bread is nice to make for company.  And this lemon tart is perfect for a special occasion.  Can you tell I often have those cravings?  Anyway, these lemon madeleines fit nicely into this list.

Lemon Madeleines via Relishing It

The Recipe:  Lemon Madeleines

(makes 12 large madeleines)

2/3 cup white whole wheat flour

3/4 teaspoon baking powder

pinch of kosher salt

1/2 cup granulated sugar

zest of two smallish lemons (meyer lemons work wonderfully)

2 large eggs, room temperature

2 teaspoons vanilla extract

6 tablespoons butter (melted and cooled)

Confectioners’ sugar for dusting

Prepare a 12-mold madeleine pan by spraying with cooking spray or rubbing with butter.  Set aside.

In a small bowl, whisk together the flour, baking powder, and salt.  Set aside.

In a bowl of a stand mixer,  mix the sugar and lemon zest with your fingers until well combined.  Add the eggs to the bowl and beat, using the whisk attachment, for about 2 minutes, or until the batter is light colored, fluffy, and thick.  Beat in the vanilla extract.  Then fold in the dry ingredients using a rubber spatula, followed by the melted butter.  Divide the batter evenly among the 12 madeleine molds and cover tightly with plastic wrap.  Refrigerated for at least 2-3 hours, or overnight.

When ready to bake, pre-heat oven to 400°F.  Remove plastic wrap and bake madeleines for 11-13 minutes, or until they are a deep golden brown.  Remove from pan and place on cooling racks.  Dust with confectioners’ sugar before serving.  These are best enjoyed on the day they are made, though they will keep in a sealed container (the edges will loose their crispiness, however).  Enjoy!

Adapted from Dorie Greenspan’s Around My French Table

I hope you all have a wonderful weekend.  I know mine will include some green beer.

Cheers!

Laurie

Read Full Post »

Today’s recipe is another healthy, vegetable-laden dish– a fresh, simple soup that is brilliant served hot or cold.  See, I told you I was going to eat my weight in veggies.  This week the seasonal produce in my refrigerator– asparagus, pea shoots, and leeks– was just begging to be made into something wonderful.  This soup is the result.  It’s simple, though with seriously impressive flavors.  What I mean is, even though it comes together in about 30 minutes from start to finish (if you’re skilled with a chef’s knife), it tastes surprisingly complex.

From the first spoonful, you can distinctly taste each of the main vegetables.  Clean and crisp.  And the lemon adds that nice acidity that frames the flavors of the asparagus, pea shoots, and leeks.  As you stroll through the recipe, you’ll notice there are no herbs or spices (aside from salt and pepper).  For this soup, I wanted the pure flavor of the vegetables to stand out.  I also knew I didn’t want it packed with cream (though I love, love creamy soups).  Instead, I added a Yukon Gold potato to provide that smooth texture.

This soup is very good by itself– especially as a chilled Summer dish.  I also love it warm with a piece of toasted french bread and poached egg gently laid on top.  Magic happens where egg yolk meets soup.  Give it a try, you’ll see.  One last thing to keep in mind is that the balance of flavors in this soup stands or falls on how much lemon and salt you add.  As always, taste, taste, taste!

The Recipe: Spring Vegetable Soup

(Serves 4 — enjoy hot or cold)

1 quart chicken stock

2 tablespoons extra virgin olive oil, plus more to drizzle

1 pound asparagus

1 large white onion, chopped

1 medium leek, chopped

2 stalks celery, chopped

1 large yukon gold potato, peeled and chopped

1 packed cup of pea shoots

squeeze of lemon

sea salt and freshly cracked black pepper

crusty french bread and poached eggs, optional

Prepare the asparagus by trimming the very ends.  If you have some thick ones, peel the last 1 1/2-inch of the stock with a vegetable peeler.  Cut off the tips of the asparagus and set aside.  Cut up the remaining asparagus into 1-inch pieces.

In a large Dutch oven or heavy-bottomed soup kettle, add the olive oil.  Over medium heat, sauté the onion, leek, celery and a sprinkle of salt and pepper until tender, about 5-7 minutes.  Add the chicken stock, potato, and asparagus.  Bring to a boil, then reduce heat.  Simmer for about 15-20 minutes, or until the potatoes and asparagus are tender.  Then, put the pea shoots into the soup and cook for about 1 minute, or until the pea shoots have wilted a bit.

Meanwhile, bring a small saucepan of water to a boil.  Add the reserved asparagus tips and cook for about 2 minutes.  Remove from water and place into an ice bath to stop the cooking process.  Set aside.

Remove soup from heat.  Use an immersion blender or carefully pour the soup into a stand blender (in batches), blend the soup until creamy.  Season with a squeeze of lemon, to taste, as well as salt and pepper.  Seasoning this soup properly is key.  A bit more lemon or salt can make all the difference.   Add the asparagus tips to the soup or serve as a garnish on top.  This soup is wonderful served hot or cold.   It is outstanding served with toasted french bread and a poached egg on top.  Drizzle with olive oil.  Enjoy!

Thanks for stopping by Relishing It!  Have a fantastic weekend!

Laurie

Read Full Post »

Every once in awhile an idea for a recipe pops into my head, and I can’t believe I hadn’t considered it before.  On the one hand, I get a bit disappointed in myself for missing something so obvious.  But then I think, ‘Who cares?  This is going to be incredible!’  Today’s recipe came from one of those epiphanies.  I wanted something bursting with Spring flavors, and this pea shoot and mint pesto does just that.

Pea shoots should be showing up at your local farmers market right now.  If you haven’t tasted them before, please go buy some.   These tasty little shoots are the young tendrils and leaves of the pea plant.  They’re packed with nutrients, including vitamins A and C.  And they’re wonderful on sandwiches, salads, mixed into stir fry, pureed into soups– and of course, in this pesto.

Mint and peas make a great combination– remember this carbonara?  Pea shoots taste like fresh peas, but you don’t have to go through the fuss of shelling.  Here, I blanched the pea shoots for a few seconds to brighten their color.  I added a few mint leaves, and finished it off with a squeeze of fresh lemon.  Do not leave out the lemon!  It’s fine without, but we’re looking for better than ‘fine’ with this pesto.

A couple tips on the bruschetta:  First, make sure you grill the bread.  Season it with olive oil, salt, and pepper.  It makes a huge difference.  I also recommend tearing– rather than cleanly slicing– the mozzerella.  It creates nice crevices and curves to drizzle the olive oil into.  I think it also happens to  look much more interesting.  The radishes add an additional pop of color and fresh crunch.  Aside from using this pesto on bruschetta, you can add it to pasta.  If you think it’s going to be too thick to toss with pasta, add a little more olive oil and remember to always reserve a bit of hot pasta water to get the texture you want.  Either way, I think you’ll be happy with this fresh dish.  Enjoy!

The Recipe: Bruschetta with Pea Shoot Mint Pesto and Fresh Mozzarella

Pea Shoot Mint Pesto:

1 1/2 cups packed pea shoots

2-3 tablespoons freshly grated parmesan or grana padano cheese

1/4 cup lightly toasted walnuts, chopped

1 garlic cloves

10 fresh mint leaves

1/4 cup extra-virgin olive oil

squeeze of lemon juice, to taste

sea salt and freshly cracked pepper, to taste

hot pepper flakes, to taste

For the Bruschetta:

1-2 balls of fresh mozzarella

1 -2 cloves of garlic

extra-virgin olive oil

pea shoot  mint pesto

handful of radishes, diced

Good quality rustic bread, sliced  ( I used sour dough)

To make the pesto:  Bring a medium sized saucepan filled with water to a small boil.  Prepare an ice bath, set aside.  Place the pea shoots in the hot water for 30 seconds.  Remove immediately and submerge into the ice bath.  Remove pea shoots from water and gently “wring” them out.  It’s ok if they have a bit of water on them.  Let cool.

Place the pea shoots, mint leaves, and 1 clove of garlic in a mini-food processor.  Pulse a few times, until the greens are adequately chopped.  Add the parmesan or grana padano and walnuts, pulse a few more times.  With the processor running, slowly drizzle in the olive oil.  You may need to stop the machine and scrape down the sides of the bowl.  Once the pesto is thoroughly combined, taste it.  Stir in some salt, cracked pepper, hot pepper flakes, and a squeeze or two of lemon to brighten the pesto.  Use immediately or store in the refrigerator with plastic wrap placed directly on it.

To make the Bruschetta:  Fire up your grill.  Brush olive oil on both sides.  Sprinkle with salt and pepper. Place on a hot grill and let it toast on each side until it is beautifully golden, but not burnt.  Remove from the grill and while still hot, rub a clove of garlic on one side of the toast.  Spread the pesto on that.  Rip the mozzarella, to create crevices, and place on the pesto.  Top with the chopped radishes.  Drizzle with a bit of olive oil and finish with a sprinkle of sea salt.  Enjoy!

I’m currently in North Dakota with my kids — made the long 8 hour trip to spend Mother’s Day with my Mom.  I hope all of you Moms out there have a wonderful day.  Thanks to everyone for stopping in — see you next week!

Laurie

Read Full Post »

Before Radd and I had kids, there would be nights that we weren’t able to have dinner together.  School, work, and friends sometimes just got in the way of sitting down for a full meal with each other.  Now if I happened to be home on one of those nights, there was absolutely no doubt about what my dinner plan would be– egg salad.  Wild, right?

You see, I was never able to make egg salad for the both of us because– and I still don’t understand this– Radd despises hard-boiled eggs. To this day, I’m quite certain he would gag if he had to swallow a bite of egg salad.  Even more incomprehensible is the fact that he’ll eat eggs any other way.  He loves these pickled versions, and can even do this mollet version.  Why not regular?  Weirdo.  At any rate, I’ve always loved egg salad.  It’s creamy and so versatile.  I make it a different way almost every time.

Here, I’ve swapped out mayonnaise for a mashed avocado.  Let’s be clear, I have no problem with a little bit of mayonnaise.  Especially the really good homemade stuff.  But, I love avocados so much, that I figured I’d incorporate them into a spread.  Plus, they are loaded with good fat that your body needs.  I like to keep the eggs diced and gently fold them in– nice for a bit of texture.  The avocado binds everything together wonderfully and adds such beautiful color.  This is comfort food– delicious, quick to prepare, and healthy.  And in case my constant urging for you to buy organic/local eggs hasn’t convinced you to do so quite yet — read this article.  Want another option?  Check out this fantastic recipe for Curried Egg Salad.

The Recipe:  Avocado Egg Salad

(Serves 1)

2 hard-boiled eggs, diced, preferably organic/local

1/2 ripe avocado, mashed

1 1/2 tablespoons red onion, diced

1 1/2 tablespoons fresh chives, finely chopped

juice of 1/4 of a small lemon

kosher salt and freshly cracked pepper

How to make perfect hard-boiled eggs:  In a sauce pan, place the eggs in a single layer.  Fill pan with cold water and make sure it covers the eggs by an inch.  Place pan on the stove and bring to a boil.  Boil for 1 minute.  Cover and remove from heat.  Set a timer for 10 minutes.  After 10 minutes, place eggs into an ice bath to stop the cooking process.

To make the egg salad:  In a medium-sized bowl, mash the avocado and some of the lemon juice together until creamy, add salt and pepper.  Remember you can always add more lemon juice at the end to get it to your desired consistency, but you can never take it out.  Gently fold in the egg, red onion, and chives.  Re-season with lemon juice, salt, or pepper, if necessary.  Feel free to add a jalapeño or sriracha sauce for a bit of heat.  Enjoy with arugula and whole wheat bread or by the spoonful!

Have a wonderful weekend, friends!

Laurie

Read Full Post »

I get the impression that when most people hear ‘pea soup’, they evision a bowl of thick green goo.  While I’ve seen my share of that style, I think– generally– split-pea soup has gotten a bad rap.  It doesn’t have to be tasteless mush.  Instead, split-pea soup can be beautiful, colorful, and full of amazing flavors and textures.  Of course, peas pair perfectly with the rich, salty flavor of a smoked ham shank.

It may take a bit longer to get the wonderful ham broth, but it’s worth the effort.  Keep in mind, you can cook the broth/ham shank and refrigerate it overnight or until you are ready to make the soup.  Aside from helping manage your prep time, doing so makes it easier to remove the fat from the soup.  Then re-heat the broth and continue with the recipe.  And remember, peas are best when handled delicately. Keep a watchful eye on them, as they cook rather quickly.  I like them to retain their shape and to have a bit of a toothsome bite.  Don’t forget to add the parsley and the lemon, as they really brighten this soup up.  It’s a perfect finish.  Hope you enjoy!

The Recipe:  Green and Yellow Split Pea Soup with Smoked Ham Shank

2 tablespoons olive oil

1/2 large white onion, chopped (1 1/4 cups)

5 – 6 large carrots, peeled and chopped (1 1/2 cups)

5 – 6 medium parsnips, peeled and chopped (1 cup)

kosher salt and cracked black pepper

1 1/2 pounds smoked ham shank

1 cup yellow spilt peas, rinsed

1 cup green split peas, rinsed

juice of 1/2 lemon

1 tablespoon chopped fresh parsley

In a large Dutch oven over medium heat add the olive oil.  Sauté the onion, carrots, parsnips, and a sprinkle of salt and pepper for about 5 minutes.  Add 2 quarts of water and the smoked ham shank.  Bring to a boil and cover, then reduce heat to a medium simmer.  Cook for about 2 hours, or until the ham shank is very tender and falling off of the bone.  Remove ham shank from soup and shred the ham from it.  Discard the bone.  Meanwhile, take a spoon a carefully remove any fat from the broth and discard.  Bring the broth back to a medium simmer and add the split peas and the shredded ham. Cook the soup for another 30 minutes, or until the split peas are tender, but still hold their shape.  Make sure to not over-cook it.  Re-season with salt and pepper, if necessary.  Stir in the chopped parsley and the juice of a 1/2 lemon.  Enjoy!

As always, thanks for stopping by Relishing It!

Laurie

Read Full Post »

Ah yes, lemon season…  It’s that one bright seasonal food that falls just when I need it the most–right in the middle of Winter.  The lemons are sublime right now.  Obviously I love to bake with these beauties.  This tart  and these bars always make me weak in the knees. And this delicious yogurt cake  is one of the best desserts I’ve ever made.  But don’t stop at baking.  Remember to preserve a batch of lemons to use in savory dishes as well.  With lemons around, the dull gray of late February just seems a little less oppresive.

This fantastic pull-apart bread is another mouth-watering way to bring that lemon-y zing into your baking.  And how good is this bread?  It knocked our socks off!  My family was wowed by this one– we inhaled it in one day.  It really is that good.  I mean, it’s so good that you’ll want to invite friends over to share so they can ”ooooo…”  and “ahhh…” at your masterpiece.

Don’t be intimidated by the recipe’s length– it’s not difficult.  The photos here show you how to cut the dough, which seemed to be the most confusing part of the original directions.  Just remember the goal– make a dough, let it rise, roll it into a large rectangle, top with lemon/sugar mixture, cut into 30 small, equal rectangles, stack in a bread pan, let rise, and bake.  That’s it.  The cutting measurements don’t have to be perfect, so slight variations in shape are just fine.  The key is to make sure you bake it long enough.  Otherwise, the center may not be done, which will ruin your bread.  If you make the dough and store it in the refrigerator, you’ll find it really shortens the wait if you plan on making it for breakfast.  Enjoy!


The Recipe: Lemon Pull-Apart Bread

(Makes one loaf)

For the Dough:

2 3/4 cups (12 1/4 ounces) all-purpose flour

1/4 cup (1 3/4 ounces) granulated sugar

2 1/4 teaspoons (1 envelope) instant yeast

1/2 teaspoon kosher salt

1/3 cup (2 1/2 ounces) whole milk

2 ounces (4 tablespoons), unsalted butter

1/4 cup water

1 1/2 teaspoon vanilla extract

2 large eggs, at room temperature

For the Lemon Paste Filling:

1/2 cup (3 1/2 ounces) granulated sugar

4 tablespoons finely grated lemon zest (4 lemons)

2 ounces unsalted butter (4 tablespoons), melted

For the Icing:

3 ounces cream cheese, softened

1/3 cup (1 1/4 ounce) confectioners’ sugar

About 2 tablespoons lemon juice

I recommend  making the dough and refrigerating the night before.  The dough is remarkably easy to handle this way.  To make the dough, mix together 2 cups (9 ounces) flour, sugar, salt, and yeast in the bowl of a stand mixer.  In a small sauce pan, heat the butter and milk until it is entirely melted.  Remove from heat and add the water and vanilla.  Set aside until the temperature drops to  120°F – 130°F.

Pour the milk mixture over the flour mixture and stir with a spoon until moistened.  Attach bowl to mixer and using the paddle attachment, begin to add the eggs one at a time while the mixer is on low.  Mix until just incorporated after each egg.  Stop the mixer and add 1/2 cup of the remaining flour, and continue to mix on low until the dough is smooth, 30-45 seconds.  Add 2 more tablespoons of flour and mix on medium speed until the dough is smooth, soft, and slightly sticky, about 45 seconds.

Sprinkle work surface with 1 tablespoon of flour, knead dough by hand for about 1 minute, or until no longer sticky.  1-2 tablespoons of flour can be added, if needed.  Butter a large bowl and place dough in it and cover with plastic wrap.  Let rise until doubled in size, about 1 hour.  Gently deflate the dough.  At this point, either refrigerate the well-covered dough overnight or proceed onto the next step.

Meanwhile, while dough is rising, make the lemon filling.  In a small bowl, add the sugar and lemon zest.  Using a spoon or your hand, mix together until it forms a sandy mixture.

Center a rack in the center of an oven pre-heated to 350°F.  Butter a 9 x 5 – inch loaf pan, line the bottom with parchment paper, and butter again.  Set aside.

On a lightly floured work surface roll the dough out to a 20 x 12 – inch rectangle.  Use a pastry brush (or smear with your hands) to distribute the melted butter onto the dough.  Sprinkle the lemon/sugar mixture evenly over the melted butter.  Give the mixture a gentle pat so that it sticks well.  Using a pizza cutter, cut the dough crosswise into 5 equal strips (each about 12 x 4 – inches).  Carefully stack all 5 strips of dough.  Again using the pizza cutter, cut the stack into 6 equal sections (each about 4 x 2 -inches).

Carefully place all of the stacks, widthwise, into the prepared bread pan.  Make sure the dough pieces are close/snug with each other.  There will be extra room at the end of the pan and that’s good.  The dough will rise and fill that space in.  Loosely cover with plastic wrap and let rise in a warm place until doubled in size, about 30-50 minutes, or a bit longer if the dough was refrigerated.

Bake the bread until the top is a beautiful golden brown and an instant read thermometer inserted into the center of the bread reads about 200°F, about 35 minutes.  If the bread seems to be browning too quickly and the inside is not yet done, place some aluminum foil over the bread while it continues to bake.  Transfer to a wire rack and let cool completely in pan, or else the bread will fall apart.

Gently run knife around the edges of the pan and carefully invert cooled bread into your hand, then place on a plate.  Using a wooden spoon or whisk, mix the cream cheese, confectioners’ sugar, and lemon juice together — using more or less lemon juice depending upon your desired consistency.  Drizzle over the bread.  Stores well in an airtight container.  Enjoy!

Adapted from Flo Braker’s Baking for All Occasions via Leite’s Culinaria

Thanks for stopping by!

Laurie

Read Full Post »

Unfortunately the glorious Indian Summer in Minnesota appears to be ending.  That’s the way of it up here, I guess.  The tempermental mid-Summer months were suffocating at times, keeping us indoors more days than I like.  And the cool comfort of Fall just isn’t long enough.  At least it was magical.  Now the last couple of days have been gray, wet, and cold.  I’m not ready for the long dark of Winter, though I expect my wishes won’t hold it back much longer.  I suppose I should be thankful for the recent– if brief– temperate weather, because I recall  as a child trick-or-treating in October during snowstorms.  Memories of huge freshly-piled snowbanks, and the frustration of not being able to see because my glasses had fogged-up beneath my mask.  Yes, it’s time to appreciate these few weeks, even if they are getting cool, windy, and wet.

One benefit of the colder weather is that many of our meals shift towards warming comfort foods, like soup.  I love soup.  Not like a typical person loves soup, but on a fundamental– maybe inherited genetic– level.  My Mom likes to declare that she “could live on nothing more than soup!”  And she cooks up some divine ones.  While I won’t be so bold as to say I could survive on it alone, soup gets me through those bone-chilling days.  It’s genius– a hearty bowl is the best way to warm up from the inside out, and the smell of a simmering kettle on the stove for a few hours chases the cold away for awhile.

Today’s recipe is my variation on the old ‘vegetable-chicken’ soup that is the staple of so many Winter meals.  While it may look familiar, it offers so much more than the simple vegetable, chicken, and broth flavors you’re used to.  The reason is the addition of lemon and pesto (or pistou if you prefer to make it without the nuts…and want to show off your command of Provençal).  The lemon provides a subtle, though noticeable, hint of interesting acidity.  And the dollop of pesto is brilliant.  It combines the boldness of fresh herbs along with a delicate saltiness.  You can make your own, or buy it at your local market.  For the meat, I generally use roasted chicken, though it is also beautiful with the more potent flavors of wild pheasant.  Like most soups, you can experiment with the ingredients to make it your own.  This soup has become a family favorite that we all love– even my little ones.  I hope you enjoy it, too.

The Recipe:  Roasted Chicken Vegetable Soup with Lemon and Pesto

(As always, you will get the best results by using fresh organic ingredients.)

2 tablespoon olive oil

1 small leek, chopped

4-5 medium carrots, peeled and diced

4-5 medium parsnips, peeled and diced

2 small celery stalks with leaves, diced

1 medium white onion, diced

2 cloves garlic, minced

3/4 cup green beans, trimmed and chopped

Zest and juice of 1 lemon

1 1/2 cups roasted chicken, cut into bite-sized pieces

1/2 cup pearled barley, rinsed

1 bay leaf

1 1/2 tablespoons parsley,  finely chopped

2 quarts chicken stock (homemade or store -bought)

kosher salt and freshly cracked black pepper, to taste

red pepper flakes, to taste

Pesto:

1 3/4 cup fresh basil, torn

1/4 cup fresh parsley, torn

1/3 cup grated Parmesan-Reggiano cheese (or Grana Padano — almost as wonderful, but at a much better price.)

1/4 cup lightly toasted walnuts, chopped

2-3 cloves of garlic, chopped

1/2 cup extra-virgin olive oil (adjust more or less, depending upon your desired consistency.)

pinch of red pepper flakes

Kosher salt, to taste

To make the soup: Heat the olive oil in a large Dutch oven.  On medium heat, sauté  the onion, leek, celery, carrots, parsnips, green beans, and a bit of salt and pepper until the vegetables start to become tender, about 5 minutes.  Add the garlic and sauté for another minute.  Add the chicken broth, barley, chicken, and bay leaf.  Bring to a boil, then reduce heat and let simmer until the barley is done, about 3o-40 minutes.  Add the lemon zest and juice.  Stir in the parsley.  Season with more salt and pepper, if needed, and a pinch of red-pepper flakes.

To make the pesto:  Add the basil, parsley, garlic, Parmesan-Reggiano cheese, walnuts, pinch of salt and red pepper flakes to a mini-food processor.  Pulse a few times to incorporate everything together.  With the machine running, slowly add the olive oil.  Adjust seasonings, if necessary.  Serve a dollop on top of a bowl of hot soup.  Enjoy!

Thanks for stopping by Relishing It today — wishing you all a wonderful weekend!

Laurie

Follow me on Twitter

Read Full Post »

« Newer Posts - Older Posts »